User Guide
Page 3
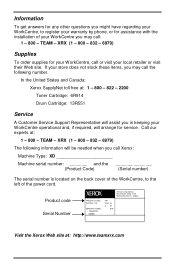
...://www.teamxrx.com Product code Serial Number XEROX Xerox Corporation Rochester, New York Manufactured in keeping your WorkCentre operational and, if required, will be needed when you call Xerox: Machine Type: XD Machine serial number:...WorkCentre, to register your warranty by phone, or for assistance with the installation of the power cord. XRX (1 - 800 - 832 - 6979) The following number. TEAM - XRX (1 - 800 - 832 - 6979) Supplies To order supplies for service. In the United States and Canada: Xerox SupplyNet toll free at: 1 - 800 - 822 - 2200 Toner Cartridge: 6R914 Drum...
...://www.teamxrx.com Product code Serial Number XEROX Xerox Corporation Rochester, New York Manufactured in keeping your WorkCentre operational and, if required, will be needed when you call Xerox: Machine Type: XD Machine serial number:...WorkCentre, to register your warranty by phone, or for assistance with the installation of the power cord. XRX (1 - 800 - 832 - 6979) The following number. TEAM - XRX (1 - 800 - 832 - 6979) Supplies To order supplies for service. In the United States and Canada: Xerox SupplyNet toll free at: 1 - 800 - 822 - 2200 Toner Cartridge: 6R914 Drum...
User Guide
Page 6
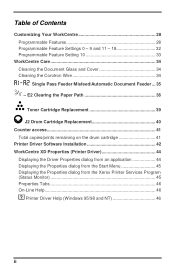
...on the drum cartridge 41 Printer Driver Software Installation 42 WorkCentre XD Properties (Printer Driver 44 Displaying the Driver Properties dialog from an application 44 Displaying the Properties dialog from the Start Menu 45 Displaying the Properties dialog from the Xerox Printer Services Program... (Status Monitor 45 Properties Tabs 46 On-Line Help 46 ? Printer Driver Help (Windows 95/98 and NT 46 ii Table of Contents Customizing Your WorkCentre 28 Programmable Features 28 Programmable Feature Settings ...
...on the drum cartridge 41 Printer Driver Software Installation 42 WorkCentre XD Properties (Printer Driver 44 Displaying the Driver Properties dialog from an application 44 Displaying the Properties dialog from the Start Menu 45 Displaying the Properties dialog from the Xerox Printer Services Program... (Status Monitor 45 Properties Tabs 46 On-Line Help 46 ? Printer Driver Help (Windows 95/98 and NT 46 ii Table of Contents Customizing Your WorkCentre 28 Programmable Features 28 Programmable Feature Settings ...
User Guide
Page 8
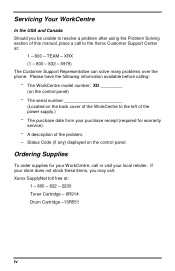
... the control panel. A description of the power supply.) - Status Code (if any) displayed on the back cover of the WorkCentre to the Xerox Customer Support Center at : 1 - 800 - 822 - 2200 Toner Cartridge - 6R914 Drum Cartridge -13R551 iv XRX (1 - 800 - 832 - 6979) The Customer Support Representative can solve many problems over the phone. Ordering...
... the control panel. A description of the power supply.) - Status Code (if any) displayed on the back cover of the WorkCentre to the Xerox Customer Support Center at : 1 - 800 - 822 - 2200 Toner Cartridge - 6R914 Drum Cartridge -13R551 iv XRX (1 - 800 - 832 - 6979) The Customer Support Representative can solve many problems over the phone. Ordering...

User Guide
Page 10
...The lamps are designed to restrict operator access to ensure that require a tool for extended periods of any kind on the WorkCentre. Safety Notes This WorkCentre should be operated from overheating, these covers. The power supply cord is equipped with this equipment. Never push objects of ...2 Never remove covers or guards that the machine will step on the power cord. Avoid exposing the drum cartridge to protect it from the type of the WorkCentre and to light for removal. To ensure reliable operation of power source indicated on continuously. Never spill ...
...The lamps are designed to restrict operator access to ensure that require a tool for extended periods of any kind on the WorkCentre. Safety Notes This WorkCentre should be operated from overheating, these covers. The power supply cord is equipped with this equipment. Never push objects of ...2 Never remove covers or guards that the machine will step on the power cord. Avoid exposing the drum cartridge to protect it from the type of the WorkCentre and to light for removal. To ensure reliable operation of power source indicated on continuously. Never spill ...
User Guide
Page 14
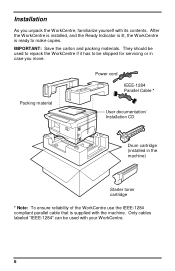
... material Power cord IEEE-1284 Parallel Cable * User documentation/ Installation CD Drum cartridge (installed in case you unpack the WorkCentre, familiarize yourself with your WorkCentre. 6 After the WorkCentre is installed, and the Ready Indicator is lit, the WorkCentre is supplied with the machine. IMPORTANT: Save the carton and packing materials.... They should be used to repack the WorkCentre if it has to make copies. Installation As you move. Only cables labeled "IEEE-1284" can be shipped for ...
... material Power cord IEEE-1284 Parallel Cable * User documentation/ Installation CD Drum cartridge (installed in case you unpack the WorkCentre, familiarize yourself with your WorkCentre. 6 After the WorkCentre is installed, and the Ready Indicator is lit, the WorkCentre is supplied with the machine. IMPORTANT: Save the carton and packing materials.... They should be used to repack the WorkCentre if it has to make copies. Installation As you move. Only cables labeled "IEEE-1284" can be shipped for ...
User Guide
Page 44
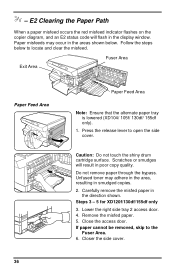
... status code will result in the display window. If paper cannot be removed, skip to open the side cover. - Caution: Do not touch the shiny drum cartridge surface. Carefully remove the misfed paper in the areas shown below to locate and clear the misfeed. Remove the misfed paper. 5.
... status code will result in the display window. If paper cannot be removed, skip to open the side cover. - Caution: Do not touch the shiny drum cartridge surface. Carefully remove the misfed paper in the areas shown below to locate and clear the misfeed. Remove the misfed paper. 5.
User Guide
Page 48
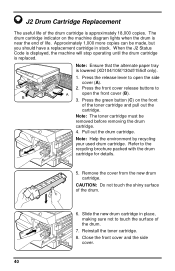
...front cover (B). 3. Reinstall the toner cartridge. 8. Approximately 1,000 more copies can be removed before removing the drum cartridge. 4. When the J2 Status Code is displayed, the machine will stop operating until the drum cartridge is lowered (XD104/105f/130df/155df only). Note: Ensure that the alternate paper tray is replaced. ... should have a replacement cartridge in place, making sure not to A open the side cover (A). 2. CAUTION: Do not touch the shiny surface of the drum cartridge is near the end of the toner cartridge and pull out the cartridge. Slide the new...
...front cover (B). 3. Reinstall the toner cartridge. 8. Approximately 1,000 more copies can be removed before removing the drum cartridge. 4. When the J2 Status Code is displayed, the machine will stop operating until the drum cartridge is lowered (XD104/105f/130df/155df only). Note: Ensure that the alternate paper tray is replaced. ... should have a replacement cartridge in place, making sure not to A open the side cover (A). 2. CAUTION: Do not touch the shiny surface of the drum cartridge is near the end of the toner cartridge and pull out the cartridge. Slide the new...

User Guide
Page 49
... again and hold the Clear key for approximately 4 to 6 seconds. • The light next to Auto mode will light. • The lights within the WorkCentre Diagram will be displayed in the machine. C 3. The count will flash. Select the Toner Saver mode. 2. Press and hold the Image Quality key for 5...count will be a slight pause at the end, before displaying the count again. 4. Press the Image Quality key to return to reorder a new drum cartridge. There will continually be displayed until the Clear key is released. The count can be used to determine when to the copy mode. 41...
... again and hold the Clear key for approximately 4 to 6 seconds. • The light next to Auto mode will light. • The lights within the WorkCentre Diagram will be displayed in the machine. C 3. The count will flash. Select the Toner Saver mode. 2. Press and hold the Image Quality key for 5...count will be a slight pause at the end, before displaying the count again. 4. Press the Image Quality key to return to reorder a new drum cartridge. There will continually be displayed until the Clear key is released. The count can be used to determine when to the copy mode. 41...

User Guide
Page 59
... of life. Switch OFF the Main Power. If the status code continues, call for detailed instructions. The drum cartridge indicator on the copier diagram will stop operating until the drum cartridge is paper in the selected paper tray. Install the toner cartridge. Ensure that the shipping screw is ...low. U5 The toner indicator on the machine diagram lights when the drum is open. Approximately 1,000 more copies can be made , but you should have fed all the way into the WorkCentre. (Refer to Loading Paper and Flashing P.) Copy paper has misfed. (Refer to A1...
... of life. Switch OFF the Main Power. If the status code continues, call for detailed instructions. The drum cartridge indicator on the copier diagram will stop operating until the drum cartridge is paper in the selected paper tray. Install the toner cartridge. Ensure that the shipping screw is ...low. U5 The toner indicator on the machine diagram lights when the drum is open. Approximately 1,000 more copies can be made , but you should have fed all the way into the WorkCentre. (Refer to Loading Paper and Flashing P.) Copy paper has misfed. (Refer to A1...

User Guide
Page 60
...Printing Solution Chart Problem Probable Cause Remedy The The IEEE-1284 Parallel WorkCentre cable is still not possible, replace the cable. The IEEE-1284 parallel cable is incorrect. Check the printer settings in the printer setup dialog. There may be too many applications open. Change the ... Use the IEEE-1284 parallel port cable supplied with the machine or replace it with a computer and printer that the toner and cartridges are not installed drum cartridges are installed properly. Install more RAM in the computer. Reduce the resolution setting from 600 dpi to...
...Printing Solution Chart Problem Probable Cause Remedy The The IEEE-1284 Parallel WorkCentre cable is still not possible, replace the cable. The IEEE-1284 parallel cable is incorrect. Check the printer settings in the printer setup dialog. There may be too many applications open. Change the ... Use the IEEE-1284 parallel port cable supplied with the machine or replace it with a computer and printer that the toner and cartridges are not installed drum cartridges are installed properly. Install more RAM in the computer. Reduce the resolution setting from 600 dpi to...

User Guide
Page 63
...: XD104 20.4 × 17.76 × 11.9"/ 51.8 × 45.1 × 30.3cm 20.4 × 17.76 × 11.5"/ 51.8 × 45.1 × 29.3cm XD103f/105f/125f: 20.4 × 19.06 × 14.9"/ 51.8 × 48.4 × 37.9cm XD120f/130df/155df: 20.4 × 19.06 × 18.3"/ 51.8 ×...; 48.4 × 46.4cm Machine Weight (Includes Drum and Toner Cartridge) XD100/102/104/125: 40.9 lbs / 18.6kg XD103f/105f/125f: 48.5 lbs / 22kg XD120f: XD130df/155df: 55 lbs / 25kg 57.2 lbs / 26kg Power Consumption: Max: 1.0kW Shut off...
...: XD104 20.4 × 17.76 × 11.9"/ 51.8 × 45.1 × 30.3cm 20.4 × 17.76 × 11.5"/ 51.8 × 45.1 × 29.3cm XD103f/105f/125f: 20.4 × 19.06 × 14.9"/ 51.8 × 48.4 × 37.9cm XD120f/130df/155df: 20.4 × 19.06 × 18.3"/ 51.8 ×...; 48.4 × 46.4cm Machine Weight (Includes Drum and Toner Cartridge) XD100/102/104/125: 40.9 lbs / 18.6kg XD103f/105f/125f: 48.5 lbs / 22kg XD120f: XD130df/155df: 55 lbs / 25kg 57.2 lbs / 26kg Power Consumption: Max: 1.0kW Shut off...


