Quick Use Guide
Page 5
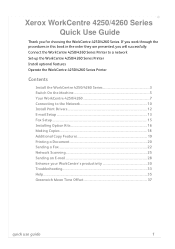
... will successfully: Connect the WorkCentre 4250/4260 Series Printer to a network Set-up the WorkCentre 4250/4260 Series Printer Install optional features Operate the WorkCentre 4250/4260 Series Printer Contents Install the WorkCentre 4250/4260 Series 3 Switch On the Machine 5 Your WorkCentre 4250/4260 7 Connecting to the Network 10 Install Print Drivers 12 E-mail Setup ...13 Fax Setup ...15 Installing Option Kits...
... will successfully: Connect the WorkCentre 4250/4260 Series Printer to a network Set-up the WorkCentre 4250/4260 Series Printer Install optional features Operate the WorkCentre 4250/4260 Series Printer Contents Install the WorkCentre 4250/4260 Series 3 Switch On the Machine 5 Your WorkCentre 4250/4260 7 Connecting to the Network 10 Install Print Drivers 12 E-mail Setup ...13 Fax Setup ...15 Installing Option Kits...

Quick Use Guide
Page 10
... the information. 11 The next 4 screens will be displayed. This indicates that you to Fax Setup on each screen. 12 The Congratulations screen will allow you have successfully completed the System Settings portion of the Xerox Installation Wizard. When this occurs, contact your Customer Support Representative for the passcode. 13 The machine...
... the information. 11 The next 4 screens will be displayed. This indicates that you to Fax Setup on each screen. 12 The Congratulations screen will allow you have successfully completed the System Settings portion of the Xerox Installation Wizard. When this occurs, contact your Customer Support Representative for the passcode. 13 The machine...
Quick Use Guide
Page 12
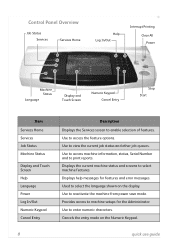
... access machine information, status, Serial Number and to access the feature options. Use to print reports. Displays the current machine status and screens to machine setups for features and error messages.
... access machine information, status, Serial Number and to access the feature options. Use to print reports. Displays the current machine status and screens to machine setups for features and error messages.
Quick Use Guide
Page 14
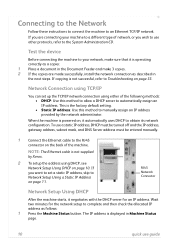
... DHCP After the machine starts, it negotiates with the DHCP server for the network setup to obtain its network configuration. If you want to the System Administration CD. The IP address is operating correctly as a copier. 1 Place a document in the Document Feeder and make 3 copies. 2 If the ...the network administrator. Network Connection using TCP/IP You can set a static IP address, skip to manually assign an IP address provided by Xerox. 2 To setup the address using either of the machine. NOTE: The Ethernet cable is the factory default setting. • Static IP address: Use this...
... DHCP After the machine starts, it negotiates with the DHCP server for the network setup to obtain its network configuration. If you want to the System Administration CD. The IP address is operating correctly as a copier. 1 Place a document in the Document Feeder and make 3 copies. 2 If the ...the network administrator. Network Connection using TCP/IP You can set a static IP address, skip to manually assign an IP address provided by Xerox. 2 To setup the address using either of the machine. NOTE: The Ethernet cable is the factory default setting. • Static IP address: Use this...
Quick Use Guide
Page 15
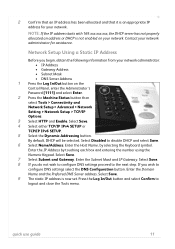
... Password [1111] and select Enter. 2 Press the Machine Status button then select Tools > Connectivity and Network Setup > Advanced > Network Setting > Network Setup > TCP/IP Options. 3 Select HTTP and Enable. Network Setup Using a Static IP Address Before you wish to the next step. By default, DHCP will be selected.... has been allocated and that it is an appropriate IP address for assistance. Select Save. 4 Select either TCP/IP IPv4 SETUP or TCP/IP IPv6 SETUP. 5 Select the Dynamic Addressing button. quick use guide 11 Enter the Domain Name and the Preferred DNS Server address. Select...
... Password [1111] and select Enter. 2 Press the Machine Status button then select Tools > Connectivity and Network Setup > Advanced > Network Setting > Network Setup > TCP/IP Options. 3 Select HTTP and Enable. Network Setup Using a Static IP Address Before you wish to the next step. By default, DHCP will be selected.... has been allocated and that it is an appropriate IP address for assistance. Select Save. 4 Select either TCP/IP IPv4 SETUP or TCP/IP IPv6 SETUP. 5 Select the Dynamic Addressing button. quick use guide 11 Enter the Domain Name and the Preferred DNS Server address. Select...
Quick Use Guide
Page 16
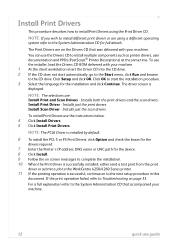
...on to install multiple components such as printer drivers, user documentation and PPDs (PostScript® Printer Descriptions) at the same time. Click Setup and click OK. Click OK to Troubleshooting on screen messages to complete the installation. 10 When the Print Driver is successfully installed, ...either send a test print from the print driver or submit a job to the WorkCentre 4250/4260 Series printer. 11 If the printing operation is displayed. Install Print Drivers This procedure describes how to install Print Drivers using a ...
...on to install multiple components such as printer drivers, user documentation and PPDs (PostScript® Printer Descriptions) at the same time. Click Setup and click OK. Click OK to Troubleshooting on screen messages to complete the installation. 10 When the Print Driver is successfully installed, ...either send a test print from the print driver or submit a job to the WorkCentre 4250/4260 Series printer. 11 If the printing operation is displayed. Install Print Drivers This procedure describes how to install Print Drivers using a ...
Quick Use Guide
Page 17
... machine (DHCP or BootP) the Domain Name will not be used. The default is [admin] which the machine will use guide 13 Before starting the setup procedure, please ensure the following items are to be accessible. Press Enter. 2 Click Properties > Connectivity > Protocols > TCP/IP. 3 Enter the domain name in... tools User Name and Password. You will use as the default From address. • Test the E-mail account by sending an E-mail to the Xerox machine account. NOTE: If you need to change it, click Static from the IP Address Resolution menu list. 4 Scroll to the bottom of the...
... machine (DHCP or BootP) the Domain Name will not be used. The default is [admin] which the machine will use guide 13 Before starting the setup procedure, please ensure the following items are to be accessible. Press Enter. 2 Click Properties > Connectivity > Protocols > TCP/IP. 3 Enter the domain name in... tools User Name and Password. You will use as the default From address. • Test the E-mail account by sending an E-mail to the Xerox machine account. NOTE: If you need to change it, click Static from the IP Address Resolution menu list. 4 Scroll to the bottom of the...
Quick Use Guide
Page 18
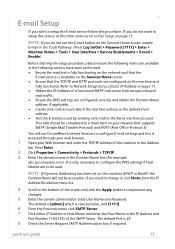
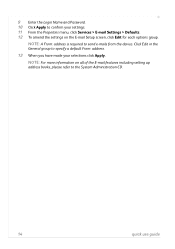
9 Enter the Login Name and Password. 10 Click Apply to confirm your selections click Apply. NOTE: A From: address is required to specify a default From: address. 13 When you have made your settings. 11 From the Properties menu, click Services > E-mail Settings > Defaults. 12 To amend the settings on all of the E-mail features including setting up address books, please refer to the System Administration CD. 14 quick use guide Click Edit in the General group to send e-mails from the device. NOTE: For more information on the E-mail Setup screen, click Edit for each options group.
9 Enter the Login Name and Password. 10 Click Apply to confirm your selections click Apply. NOTE: A From: address is required to specify a default From: address. 13 When you have made your settings. 11 From the Properties menu, click Services > E-mail Settings > Defaults. 12 To amend the settings on all of the E-mail features including setting up address books, please refer to the System Administration CD. 14 quick use guide Click Edit in the General group to send e-mails from the device. NOTE: For more information on the E-mail Setup screen, click Edit for each options group.
Quick Use Guide
Page 19
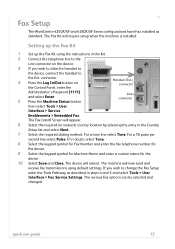
The machine will reboot. The Fax Install Screen will require setup when the machine is installed. If in the Country Setup list and select Next. 7 Select the required dialing method. The device will now send and receive fax transmissions using the instructions in steps 4 and ...second line select Pulse. quick use guide 15 For a tone line select Tone. If you wish to change the Fax Setup enter the Tools Pathway as standard. Fax Setup The WorkCentre 4250X/XF and 4260X/XF Series configurations have Fax installed as described in the Kit. 2 Connect the telephone line to the...
The machine will reboot. The Fax Install Screen will require setup when the machine is installed. If in the Country Setup list and select Next. 7 Select the required dialing method. The device will now send and receive fax transmissions using the instructions in steps 4 and ...second line select Pulse. quick use guide 15 For a tone line select Tone. If you wish to change the Fax Setup enter the Tools Pathway as standard. Fax Setup The WorkCentre 4250X/XF and 4260X/XF Series configurations have Fax installed as described in the Kit. 2 Connect the telephone line to the...
Quick Use Guide
Page 31
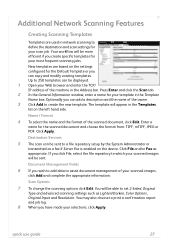
... for your template in the Address bar. Enter a name for your most frequent scanning jobs. Destination Services 5 The scan can be able to a file repository setup by the System Administrator or transmitted as a fax if Server Fax is enabled on the device. If you create specific templates for the scanned document...
... for your template in the Address bar. Enter a name for your most frequent scanning jobs. Destination Services 5 The scan can be able to a file repository setup by the System Administrator or transmitted as a fax if Server Fax is enabled on the device. If you create specific templates for the scanned document...

Quick Use Guide
Page 35
Customize your device The machine can be setup to reflect your machine is accessed from your own desktop. To explore the options, access Tools and explore the Feature Defaults and Copy Service Settings. ..., customized reduction ratios and 2-sided copying to save on the web page contain different options to the machine, from a .csv file in queue and Administrator setups. Default settings for the Address Book can be set to program the Address Book with this feature. Use this feature to your own requirements such...
Customize your device The machine can be setup to reflect your machine is accessed from your own desktop. To explore the options, access Tools and explore the Feature Defaults and Copy Service Settings. ..., customized reduction ratios and 2-sided copying to save on the web page contain different options to the machine, from a .csv file in queue and Administrator setups. Default settings for the Address Book can be set to program the Address Book with this feature. Use this feature to your own requirements such...
Quick Use Guide
Page 37
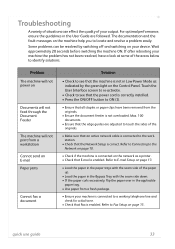
...quality of your machine the problem has not been resolved, have been removed from a fresh package. • Ensure your device. Refer to E-mail Setup on the Control Panel. Troubleshooting A variety of situations can be resolved by the green light on page 13. • Load the paper in ...ON (I). • Ensure that E-mail is not overloaded. Refer to Connecting to identify solutions. Max. 100 documents. • Ensure that the Network Setup is correct. Touch the User Interface screen to re-activate. • Check to see that the machine is not in Low Power Mode as a ...
...quality of your machine the problem has not been resolved, have been removed from a fresh package. • Ensure your device. Refer to E-mail Setup on the Control Panel. Troubleshooting A variety of situations can be resolved by the green light on page 13. • Load the paper in ...ON (I). • Ensure that E-mail is not overloaded. Refer to Connecting to identify solutions. Max. 100 documents. • Ensure that the Network Setup is correct. Touch the User Interface screen to re-activate. • Check to see that the machine is not in Low Power Mode as a ...
System Administration Guide
Page 3
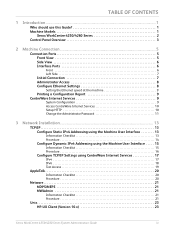
TABLE OF CONTENTS 1 Introduction ...1 Who should use this Guide 1 Machine Models 1 Xerox WorkCentre 4250/4260 Series 2 Control Panel Overview 3 2 Machine Connection ...5 Connection Ports 5 Front View 5 Side View 6 Interface Ports 6 Front 6 Left Side 7 ...Setting the Ethernet speed at the machine 9 Printing a Configuration Report 9 CentreWare Internet Services 9 System Configuration 9 Access CentreWare Internet Services 10 Setup HTTP 10 Change the Administrator Password 11 3 Network Installation ...13 TCP/IP 13 Configure Static IPv4 Addressing using the Machine User Interface 13...
TABLE OF CONTENTS 1 Introduction ...1 Who should use this Guide 1 Machine Models 1 Xerox WorkCentre 4250/4260 Series 2 Control Panel Overview 3 2 Machine Connection ...5 Connection Ports 5 Front View 5 Side View 6 Interface Ports 6 Front 6 Left Side 7 ...Setting the Ethernet speed at the machine 9 Printing a Configuration Report 9 CentreWare Internet Services 9 System Configuration 9 Access CentreWare Internet Services 10 Setup HTTP 10 Change the Administrator Password 11 3 Network Installation ...13 TCP/IP 13 Configure Static IPv4 Addressing using the Machine User Interface 13...
System Administration Guide
Page 5
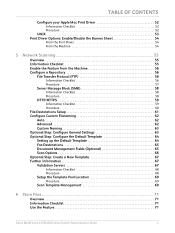
... Message Block (SMB 58 Information Checklist 58 Procedure 58 HTTP/HTTPS 59 Information Checklist 59 Procedure 60 File Destinations Setup 61 Configure Custom Filenaming 62 Auto 62 Advanced 62 Custom Naming 63 Optional Step: Configure General Settings 63 Optional ...Template 67 Further Information 67 Validation Servers 67 Information Checklist 68 Procedure 68 Setup the Template Pool Location 69 Procedure 69 Scan Template Management 69 6 Store Files...71 Overview 71 Information Checklist 71 Use the Feature 71 Xerox WorkCentre 4250/4260 Series System Administration Guide v
... Message Block (SMB 58 Information Checklist 58 Procedure 58 HTTP/HTTPS 59 Information Checklist 59 Procedure 60 File Destinations Setup 61 Configure Custom Filenaming 62 Auto 62 Advanced 62 Custom Naming 63 Optional Step: Configure General Settings 63 Optional ...Template 67 Further Information 67 Validation Servers 67 Information Checklist 68 Procedure 68 Setup the Template Pool Location 69 Procedure 69 Scan Template Management 69 6 Store Files...71 Overview 71 Information Checklist 71 Use the Feature 71 Xerox WorkCentre 4250/4260 Series System Administration Guide v

System Administration Guide
Page 6
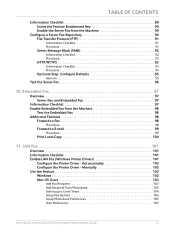
... 76 Configure the Feature 77 General 77 Scan to E-mail 79 Advanced Settings 79 Layout Adjustment 79 Filing Options 79 Image Settings 80 Optional Step: Setup Address Books 80 8 LDAP Configuration and Address Books 81 Overview 81 Information Checklist 81 LDAP Configuration 82 General Settings 82 Verify the LDAP Settings 83... Address Book 86 Create a New Address 86 Test the Group Address Book 86 9 Server Fax...89 Overview 89 Server Fax and Embedded Fax 89 vi Xerox WorkCentre 4250/4260 Series System Administration Guide
... 76 Configure the Feature 77 General 77 Scan to E-mail 79 Advanced Settings 79 Layout Adjustment 79 Filing Options 79 Image Settings 80 Optional Step: Setup Address Books 80 8 LDAP Configuration and Address Books 81 Overview 81 Information Checklist 81 LDAP Configuration 82 General Settings 82 Verify the LDAP Settings 83... Address Book 86 Create a New Address 86 Test the Group Address Book 86 9 Server Fax...89 Overview 89 Server Fax and Embedded Fax 89 vi Xerox WorkCentre 4250/4260 Series System Administration Guide
System Administration Guide
Page 7
... Embedded Fax ...97 Overview 97 Server Fax and Embedded Fax 97 Information Checklist 97 Enable Embedded Fax from Phonebook 103 Setting up a Cover Sheet 104 Setup Fax Options 104 Setup Phonebook Preferences 105 User Preferences 105 Xerox WorkCentre 4250/4260 Series System Administration Guide vii Automatically 102 Configure the Printer Driver -
... Embedded Fax ...97 Overview 97 Server Fax and Embedded Fax 97 Information Checklist 97 Enable Embedded Fax from Phonebook 103 Setting up a Cover Sheet 104 Setup Fax Options 104 Setup Phonebook Preferences 105 User Preferences 105 Xerox WorkCentre 4250/4260 Series System Administration Guide vii Automatically 102 Configure the Printer Driver -

System Administration Guide
Page 9
TABLE OF CONTENTS SMart eSolutions Information 126 Setup Meter Assistant 127 Supplies Assistant 127 15 Security ...129 Security @ Xerox 129 Standard Authentication 129 Overview 129 Open Authentication 129 Network Authentication 129 Local Authentication ...Image Overwrite 142 Overview 142 Information Checklist 142 Enable the IIO 143 Test Immediate Image Overwrite 143 Immediate Image Overwrite Error 143 Xerox WorkCentre 4250/4260 Series System Administration Guide ix Kerberos (Unix/Linux 131 Configure Network Authentication - SMB (Windows ADS 133 Configure Network Authentication...
TABLE OF CONTENTS SMart eSolutions Information 126 Setup Meter Assistant 127 Supplies Assistant 127 15 Security ...129 Security @ Xerox 129 Standard Authentication 129 Overview 129 Open Authentication 129 Network Authentication 129 Local Authentication ...Image Overwrite 142 Overview 142 Information Checklist 142 Enable the IIO 143 Test Immediate Image Overwrite 143 Immediate Image Overwrite Error 143 Xerox WorkCentre 4250/4260 Series System Administration Guide ix Kerberos (Unix/Linux 131 Configure Network Authentication - SMB (Windows ADS 133 Configure Network Authentication...
System Administration Guide
Page 13
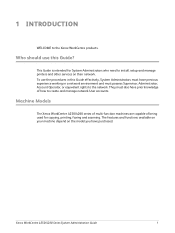
..., faxing and scanning. The features and functions available on your machine depend on their network. Xerox WorkCentre 4250/4260 Series System Administration Guide 1 Machine Models The Xerox WorkCentre 4250/4260 series of multi-function machines are capable of how to install, setup and manage printers and other services on the model you have previous experience working in...
..., faxing and scanning. The features and functions available on your machine depend on their network. Xerox WorkCentre 4250/4260 Series System Administration Guide 1 Machine Models The Xerox WorkCentre 4250/4260 series of multi-function machines are capable of how to install, setup and manage printers and other services on the model you have previous experience working in...

System Administration Guide
Page 21
... use CentreWare Internet Services, you need to be set via the machine and the CentreWare Internet Service. Touch [Connectivity and Network Setup]. 7. Touch [Physical Media]. 10. Press the button on Xerox WorkCentre 4250/4260 Series System Administration Guide 9 Touch the [Information Pages] tab. 3. See Configure Static IPv4 Addressing using the Machine User Interface on...
... use CentreWare Internet Services, you need to be set via the machine and the CentreWare Internet Service. Touch [Connectivity and Network Setup]. 7. Touch [Physical Media]. 10. Press the button on Xerox WorkCentre 4250/4260 Series System Administration Guide 9 Touch the [Information Pages] tab. 3. See Configure Static IPv4 Addressing using the Machine User Interface on...
System Administration Guide
Page 22
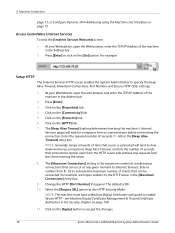
...on the [Go] button. Press [Enter] or click on page 15. Click on the [Apply] button to accept the changes. 10 Xerox WorkCentre 4250/4260 Series System Administration Guide The [Keep Alive Timeout] setting determines how long the machine's Internet Services pages will tend to the HTTP ... Number] if required. Click on the [HTTP] link. 7. Select the [Require SSL] option as the HTTP Security Mode. For example: Setup HTTP The Internet Services HTTP screen enables the System Administrator to enable Secure HTTP - Keep Alive Timeout controls the number of the machine in the...
...on the [Go] button. Press [Enter] or click on page 15. Click on the [Apply] button to accept the changes. 10 Xerox WorkCentre 4250/4260 Series System Administration Guide The [Keep Alive Timeout] setting determines how long the machine's Internet Services pages will tend to the HTTP ... Number] if required. Click on the [HTTP] link. 7. Select the [Require SSL] option as the HTTP Security Mode. For example: Setup HTTP The Internet Services HTTP screen enables the System Administrator to enable Secure HTTP - Keep Alive Timeout controls the number of the machine in the...


