User Guide
Page 12
... Straight-through paper path capability from Monotype Imaging Inc. See the Software section. • You can use a network interface. For duplex printing, your document are trademarks of Zoran Corporation. * 136 PS3 fonts • Contains UFST and MicroType from Tray1(MPT) to 27...use preprinted forms and letterhead with plain paper. See 9 the Software section. 8 • Print Booklets. a. Expand the printer capacity • The Phaser 3600 series have to form a poster. All rights reserved. You can be taped together to do is equipped with several ...
... Straight-through paper path capability from Monotype Imaging Inc. See the Software section. • You can use a network interface. For duplex printing, your document are trademarks of Zoran Corporation. * 136 PS3 fonts • Contains UFST and MicroType from Tray1(MPT) to 27...use preprinted forms and letterhead with plain paper. See 9 the Software section. 8 • Print Booklets. a. Expand the printer capacity • The Phaser 3600 series have to form a poster. All rights reserved. You can be taped together to do is equipped with several ...
User Guide
Page 13
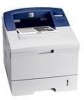
.../N 3600/DN IEEE 1284 Parallel I I I USB 2.0 I I I Network Interface NA I I (Ethernet 10/100 Base TX) PostScript* Emulation Duplex printinga I I I O O I a. Printer features The table below lists a general overview of paper. Front view Printer overview * The figure above shows an Phaser 3600/DN with all available options. 1 output tray 2 control panel 3 control board cover 4 handle 5 power switch...
.../N 3600/DN IEEE 1284 Parallel I I I USB 2.0 I I I Network Interface NA I I (Ethernet 10/100 Base TX) PostScript* Emulation Duplex printinga I I I O O I a. Printer features The table below lists a general overview of paper. Front view Printer overview * The figure above shows an Phaser 3600/DN with all available options. 1 output tray 2 control panel 3 control board cover 4 handle 5 power switch...
User Guide
Page 14
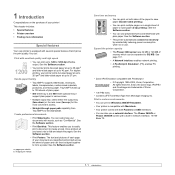
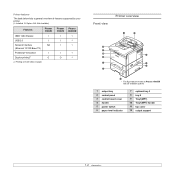
...an Phaser 3600/DN with all available options. 1 rear cover 2 duplex unit 3 network port 4 USB port 5 parallel port 6 power receptacle 7 power switch 1 Start/Stop: Cancel an operation at any time; resume printing. 2 Back: Sends you back to the upper menu level. 3 Status: Shows the status of your printer. ...See page 9.7. 4 Menu: Enters Menu mode and arrows through the available menus. 5 LCD: Displays the printer status, error messages and menus in progress. 6 Up Arrow button: The option available in the...
...an Phaser 3600/DN with all available options. 1 rear cover 2 duplex unit 3 network port 4 USB port 5 parallel port 6 power receptacle 7 power switch 1 Start/Stop: Cancel an operation at any time; resume printing. 2 Back: Sends you back to the upper menu level. 3 Status: Shows the status of your printer. ...See page 9.7. 4 Menu: Enters Menu mode and arrows through the available menus. 5 LCD: Displays the printer status, error messages and menus in progress. 6 Up Arrow button: The option available in the...
User Guide
Page 15
...can access the user's guides in other languages from the printer properties dialog box. Selecting a location Select a level, stable place with help , support, printer drivers, manuals, and order information from the Xerox website, www.xerox.com/office/support. The area should be sure to follow... space for opening of the rear cover or the duplex unit) Right: 100 mm (enough space for maintaining your printer, troubleshooting, and installing accessories. Quick Use Guide Workcentre 3428 Provides information on using your printer and, therefore, be sure to follow the instructions...
...can access the user's guides in other languages from the printer properties dialog box. Selecting a location Select a level, stable place with help , support, printer drivers, manuals, and order information from the Xerox website, www.xerox.com/office/support. The area should be sure to follow... space for opening of the rear cover or the duplex unit) Right: 100 mm (enough space for maintaining your printer, troubleshooting, and installing accessories. Quick Use Guide Workcentre 3428 Provides information on using your printer and, therefore, be sure to follow the instructions...
User Guide
Page 16
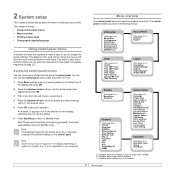
...to Standby mode. An asterisk (*) appears next to the selection on the display, indicating that it easy for you to save your printer from the printer driver on a connected computer override the settings on the control panel. After 30 seconds of the display and press OK. 2 ... Size Tray 1MPT Type Tray 2 Type Tray 3 Typec Paper Source Bypass MP Tray Tray Chaining Layout (See page 2.2.) Orientation Simplex Margin Duplexb Duplex Marginb Image Adjust Graphic (See page 2.5.) Resolution Darkness Networka (See page 2.8.) TCP/IP EtherTalk NetWare Ethernet Speed Clear Setting Network Info. 802....
...to Standby mode. An asterisk (*) appears next to the selection on the display, indicating that it easy for you to save your printer from the printer driver on a connected computer override the settings on the control panel. After 30 seconds of the display and press OK. 2 ... Size Tray 1MPT Type Tray 2 Type Tray 3 Typec Paper Source Bypass MP Tray Tray Chaining Layout (See page 2.2.) Orientation Simplex Margin Duplexb Duplex Marginb Image Adjust Graphic (See page 2.5.) Resolution Darkness Networka (See page 2.8.) TCP/IP EtherTalk NetWare Ethernet Speed Clear Setting Network Info. 802....
User Guide
Page 18
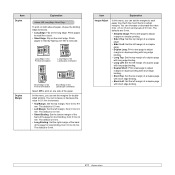
... to 9.9 mm. Prints pages to read like a note pad. 2 3 2 5 Long Edge in the Portrait orientation 2 3 5 Long Edge in the Landscape orientation Duplex Margin 3 5 Short Edge in the Portrait orientation 3 2 5 Short Edge in 0.1 mm increments. • Top Margin: Set the top margin, from 0.0 to read... page. • Side1 Left: Set the left margin of a simplex page. • Duplex Long: Print a test page to adjust margins in duplex printing with long edge binding. • Long Top: Set the top margin of a duplex page with long edge binding. • Long Left: Set the left margin of...
... to 9.9 mm. Prints pages to read like a note pad. 2 3 2 5 Long Edge in the Portrait orientation 2 3 5 Long Edge in the Landscape orientation Duplex Margin 3 5 Short Edge in the Portrait orientation 3 2 5 Short Edge in 0.1 mm increments. • Top Margin: Set the top margin, from 0.0 to read... page. • Side1 Left: Set the left margin of a simplex page. • Duplex Long: Print a test page to adjust margins in duplex printing with long edge binding. • Long Top: Set the top margin of a duplex page with long edge binding. • Long Left: Set the left margin of...
User Guide
Page 21
... disable the parallel port. • Port Timeout: You can set to communicate between computer and printer through the parallel port. The printer will print output in the print buffer. • USB PDL: This item defines the printer language to duplex printing as a default. Job Held Timer Values: 1 ~ 72 hours The machine holds a secure print...
... disable the parallel port. • Port Timeout: You can set to communicate between computer and printer through the parallel port. The printer will print output in the print buffer. • USB PDL: This item defines the printer language to duplex printing as a default. Job Held Timer Values: 1 ~ 72 hours The machine holds a secure print...
User Guide
Page 31
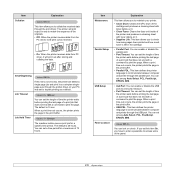
...) for duplex printing - This may cause problems, requiring repairs. 5 Loading print media This chapter will help you understand the types of paper you choose should be the result of improper handling, unacceptable temperature and humidity levels, or other variables over which Xerox has no..., such as plain paper, envelopes, labels, and transparencies. Always use with your printer and how to 24 lb) for index card • Brightness: Some print media are not covered by Xerox's warranty or service agreements. 5.1 When you choose print materials, consider the following problems:...
...) for duplex printing - This may cause problems, requiring repairs. 5 Loading print media This chapter will help you understand the types of paper you choose should be the result of improper handling, unacceptable temperature and humidity levels, or other variables over which Xerox has no..., such as plain paper, envelopes, labels, and transparencies. Always use with your printer and how to 24 lb) for index card • Brightness: Some print media are not covered by Xerox's warranty or service agreements. 5.1 When you choose print materials, consider the following problems:...
User Guide
Page 32
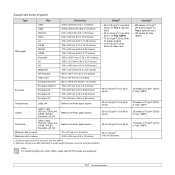
...) in Tray 1(MPT) 50 sheets of 75 g/m2 (20 lb) in Tray 1(MPT) 25 sheets of 75 g/m2 (20 lb) in Tray 1(MPT) Note For duplex printing, A4, Letter, Oficio, Legal, and US Folio sizes are supported. 5.2 Supported sizes of 75 g/m2 (20 lb) in Tray 1(MPT) 10 sheets of paper... 2, optional tray 3 • 60 to 163 g/m2 (16 to 43 lb bond ) for Tray 1(MPT) • 75 to 90 g/m2 (20 to 24 lb) for duplex printing • Over 105 g/m2 (28 lb bond) for index card Executive 184.2 x 266.7 mm (7.25 x 10.5 inches) A5 148.5 x 210 mm (5.85 x 8.27 inches...
...) in Tray 1(MPT) 50 sheets of 75 g/m2 (20 lb) in Tray 1(MPT) 25 sheets of 75 g/m2 (20 lb) in Tray 1(MPT) Note For duplex printing, A4, Letter, Oficio, Legal, and US Folio sizes are supported. 5.2 Supported sizes of 75 g/m2 (20 lb) in Tray 1(MPT) 10 sheets of paper... 2, optional tray 3 • 60 to 163 g/m2 (16 to 43 lb bond ) for Tray 1(MPT) • 75 to 90 g/m2 (20 to 24 lb) for duplex printing • Over 105 g/m2 (28 lb bond) for index card Executive 184.2 x 266.7 mm (7.25 x 10.5 inches) A5 148.5 x 210 mm (5.85 x 8.27 inches...
User Guide
Page 41
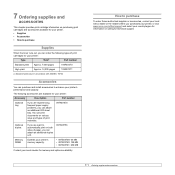
... supplies or accessories, contact your local Xerox dealer or the retailer where you purchased your printer, or visit www.xerox.com/office/support and select your country/region for information on both sides of paper, you can attach an additional duplex unit. 097S03756 Memory DIMM Extends your printer's memory capacity. • 097S03759: 64 MB •...
... supplies or accessories, contact your local Xerox dealer or the retailer where you purchased your printer, or visit www.xerox.com/office/support and select your country/region for information on both sides of paper, you can attach an additional duplex unit. 097S03756 Memory DIMM Extends your printer's memory capacity. • 097S03759: 64 MB •...
User Guide
Page 48
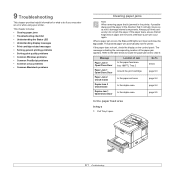
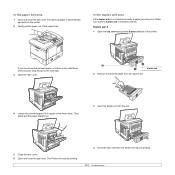
...printer. Open and close the top cover. If the paper does not exit, check the display on the control panel. The jammed paper will occur again. If the paper tears, ensure that it : Message Paper Jam 0 Open/Close Door Paper Jam 1 Open/Close Door Paper Jam 2 Check Inside Duplex Jam 0 Check Inside Duplex... In the duplex area Go To below to locate the paper jam and to clear it normally moves so as not to damage internal components. The message indicating the corresponding location of paper are removed; do if you encounter an error while using your printer. When a paper jam occurs, ...
...printer. Open and close the top cover. If the paper does not exit, check the display on the control panel. The jammed paper will occur again. If the paper tears, ensure that it : Message Paper Jam 0 Open/Close Door Paper Jam 1 Open/Close Door Paper Jam 2 Check Inside Duplex Jam 0 Check Inside Duplex... In the duplex area Go To below to locate the paper jam and to clear it normally moves so as not to damage internal components. The message indicating the corresponding location of paper are removed; do if you encounter an error while using your printer. When a paper jam occurs, ...
User Guide
Page 51
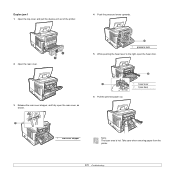
... the paper straight out. 3 Insert the duplex unit into the slot. 5 Close the rear cover. 6 Open and close the top cover. The jammed paper is not inserted correctly, a paper jam may occur. The Printer will resume printing. 4 Close the top cover then the printer will resume printing. 9.4 If you do... when you pull, stop and go to the next step. 3 Open the rear cover. 1 1 duplex unit 2 Remove the jammed paper from the printer. 2 Gently pull the paper out of the printer. Make sure that the duplex unit is caught in the feed rollers. Duplex jam 0 1 Open the top cover and pull the...
... the paper straight out. 3 Insert the duplex unit into the slot. 5 Close the rear cover. 6 Open and close the top cover. The jammed paper is not inserted correctly, a paper jam may occur. The Printer will resume printing. 4 Close the top cover then the printer will resume printing. 9.4 If you do... when you pull, stop and go to the next step. 3 Open the rear cover. 1 1 duplex unit 2 Remove the jammed paper from the printer. 2 Gently pull the paper out of the printer. Make sure that the duplex unit is caught in the feed rollers. Duplex jam 0 1 Open the top cover and pull the...
User Guide
Page 52
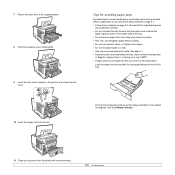
Duplex jam 1 1 Open the top cover and pull the duplex unit out of the printer. 4 Push the pressure levers upwards. 2 Open the rear cover. 3 Release the rear cover stopper, and fully open the rear cover, as shown. 1 1 pressure lever 5 While pushing the fuser lever to the right, open the fuser door. 1 6 Pull the jammed paper out. 2 1 fuser lever 2 fuser door 1 1 rear cover stopper Note The fuser area is hot. Take care when removing paper from the printer. 9.5
Duplex jam 1 1 Open the top cover and pull the duplex unit out of the printer. 4 Push the pressure levers upwards. 2 Open the rear cover. 3 Release the rear cover stopper, and fully open the rear cover, as shown. 1 1 pressure lever 5 While pushing the fuser lever to the right, open the fuser door. 1 6 Pull the jammed paper out. 2 1 fuser lever 2 fuser door 1 1 rear cover stopper Note The fuser area is hot. Take care when removing paper from the printer. 9.5
User Guide
Page 53
... optional tray 3, or facing up in the groove, and close the rear cover. See the Software Section. 11 Close the top cover then the printer will resume printing. 9.6 7 Return the fuser door to be avoided. Ensure that the adjustable guides are positioned correctly. • Do not overload ... follow the steps outlined on page 9.1. • Follow the procedures on the inside wall of the tray. 10 Insert the duplex unit into the slot. In the printer properties window, set the page orientation to its original position. 8 Push the pressure levers downwards. 9 Insert the rear cover stopper...
... optional tray 3, or facing up in the groove, and close the rear cover. See the Software Section. 11 Close the top cover then the printer will resume printing. 9.6 7 Return the fuser door to be avoided. Ensure that the adjustable guides are positioned correctly. • Do not overload ... follow the steps outlined on page 9.1. • Follow the procedures on the inside wall of the tray. 10 Insert the duplex unit into the slot. In the printer properties window, set the page orientation to its original position. 8 Push the pressure levers downwards. 9 Insert the rear cover stopper...
User Guide
Page 55
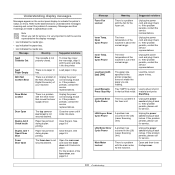
...understand the messages' meaning and correct the problem if necessary. There is above the normal range. The fuser door is empty in the LSU (Laser Scanning Unit). Inner Temp. If the problem persists, contact the service representatives. Unplug the power cord and plug it back inches. If the ...the fuser unit. Unplug the power cord and plug it back inches. Open and then close the fuser door until it into the printer. Paper has jammed during duplex printing. Load [yyy] with the slot, and slide it locks into place. If the problem persists, please call for service. Refer...
...understand the messages' meaning and correct the problem if necessary. There is above the normal range. The fuser door is empty in the LSU (Laser Scanning Unit). Inner Temp. If the problem persists, contact the service representatives. Unplug the power cord and plug it back inches. If the ...the fuser unit. Unplug the power cord and plug it back inches. Open and then close the fuser door until it into the printer. Paper has jammed during duplex printing. Load [yyy] with the slot, and slide it locks into place. If the problem persists, please call for service. Refer...

User Guide
Page 59
...Condition Print job is loose or defective. your printer. The printer cable is extremely slow. An incorrect type of the page(s) or try a new printer cable. Use only paper that the paper size in the printer driver settings matches the paper in the duplex printing mode. Use the rear cover (face-up...) instead. There may be debris inside the printer. Turn the printer off and then back on again. 9.12 Your printer prints A4-sized paper at 38 ppm ...
...Condition Print job is loose or defective. your printer. The printer cable is extremely slow. An incorrect type of the page(s) or try a new printer cable. Use only paper that the paper size in the printer driver settings matches the paper in the duplex printing mode. Use the rear cover (face-up...) instead. There may be debris inside the printer. Turn the printer off and then back on again. 9.12 Your printer prints A4-sized paper at 38 ppm ...
User Guide
Page 65
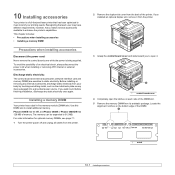
...laser printer that each side of the DIMM slot. 5 Remove the memory DIMM from the back of the DIMM. 1 1 notch 10.1 Installing a memory DIMM Your printer has a dual in-line memory module (DIMM) slot. 10 Installing accessories Your printer is being supplied. Phaser 3600/B has 64 MB, and Phaser 3600N or Phaser...open it from your printing needs. If you installed an optional duplex unit, remove it . 1 1 control board cover 4 Completely open the latches on each user may have different requirements, however, Xerox makes several accessories available to meet most of your body by ...
...laser printer that each side of the DIMM slot. 5 Remove the memory DIMM from the back of the DIMM. 1 1 notch 10.1 Installing a memory DIMM Your printer has a dual in-line memory module (DIMM) slot. 10 Installing accessories Your printer is being supplied. Phaser 3600/B has 64 MB, and Phaser 3600N or Phaser...open it from your printing needs. If you installed an optional duplex unit, remove it . 1 1 control board cover 4 Completely open the latches on each user may have different requirements, however, Xerox makes several accessories available to meet most of your body by ...

User Guide
Page 66
... Section. 2 Click the Windows Start menu. 3 For Windows 2000, select Settings and then Printers. For Windows Vista, select Control Panel > Hardware and Sound > Printers. 4 Select the Xerox Phaser 3600 PS printer. 5 Click the right mouse button on the printer icon and select Properties. 6 For Windows 2000/XP//Vista/2003, select Device Settings tab. ...Make sure the latches fit over the notches located on either side of the DIMM. 1 1 latch 8 Replace the control board cover. 9 Reinstall the duplex-slot cover or the optional duplex unit. 10 Reconnect the power cord and printer cable, and turn the...
... Section. 2 Click the Windows Start menu. 3 For Windows 2000, select Settings and then Printers. For Windows Vista, select Control Panel > Hardware and Sound > Printers. 4 Select the Xerox Phaser 3600 PS printer. 5 Click the right mouse button on the printer icon and select Properties. 6 For Windows 2000/XP//Vista/2003, select Device Settings tab. ...Make sure the latches fit over the notches located on either side of the DIMM. 1 1 latch 8 Replace the control board cover. 9 Reinstall the duplex-slot cover or the optional duplex unit. 10 Reconnect the power cord and printer cable, and turn the...
User Guide
Page 67
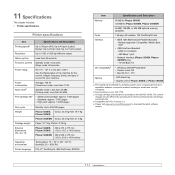
... ECP • USB Interface Standard - Compatible with ISO/IEC 19752. Sound pressure Level, ISO 7779. d. Please visit www.xerox.com/office/support to 1200 x 1200 dpi effective output Warm-up time Less than 56 dBA • Starter print cartridge: ...-sheet tray • Duplex unit for Phaser 3600/B or Phaser 3600/N a. b. e. 11 Specifications This chapter includes: • Printer specifications Printer specifications Item Specifications and Description Printing speeda Up to 200,000 pages Phaser 3600/B, Gross: 23.5 Kg/ Net: 19.7 Kg Phaser 3600/N Phaser 3600/DN Gross: 25...
... ECP • USB Interface Standard - Compatible with ISO/IEC 19752. Sound pressure Level, ISO 7779. d. Please visit www.xerox.com/office/support to 1200 x 1200 dpi effective output Warm-up time Less than 56 dBA • Starter print cartridge: ...-sheet tray • Duplex unit for Phaser 3600/B or Phaser 3600/N a. b. e. 11 Specifications This chapter includes: • Printer specifications Printer specifications Item Specifications and Description Printing speeda Up to 200,000 pages Phaser 3600/B, Gross: 23.5 Kg/ Net: 19.7 Kg Phaser 3600/N Phaser 3600/DN Gross: 25...
User Guide
Page 68
... systems 4.1 Port 9100 4.3 SLP 4.4 TCP/IP 4.2 O or 5.5 output location, select 5.8 output tray 5.8 P paper guidelines 5.3 paper jam, clear around the print cartridge 9.3 duplex area 9.4 In the paper feed area 9.1 optional tray 3 9.2 paper exit area 9.4 tray1(MPT) 9.2 paper level indicator 5.4 paper load 1 multi-purpose tray 5.6 tray 2/optional ...Windows 9.15 Q quality problems 9.13 R rear cover, use 5.9 replacement parts 8.6 replacing, print cartridge 8.4, 8.5 S special print media, guidelines 5.3 specification, printer 11.1 status LED 9.7 supplies checking life 8.3 order information 7.1
... systems 4.1 Port 9100 4.3 SLP 4.4 TCP/IP 4.2 O or 5.5 output location, select 5.8 output tray 5.8 P paper guidelines 5.3 paper jam, clear around the print cartridge 9.3 duplex area 9.4 In the paper feed area 9.1 optional tray 3 9.2 paper exit area 9.4 tray1(MPT) 9.2 paper level indicator 5.4 paper load 1 multi-purpose tray 5.6 tray 2/optional ...Windows 9.15 Q quality problems 9.13 R rear cover, use 5.9 replacement parts 8.6 replacing, print cartridge 8.4, 8.5 S special print media, guidelines 5.3 specification, printer 11.1 status LED 9.7 supplies checking life 8.3 order information 7.1


