
Service Manual
Page 3
First Printing: July, 2003 071-0866-00 Phaser 3450 Laser Printer Service Manual Warning The following servicing instructions are qualified to do not perform any servicing other than that contained in the operating instructions, unless you are for use by qualified service personnel only. To avoid personal injury, do so.
First Printing: July, 2003 071-0866-00 Phaser 3450 Laser Printer Service Manual Warning The following servicing instructions are qualified to do not perform any servicing other than that contained in the operating instructions, unless you are for use by qualified service personnel only. To avoid personal injury, do so.

Service Manual
Page 8
... laser radiation; Safety Interlocks Make sure all covers and the printer's front panel are in this is possible only because the laser beam is totally enclosed during all interlock switches are displayed on . Disconnect power before removing the power supply shield or replacing components. Do not wear jewelry: Remove jewelry prior to the preceding Power Safety Precautions. As you follow the procedures specified in the manual. Service...
... laser radiation; Safety Interlocks Make sure all covers and the printer's front panel are in this is possible only because the laser beam is totally enclosed during all interlock switches are displayed on . Disconnect power before removing the power supply shield or replacing components. Do not wear jewelry: Remove jewelry prior to the preceding Power Safety Precautions. As you follow the procedures specified in the manual. Service...
Service Manual
Page 14
... 1-7 Service Parts 1-8 Consumables 1-9 Supply Life Counter Behavior 1-10 Printer Specifications 1-11 Physical Dimensions and Clearances 1-11 Functional Specifications 1-12 Electrical Specifications 1-12 Environmental Specifications 1-13 Duplex Printing Media Sizes 1-13 Media and Tray Specifications 1-14 2 Theory of Operation Overview of the Phaser 3450 Laser Printer 2-2 Summary of the Printer 2-6 Duplex Paper Path 2-6 Contents xiii Paper Pick 2-4 Laser Light Intensity Control 2-5 Process Control 2-5 Toner Control 2-5 Fuser Control 2-5 Paper Path of the Printing Process...
... 1-7 Service Parts 1-8 Consumables 1-9 Supply Life Counter Behavior 1-10 Printer Specifications 1-11 Physical Dimensions and Clearances 1-11 Functional Specifications 1-12 Electrical Specifications 1-12 Environmental Specifications 1-13 Duplex Printing Media Sizes 1-13 Media and Tray Specifications 1-14 2 Theory of Operation Overview of the Phaser 3450 Laser Printer 2-2 Summary of the Printer 2-6 Duplex Paper Path 2-6 Contents xiii Paper Pick 2-4 Laser Light Intensity Control 2-5 Process Control 2-5 Toner Control 2-5 Fuser Control 2-5 Paper Path of the Printing Process...

Service Manual
Page 15
... Print Cartridge 2-10 Laser Scan Unit (LSU 2-10 Transfer Roller 2-11 Fuser Assembly 2-11 Paper Feed Drive 2-11 Paper Out Sensor 2-11 Paper Feed Sequence 2-12 Registration Sensor 2-12 Paper Transport 2-12 Fuser Exit Sensor 2-13 Duplex Unit 2-13 3 Error Messages and Codes Introduction 3-2 Servicing Instructions 3-4 Using the Troubleshooting Procedures 3-5 General Notes on Troubleshooting 3-6 Voltage Measurements 3-7 Service Diagnostics 3-8 Service Diagnostic Front Panel Button Descriptions 3-9 Service Diagnostics Menu Map 3-9 Error Messages and Codes Summary Table 3-13 Fuser...
... Print Cartridge 2-10 Laser Scan Unit (LSU 2-10 Transfer Roller 2-11 Fuser Assembly 2-11 Paper Feed Drive 2-11 Paper Out Sensor 2-11 Paper Feed Sequence 2-12 Registration Sensor 2-12 Paper Transport 2-12 Fuser Exit Sensor 2-13 Duplex Unit 2-13 3 Error Messages and Codes Introduction 3-2 Servicing Instructions 3-4 Using the Troubleshooting Procedures 3-5 General Notes on Troubleshooting 3-6 Voltage Measurements 3-7 Service Diagnostics 3-8 Service Diagnostic Front Panel Button Descriptions 3-9 Service Diagnostics Menu Map 3-9 Error Messages and Codes Summary Table 3-13 Fuser...

Service Manual
Page 22
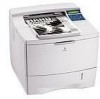
Configuration upgrades available for the Phaser 3450 Laser Printer include a Network Interface Card (NIC), additional RAM memory, a 500 sheet feeder, and flash memory for fonts, forms, and macros. Features Max print speed Ltr/Duplex A4/Duplex Memory (Mbytes) Flash Memory (8 Mbytes) Postscript Fonts PCL Fonts Emulation Resolutions Automatic 2-Sided Printing (AutoDuplex) Printer Cart 500-Sheet Feeder Additional 500-Sheet Feeder Ethernet capabilities USB, Parallel Optional Hard Drive Printer Configuration 3450B 3450D 3450DN 25/NA 24/NA 25/14-ipm 24/13-ipm 25/14-ipm 24/13-ipm...
Configuration upgrades available for the Phaser 3450 Laser Printer include a Network Interface Card (NIC), additional RAM memory, a 500 sheet feeder, and flash memory for fonts, forms, and macros. Features Max print speed Ltr/Duplex A4/Duplex Memory (Mbytes) Flash Memory (8 Mbytes) Postscript Fonts PCL Fonts Emulation Resolutions Automatic 2-Sided Printing (AutoDuplex) Printer Cart 500-Sheet Feeder Additional 500-Sheet Feeder Ethernet capabilities USB, Parallel Optional Hard Drive Printer Configuration 3450B 3450D 3450DN 25/NA 24/NA 25/14-ipm 24/13-ipm 25/14-ipm 24/13-ipm...

Service Manual
Page 38
.... Laser Light Intensity Control Image data is transmitted to the laser diode in the Laser Unit as mirrors and lenses), or variations in drum sensitivity are supplied to the Main Board. charging, development, transfer, fixing, etc.) and adjusting the appropriate supply voltages to optical signals; Toner Control Print Cartridge installation and Toner Level are detected by blinking laser beams. The laser unit monitors the output to match the target temperature by the printer. The heat roller surface...
.... Laser Light Intensity Control Image data is transmitted to the laser diode in the Laser Unit as mirrors and lenses), or variations in drum sensitivity are supplied to the Main Board. charging, development, transfer, fixing, etc.) and adjusting the appropriate supply voltages to optical signals; Toner Control Print Cartridge installation and Toner Level are detected by blinking laser beams. The laser unit monitors the output to match the target temperature by the printer. The heat roller surface...

Service Manual
Page 45
... the paper is almost at the sensor location too long, the Main Board will shut down the machine, the control panel LED will blink red, and a "Jam" error message will display on the control panel. When the paper goes between the fuser rollers. The temperature of the developed image on the second side. 2-12 Phaser 3450 Laser Printer Service Manual Paper is then directed into the paper forming a permanent image. Before arriving at the same time as...
... the paper is almost at the sensor location too long, the Main Board will shut down the machine, the control panel LED will blink red, and a "Jam" error message will display on the control panel. When the paper goes between the fuser rollers. The temperature of the developed image on the second side. 2-12 Phaser 3450 Laser Printer Service Manual Paper is then directed into the paper forming a permanent image. Before arriving at the same time as...
Service Manual
Page 49
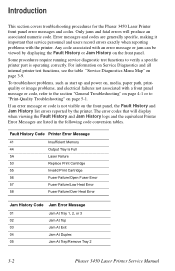
... Error Message 41 Insufficient Memory 44 Output Tray Is Full 5A Laser Failure 53 Replace Print Cartridge 55 Invalid Print Cartridge 56 Fuser Failure/Open Fuser Error 57 Fuser Failure/Low Heat Error 58 Fuser Failure/Over Heat Error Jam History Code Jam Error Message 01 Jam At Tray 1, 2, or 3 02 Jam At Top 03 Jam At Exit 04 Jam At Duplex 05 Jam At Tray/Remove Tray 2 3-2 Phaser 3450 Laser Printer Service Manual Some procedures require running service diagnostic test functions to "Print-Quality Troubleshooting" on , media, paper path, printquality or image problems...
... Error Message 41 Insufficient Memory 44 Output Tray Is Full 5A Laser Failure 53 Replace Print Cartridge 55 Invalid Print Cartridge 56 Fuser Failure/Open Fuser Error 57 Fuser Failure/Low Heat Error 58 Fuser Failure/Over Heat Error Jam History Code Jam Error Message 01 Jam At Tray 1, 2, or 3 02 Jam At Top 03 Jam At Exit 04 Jam At Duplex 05 Jam At Tray/Remove Tray 2 3-2 Phaser 3450 Laser Printer Service Manual Some procedures require running service diagnostic test functions to "Print-Quality Troubleshooting" on , media, paper path, printquality or image problems...
Service Manual
Page 51
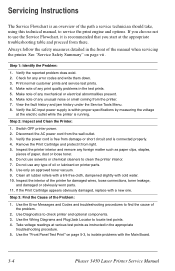
... Problem: 1. Switch OFF printer power. 2. Use only an approved toner vacuum. 9. Check for damaged wires, loose connections, toner leakage, and damaged or obviously worn parts. 11. Inspect the printer interior and remove any type of paper, dust or loose toner. 6. Do not use any foreign matter such as instructed in the front of the problem. 2. Inspect the interior of any error codes and write them down. 3. Use the "Front Panel Test Print" on page vii . Make...
... Problem: 1. Switch OFF printer power. 2. Use only an approved toner vacuum. 9. Check for damaged wires, loose connections, toner leakage, and damaged or obviously worn parts. 11. Inspect the printer interior and remove any type of paper, dust or loose toner. 6. Do not use any foreign matter such as instructed in the front of the problem. 2. Inspect the interior of any error codes and write them down. 3. Use the "Front Panel Test Print" on page vii . Make...

Service Manual
Page 52
... you to replace a printer component, Chapter 8, "Service Parts Disassembly" on page 9-1 details the location, quantity and part number for continuity at certain test points within the printer. Using the Troubleshooting Procedures 1. Use the Removal and Replacement Procedures to the question is followed by a question. When a procedure instructs you to be sure you to test a component using service diagnostics, see the "Service Diagnostics Menu Map" on test point locations and signal names. 6. Error Messages and Codes 3-5 Troubleshooting Procedures...
... you to replace a printer component, Chapter 8, "Service Parts Disassembly" on page 9-1 details the location, quantity and part number for continuity at certain test points within the printer. Using the Troubleshooting Procedures 1. Use the Removal and Replacement Procedures to the question is followed by a question. When a procedure instructs you to be sure you to test a component using service diagnostics, see the "Service Diagnostics Menu Map" on test point locations and signal names. 6. Error Messages and Codes 3-5 Troubleshooting Procedures...

Service Manual
Page 58
Paper size: Letter With tray down on duplex jam gate, actuate the sensor, and confirm that message changes to "Tray 1 Out Paper With Paper". Tray 3 W/ Out Paper Remove Tray 2, pull down , touch sensor and Tray 1 W/ confirm message changes to "Output Bin Full". If Tray 3 is installed, both Tray 2 and Tray 3 sizes will display. Tray 2 W/ Out Paper With tray extended, touch sensor and confirm message changes to "Exit Sensor With Paper". Duplex Sensor Off With cover open and print cartridge out, touch sensor; With cover open , touch sensor and Cover Open confirm message changes ...
Paper size: Letter With tray down on duplex jam gate, actuate the sensor, and confirm that message changes to "Tray 1 Out Paper With Paper". Tray 3 W/ Out Paper Remove Tray 2, pull down , touch sensor and Tray 1 W/ confirm message changes to "Output Bin Full". If Tray 3 is installed, both Tray 2 and Tray 3 sizes will display. Tray 2 W/ Out Paper With tray extended, touch sensor and confirm message changes to "Exit Sensor With Paper". Duplex Sensor Off With cover open and print cartridge out, touch sensor; With cover open , touch sensor and Cover Open confirm message changes ...
Service Manual
Page 63
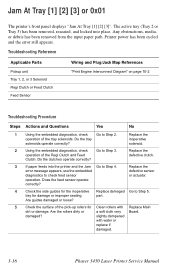
... Phaser 3450 Laser Printer Service Manual Are guides damaged or loose? 5 Check the surface of the pick-up rollers for the inoperative Replace damaged Go to Step 2. Replace the inoperative solenoid. 2 Using the embedded diagnostics, check Go to check feed sensor operation. Does the feed sensor operate correctly? damaged? Troubleshooting Reference Applicable Parts Pickup unit Tray 1, 2, or 3 Solenoid Regi Clutch or Feed Clutch Feed Sensor Wiring and Plug/Jack Map References "Print Engine Interconnect Diagram" on page...
... Phaser 3450 Laser Printer Service Manual Are guides damaged or loose? 5 Check the surface of the pick-up rollers for the inoperative Replace damaged Go to Step 2. Replace the inoperative solenoid. 2 Using the embedded diagnostics, check Go to check feed sensor operation. Does the feed sensor operate correctly? damaged? Troubleshooting Reference Applicable Parts Pickup unit Tray 1, 2, or 3 Solenoid Regi Clutch or Feed Clutch Feed Sensor Wiring and Plug/Jack Map References "Print Engine Interconnect Diagram" on page...

Service Manual
Page 69
... panel error message, notes on page 1-11? 10. Is the paper stock used in the printer as recommended in the User Guide? 13. Is the Print Cartridge properly installed? 15. Are all of the AC power cord plugged into a grounded three-pronged AC wall outlet? 5. For troubleshooting problems associated with an error code or front panel error message. Is the printer located away from the direct rays of the printer to use the printer as instructed...
... panel error message, notes on page 1-11? 10. Is the paper stock used in the printer as recommended in the User Guide? 13. Is the Print Cartridge properly installed? 15. Are all of the AC power cord plugged into a grounded three-pronged AC wall outlet? 5. For troubleshooting problems associated with an error code or front panel error message. Is the printer located away from the direct rays of the printer to use the printer as instructed...

Service Manual
Page 73
... correct media type is set correctly. 5. Prior to "Service Diagnostics Menu Map" on page 3-9. 5 a. Is paper loaded correctly? 2 a. Are parts missing? 3 a. Are the feed roller or retard/drag pads damaged or dirty? Yes No Go to Step 3. Replace Tray 1 Assembly. Go to Step 2. Repair or replace Tray 1 Actuator. Check that media is being held in the front panel. 4. Is tray damaged? Is Tray 1 actuator binding? 4 a. Load paper correctly. Go to Step 4. Replace damaged parts. 4-6 Phaser 3450 Laser Printer Service Manual Ensure...
... correct media type is set correctly. 5. Prior to "Service Diagnostics Menu Map" on page 3-9. 5 a. Is paper loaded correctly? 2 a. Are parts missing? 3 a. Are the feed roller or retard/drag pads damaged or dirty? Yes No Go to Step 3. Replace Tray 1 Assembly. Go to Step 2. Repair or replace Tray 1 Actuator. Check that media is being held in the front panel. 4. Is tray damaged? Is Tray 1 actuator binding? 4 a. Load paper correctly. Go to Step 4. Replace damaged parts. 4-6 Phaser 3450 Laser Printer Service Manual Ensure...

Service Manual
Page 84
... Black spots and image ghost Black spots on back Front Panel Test Print A test print is available to aid in determining the quality of output from a fresh, unopened ream (whenever possible), to assist in troubleshooting problems. Each area of the test print is used for image-quality analysis. Make five copies of the areas and the print-quality parameters. Use supported paper from the printer and to check the image quality of prints. From the printers front panel menus select Troubleshooting --> Service Tools --> Test Prints...
... Black spots and image ghost Black spots on back Front Panel Test Print A test print is available to aid in determining the quality of output from a fresh, unopened ream (whenever possible), to assist in troubleshooting problems. Each area of the test print is used for image-quality analysis. Make five copies of the areas and the print-quality parameters. Use supported paper from the printer and to check the image quality of prints. From the printers front panel menus select Troubleshooting --> Service Tools --> Test Prints...

Service Manual
Page 88
... ■ Defective ground to cartridge ground and frame. obstruction. ■ Verify low toner warning is not set to 30 Panel settings. the Print Cartridge and shake, ■ Low ambient reinstall or replace. pages using the recommended ■ Seal tape was not ■ Ensure that the Remote Control cartridge. Remove output. Image Defect Possible Cause Solution No Image/Blank Prints ■ Seal tape was not paper. Print 20 to "light." ■ Transfer Roller ■ Ensure that may...
... ■ Defective ground to cartridge ground and frame. obstruction. ■ Verify low toner warning is not set to 30 Panel settings. the Print Cartridge and shake, ■ Low ambient reinstall or replace. pages using the recommended ■ Seal tape was not ■ Ensure that the Remote Control cartridge. Remove output. Image Defect Possible Cause Solution No Image/Blank Prints ■ Seal tape was not paper. Print 20 to "light." ■ Transfer Roller ■ Ensure that may...

Service Manual
Page 90
.... ■ Replace Power Supply Board. ■ Replace Laser Assembly. Character Defects: ■ Loose/defective ■ Inspect cable connections; characters are marked with Specific Printer Components" on page 5-2 for defect pitch. ■ Remove the Transfer Roller and clean (dust off). character generation. ■ Main Board Print-Quality Troubleshooting 5-9 Image Defect Possible Cause Black Spots/Marks: ■ Print Cartridge There are spots and/or ■ Fuser assembly marks of toner on the ■ Paper transports printed side of...
.... ■ Replace Power Supply Board. ■ Replace Laser Assembly. Character Defects: ■ Loose/defective ■ Inspect cable connections; characters are marked with Specific Printer Components" on page 5-2 for defect pitch. ■ Remove the Transfer Roller and clean (dust off). character generation. ■ Main Board Print-Quality Troubleshooting 5-9 Image Defect Possible Cause Black Spots/Marks: ■ Print Cartridge There are spots and/or ■ Fuser assembly marks of toner on the ■ Paper transports printed side of...

Service Manual
Page 95
...; Black light protective bag Cleaning Caution Never apply alcohol to light can degrade its performance and result in a light protective bag. Print several sheets of use a damp cloth to check for problems or defects. 3. Remove and clean the paper trays. 7. Record number of sheets printed. Clean pick rollers with a slightly damp, lint-free cloth. 7-2 Phaser 3450 Laser Printer Service Manual Exposure to any parts in the future. Turn off the printer. 4. If you check, service, or repair a printer. Record the number of sheets printed. 2. The...
...; Black light protective bag Cleaning Caution Never apply alcohol to light can degrade its performance and result in a light protective bag. Print several sheets of use a damp cloth to check for problems or defects. 3. Remove and clean the paper trays. 7. Record number of sheets printed. Clean pick rollers with a slightly damp, lint-free cloth. 7-2 Phaser 3450 Laser Printer Service Manual Exposure to any parts in the future. Turn off the printer. 4. If you check, service, or repair a printer. Record the number of sheets printed. 2. The...

Service Manual
Page 119
... improved access, remove the crossbar screw above the Paper Size Sensor and loosen the screw on either side of the printer, remove 2 screws, one on the other side so you can be removed before perfoming this procedure. 1. Remove the left side of the rear crossbar, that secure the Paper Size Sensor to the Print Cartridge Interconnect Board) from the Exit Motor. 8-22 Phaser 3450 Laser Printer Service Manual Remove the Top Cover Assembly (page 8-9). 3. Remove the Print Cartridge (page...
... improved access, remove the crossbar screw above the Paper Size Sensor and loosen the screw on either side of the printer, remove 2 screws, one on the other side so you can be removed before perfoming this procedure. 1. Remove the left side of the rear crossbar, that secure the Paper Size Sensor to the Print Cartridge Interconnect Board) from the Exit Motor. 8-22 Phaser 3450 Laser Printer Service Manual Remove the Top Cover Assembly (page 8-9). 3. Remove the Print Cartridge (page...

Service Manual
Page 176
...Printing Media Sizes, 1-13 Duplex Roller Drive Assembly, 8-45 Duplex Unit, 2-13 E Electrical Specifications, 1-12 Engine Power-Up Sequence ???, 4-4 Environmental Specifications, 1-13 Error Messages and Codes Summary Table, 3-13 Exit Drive, 9-17 Exit Jam (Jam 2), 4-11 F Fault History, 3-2 Frame 1, 9-12 Frame 2, 9-15 Front (Inner) Cover, 8-12 Front Panel Assembly, 8-15 Front Panel Continually Displays "No Paper in Tray x", 4-3 Front Panel Continually Displays "Output Tray Full", 4-4 Front Panel LED is on, Front Panel Display is Blank, 4-3 Front Panel Test Prints, 5-3 Front Panel Troubleshooting...
...Printing Media Sizes, 1-13 Duplex Roller Drive Assembly, 8-45 Duplex Unit, 2-13 E Electrical Specifications, 1-12 Engine Power-Up Sequence ???, 4-4 Environmental Specifications, 1-13 Error Messages and Codes Summary Table, 3-13 Exit Drive, 9-17 Exit Jam (Jam 2), 4-11 F Fault History, 3-2 Frame 1, 9-12 Frame 2, 9-15 Front (Inner) Cover, 8-12 Front Panel Assembly, 8-15 Front Panel Continually Displays "No Paper in Tray x", 4-3 Front Panel Continually Displays "Output Tray Full", 4-4 Front Panel LED is on, Front Panel Display is Blank, 4-3 Front Panel Test Prints, 5-3 Front Panel Troubleshooting...


