
User Guide
Page 3
...Special Features 1.2 Printer Components 1.4 Front View 1.4 Inside View 1.5 Rear View 1.5 Understanding the Control Panel 1.6 On Line/Error and Toner Save LEDs 1.6 Cancel button 1.7 Chapter 2: SETTING UP YOUR PRINTER Unpacking 2.2 Selecting a Location 2.3 Installing the Toner Cartridge 2.4 Loading Paper 2.6 Changing the Paper Size in the Tray 2.8 Connecting a Printer Cable 2.9 Turning the Printer on 2.11 Printing a Demo Page 2.12 Installing Printer Software 2.13 Printer Driver Features 2.14 Installing Printer software in Windows 2.15 Installing the USB Driver in Windows 98/Me...
...Special Features 1.2 Printer Components 1.4 Front View 1.4 Inside View 1.5 Rear View 1.5 Understanding the Control Panel 1.6 On Line/Error and Toner Save LEDs 1.6 Cancel button 1.7 Chapter 2: SETTING UP YOUR PRINTER Unpacking 2.2 Selecting a Location 2.3 Installing the Toner Cartridge 2.4 Loading Paper 2.6 Changing the Paper Size in the Tray 2.8 Connecting a Printer Cable 2.9 Turning the Printer on 2.11 Printing a Demo Page 2.12 Installing Printer Software 2.13 Printer Driver Features 2.14 Installing Printer software in Windows 2.15 Installing the USB Driver in Windows 98/Me...

User Guide
Page 4
... 3.4 Selecting the Output Location 3.5 Printing to the Top Output Tray (Face down) ....... 3.5 Printing to the Rear Output Tray (Face up) ......... 3.6 Loading Paper 3.7 Using the Tray 3.7 Using the Manual Feeder 3.8 Printing on Envelopes 3.10 Printing on Labels 3.12 Printing on Transparencies 3.13 Printing on Card Stock or Custom-sized Materials .... 3.15 Printing on Preprinted Paper 3.16 Chapter 4: PRINTING TASKS Printing a Document 4.2 Canceling a Print Job 4.4 Using a Favorite Setting 4.5 Using Help 4.5 Setting Paper Properties 4.6 Using the Toner Save Mode 4.8 Scaling Your...
... 3.4 Selecting the Output Location 3.5 Printing to the Top Output Tray (Face down) ....... 3.5 Printing to the Rear Output Tray (Face up) ......... 3.6 Loading Paper 3.7 Using the Tray 3.7 Using the Manual Feeder 3.8 Printing on Envelopes 3.10 Printing on Labels 3.12 Printing on Transparencies 3.13 Printing on Card Stock or Custom-sized Materials .... 3.15 Printing on Preprinted Paper 3.16 Chapter 4: PRINTING TASKS Printing a Document 4.2 Canceling a Print Job 4.4 Using a Favorite Setting 4.5 Using Help 4.5 Setting Paper Properties 4.6 Using the Toner Save Mode 4.8 Scaling Your...

User Guide
Page 6
Chapter 7: APPENDIX Using Your Printer in Linux 7.2 Installing the Printer Driver 7.2 Changing the Printer Connection Method 7.6 Using the Configuration Tool 7.8 Changing LLPR Properties 7.10 Printing from DOS Applications 7.12 About the Remote Control Panel 7.12 Installing the Remote Control Panel 7.12 Selecting Print Settings 7.14 Printer Specifications 7.21 Paper Specifications 7.22 Overview 7.22 Supported Sizes of Paper 7.23 Guidelines for Using Paper 7.24 Paper Specifications 7.25 Paper Output Capacity 7.25 Printer and Paper Storage Environment 7.26 v
Chapter 7: APPENDIX Using Your Printer in Linux 7.2 Installing the Printer Driver 7.2 Changing the Printer Connection Method 7.6 Using the Configuration Tool 7.8 Changing LLPR Properties 7.10 Printing from DOS Applications 7.12 About the Remote Control Panel 7.12 Installing the Remote Control Panel 7.12 Selecting Print Settings 7.14 Printer Specifications 7.21 Paper Specifications 7.22 Overview 7.22 Supported Sizes of Paper 7.23 Guidelines for Using Paper 7.24 Paper Specifications 7.25 Paper Output Capacity 7.25 Printer and Paper Storage Environment 7.26 v

User Guide
Page 19
See "Troubleshooting Error Messages" on and the Toner Save mode is enabled. If you press the button while the printer is receiving data, the LED blinks red to print. LED slowly blinks If the printer is experiencing an error, such as jammed paper, the open cover or the empty toner cartridge. In Manual Feed mode, if there is no paper in Ready mode, this LED is off and the Toner Save mode is disabled. 1.6 INTRODUCTION If you press the button in...
See "Troubleshooting Error Messages" on and the Toner Save mode is enabled. If you press the button while the printer is receiving data, the LED blinks red to print. LED slowly blinks If the printer is experiencing an error, such as jammed paper, the open cover or the empty toner cartridge. In Manual Feed mode, if there is no paper in Ready mode, this LED is off and the Toner Save mode is disabled. 1.6 INTRODUCTION If you press the button in...

User Guide
Page 20
... LEDs blink, your software application. Cancel( ) button Function Description Printing demo page In Ready mode, press and hold this button. This may take some 1 problems. To solve the problem, see "Using the Manual Feeder" on the size of paper in the manual feeder, when you can't cancel the print job by pressing this button for about 2 seconds until all LEDs blink slowly, and release. Toner Save mode on page 6.18. For detailed information, see "Troubleshooting Error Messages" on...
... LEDs blink, your software application. Cancel( ) button Function Description Printing demo page In Ready mode, press and hold this button. This may take some 1 problems. To solve the problem, see "Using the Manual Feeder" on the size of paper in the manual feeder, when you can't cancel the print job by pressing this button for about 2 seconds until all LEDs blink slowly, and release. Toner Save mode on page 6.18. For detailed information, see "Troubleshooting Error Messages" on...

User Guide
Page 31
... USB driver to print using the USB interface, you need help. See your computer. See page 2.17. • In Windows 2000/XP, if you want to add the USB port. Using a USB Cable Note: Connecting the printer to the USB port on the back of the printer. See page 2.15. 2.10 SETTING UP YOUR PRINTER To the USB port on your computer 3 Connect the other end of the cable to the USB port of the computer requires a certified USB cable. 1 Make...
... USB driver to print using the USB interface, you need help. See your computer. See page 2.17. • In Windows 2000/XP, if you want to add the USB port. Using a USB Cable Note: Connecting the printer to the USB port on the back of the printer. See page 2.15. 2.10 SETTING UP YOUR PRINTER To the USB port on your computer 3 Connect the other end of the cable to the USB port of the computer requires a certified USB cable. 1 Make...
User Guide
Page 34
... USB port is provided, so you are printing from Windows You can install the following printer software using the CD-ROM. • Printer driver for information about installing the Remote Control Panel and printing from DOS Applications" on page 7.12, for DOS application. see page 2.15. • Remote Control Panel for information about installing the Linux driver. If you don't have to "Using Your Printer in Linux" on page 7.2, for windows. Installing Printer Software The supplied CD-ROM contains Windows printing software, Linux printing software, on-line User's Guide...
... USB port is provided, so you are printing from Windows You can install the following printer software using the CD-ROM. • Printer driver for information about installing the Remote Control Panel and printing from DOS Applications" on page 7.12, for DOS application. see page 2.15. • Remote Control Panel for information about installing the Linux driver. If you don't have to "Using Your Printer in Linux" on page 7.2, for windows. Installing Printer Software The supplied CD-ROM contains Windows printing software, Linux printing software, on-line User's Guide...

User Guide
Page 37
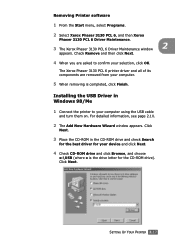
Click Repair and then click Next. 4 When reinstallation is required if your installation fails. 1 From the Start menu, select Programs. 2 Select Xerox Phaser 3130 PCL 6, and then Xerox Phaser 3130 PCL 6 Driver Maintenance. 3 The Xerox Phaser 3130 PCL 6 Driver Maintenance window appears. Reinstalling Printer software Reinstall is done, click Finish. 2.16 SETTING UP YOUR PRINTER Click Next. 5 Follow the instructions on the screen to complete the installation. 3 Click Install the Print Driver. 4 The Welcome window opens.
Click Repair and then click Next. 4 When reinstallation is required if your installation fails. 1 From the Start menu, select Programs. 2 Select Xerox Phaser 3130 PCL 6, and then Xerox Phaser 3130 PCL 6 Driver Maintenance. 3 The Xerox Phaser 3130 PCL 6 Driver Maintenance window appears. Reinstalling Printer software Reinstall is done, click Finish. 2.16 SETTING UP YOUR PRINTER Click Next. 5 Follow the instructions on the screen to complete the installation. 3 Click Install the Print Driver. 4 The Welcome window opens.
User Guide
Page 38
... your selection, click OK. For detailed information, see page 2.10. 2 The Add New Hardware Wizard window appears. Check Remove and then click Next. 4 When you are removed from your device and click Next. 4 Check CD-ROM drive and click Browse, and choose x:\USB (where x is completed, click Finish. SETTING UP YOUR PRINTER 2.17 Removing Printer software 1 From the Start menu, select Programs. 2 Select Xerox Phaser 3130 PCL 6, and then Xerox Phaser 3130 PCL 6 Driver Maintenance. 3 The Xerox Phaser 3130 PCL 6 Driver Maintenance window 2 appears.
... your selection, click OK. For detailed information, see page 2.10. 2 The Add New Hardware Wizard window appears. Check Remove and then click Next. 4 When you are removed from your device and click Next. 4 Check CD-ROM drive and click Browse, and choose x:\USB (where x is completed, click Finish. SETTING UP YOUR PRINTER 2.17 Removing Printer software 1 From the Start menu, select Programs. 2 Select Xerox Phaser 3130 PCL 6, and then Xerox Phaser 3130 PCL 6 Driver Maintenance. 3 The Xerox Phaser 3130 PCL 6 Driver Maintenance window 2 appears.
User Guide
Page 47
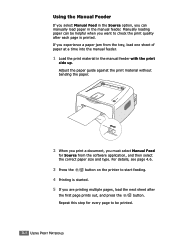
... start feeding. 4 Printing is printed. Adjust the paper guide against the print material without bending the paper. 2 When you print a document, you must select Manual Feed for every page to check the print quality after the first page prints out, and press the button. Manually loading paper can manually load paper in the manual feeder with the print side up. If you want to be helpful when you experience a paper jam from the software application, and then select the correct paper size and type.
... start feeding. 4 Printing is printed. Adjust the paper guide against the print material without bending the paper. 2 When you print a document, you must select Manual Feed for every page to check the print quality after the first page prints out, and press the button. Manually loading paper can manually load paper in the manual feeder with the print side up. If you want to be helpful when you experience a paper jam from the software application, and then select the correct paper size and type.

User Guide
Page 98
The printer is working properly and print a job. press the button on the printer's 6 control panel to the manual feeder and Manual Feed mode. If possible, attach the cable to the correct one port, make sure that is not selected as your default printer. If the computer has more than one . Check the printer for the following: • The printer cover is not closed. • Paper is jammed. • No paper is loaded. • The toner cartridge is attached...
The printer is working properly and print a job. press the button on the printer's 6 control panel to the manual feeder and Manual Feed mode. If possible, attach the cable to the correct one port, make sure that is not selected as your default printer. If the computer has more than one . Check the printer for the following: • The printer cover is not closed. • Paper is jammed. • No paper is loaded. • The toner cartridge is attached...
User Guide
Page 109
..." on page 2.4. See "Installing the Toner Cartridge" on page 5.5. • Check the paper type and quality. Contact a service representative. 6.14 SOLVING PROBLEMS See "Installing the Toner Cartridge" on page 2.4. • Parts of the printer may be damaged. If the defects occur on the back of the page, the problem will likely correct itself after a few more pages. • The fusing assembly may fix the problem. • Change to clean the cartridge (see page 5.5). very dry (low humidity...
..." on page 2.4. See "Installing the Toner Cartridge" on page 5.5. • Check the paper type and quality. Contact a service representative. 6.14 SOLVING PROBLEMS See "Installing the Toner Cartridge" on page 2.4. • Parts of the printer may be damaged. If the defects occur on the back of the page, the problem will likely correct itself after a few more pages. • The fusing assembly may fix the problem. • Change to clean the cartridge (see page 5.5). very dry (low humidity...
User Guide
Page 110
... up output slot. Printing on the reverse side. For service, contact a service representative. 6 • Check the paper type and quality. See "Paper Specifications" on page 7.22. • Ensure that it also occurs on a demo page by pressing the button on the control panel when the printer is loaded correctly and the guides are not too tight or too loose against the paper stack. Both high temperature and humidity can cause problems...
... up output slot. Printing on the reverse side. For service, contact a service representative. 6 • Check the paper type and quality. See "Paper Specifications" on page 7.22. • Ensure that it also occurs on a demo page by pressing the button on the control panel when the printer is loaded correctly and the guides are not too tight or too loose against the paper stack. Both high temperature and humidity can cause problems...

User Guide
Page 113
... toner cartridge and install a new one. See "Installing the Toner Cartridge" on page 6.7. • The front cover is no paper in the Manual Feeder. Troubleshooting Error Messages When the printer experiences an error, the control panel will indicate an error message with the indicator lights. To solve the problem, see "Clearing Paper Jams" on page 2.4. • You pressed the button while the printer is receiving data. • In Manual Feed mode, there is open. LED status legend symbol for "light off" symbol for "light on" symbol for "light blinking...
... toner cartridge and install a new one. See "Installing the Toner Cartridge" on page 6.7. • The front cover is no paper in the Manual Feeder. Troubleshooting Error Messages When the printer experiences an error, the control panel will indicate an error message with the indicator lights. To solve the problem, see "Clearing Paper Jams" on page 2.4. • You pressed the button while the printer is receiving data. • In Manual Feed mode, there is open. LED status legend symbol for "light off" symbol for "light on" symbol for "light blinking...
Service Manual
Page 4
... written down. (2) Before servicing or replacing electric parts, take off a plug. (3) Take off printer cables and power code connected to printer. (4) Do use formal parts and same standardized goods when replacing parts.Must check the product name, part code, rated voltage, rated current, operating temperature, etc. (5) Do not give an over . (2) Be careful not to insert a finger of tracking, short, or etc. (9) After finished repair, check the assembling state...
... written down. (2) Before servicing or replacing electric parts, take off a plug. (3) Take off printer cables and power code connected to printer. (4) Do use formal parts and same standardized goods when replacing parts.Must check the product name, part code, rated voltage, rated current, operating temperature, etc. (5) Do not give an over . (2) Be careful not to insert a finger of tracking, short, or etc. (9) After finished repair, check the assembling state...
Service Manual
Page 6
... for safe and smooth troubleshooting described in this service manual. 1 DCU(Diagnostic Control Unit) Standard : Test equipment to diagnose the Laser printer supplied by Samsung Electronics. 4 Driver Standard : "-" type, "+" type (M3 long, M3 short, M2 long, M2 short). 5 Pinset Standard : For general home use, small type. 2 DVM(Digital Volt Meter) Standard : Indicates more than 3 digits. 6 Cotton Swab Standard : For general home use, for medical ser-vice 7 Cleaning Equipments a IPA(Isopropyl Alcohol...
... for safe and smooth troubleshooting described in this service manual. 1 DCU(Diagnostic Control Unit) Standard : Test equipment to diagnose the Laser printer supplied by Samsung Electronics. 4 Driver Standard : "-" type, "+" type (M3 long, M3 short, M2 long, M2 short). 5 Pinset Standard : For general home use, small type. 2 DVM(Digital Volt Meter) Standard : Indicates more than 3 digits. 6 Cotton Swab Standard : For general home use, for medical ser-vice 7 Cleaning Equipments a IPA(Isopropyl Alcohol...

Service Manual
Page 21
... (LETTER) 02 READY (A4) 03 READY (EXECUTIVE) 04 READY (B5) 20 PRINT START 30 FEED SENSOR ON 40 FEED SENSOR OFF 50 PAPER OUT 69 SLEEP MODE ERROR STATUS CODE 60 OPEN FUSER ERROR 62 LOW TEMPERATURE ERROR 68 OVER HEATING ERROR 64 COVER OPEN ERROR 70 NO PAPERR 71 PAPER JAM 0 72 PAPER JAM 1 73 PAPER JAM 2 95 LSU NOT READY DIAGNOSTIC MODE DOWN UP SHIFT STOP ENTER TO ENTER DIAGNOSTIC MODE, PUSH THREE BUTTONS SIMUL ANEOUSL AND TURN THE PRINTER POWER ON. Troubleshooting...
... (LETTER) 02 READY (A4) 03 READY (EXECUTIVE) 04 READY (B5) 20 PRINT START 30 FEED SENSOR ON 40 FEED SENSOR OFF 50 PAPER OUT 69 SLEEP MODE ERROR STATUS CODE 60 OPEN FUSER ERROR 62 LOW TEMPERATURE ERROR 68 OVER HEATING ERROR 64 COVER OPEN ERROR 70 NO PAPERR 71 PAPER JAM 0 72 PAPER JAM 1 73 PAPER JAM 2 95 LSU NOT READY DIAGNOSTIC MODE DOWN UP SHIFT STOP ENTER TO ENTER DIAGNOSTIC MODE, PUSH THREE BUTTONS SIMUL ANEOUSL AND TURN THE PRINTER POWER ON. Troubleshooting...

Service Manual
Page 22
... part of paper) 20, 21, 22 Print Start 30 Feed Sensor On 40 Feed Sensor off to the printer and turn the power on , the cover is filled with paper. The paper has passed out of the Feed Sensor. Service Manual 4-2 Code State 60, 62, 68 Fuser Error 64 Cover Open 65 CRU Error 70 No Paper 71 Paper Jam 0 72 Paper Jam 1 73 Paper Jam 2 76 Out Bin Full 95 LSU Not Ready Description The error in the paper cassette. The Toner Cartridge not installed...
... part of paper) 20, 21, 22 Print Start 30 Feed Sensor On 40 Feed Sensor off to the printer and turn the power on , the cover is filled with paper. The paper has passed out of the Feed Sensor. Service Manual 4-2 Code State 60, 62, 68 Fuser Error 64 Cover Open 65 CRU Error 70 No Paper 71 Paper Jam 0 72 Paper Jam 1 73 Paper Jam 2 76 Out Bin Full 95 LSU Not Ready Description The error in the paper cassette. The Toner Cartridge not installed...
Service Manual
Page 26
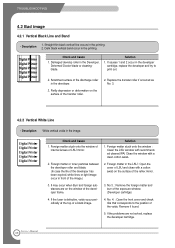
.... 3. Digital Printer Digital Printer Digital Printer Digital Printer Digital Printer Check and Cause 1. No 3. : Remove the foreign matter and burr of a black image. 4. Deformed Doctor-blade or cleaningblade. Solution 1. Remove if found. 5. Service Manual 4-6 TROUBLESHOOTING 4.2 Bad image 4.2.1 Vertical Black Line and Band • Description 1. If the fuser is defective, voids occur periodically at the top of the exposure window. (Developer cartridge) 4. Foreign matter stuck onto the window : Clean the LSU window with recommended...
.... 3. Digital Printer Digital Printer Digital Printer Digital Printer Digital Printer Check and Cause 1. No 3. : Remove the foreign matter and burr of a black image. 4. Deformed Doctor-blade or cleaningblade. Solution 1. Remove if found. 5. Service Manual 4-6 TROUBLESHOOTING 4.2 Bad image 4.2.1 Vertical Black Line and Band • Description 1. If the fuser is defective, voids occur periodically at the top of the exposure window. (Developer cartridge) 4. Foreign matter stuck onto the window : Clean the LSU window with recommended...
Service Manual
Page 45
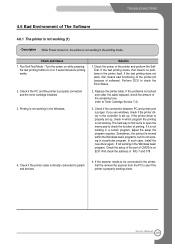
... the toner cartridge installed. 3. Run Self-Test Mode : Turn the power on while pressing the test printing button for 2 or 3 seconds before printing works. 2. Replace the printer cable. And check the address of software). Check if the PC and the printer is directly connected to peripheral devices 4. If the test printing does not work, that means no problems in a particular program. Check if the connection between PC and printer port is properly working alone. Perform DCU to Toner Cartridge Service 7.4) 3. In such case, install the new driver...
... the toner cartridge installed. 3. Run Self-Test Mode : Turn the power on while pressing the test printing button for 2 or 3 seconds before printing works. 2. Replace the printer cable. And check the address of software). Check if the PC and the printer is directly connected to peripheral devices 4. If the test printing does not work, that means no problems in a particular program. Check if the connection between PC and printer port is properly working alone. Perform DCU to Toner Cartridge Service 7.4) 3. In such case, install the new driver...


