Quick Reference Guide
Page 6
... motor 36 Motor and fuser roller resistances 37 Media jams and the paper path 38 Media-based problems 38 Media problems 38 Multiple-sheet pick 38 The media skews passing through the paper path 39 The paper tray indicates it is empty when it is not 39 Service Guide v Contents General Information 1 The Phaser 2135 Color Printer 2 Printer RAM and printer capabilities 4 CRC life counter behavior 4 Print engine assemblies 5 The image processor board 8 The control panel 9 On Line LED 9 !
... motor 36 Motor and fuser roller resistances 37 Media jams and the paper path 38 Media-based problems 38 Media problems 38 Multiple-sheet pick 38 The media skews passing through the paper path 39 The paper tray indicates it is empty when it is not 39 Service Guide v Contents General Information 1 The Phaser 2135 Color Printer 2 Printer RAM and printer capabilities 4 CRC life counter behavior 4 Print engine assemblies 5 The image processor board 8 The control panel 9 On Line LED 9 !

Quick Reference Guide
Page 15
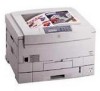
... being selected, such as the Phaser 2135N except it includes 192 Mbytes of memory, an auto-duplexer, an internal hard drive and a lower feeder tray assembly. The resolution supported is the same as Fax Friendly Black and Draft Mode. For 600 x 1200 dpi (enhanced) color printing, the printer prints color at 21 pages-per -inch. The printer support printing on paper sizes such as standard mode. All printer versions support the color PCL5C printer language. The printer supports the following resolutions: s 600...
... being selected, such as the Phaser 2135N except it includes 192 Mbytes of memory, an auto-duplexer, an internal hard drive and a lower feeder tray assembly. The resolution supported is the same as Fax Friendly Black and Draft Mode. For 600 x 1200 dpi (enhanced) color printing, the printer prints color at 21 pages-per -inch. The printer support printing on paper sizes such as standard mode. All printer versions support the color PCL5C printer language. The printer supports the following resolutions: s 600...
Quick Reference Guide
Page 17
... s Valid on the control panel. All printer CRCs wait for toner, the printer terminates printing at all. Press Enter to finish before declaring a Low or Empty state. 4 Phaser 2135 Color Printer Note that can be mixed with defective memory cells the printer declares "Diagnostics Failed - The printer features three slots each of -use messages. CRC life counter behavior Internal counters track customer replaceable consumable (CRC) life usage and store the...
... s Valid on the control panel. All printer CRCs wait for toner, the printer terminates printing at all. Press Enter to finish before declaring a Low or Empty state. 4 Phaser 2135 Color Printer Note that can be mixed with defective memory cells the printer declares "Diagnostics Failed - The printer features three slots each of -use messages. CRC life counter behavior Internal counters track customer replaceable consumable (CRC) life usage and store the...

Quick Reference Guide
Page 27
... Xerox-brand Phaser 35-series A- B4, 8 x 13 in, A5 Tabloid (11 x 17 in . Functional specifications Characteristic Printing process Color medium Addressability Printing speed pages per minute (ppm) Specification Electro-photographic, four color (CMYK) tandem transfer printing Four toner cartridges each contain one of four colors: cyan, magenta, yellow or black. Use only premium bond laser printer or copier paper, transparency film, card stock and glossy paper...
... Xerox-brand Phaser 35-series A- B4, 8 x 13 in, A5 Tabloid (11 x 17 in . Functional specifications Characteristic Printing process Color medium Addressability Printing speed pages per minute (ppm) Specification Electro-photographic, four color (CMYK) tandem transfer printing Four toner cartridges each contain one of four colors: cyan, magenta, yellow or black. Use only premium bond laser printer or copier paper, transparency film, card stock and glossy paper...
Quick Reference Guide
Page 30
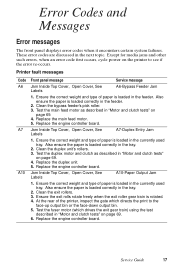
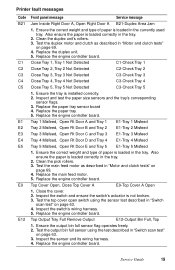
... an error code first occurs, cycle power on page 69. 4. Also ensure the paper is loaded in "Motor and clutch tests" on page 69. 6. Replace the engine controller board. Clean the exit rollers. 3. Replace the engine controller board. Service Guide 17 Clean the bypass feeder's pick roller. 3. Replace the main feed motor. 5. Jam Inside Top Cover, Open Cover, See Labels A10-Paper Output Jam 1. Printer fault messages Code A6 A7 A10 Front panel message Service message Jam Inside Top Cover, Open Cover, See Labels A6-Bypass Feeder Jam 1. Test the duplex motor...
... an error code first occurs, cycle power on page 69. 4. Also ensure the paper is loaded in "Motor and clutch tests" on page 69. 6. Replace the engine controller board. Clean the exit rollers. 3. Replace the engine controller board. Service Guide 17 Clean the bypass feeder's pick roller. 3. Replace the main feed motor. 5. Jam Inside Top Cover, Open Cover, See Labels A10-Paper Output Jam 1. Printer fault messages Code A6 A7 A10 Front panel message Service message Jam Inside Top Cover, Open Cover, See Labels A6-Bypass Feeder Jam 1. Test the duplex motor...
Quick Reference Guide
Page 32
...in the tray. 2. Clean the duplex unit's rollers. 3. Replace the engine controller board. Replace the paper tray. 5. Clean the pick rollers. 3. Replace the engine controller board. Replace the engine controller board. Ensure the tray is not broken. 3. Ensure the output bin full sensor flag operates freely. 2. Service Guide 19 Ensure the correct weight and type of paper is loaded correctly in the currently used tray. Close the cover. 2. Top Output Tray Full Remove Output E12-Output Bin Full, Top 1. Inspect and test the paper size sensors and...
...in the tray. 2. Clean the duplex unit's rollers. 3. Replace the engine controller board. Replace the paper tray. 5. Clean the pick rollers. 3. Replace the engine controller board. Replace the engine controller board. Ensure the tray is not broken. 3. Ensure the output bin full sensor flag operates freely. 2. Service Guide 19 Ensure the correct weight and type of paper is loaded correctly in the currently used tray. Close the cover. 2. Top Output Tray Full Remove Output E12-Output Bin Full, Top 1. Inspect and test the paper size sensors and...

Quick Reference Guide
Page 34
...-voltage power supply. 4. Replace the system controller board. Remove and reinstall the fuser. 2. Replace the engine controller board. Printer fault messages Code EE EF H1 H2 H3 J3 J4 Front panel message Service message Transfer Belt Missing, Reseat Belt EE-Transfer Belt Unit Missing 1. Install a new transfer belt unit. 4. Replace the printer unit chassis. Turn the printer off and on the front-left side of the engine chassis. Disk Full Error, Press Enter to ask for a new fuser, reset the fuser life count using the topic "Consumable count initialization" on page...
...-voltage power supply. 4. Replace the system controller board. Remove and reinstall the fuser. 2. Replace the engine controller board. Printer fault messages Code EE EF H1 H2 H3 J3 J4 Front panel message Service message Transfer Belt Missing, Reseat Belt EE-Transfer Belt Unit Missing 1. Install a new transfer belt unit. 4. Replace the printer unit chassis. Turn the printer off and on the front-left side of the engine chassis. Disk Full Error, Press Enter to ask for a new fuser, reset the fuser life count using the topic "Consumable count initialization" on page...

Quick Reference Guide
Page 35
... controller board. Replace the paper tray. 6. If a new cartridge has been installed but the print engine continues to ask for a new drum unit, reset the drum unit life count using the topic "Consumable count initialization" on page 73. 3. Load Tray # 1 Size 2 Type 3 Load Tray #, Size Type 1. Load the requested size and type of three). Replace the drum unit. 4. Replace the paper tray sensor board. 5. Yellow Toner Empty Replace Yellow Toner J9-Yellow Toner Empty Magenta Toner Empty Replace Magenta Toner J10-Magenta Toner Empty Cyan Toner Empty Replace Cyan Toner...
... controller board. Replace the paper tray. 6. If a new cartridge has been installed but the print engine continues to ask for a new drum unit, reset the drum unit life count using the topic "Consumable count initialization" on page 73. 3. Load Tray # 1 Size 2 Type 3 Load Tray #, Size Type 1. Load the requested size and type of three). Replace the drum unit. 4. Replace the paper tray sensor board. 5. Yellow Toner Empty Replace Yellow Toner J9-Yellow Toner Empty Magenta Toner Empty Replace Magenta Toner J10-Magenta Toner Empty Cyan Toner Empty Replace Cyan Toner...
Quick Reference Guide
Page 39
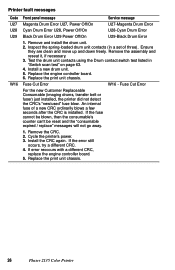
..., if necessary. 3. Replace the print unit chassis. Printer fault messages Code U27 U28 U29 W16 Front panel message Service message Magenta Drum Error U27, Power Off/On U27-Magenta Drum Error Cyan Drum Error U28, Power Off/On U28-Cyan Drum Error Black Drum Error U29 Power Off/On U29-Black Drum Error 1. Remove and install the drum unit. 2. Fuse Cut Error W16 - Inspect the spring-loaded drum unit contacts (in "Switch scan test" on page 63. 4. Remove the CRC. 2. Test the drum unit contacts using the Drum contact switch test listed in a set of a new CRC ordinarily blows...
..., if necessary. 3. Replace the print unit chassis. Printer fault messages Code U27 U28 U29 W16 Front panel message Service message Magenta Drum Error U27, Power Off/On U27-Magenta Drum Error Cyan Drum Error U28, Power Off/On U28-Cyan Drum Error Black Drum Error U29 Power Off/On U29-Black Drum Error 1. Remove and install the drum unit. 2. Fuse Cut Error W16 - Inspect the spring-loaded drum unit contacts (in "Switch scan test" on page 63. 4. Remove the CRC. 2. Test the drum unit contacts using the Drum contact switch test listed in a set of a new CRC ordinarily blows...
Quick Reference Guide
Page 44
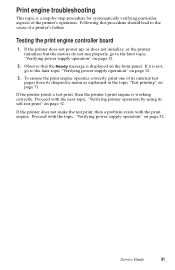
... Ready message is working correctly. If it is not, go to the cause of its internal test pages from its self-test print" on page 32. To ensure the print engine operates correctly, print one of a printer's failure. Service Guide 31 Following this procedure should lead to the later topic, "Verifying power supply operation" on page 32. 2. Print engine troubleshooting This topic is a step-by using its diagnostic menu...
... Ready message is working correctly. If it is not, go to the cause of its internal test pages from its self-test print" on page 32. To ensure the print engine operates correctly, print one of a printer's failure. Service Guide 31 Following this procedure should lead to the later topic, "Verifying power supply operation" on page 32. 2. Print engine troubleshooting This topic is a step-by using its diagnostic menu...
Quick Reference Guide
Page 45
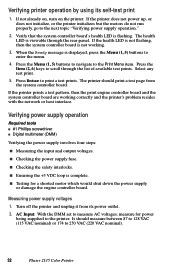
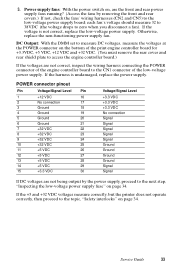
... list of available test prints. Press the Item (2, 6) keys to 250 VAC (220 VAC nominal). 32 Phaser 2135 Color Printer If the printer prints a test pattern, then the print engine controller board and the system controller board are working . 3. Turn off the printer and unplug it from the system controller board. s Checking the power supply fuse. Measuring power supply voltages 1. Press the Menu (1, 5) buttons to navigate to print a test prints. It should print a test page from its self-test print 1. The printer...
... list of available test prints. Press the Item (2, 6) keys to 250 VAC (220 VAC nominal). 32 Phaser 2135 Color Printer If the printer prints a test pattern, then the print engine controller board and the system controller board are working . 3. Turn off the printer and unplug it from the system controller board. s Checking the power supply fuse. Measuring power supply voltages 1. Press the Menu (1, 5) buttons to navigate to print a test prints. It should print a test page from its self-test print 1. The printer...
Quick Reference Guide
Page 46
... and rear power supply fans running? (Access the fans by the power supply, proceed to the low-voltage power supply board; Service Guide 33 3. Power supply fans: With the power switch on, are not being output by removing the front and rear covers.) If not, check the fans' wiring harnesses (CN2 and CN5) to the next step, "Inspecting the low-voltage power supply fuse" on page 34. DC Output: With the DMM set to...
... and rear power supply fans running? (Access the fans by the power supply, proceed to the low-voltage power supply board; Service Guide 33 3. Power supply fans: With the power switch on, are not being output by removing the front and rear covers.) If not, check the fans' wiring harnesses (CN2 and CN5) to the next step, "Inspecting the low-voltage power supply fuse" on page 34. DC Output: With the DMM set to...

Quick Reference Guide
Page 51
.... 7. Replace the paper tray. 38 Phaser 2135 Color Printer Refer to determine the printer's condition. 3. Clean the pick rollers with a clean, dry, lint-free wipe if debris is loaded in good condition and appropriate for this printer should be used . Print the Diagnostic Summary Page to the media specifications in the tray. 4. Ensure the paper is being used from Tray 1 or from the multi-sheet bypass feeder. 5. The customer should be using a quality laser printer paper. The printer...
.... 7. Replace the paper tray. 38 Phaser 2135 Color Printer Refer to determine the printer's condition. 3. Clean the pick rollers with a clean, dry, lint-free wipe if debris is loaded in good condition and appropriate for this printer should be used . Print the Diagnostic Summary Page to the media specifications in the tray. 4. Ensure the paper is being used from Tray 1 or from the multi-sheet bypass feeder. 5. The customer should be using a quality laser printer paper. The printer...
Quick Reference Guide
Page 53
... page 63. Does the pick clutch work properly? For the multi-sheet bypass feeder, ensure the loaded media matches the control panel settings. 2. Is the printer printing within its environmental specifications? Check the motor's wiring harness and connection (HOPFF) to determine the printer's environmental conditions. 3. Test the printer's paper size sensors using the service test "Switch scan test" on the inner-sides of the paper tray cavity. Inspect the tray's paper lift mechanism. 5. Does the paper feed motor run? Replace...
... page 63. Does the pick clutch work properly? For the multi-sheet bypass feeder, ensure the loaded media matches the control panel settings. 2. Is the printer printing within its environmental specifications? Check the motor's wiring harness and connection (HOPFF) to determine the printer's environmental conditions. 3. Test the printer's paper size sensors using the service test "Switch scan test" on the inner-sides of the paper tray cavity. Inspect the tray's paper lift mechanism. 5. Does the paper feed motor run? Replace...
Quick Reference Guide
Page 54
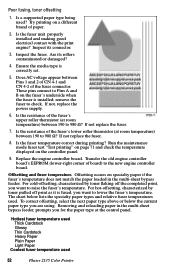
...-free wipe if debris is visible. 4. Is the transfer belt assembly correctly installed? 3. Clean the registration rollers with the service test "Motor and clutch tests" on page 63. 6. Check for a paper scrap in good condition and appropriate for a laser printer? 2. Service Guide 41 Replace the roller, if necessary. 5. Check the paper path for this printer. otherwise jams will occur. 4. Test the manual bypass feeder sensors using the service test "Motor and clutch tests" on page 69. Paper jams at the transfer belt 1. Use only Xerox...
...-free wipe if debris is visible. 4. Is the transfer belt assembly correctly installed? 3. Clean the registration rollers with the service test "Motor and clutch tests" on page 63. 6. Check for a paper scrap in good condition and appropriate for a laser printer? 2. Service Guide 41 Replace the roller, if necessary. 5. Check the paper path for this printer. otherwise jams will occur. 4. Test the manual bypass feeder sensors using the service test "Motor and clutch tests" on page 69. Paper jams at the transfer belt 1. Use only Xerox...
Quick Reference Guide
Page 65
... control panel. For hot-offsetting, characterized by toner flaking off print as it is correctly set. 5. If not replace the fuser. 7. Inspect its rollers contaminated or damaged? 4. If not replace the fuser. 8. To correct offsetting, select the next paper type above or below lists the specialty paper types and relative fuser temperatures used 52 Phaser 2135 Color Printer Removing and reloading paper in the multi-sheet bypass feeder. Poor fusing, toner offsetting 1. Is the fuser unit...
... control panel. For hot-offsetting, characterized by toner flaking off print as it is correctly set. 5. If not replace the fuser. 7. Inspect its rollers contaminated or damaged? 4. If not replace the fuser. 8. To correct offsetting, select the next paper type above or below lists the specialty paper types and relative fuser temperatures used 52 Phaser 2135 Color Printer Removing and reloading paper in the multi-sheet bypass feeder. Poor fusing, toner offsetting 1. Is the fuser unit...
Quick Reference Guide
Page 77
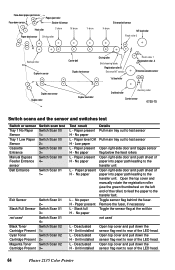
... transfer belt. Remove the fuser, if necessary Toggle the sensor flag at the exit bin not used Black Toner Cartridge Present Cyan Toner Cartridge Present Magenta Toner Cartridge Present Switch Scan 01 2= Switch Scan 01 3= Switch Scan 01 4= Switch Scan 02 1= Switch Scan 02 2= Switch Scan 02 3= Test result L - Deactuated H - Deactuated H - Open top cover and pull down sensor Paper eject roller Stacker full sensor Heat roller C drum M drum Paper eject sensor Driving roller Y drum Entrance belt sensor K drum MT feed roller Pinch roller 2 Backup roller Duplex-in sensor...
... transfer belt. Remove the fuser, if necessary Toggle the sensor flag at the exit bin not used Black Toner Cartridge Present Cyan Toner Cartridge Present Magenta Toner Cartridge Present Switch Scan 01 2= Switch Scan 01 3= Switch Scan 01 4= Switch Scan 02 1= Switch Scan 02 2= Switch Scan 02 3= Test result L - Deactuated H - Deactuated H - Open top cover and pull down sensor Paper eject roller Stacker full sensor Heat roller C drum M drum Paper eject sensor Driving roller Y drum Entrance belt sensor K drum MT feed roller Pinch roller 2 Backup roller Duplex-in sensor...
Quick Reference Guide
Page 78
.... Paper loaded H - Deactuated L - Deactuated Density Value ***H Density Value ***H Manually feed a sheet of the tray cavity Color value in a hole below the registration rollers. not used not used L - Full Details Open top cover and pull down the sensor flag next to light. Paper L - Open top cover Open right-side door Remove the drum units and the transfer belt. Actuated H - The default is too high, clean any toner dust off the sensor lens and test again. Unit installed L - Actuated H - not used Switch Scan 09 2= Test...
.... Paper loaded H - Deactuated L - Deactuated Density Value ***H Density Value ***H Manually feed a sheet of the tray cavity Color value in a hole below the registration rollers. not used not used L - Full Details Open top cover and pull down the sensor flag next to light. Paper L - Open top cover Open right-side door Remove the drum units and the transfer belt. Actuated H - The default is too high, clean any toner dust off the sensor lens and test again. Unit installed L - Actuated H - not used Switch Scan 09 2= Test...
Quick Reference Guide
Page 81
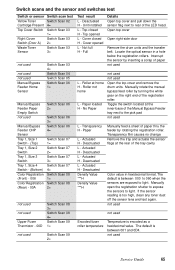
... unit to test sensor not used not used Open door to test. 68 Phaser 2135 Color Printer Paper present H - Installed H - Missing L - The default is encoded as a hexidecimal value. Actuated H - Opened H - Tests the imaging drum up/down sensor. Switch scans and the sensor and switches test Switch or sensor Switch scan test Tray 5, Size 1 Switch Scan 21 Switch - (Top) 1= Tray 5, Size 2 Switch Scan 21 Switch 2= Tray 5, Size 3 Switch Scan 21 Switch 3= Tray 5, Size 4 Switch Scan 21 Switch - (Bottom) 4= Tray 5 No Paper Switch Scan 22 Sensor 1= Tray 5 Low Paper Switch...
... unit to test sensor not used not used Open door to test. 68 Phaser 2135 Color Printer Paper present H - Installed H - Missing L - The default is encoded as a hexidecimal value. Actuated H - Opened H - Tests the imaging drum up/down sensor. Switch scans and the sensor and switches test Switch or sensor Switch scan test Tray 5, Size 1 Switch Scan 21 Switch - (Top) 1= Tray 5, Size 2 Switch Scan 21 Switch 2= Tray 5, Size 3 Switch Scan 21 Switch 3= Tray 5, Size 4 Switch Scan 21 Switch - (Bottom) 4= Tray 5 No Paper Switch Scan 22 Sensor 1= Tray 5 Low Paper Switch...
Quick Reference Guide
Page 95
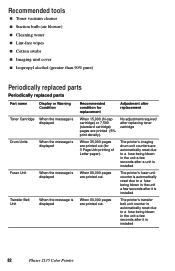
... replacement Toner Cartridge When the message is installed 82 Phaser 2135 Color Printer The printer's fuser unit counter is automatically reset due to a fuse being blown in the unit a few seconds after a unit is installed Fuser Unit When the message is When 80,000 pages displayed are printed (5% print density). Recommended tools s Toner vacuum cleaner s Suction bulb (air blower) s Cleaning water s Lint-free wipes s Cotton swabs s Imaging unit cover s Isopropyl alcohol (greater than 90% pure) Periodically replaced parts Periodically replaced parts Part name Display...
... replacement Toner Cartridge When the message is installed 82 Phaser 2135 Color Printer The printer's fuser unit counter is automatically reset due to a fuse being blown in the unit a few seconds after a unit is installed Fuser Unit When the message is When 80,000 pages displayed are printed (5% print density). Recommended tools s Toner vacuum cleaner s Suction bulb (air blower) s Cleaning water s Lint-free wipes s Cotton swabs s Imaging unit cover s Isopropyl alcohol (greater than 90% pure) Periodically replaced parts Periodically replaced parts Part name Display...


