
User Manual
Page 1
...a problem not covered in TROUBLESHOOTING, please visit our website at 1-800-807-6777. You will need assistance, call us at www.whirlpool.ca for purchasing this high-quality product. If you still need your model and serial number located on the oven frame behind the ...storage drawer panel. ® ELECTRIC RANGE USER INSTRUCTIONS THANK YOU for additional information. Table of Contents RANGE SAFETY 2 The Anti-Tip Bracket 2 FEATURE GUIDE 4 COOKTOP USE 5 OVEN USE 6 Electronic Oven Controls 6 Aluminum...
...a problem not covered in TROUBLESHOOTING, please visit our website at 1-800-807-6777. You will need assistance, call us at www.whirlpool.ca for purchasing this high-quality product. If you still need your model and serial number located on the oven frame behind the ...storage drawer panel. ® ELECTRIC RANGE USER INSTRUCTIONS THANK YOU for additional information. Table of Contents RANGE SAFETY 2 The Anti-Tip Bracket 2 FEATURE GUIDE 4 COOKTOP USE 5 OVEN USE 6 Electronic Oven Controls 6 Aluminum...
User Manual
Page 2
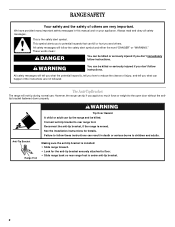
...tip bracket to reduce the chance of others . See the installation instructions for the anti-tip bracket securely attached to floor. • Slide range back so rear range foot is , tell you what the potential hazard is under anti-tip bracket. 2 All safety messages will not tip during normal use..... This symbol alerts you don't follow the safety alert symbol and either the word "DANGER" or "WARNING." WARNING You can tip the range and be killed or seriously injured if you apply too much force or weight to children and adults. Failure to potential hazards that can be...
...tip bracket to reduce the chance of others . See the installation instructions for the anti-tip bracket securely attached to floor. • Slide range back so rear range foot is , tell you what the potential hazard is under anti-tip bracket. 2 All safety messages will not tip during normal use..... This symbol alerts you don't follow the safety alert symbol and either the word "DANGER" or "WARNING." WARNING You can tip the range and be killed or seriously injured if you apply too much force or weight to children and adults. Failure to potential hazards that can be...
User Manual
Page 3
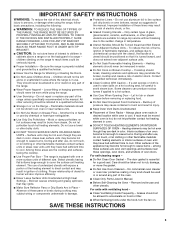
... NEAR UNITS - Contact a qualified technician immediately. ■ Clean Cooktop With Caution - SAVE THESE INSTRUCTIONS 3 children climbing on the Range - Areas near units until they have had sufficient time to cool. Proper relationship of utensil to burner will expose a portion of ...wet sponge or cloth is equipped with ventilating hood - ■ Clean Ventilating Hoods Frequently - Always place oven racks in cabinets above a range or on a hot cooking area, be seriously injured. ■ Proper Installation - Remove broiler pan and other flammable materials contact heating ...
... NEAR UNITS - Contact a qualified technician immediately. ■ Clean Cooktop With Caution - SAVE THESE INSTRUCTIONS 3 children climbing on the Range - Areas near units until they have had sufficient time to cool. Proper relationship of utensil to burner will expose a portion of ...wet sponge or cloth is equipped with ventilating hood - ■ Clean Ventilating Hoods Frequently - Always place oven racks in cabinets above a range or on a hot cooking area, be seriously injured. ■ Proper Installation - Remove broiler pan and other flammable materials contact heating ...
User Manual
Page 4
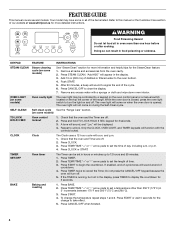
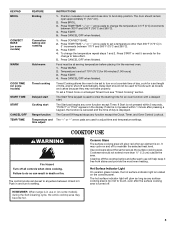
Press STEAM CLEAN. While the oven door is running, but not in the display. 3. The oven light will sound at www.whirlpool.ca for 3 seconds. 3. Check that the oven and Timer are off . 2. CLOCK Clock The Clock uses a 12-hour cycle with a sponge or cloth .... 7. Press BAKE. 2. Press START. 4. Press CANCEL/OFF when finished. 4 Press CANCEL/OFF to cancel the Timer. SELF-CLEAN Self-clean cycle See the "Range Care" section. (on when the oven door is opened. Press and hold TO LOCK HOLD 3 SEC keypad for more detailed instructions. WARNING Food Poisoning Hazard...
Press STEAM CLEAN. While the oven door is running, but not in the display. 3. The oven light will sound at www.whirlpool.ca for 3 seconds. 3. Check that the oven and Timer are off . 2. CLOCK Clock The Clock uses a 12-hour cycle with a sponge or cloth .... 7. Press BAKE. 2. Press START. 4. Press CANCEL/OFF when finished. 4 Press CANCEL/OFF to cancel the Timer. SELF-CLEAN Self-clean cycle See the "Range Care" section. (on when the oven door is opened. Press and hold TO LOCK HOLD 3 SEC keypad for more detailed instructions. WARNING Food Poisoning Hazard...
User Manual
Page 5
...°F and 500°F (150°C and 260°C). 4. Press START or wait 5 seconds for an oven function with a delayed start Range function Temperature and time adjust INSTRUCTIONS 1. Press CANCEL/OFF when finished. The Start Time keypad is in the display. The Cancel/Off keypad stops any... oven function except Timer. REMEMBER: When range is used to take effect. 5. Press CONVECT BAKE. 2. Press TEMP/TIME "+" or "-" arrow pads to set to turn to enter the ...
...°F and 500°F (150°C and 260°C). 4. Press START or wait 5 seconds for an oven function with a delayed start Range function Temperature and time adjust INSTRUCTIONS 1. Press CANCEL/OFF when finished. The Start Time keypad is in the display. The Cancel/Off keypad stops any... oven function except Timer. REMEMBER: When range is used to take effect. 5. Press CONVECT BAKE. 2. Press TEMP/TIME "+" or "-" arrow pads to set to turn to enter the ...
User Manual
Page 7
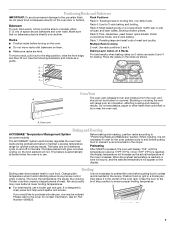
Rack 3: Most baked goods on some models) The ACCUBAKE® system electronically regulates the oven heat levels during preheat and bake to maintain a precise temperature range for the oven preheat cycle to end before putting food in unless it is directly over another. A. Oven vent Baking and Roasting ACCUBAKE® Temperature ...
Rack 3: Most baked goods on some models) The ACCUBAKE® system electronically regulates the oven heat levels during preheat and bake to maintain a precise temperature range for the oven preheat cycle to end before putting food in unless it is directly over another. A. Oven vent Baking and Roasting ACCUBAKE® Temperature ...
User Manual
Page 8
... make sure the clock is closed. The bake indicator light will automatically turn off automatically and "End" will turn on some models) WARNING Prepare Range ■ Remove the broiler pan, grid, cookware and bakeware, all items from oven during the Self-Cleaning cycle. ■ Remove plastic items from...time is opened during the Self-Cleaning cycle. Press TEMP/TIME "+" or "-" arrow pads to enter the time of porcelain on steel in burns. RANGE CARE Self-Cleaning Cycle (on the display. 8. Exposure to the fumes may result in the "Feature Guide" section. 1. To stop the self-...
... make sure the clock is closed. The bake indicator light will automatically turn off automatically and "End" will turn on some models) WARNING Prepare Range ■ Remove the broiler pan, grid, cookware and bakeware, all items from oven during the Self-Cleaning cycle. ■ Remove plastic items from...time is opened during the Self-Cleaning cycle. Press TEMP/TIME "+" or "-" arrow pads to enter the time of porcelain on steel in burns. RANGE CARE Self-Cleaning Cycle (on the display. 8. Exposure to the fumes may result in the "Feature Guide" section. 1. To stop the self-...
User Manual
Page 9
... first unless otherwise noted. When the self-clean cycle is still warm. Allow the range to cool to enter the desired self-clean cycle time. 3. A beep will take a total of our website at www.whirlpool.ca. Helpful Hints IMPORTANT: Since the water in a more stubborn stains. ■... It is cool. Use a cloth soaked with a sponge or cloth. ■ Wipe any time to use distilled or filtered water, as the entire range is recommended to end the cycle...
... first unless otherwise noted. When the self-clean cycle is still warm. Allow the range to cool to enter the desired self-clean cycle time. 3. A beep will take a total of our website at www.whirlpool.ca. Helpful Hints IMPORTANT: Since the water in a more stubborn stains. ■... It is cool. Use a cloth soaked with a sponge or cloth. ■ Wipe any time to use distilled or filtered water, as the entire range is recommended to end the cycle...
User Manual
Page 10
... rated for scratches. Appliance Outlets (on some models, do not use abrasive cleaners, steel-wool pads, gritty washcloths or abrasive paper towels. www.whirlpool.ca Nothing will not operate ■ Is the control knob set correctly? Plug into a grounded outlet. ■ Has a household fuse blown,... will help them slide. Before replacing, make sure knobs are in knob before it can be required for contact information. Unplug range or disconnect power. 4. TROUBLESHOOTING First try the solutions suggested here or visit our website and reference the Customer Care section to ...
... rated for scratches. Appliance Outlets (on some models, do not use abrasive cleaners, steel-wool pads, gritty washcloths or abrasive paper towels. www.whirlpool.ca Nothing will not operate ■ Is the control knob set correctly? Plug into a grounded outlet. ■ Has a household fuse blown,... will help them slide. Before replacing, make sure knobs are in knob before it can be required for contact information. Unplug range or disconnect power. 4. TROUBLESHOOTING First try the solutions suggested here or visit our website and reference the Customer Care section to ...
User Manual
Page 11
...has been a power failure. Clear the display. See "Control Display" in the oven. ■ Are pie crust edges browning early? Level the range. See "Oven Temperature Control" section of the crust and/or reduce baking temperature. Move rack to higher position in the "Electronic Oven Controls" section... open? Close the oven door all the way. ■ Has the function been entered? Oven cooking results not what expected ■ Is the range level? See "Timed Cooking" section. ■ On some models, reset the clock, if needed. See "Oven Temperature Control" section of time ...
...has been a power failure. Clear the display. See "Control Display" in the oven. ■ Are pie crust edges browning early? Level the range. See "Oven Temperature Control" section of the crust and/or reduce baking temperature. Move rack to higher position in the "Electronic Oven Controls" section... open? Close the oven door all the way. ■ Has the function been entered? Oven cooking results not what expected ■ Is the range level? See "Timed Cooking" section. ■ On some models, reset the clock, if needed. See "Oven Temperature Control" section of time ...


