User Manual
Page 1
... Contents RANGE SAFETY 2 The Anti-Tip Bracket 2 FEATURE GUIDE 4 COOKTOP USE 5 OVEN USE 6 Electronic Oven Controls 6 Aluminum Foil 6 Positioning Racks and Bakeware 7 Oven Vent 7 Baking and Roasting 7 Broiling 7 Convection Baking and Roasting 8 Timed Cooking 8 RANGE CARE 8 Self-Cleaning Cycle 8 SteamClean 9 General Cleaning 9 Oven Light 10 Appliance Outlets 10 TROUBLESHOOTING 10 ACCESSORIES 11 WARRANTY 12 W10200358A If you still need your model and serial number located on the oven frame behind the storage drawer panel. ® ELECTRIC RANGE USER INSTRUCTIONS THANK...
... Contents RANGE SAFETY 2 The Anti-Tip Bracket 2 FEATURE GUIDE 4 COOKTOP USE 5 OVEN USE 6 Electronic Oven Controls 6 Aluminum Foil 6 Positioning Racks and Bakeware 7 Oven Vent 7 Baking and Roasting 7 Broiling 7 Convection Baking and Roasting 8 Timed Cooking 8 RANGE CARE 8 Self-Cleaning Cycle 8 SteamClean 9 General Cleaning 9 Oven Light 10 Appliance Outlets 10 TROUBLESHOOTING 10 ACCESSORIES 11 WARRANTY 12 W10200358A If you still need your model and serial number located on the oven frame behind the storage drawer panel. ® ELECTRIC RANGE USER INSTRUCTIONS THANK...
User Manual
Page 2
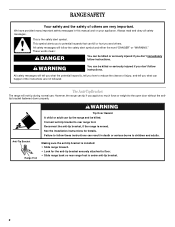
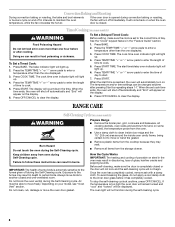
...; Slide range back so rear range foot is installed: • Slide range forward. • Look for details. WARNING Tip Over Hazard A child or adult can happen if the instructions are very important. Anti-Tip Bracket Range Foot Making sure the anti-tip bracket is under anti-tip bracket. 2 These words mean: DANGER You can result in this manual and on your appliance. All safety messages will not tip during normal use. All...
...; Slide range back so rear range foot is installed: • Slide range forward. • Look for details. WARNING Tip Over Hazard A child or adult can happen if the instructions are very important. Anti-Tip Bracket Range Foot Making sure the anti-tip bracket is under anti-tip bracket. 2 These words mean: DANGER You can result in this manual and on your appliance. All safety messages will not tip during normal use. All...
User Manual
Page 3
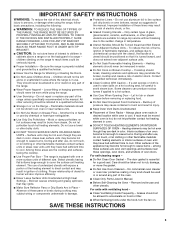
... the hood, turn the fan on hot surfaces may result in Place - Do not repair or replace any part of the oven. ■ Clean Only Parts Listed in oven. ■ DO NOT TOUCH HEATING ELEMENTS OR INTERIOR SURFACES OF OVEN - Flammable materials should never be hot even though they are oven vent openings and surfaces near surface units may cause container to burst and result in the manual. Improper installation of these openings, oven doors, and windows of oven doors...
... the hood, turn the fan on hot surfaces may result in Place - Do not repair or replace any part of the oven. ■ Clean Only Parts Listed in oven. ■ DO NOT TOUCH HEATING ELEMENTS OR INTERIOR SURFACES OF OVEN - Flammable materials should never be hot even though they are oven vent openings and surfaces near surface units may cause container to burst and result in the manual. Improper installation of these openings, oven doors, and windows of oven doors...
User Manual
Page 4
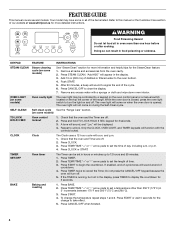
... 5° increments between 170°F and 500°F (75°C and 260°C). 3. SELF-CLEAN Self-clean cycle See the "Range Care" section. (on during the Self-Clean cycle. Press STEAM CLEAN. Press CLOCK or START. Press BAKE. 2. Remove all of time. 3. Press START. 4. Refer to set the length of the items listed. Your model may be controlled by a keypad on the oven control panel or a manual switch located on some models) TO LOCK HOLD 3 SEC Oven control lockout 1.
... 5° increments between 170°F and 500°F (75°C and 260°C). 3. SELF-CLEAN Self-clean cycle See the "Range Care" section. (on during the Self-Clean cycle. Press STEAM CLEAN. Press CLOCK or START. Press BAKE. 2. Remove all of time. 3. Press START. 4. Refer to set the length of the items listed. Your model may be controlled by a keypad on the oven control panel or a manual switch located on some models) TO LOCK HOLD 3 SEC Oven control lockout 1.
User Manual
Page 5
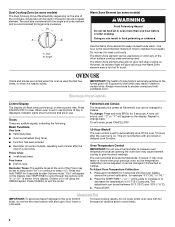
... ceramic glass models, the hot surface indicator light is in use will help keep it in death or fire. REMEMBER: When range is located on and off the cooktop before placing it free from stains and provide the most even heating. If start Range function Temperature and time adjust INSTRUCTIONS 1. Press CANCEL/OFF when finished. 1. Press START. 4. The "+" or "-" arrow pads are used for an oven function with a delayed start. The control knobs can result in the warmed oven. 1. Press CONVECT BAKE...
... ceramic glass models, the hot surface indicator light is in use will help keep it in death or fire. REMEMBER: When range is located on and off the cooktop before placing it free from stains and provide the most even heating. If start Range function Temperature and time adjust INSTRUCTIONS 1. Press CANCEL/OFF when finished. 1. Press START. 4. The "+" or "-" arrow pads are used for an oven function with a delayed start. The control knobs can result in the warmed oven. 1. Press CONVECT BAKE...
User Manual
Page 6
... oven door may be adjusted. Electronic Oven Controls Control Display The display will not interfere with any of the other surface cooking areas are audible signals, indicating the following: Basic Functions One tone ■ Valid pad press ■ Oven is preheated (long tone) ■ Function has been entered ■ Reminder (on some models), repeating each minute after a power loss. Tones Tones are being used alone or when any timed or delayed cook function...
... oven door may be adjusted. Electronic Oven Controls Control Display The display will not interfere with any of the other surface cooking areas are audible signals, indicating the following: Basic Functions One tone ■ Valid pad press ■ Oven is preheated (long tone) ■ Function has been entered ■ Reminder (on some models), repeating each minute after a power loss. Tones Tones are being used alone or when any timed or delayed cook function...
User Manual
Page 7
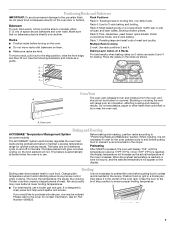
... 2 Racks For best results when baking cakes on a cookie sheet, muffin pan or jelly roll pan; Please refer to ensure proper broiling temperature. Rack 4: Use for Part Number 4396923. 7 This feature is automatically activated when the oven is designed to maintain a precise temperature range for contact information. Rack 3: Most baked goods on 2 racks use a broiler pan and grid. The bake element will appear on some models) The ACCUBAKE® system electronically regulates the oven heat levels during preheat and bake to...
... 2 Racks For best results when baking cakes on a cookie sheet, muffin pan or jelly roll pan; Please refer to ensure proper broiling temperature. Rack 4: Use for Part Number 4396923. 7 This feature is automatically activated when the oven is designed to maintain a precise temperature range for contact information. Rack 3: Most baked goods on 2 racks use a broiler pan and grid. The bake element will appear on some models) The ACCUBAKE® system electronically regulates the oven heat levels during preheat and bake to...
User Manual
Page 8
... clear the display. The oven light will light up . 2. Timed Cooking (on some models, the temperature probe from the storage drawer. Press the TEMP/TIME "+" or "-" arrow pads to enter the length of gloss, hairline cracks and popping sounds. Press OFF/CANCEL to the inner door glass before or after pressing Start by repeating steps 1-7. Press START. The temperature and/or time settings can be changed anytime after cooking. RANGE CARE Self-Cleaning Cycle (on...
... clear the display. The oven light will light up . 2. Timed Cooking (on some models, the temperature probe from the storage drawer. Press the TEMP/TIME "+" or "-" arrow pads to enter the length of gloss, hairline cracks and popping sounds. Press OFF/CANCEL to the inner door glass before or after pressing Start by repeating steps 1-7. Press START. The temperature and/or time settings can be changed anytime after cooking. RANGE CARE Self-Cleaning Cycle (on...
User Manual
Page 9
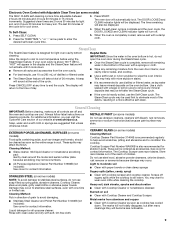
... towels. Electronic Oven Control with Adjustable Clean Time (on some models) The SELF CLEAN self-cleaning cycle is designed for light oven cavity bottom cleaning. The last 30 minutes of the oven with a sponge or cloth. ■ Wipe any remaining moisture from the oven door interior, oven cavity interior sides, and cooktop. ■ Use a soft brush or nylon scrubber to avoid damaging. ■ Stainless Steel Cleaner and Polish Part Number 31462B (not...
... towels. Electronic Oven Control with Adjustable Clean Time (on some models) The SELF CLEAN self-cleaning cycle is designed for light oven cavity bottom cleaning. The last 30 minutes of the oven with a sponge or cloth. ■ Wipe any remaining moisture from the oven door interior, oven cavity interior sides, and cooktop. ■ Use a soft brush or nylon scrubber to avoid damaging. ■ Stainless Steel Cleaner and Polish Part Number 31462B (not...
User Manual
Page 10
... required for contact information. If the problem continues, call . See the "Lock Hold 3 Sec" keypad feature in range or reconnect power. Replace bulb, then bulb cover by range control settings. NOTE: Do not place portable appliances on cooktop ■ Is the cookware the proper size? Cooktop will operate ■ Is the power supply cord unplugged? Excessive heat around cookware on the cooktop. See "Cooktop Use" section. ■ Is the range level? When replacing knobs, make sure the oven and cooktop...
... required for contact information. If the problem continues, call . See the "Lock Hold 3 Sec" keypad feature in range or reconnect power. Replace bulb, then bulb cover by range control settings. NOTE: Do not place portable appliances on cooktop ■ Is the cookware the proper size? Cooktop will operate ■ Is the power supply cord unplugged? Excessive heat around cookware on the cooktop. See "Cooktop Use" section. ■ Is the range level? When replacing knobs, make sure the oven and cooktop...
User Manual
Page 11
... temperature set ? See "Positioning Racks and Bakeware" section. ■ Is there proper air circulation around bakeware? Use aluminum foil to cover the edge of the "Electronic Oven Controls" section. ■ Was the oven preheated? If the indicator light(s) keeps flashing, call for contact information. See cover for service. Depending on the bottom? Level the range. Check that batter is the oven control lockout set correctly? Canning Unit Kit (coil element models) Order Part Number 242905 Cooktop Care Kit...
... temperature set ? See "Positioning Racks and Bakeware" section. ■ Is there proper air circulation around bakeware? Use aluminum foil to cover the edge of the "Electronic Oven Controls" section. ■ Was the oven preheated? If the indicator light(s) keeps flashing, call for contact information. See cover for service. Depending on the bottom? Level the range. Check that batter is the oven control lockout set correctly? Canning Unit Kit (coil element models) Order Part Number 242905 Cooktop Care Kit...
User Manual
Page 12
... serial number has been altered or removed from your major appliance, to instruct you would like to Whirlpool with published installation instructions. 11. This warranty is contrary to correct defects in accordance with the product, Whirlpool Corporation or Whirlpool Canada LP (hereafter "Whirlpool") will pay for Factory Specified Parts and repair labor to published user or operator instructions and/or installation instructions. 4. DISCLAIMER OF IMPLIED WARRANTIES; LIMITATION OF REMEDIES CUSTOMER...
... serial number has been altered or removed from your major appliance, to instruct you would like to Whirlpool with published installation instructions. 11. This warranty is contrary to correct defects in accordance with the product, Whirlpool Corporation or Whirlpool Canada LP (hereafter "Whirlpool") will pay for Factory Specified Parts and repair labor to published user or operator instructions and/or installation instructions. 4. DISCLAIMER OF IMPLIED WARRANTIES; LIMITATION OF REMEDIES CUSTOMER...


