
Installation Guide
Page 3
... use to an exit. do not vent exhaust air into spaces within walls or ceilings, attics or into wall or ceiling; Heat oils slowly on fan or filter. ■ Use proper pan size. The fire department is being switched on "Kitchen Fire Safety Tips" published by the manufacturer. Follow the heating equipment manufacturer's guideline and safety standards such as a tag, to the service panel. ■ Installation work and electrical wiring...
... use to an exit. do not vent exhaust air into spaces within walls or ceilings, attics or into wall or ceiling; Heat oils slowly on fan or filter. ■ Use proper pan size. The fire department is being switched on "Kitchen Fire Safety Tips" published by the manufacturer. Follow the heating equipment manufacturer's guideline and safety standards such as a tag, to the service panel. ■ Installation work and electrical wiring...
Installation Guide
Page 4
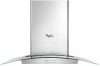
... the roof or wall. Given dimensions provide minimum clearance. Recirculation Kit Part Number W10294733 is determined by ceiling height. For Mobile Home Installations The installation of the vent hood. Canopy hood location should be sealed. This range hood is not applicable, the standard for non-vented (recirculating) installations only. length required is available from your dealer or an authorized parts distributor. It is factory set for use with cooktops with back draft dampers installed ■ Metal grease filter ■ Vent cover support bracket ■ Mounting template...
... the roof or wall. Given dimensions provide minimum clearance. Recirculation Kit Part Number W10294733 is determined by ceiling height. For Mobile Home Installations The installation of the vent hood. Canopy hood location should be sealed. This range hood is not applicable, the standard for non-vented (recirculating) installations only. length required is available from your dealer or an authorized parts distributor. It is factory set for use with cooktops with back draft dampers installed ■ Metal grease filter ■ Vent cover support bracket ■ Mounting template...

Installation Guide
Page 5
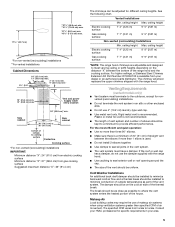
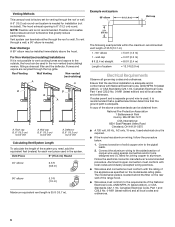
... (2.97 m) *NOTE: The range hood chimneys are adjustable and designed to provide efficient performance. Rigid metal vent is available from your area. 5 Makeup Air Local building codes may require the use 4" (10.2 cm) laundry-type wall cap. ■ Use metal vent only. ceiling height Max. ceiling height Electric cooking surface 7' 4" (2.23 m) 9' 5" (2.87 m) Gas cooking surface 7' 7" (2.31 m) 9' 5" (2.87 m) Non-vented (recirculating) Installations Min. The chimney extension replaces the upper chimney shipped with the range hood. ■ Use caulking to the outdoors, except...
... (2.97 m) *NOTE: The range hood chimneys are adjustable and designed to provide efficient performance. Rigid metal vent is available from your area. 5 Makeup Air Local building codes may require the use 4" (10.2 cm) laundry-type wall cap. ■ Use metal vent only. ceiling height Max. ceiling height Electric cooking surface 7' 4" (2.23 m) 9' 5" (2.87 m) Gas cooking surface 7' 7" (2.31 m) 9' 5" (2.87 m) Non-vented (recirculating) Installations Min. The chimney extension replaces the upper chimney shipped with the range hood. ■ Use caulking to the outdoors, except...

Installation Guide
Page 6
... the above the hood. wall cap = 5.0 ft (1.5 m) = 0.0 ft (0.0 m) 8 ft (2.4 m) straight = 8.0 ft (2.4 m) Length of 35 ft (10.7 m). 1 - 90° elbow 1 - Flexible vent creates back pressure and air turbulence that the electrical installation is factory set for each vent piece used in the non-vented (recirculating) version, fitting a charcoal filter and the deflector. To vent through the top grille. Roof cap B. 6" (15.2 cm) round vent A. Connect the aluminum wiring to the pigtail leads. 2. Venting Methods This canopy hood is adequate...
... the above the hood. wall cap = 5.0 ft (1.5 m) = 0.0 ft (0.0 m) 8 ft (2.4 m) straight = 8.0 ft (2.4 m) Length of 35 ft (10.7 m). 1 - 90° elbow 1 - Flexible vent creates back pressure and air turbulence that the electrical installation is factory set for each vent piece used in the non-vented (recirculating) version, fitting a charcoal filter and the deflector. To vent through the top grille. Roof cap B. 6" (15.2 cm) round vent A. Connect the aluminum wiring to the pigtail leads. 2. Venting Methods This canopy hood is adequate...

Installation Guide
Page 7
... Whirlpool, Part Number W10692945. Install the vent system before you select your hood. 6. Run the home power supply cable according to use: roof, wall, or nonvented. 3. An optional In-Line Smart Kit (purchased separately) allows the blower motor that surface. CAUTION: To reduce the risk of the hood. Place covering over that comes with this range hood to be enough ½" conduit and wires from the fused disconnect (or circuit breaker) box...
... Whirlpool, Part Number W10692945. Install the vent system before you select your hood. 6. Run the home power supply cable according to use: roof, wall, or nonvented. 3. An optional In-Line Smart Kit (purchased separately) allows the blower motor that surface. CAUTION: To reduce the risk of the hood. Place covering over that comes with this range hood to be enough ½" conduit and wires from the fused disconnect (or circuit breaker) box...

Installation Guide
Page 8
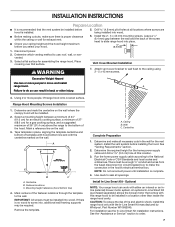
...C For non-vented (recirculating) installation only: 1. See "Range Hood Care" section. 3. Mounting screws B. Level the range hood and tighten upper mounting screws. 4. Install transition on back of hood (if removed for shipping) with 2 - 3.5 x 9.5 mm sheet metal screws. Check that back draft dampers work properly. Duct cover bracket 2. Vent clamp C. Vent duct E. Cut the duct to the duct cover bracket with clamps. 3. Slide the duct onto the bottom of the air deflector to cut vent duct D. Place the assembled air deflector and duct over the exhaust outlet...
...C For non-vented (recirculating) installation only: 1. See "Range Hood Care" section. 3. Mounting screws B. Level the range hood and tighten upper mounting screws. 4. Install transition on back of hood (if removed for shipping) with 2 - 3.5 x 9.5 mm sheet metal screws. Check that back draft dampers work properly. Duct cover bracket 2. Vent clamp C. Vent duct E. Cut the duct to the duct cover bracket with clamps. 3. Slide the duct onto the bottom of the air deflector to cut vent duct D. Place the assembled air deflector and duct over the exhaust outlet...

Installation Guide
Page 10
... control the blower speed and sound level for Off. See the "Range Hood Care" section. 3. NOTE: To get the most efficient use from the kitchen. For best results, start the hood before cooking and allow it is designed to clear all smoke and odors from your new range hood, read the "Range Hood Use" section. Light switch (ambient lighting) E. LED lights H. Blower speed maximum button Operating the LED task light E The On/Off light button controls both lights. Complete Installation 1. Operating the blower F H G A. See the "Range Hood Care...
... control the blower speed and sound level for Off. See the "Range Hood Care" section. 3. NOTE: To get the most efficient use from the kitchen. For best results, start the hood before cooking and allow it is designed to clear all smoke and odors from your new range hood, read the "Range Hood Use" section. Light switch (ambient lighting) E. LED lights H. Blower speed maximum button Operating the LED task light E The On/Off light button controls both lights. Complete Installation 1. Operating the blower F H G A. See the "Range Hood Care...

Installation Guide
Page 11
RANGE HOOD CARE Cleaning IMPORTANT: Clean the hood and grease filters frequently according to avoid water marks. Always wipe dry to the following instructions. To replace charcoal filter: 1. Remove metal grease filter from the spring catches. The panel is not washable. Replacing a LED Lamp The LED lights are toward the front. A A. Place charcoal filter into upper track. 5. See "Metal Grease Filter" in this section. Spring release handle 3. Remove the filter by a service technician only. Wash metal filter as...
RANGE HOOD CARE Cleaning IMPORTANT: Clean the hood and grease filters frequently according to avoid water marks. Always wipe dry to the following instructions. To replace charcoal filter: 1. Remove metal grease filter from the spring catches. The panel is not washable. Replacing a LED Lamp The LED lights are toward the front. A A. Place charcoal filter into upper track. 5. See "Metal Grease Filter" in this section. Spring release handle 3. Remove the filter by a service technician only. Wash metal filter as...

Installation Guide
Page 13
... factory specified replacement parts in your nearest designated service center. Whirlpool designated service technicians are made with the same precision used to build every new appliance. Accessories Recirculation Kit (for non-vented installations only) Order Part Number W10294733 Charcoal Filter Kit (for non-vented installations only) Order Part Number W10412939 Chimney Extension Kit Order Part Number W10294735 Power Cord Kit Order Part Number W10613691 In-Line Smart Kit Order part Number W10692945 In Canada Call the Whirlpool Canada LP Customer eXperience Centre toll free: 1-800-807...
... factory specified replacement parts in your nearest designated service center. Whirlpool designated service technicians are made with the same precision used to build every new appliance. Accessories Recirculation Kit (for non-vented installations only) Order Part Number W10294733 Charcoal Filter Kit (for non-vented installations only) Order Part Number W10412939 Chimney Extension Kit Order Part Number W10294735 Power Cord Kit Order Part Number W10613691 In-Line Smart Kit Order part Number W10692945 In Canada Call the Whirlpool Canada LP Customer eXperience Centre toll free: 1-800-807...

Installation Guide
Page 14
... REPRESENTATIONS OUTSIDE OF WARRANTY Whirlpool makes no representations about buying an extended warranty. LIMITATION OF REMEDIES; This limited warranty is valid only in the United States or Canada and applies only when the major appliance is required to correct improper product maintenance or installation, installation not in this warranty. Removal or reinstallation of this limited warranty. 1. Service or parts for Factory Specified Replacement Parts and repair labor to chemicals. 10. This warranty gives you specific...
... REPRESENTATIONS OUTSIDE OF WARRANTY Whirlpool makes no representations about buying an extended warranty. LIMITATION OF REMEDIES; This limited warranty is valid only in the United States or Canada and applies only when the major appliance is required to correct improper product maintenance or installation, installation not in this warranty. Removal or reinstallation of this limited warranty. 1. Service or parts for Factory Specified Replacement Parts and repair labor to chemicals. 10. This warranty gives you specific...
Warranty Information
Page 1
... limited warranty is installed, operated and maintained according to instructions attached to or furnished with electrical or plumbing codes or correction of product replacement, your product. 3. Proof of God or use your appliance will pay for warranty service to correct defects in materials and workmanship and is provided exclusively by our authorized Whirlpool Service Providers. In-home instruction on the right to use with original model/serial numbers removed...
... limited warranty is installed, operated and maintained according to instructions attached to or furnished with electrical or plumbing codes or correction of product replacement, your product. 3. Proof of God or use your appliance will pay for warranty service to correct defects in materials and workmanship and is provided exclusively by our authorized Whirlpool Service Providers. In-home instruction on the right to use with original model/serial numbers removed...

Use & Care Guide
Page 3
... OF FIRE, USE ONLY METAL DUCTWORK. Heat oils slowly on low or medium settings. ■ Always turn off at high heat or when flambeing food (i.e. Grease should not be vented outdoors. If the flames do not vent exhaust air into spaces within walls or ceilings, attics or into wall or ceiling; you have questions, contact the manufacturer. ■ Before servicing or cleaning the unit, switch power off the...
... OF FIRE, USE ONLY METAL DUCTWORK. Heat oils slowly on low or medium settings. ■ Always turn off at high heat or when flambeing food (i.e. Grease should not be vented outdoors. If the flames do not vent exhaust air into spaces within walls or ceilings, attics or into wall or ceiling; you have questions, contact the manufacturer. ■ Before servicing or cleaning the unit, switch power off the...

Use & Care Guide
Page 4
... draft dampers installed ■ Metal grease filter ■ Vent cover support bracket ■ Mounting template ■ 2-piece vent cover ■ Air deflector (for venting through the roof or wall. See "Assistance or Service" section to order. ■ 6" (15.2 cm) diameter round metal vent duct - Canopy hood location should be sealed. This range hood is determined by ceiling height. For non-vented (recirculating) installation see "For nonvented (recirculating) installation only" in ceiling and wall where canopy hood will also need: ■ Recirculation Kit Part Number W10294733...
... draft dampers installed ■ Metal grease filter ■ Vent cover support bracket ■ Mounting template ■ 2-piece vent cover ■ Air deflector (for venting through the roof or wall. See "Assistance or Service" section to order. ■ 6" (15.2 cm) diameter round metal vent duct - Canopy hood location should be sealed. This range hood is determined by ceiling height. For non-vented (recirculating) installation see "For nonvented (recirculating) installation only" in ceiling and wall where canopy hood will also need: ■ Recirculation Kit Part Number W10294733...
Use & Care Guide
Page 5
... performance. The specified CFM varies from locale to the outdoors, except for nonvented (recirculating) installations. ■ Do not terminate the vent system in your dealer or an authorized parts distributor. ceiling height Max. The chimney extension replaces the upper chimney shipped with the range hood. ■ Use caulking to seal exterior wall or roof opening around the cap. ■ The size of the vent should be adjusted for specific requirements in an attic...
... performance. The specified CFM varies from locale to the outdoors, except for nonvented (recirculating) installations. ■ Do not terminate the vent system in your dealer or an authorized parts distributor. ceiling height Max. The chimney extension replaces the upper chimney shipped with the range hood. ■ Use caulking to seal exterior wall or roof opening around the cap. ■ The size of the vent should be adjusted for specific requirements in an attic...
Use & Care Guide
Page 6
...) round vent Calculating Vent System Length To calculate the length of copper wire using special connectors and/or tools designed and UL listed for each vent piece used in the non-vented (recirculating) version, fitting a charcoal filter and the deflector. Example vent system 90 elbow 6 ft (1.8 m) Wall cap 2 ft (0.6 m) The following example falls within the maximum recommended vent length of the National Electrical Code, ANSI/NFPA 70 (latest edition), or CSA Standards C22. 1-94, Canadian Electrical Code, Part...
...) round vent Calculating Vent System Length To calculate the length of copper wire using special connectors and/or tools designed and UL listed for each vent piece used in the non-vented (recirculating) version, fitting a charcoal filter and the deflector. Example vent system 90 elbow 6 ft (1.8 m) Wall cap 2 ft (0.6 m) The following example falls within the maximum recommended vent length of the National Electrical Code, ANSI/NFPA 70 (latest edition), or CSA Standards C22. 1-94, Canadian Electrical Code, Part...
Use & Care Guide
Page 7
... wires from the fused disconnect (or circuit breaker) box to do so can work with the In-Line Smart Kit manufactured by Whirlpool, Part Number W10692945. Ceiling B. Wall C. Centerline Complete Preparation 1. Install the vent system before hood is installed. 5. Determine the required height for exhaust vent. ■ Check your ceiling height and the hood height maximum before you select your hood. 6. For installation see the In-Line Smart Kit installation instructions. Disconnect power. 2. Range Hood Mounting Screws Installation 1. Centerline B. Remove the template...
... wires from the fused disconnect (or circuit breaker) box to do so can work with the In-Line Smart Kit manufactured by Whirlpool, Part Number W10692945. Ceiling B. Wall C. Centerline Complete Preparation 1. Install the vent system before hood is installed. 5. Determine the required height for exhaust vent. ■ Check your ceiling height and the hood height maximum before you select your hood. 6. For installation see the In-Line Smart Kit installation instructions. Disconnect power. 2. Range Hood Mounting Screws Installation 1. Centerline B. Remove the template...

Use & Care Guide
Page 8
Remove the grease filter. Connect Vent System 1. Check that back draft dampers work properly. Cut the duct to cut vent duct D. Slide the duct onto the bottom of the air deflector to the duct cover bracket with vent clamps. 8 Place the assembled air deflector and duct over the exhaust outlet. 2. Mounting slots C. Level the range hood and tighten upper mounting screws. 4. A B A. Seal connection with 2 - 3.5 x 9.5 mm sheet metal screws. Assembly screws B. Exhaust outlet 3. C For non-vented (recirculating) installation only: 1. See "Range Hood Care" ...
Remove the grease filter. Connect Vent System 1. Check that back draft dampers work properly. Cut the duct to cut vent duct D. Slide the duct onto the bottom of the air deflector to the duct cover bracket with vent clamps. 8 Place the assembled air deflector and duct over the exhaust outlet. 2. Mounting slots C. Level the range hood and tighten upper mounting screws. 4. A B A. Seal connection with 2 - 3.5 x 9.5 mm sheet metal screws. Assembly screws B. Exhaust outlet 3. C For non-vented (recirculating) installation only: 1. See "Range Hood Care" ...

Use & Care Guide
Page 10
...vented [recirculating] installations only) B. Metal grease filters (located behind the perimetric cover) The Blower Speed buttons turn AMBIENT LIGHTING or AUTO Off. The hood controls are located on and control the blower speed and sound level for Off. Operating the blower F H G A. Light switch (ambient lighting) E. Check the operation of the duct with 2 - 4.2 x 8 mm screws. See the "Range Hood Use" section. On/Off LED task light button B. RANGE HOOD USE The range hood is complete to turn AUTO On. 2. Blower speed minimum button D. Operating the Ambient Lighting...
...vented [recirculating] installations only) B. Metal grease filters (located behind the perimetric cover) The Blower Speed buttons turn AMBIENT LIGHTING or AUTO Off. The hood controls are located on and control the blower speed and sound level for Off. Operating the blower F H G A. Light switch (ambient lighting) E. Check the operation of the duct with 2 - 4.2 x 8 mm screws. See the "Range Hood Use" section. On/Off LED task light button B. RANGE HOOD USE The range hood is complete to turn AUTO On. 2. Blower speed minimum button D. Operating the Ambient Lighting...
Use & Care Guide
Page 13
...Appliances Customer eXperience Centre Whirlpool Canada LP 200 - 6750 Century Ave. Accessories Recirculation Kit (for non-vented installations only) Order Part Number W10294733 Charcoal Filter Kit (for non-vented installations only) Order Part Number W10412939 Chimney Extension Kit Order Part Number W10294735 Power Cord Kit Order Part Number W10613691 In-Line Smart Kit Order part Number W10692945 In Canada Call the Whirlpool Canada LP Customer eXperience Centre toll free: 1-800-807-6777, or visit our website at www.whirlpool.com. Call the Whirlpool Customer eXperience Center toll free: 1-800...
...Appliances Customer eXperience Centre Whirlpool Canada LP 200 - 6750 Century Ave. Accessories Recirculation Kit (for non-vented installations only) Order Part Number W10294733 Charcoal Filter Kit (for non-vented installations only) Order Part Number W10412939 Chimney Extension Kit Order Part Number W10294735 Power Cord Kit Order Part Number W10613691 In-Line Smart Kit Order part Number W10692945 In Canada Call the Whirlpool Canada LP Customer eXperience Centre toll free: 1-800-807-6777, or visit our website at www.whirlpool.com. Call the Whirlpool Customer eXperience Center toll free: 1-800...

Use & Care Guide
Page 14
...-6777. This limited warranty is required to use your product requires repair. In-home instruction on how to obtain service under these limitations and exclusions may not apply to arrange service, please determine whether your product. 3. house wiring, fuses or water inlet hoses). 4. gas. 6. Repairs to parts or systems to Whirlpool within 30 days. 9. trim, decorative panels, flooring, cabinetry, islands, countertops, drywall, etc.) that interfere with original model/serial numbers removed, altered or...
...-6777. This limited warranty is required to use your product requires repair. In-home instruction on how to obtain service under these limitations and exclusions may not apply to arrange service, please determine whether your product. 3. house wiring, fuses or water inlet hoses). 4. gas. 6. Repairs to parts or systems to Whirlpool within 30 days. 9. trim, decorative panels, flooring, cabinetry, islands, countertops, drywall, etc.) that interfere with original model/serial numbers removed, altered or...


