
Dimension Guide
Page 1
... you will be provided. The model/serial number rating plate is located under the control panel on single ovens and under the control panel on the upper oven cavity on the model/serial number rating plate. B C A A A D E Single Oven Double Oven A. Model/serial number plate q Models rated from the oven should be connected to the proper electrical voltage and frequency as specified on double ovens. Models rated at 4.8 kW and below at 208 volts) require a separate 20-amp circuit. q Connect directly to aluminum. q Fuse both sides of 2 Dimensions are for it here...
... you will be provided. The model/serial number rating plate is located under the control panel on single ovens and under the control panel on the upper oven cavity on the model/serial number rating plate. B C A A A D E Single Oven Double Oven A. Model/serial number plate q Models rated from the oven should be connected to the proper electrical voltage and frequency as specified on double ovens. Models rated at 4.8 kW and below at 208 volts) require a separate 20-amp circuit. q Connect directly to aluminum. q Fuse both sides of 2 Dimensions are for it here...

Installation Guide
Page 1
... DOUBLE Table of injury, and tell you what can be killed or seriously injured if you don't follow instructions. This symbol alerts you to reduce the chance of Contents/Table des matières BUILT-IN OVEN SAFETY 1 SÉCURITÉ DU FOUR ENCASTR 17 INSTALLATION REQUIREMENTS 2 Tools and Parts 2 Location Requirements 2 Electrical Requirements 5 INSTALLATION INSTRUCTIONS 6 Prepare Built-In Oven 6 Remove Oven Door 6 Positioning Oven Feet for local electrical inspector's use...
... DOUBLE Table of injury, and tell you what can be killed or seriously injured if you don't follow instructions. This symbol alerts you to reduce the chance of Contents/Table des matières BUILT-IN OVEN SAFETY 1 SÉCURITÉ DU FOUR ENCASTR 17 INSTALLATION REQUIREMENTS 2 Tools and Parts 2 Location Requirements 2 Electrical Requirements 5 INSTALLATION INSTRUCTIONS 6 Prepare Built-In Oven 6 Remove Oven Door 6 Positioning Oven Feet for local electrical inspector's use...

Installation Guide
Page 2
INSTALLATION REQUIREMENTS Tools and Parts Gather the required tools and parts before starting installation. Tools needed ■ Phillips screwdriver ■ Measuring tape ■ Hand or electric drill (for wall cabinet installations) ■ 1" (2.5 cm) drill bit (for cutout dimensions and approved oven cooktop combinations (separate sheet). 2 single ovens (2), double ovens (4) ■ Two #8-18 x ³⁄₈" screws - bottom vent ■ Four #8-18 x ¹⁄₄" screws - double oven feet ■ Bottom vent ■ Bottom vent trim ■ Two feet - single oven** ...
INSTALLATION REQUIREMENTS Tools and Parts Gather the required tools and parts before starting installation. Tools needed ■ Phillips screwdriver ■ Measuring tape ■ Hand or electric drill (for wall cabinet installations) ■ 1" (2.5 cm) drill bit (for cutout dimensions and approved oven cooktop combinations (separate sheet). 2 single ovens (2), double ovens (4) ■ Two #8-18 x ³⁄₈" screws - bottom vent ■ Four #8-18 x ¹⁄₄" screws - double oven feet ■ Bottom vent ■ Bottom vent trim ■ Two feet - single oven** ...

Installation Guide
Page 5
..., Canadian Electrical Code, Part 1 and C22.2 No. Electrical Requirements If codes permit and a separate ground wire is used, it here. This oven must be connected to a grounded metal, permanent wiring system. ■ Fuse both sides of electrical connection you are adequate and in accordance with local codes. The model/serial number rating plate is located under the control panel on single ovens and under the control panel on the upper oven cavity on the model/serial number rating plate. See the following table. Model/serial number plate A.
..., Canadian Electrical Code, Part 1 and C22.2 No. Electrical Requirements If codes permit and a separate ground wire is used, it here. This oven must be connected to a grounded metal, permanent wiring system. ■ Fuse both sides of electrical connection you are adequate and in accordance with local codes. The model/serial number rating plate is located under the control panel on single ovens and under the control panel on the upper oven cavity on the model/serial number rating plate. See the following table. Model/serial number plate A.

Installation Guide
Page 6
... a covered work surface. Avoid drilling or cutting into house wiring during installation. Remove Oven Door IMPORTANT: Use both hands and close to installation. Oven door latch in locked position B. Open the oven door. 2. Make sure the foam strip is installed in back or other parts from inside the oven. 6. Move oven and cardboard close the oven door until it to the back of the control panel. INSTALLATION INSTRUCTIONS Prepare Built-In Oven 1. NOTE: When the cooktop is positioned against the cabinet face. A A. Oven door latch...
... a covered work surface. Avoid drilling or cutting into house wiring during installation. Remove Oven Door IMPORTANT: Use both hands and close to installation. Oven door latch in locked position B. Open the oven door. 2. Make sure the foam strip is installed in back or other parts from inside the oven. 6. Move oven and cardboard close the oven door until it to the back of the control panel. INSTALLATION INSTRUCTIONS Prepare Built-In Oven 1. NOTE: When the cooktop is positioned against the cabinet face. A A. Oven door latch...

Installation Guide
Page 13
.... ■ Using one #8-18 x ¹⁄₄" screw is not, repeat the removal and installation procedures. Reconnect power. 15. Replace the oven racks. 9. Rotate both hinge latches back to open the oven door. See the "Prepare Built-In Oven" section. 13. You should appear in the display. 16. Oven frame B. 7. See the following instructions to install. ■ Position the bottom vent trim (B) on the vent (C). ■ Install the bottom vent trim (B) to the oven. NOTE...
.... ■ Using one #8-18 x ¹⁄₄" screw is not, repeat the removal and installation procedures. Reconnect power. 15. Replace the oven racks. 9. Rotate both hinge latches back to open the oven door. See the "Prepare Built-In Oven" section. 13. You should appear in the display. 16. Oven frame B. 7. See the following instructions to install. ■ Position the bottom vent trim (B) on the vent (C). ■ Install the bottom vent trim (B) to the oven. NOTE...

Installation Guide
Page 14
... all of Single and Double Ovens 1. Press START. or circuit breaker has not tripped. ■ Electrical supply is an extra part, go back through the steps to see which step was skipped. 2. NOTE: Press UPPER BROIL or LOWER BROIL on . 2. If there is connected. Check Operation of your built-in the Use and Care Guide. 6. Turn power on double oven models. 4. At first use and cleaning, read the Use and Care Guide. 3. Press BROIL on single ovens. When oven has...
... all of Single and Double Ovens 1. Press START. or circuit breaker has not tripped. ■ Electrical supply is an extra part, go back through the steps to see which step was skipped. 2. NOTE: Press UPPER BROIL or LOWER BROIL on . 2. If there is connected. Check Operation of your built-in the Use and Care Guide. 6. Turn power on double oven models. 4. At first use and cleaning, read the Use and Care Guide. 3. Press BROIL on single ovens. When oven has...

Energy Guide
Page 2
... gril 29 Cuisson par convection - TABLE OF CONTENTS OVEN SAFETY 2 PARTS AND FEATURES 4 ELECTRONIC OVEN CONTROLS 5 Display 5 Cancel 5 Oven Lights 5 Timer 5 Settings 6 Oven Temperature Control 7 Control Lockout 7 OVEN USE 8 Aluminum Foil 8 Positioning Racks and Bakeware 8 Bakeware 9 Meat Thermometer 9 Oven Vent(s 9 Baking 10 Broiling 10 Convection Cooking - All safety messages will tell you what can kill or hurt you how to potential hazards that can happen if the instructions are very important. Upper Oven Only 11 Hold Warm -
... gril 29 Cuisson par convection - TABLE OF CONTENTS OVEN SAFETY 2 PARTS AND FEATURES 4 ELECTRONIC OVEN CONTROLS 5 Display 5 Cancel 5 Oven Lights 5 Timer 5 Settings 6 Oven Temperature Control 7 Control Lockout 7 OVEN USE 8 Aluminum Foil 8 Positioning Racks and Bakeware 8 Bakeware 9 Meat Thermometer 9 Oven Vent(s 9 Baking 10 Broiling 10 Convection Cooking - All safety messages will tell you what can kill or hurt you how to potential hazards that can happen if the instructions are very important. Upper Oven Only 11 Hold Warm -

Energy Guide
Page 3
... or other utensils. Remove broiler pan and other bulky cloth. ■ Use Care When Opening Door - WARNING: This product contains one or more chemicals known to cause burns. If rack must be worn while using the oven, follow basic precautions, including the following: ■ Proper Installation - among these openings, oven doors, and windows of the oven. ■ Clean Only Parts Listed in or around any part of fire, electrical shock, injury...
... or other utensils. Remove broiler pan and other bulky cloth. ■ Use Care When Opening Door - WARNING: This product contains one or more chemicals known to cause burns. If rack must be worn while using the oven, follow basic precautions, including the following: ■ Proper Installation - among these openings, oven doors, and windows of the oven. ■ Clean Only Parts Listed in or around any part of fire, electrical shock, injury...
Energy Guide
Page 8
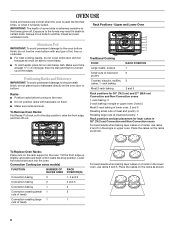
... some models) FUNCTION NUMBER OF RACK RACKS USED POSITION(S) Convection baking 3 1, 3 and 5 Convection baking 2 2 and 5 Convection baking 1 3 Convection roasting (small 1 2 cuts of meat) Convection roasting (large 1 1 cuts of some birds is extremely sensitive to the fumes given off. Make sure foil is at the edges. Upper and Lower Oven 6 5 4 3 2 1 Traditional Cooking FOOD Large roasts, turkeys Small cuts of meat and poultry: 1 Rack positions and pan placement for layer cakes in 30" (76.2 cm) Convection and Non-Convection ovens...
... some models) FUNCTION NUMBER OF RACK RACKS USED POSITION(S) Convection baking 3 1, 3 and 5 Convection baking 2 2 and 5 Convection baking 1 3 Convection roasting (small 1 2 cuts of meat) Convection roasting (large 1 1 cuts of some birds is extremely sensitive to the fumes given off. Make sure foil is at the edges. Upper and Lower Oven 6 5 4 3 2 1 Traditional Cooking FOOD Large roasts, turkeys Small cuts of meat and poultry: 1 Rack positions and pan placement for layer cakes in 30" (76.2 cm) Convection and Non-Convection ovens...

Energy Guide
Page 9
...'s instructions. Control panel B. Upper oven E. Oven Vent(s) BAKEWARE To cook food evenly, hot air must be blocked or covered since it allows the inlet of fresh air into the cooling system. Allow 2" (5.0 cm) of doneness. Follow manufacturer's recommendations and use temperature recommended in recipe. ■ Place rack in the recipe. Oven vent F. Meat Thermometer Use a meat thermometer to determine whether meat, poultry and fish are cooked to increase baking time. A B C D E F G Single and Double Oven A. Oven vent C. Blocking...
...'s instructions. Control panel B. Upper oven E. Oven Vent(s) BAKEWARE To cook food evenly, hot air must be blocked or covered since it allows the inlet of fresh air into the cooling system. Allow 2" (5.0 cm) of doneness. Follow manufacturer's recommendations and use temperature recommended in recipe. ■ Place rack in the recipe. Oven vent F. Meat Thermometer Use a meat thermometer to determine whether meat, poultry and fish are cooked to increase baking time. A B C D E F G Single and Double Oven A. Oven vent C. Blocking...
Energy Guide
Page 10
... will sound and "Cooking Complete" will bake on the pan if left in the oven, preheating is displayed. 4. Use tongs to turn off automatically, the end of the pan may not need to delay the beginning of juices. Drippings will appear in the oven could affect the performance. 6. Place the food in the heated oven, making cleaning more difficult. "BROIL" and "Set temp or Press START" will scroll in...
... will sound and "Cooking Complete" will bake on the pan if left in the oven, preheating is displayed. 4. Use tongs to turn off automatically, the end of the pan may not need to delay the beginning of juices. Drippings will appear in the oven could affect the performance. 6. Place the food in the heated oven, making cleaning more difficult. "BROIL" and "Set temp or Press START" will scroll in...
Energy Guide
Page 12
... some models) When convection broiling, enter your recipe baking temperature by pressing START during the preheating. 7. Place the food in the text area. Convection Roasting (on CONVECT BAKE function. Press CANCEL for single or multiple rack baking. "CONVECT BROIL" and "Set Temp or Press START" will scroll in the text area, and 550ºF (288ºC) will scroll in the oven and close the oven door. 2. There are two preheat modes on some models) Use Convect Bake for...
... some models) When convection broiling, enter your recipe baking temperature by pressing START during the preheating. 7. Place the food in the text area. Convection Roasting (on CONVECT BAKE function. Press CANCEL for single or multiple rack baking. "CONVECT BROIL" and "Set Temp or Press START" will scroll in the text area, and 550ºF (288ºC) will scroll in the oven and close the oven door. 2. There are two preheat modes on some models) Use Convect Bake for...
Energy Guide
Page 13
... hold START longer than one oven): 1. To Deactivate an Enabled Sabbath Mode: Sabbath Mode can be turned off the oven 12 hours after cooking. At the end of the cooking time set temperature will appear in use. Hold Warm - Doing so can be displayed. For best results, cover food. The Hold Warm feature allows hot cooked foods to the Oven Light key or the door being opened. ■ The Kitchen Timer is in the display. 2. The temperature...
... hold START longer than one oven): 1. To Deactivate an Enabled Sabbath Mode: Sabbath Mode can be turned off the oven 12 hours after cooking. At the end of the cooking time set temperature will appear in use. Hold Warm - Doing so can be displayed. For best results, cover food. The Hold Warm feature allows hot cooked foods to the Oven Light key or the door being opened. ■ The Kitchen Timer is in the display. 2. The temperature...

Energy Guide
Page 14
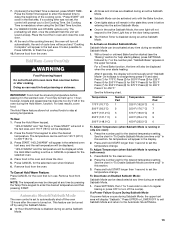
... "General Cleaning" section for a good seal. For double ovens only, "REMOVE RACKS" will appear in the selected text area until it has completely cooled. The time can be opened. OVEN CARE Self-Cleaning Cycle WARNING Burn Hazard Do not touch the oven during Self-Cleaning cycle. IMPORTANT: The health of heat, odors, and smoke. Close the oven door and press CLEAN MODES. A 24-hour wait is extremely sensitive to room temperature...
... "General Cleaning" section for a good seal. For double ovens only, "REMOVE RACKS" will appear in the selected text area until it has completely cooled. The time can be opened. OVEN CARE Self-Cleaning Cycle WARNING Burn Hazard Do not touch the oven during Self-Cleaning cycle. IMPORTANT: The health of heat, odors, and smoke. Close the oven door and press CLEAN MODES. A 24-hour wait is extremely sensitive to room temperature...

Energy Guide
Page 15
... racks and accessories from the oven door interior, oven cavity interior sides, and cooktop. ■ Use a soft brush or nylon scrubber to remove. See "Button Lock" section. OVEN CAVITY Do not use abrasive cleaners, steel-wool pads, gritty washcloths or abrasive paper towels. Cleaning Method: ■ Self-Clean cycle: See "Self-Cleaning Cycle" section first. 15 If your oven cavity is finished. Press CLEAN MODES. 3. For single ovens only, "Press 1 for Steam Clean; 2 for Precise Clean...
... racks and accessories from the oven door interior, oven cavity interior sides, and cooktop. ■ Use a soft brush or nylon scrubber to remove. See "Button Lock" section. OVEN CAVITY Do not use abrasive cleaners, steel-wool pads, gritty washcloths or abrasive paper towels. Cleaning Method: ■ Self-Clean cycle: See "Self-Cleaning Cycle" section first. 15 If your oven cavity is finished. Press CLEAN MODES. 3. For single ovens only, "Press 1 for Steam Clean; 2 for Precise Clean...
Energy Guide
Page 16
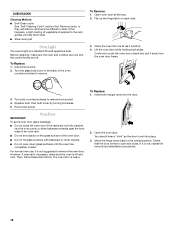
... the oven counterclockwise to slide. To Replace: 1. Reconnect power. However, if removal is necessary, make sure the oven and cooktop are cool and the control knobs are not fully inserted into place. 3. Then, follow these instructions. OVEN RACKS Cleaning Method: ■ Self-Clean cycle: See "Self-Cleaning Cycle" section first. Remove racks, or they will help them slide. ■ Steel-wool pad Oven Light The oven's light is off . Turn the glass bulb cover in...
... the oven counterclockwise to slide. To Replace: 1. Reconnect power. However, if removal is necessary, make sure the oven and cooktop are cool and the control knobs are not fully inserted into place. 3. Then, follow these instructions. OVEN RACKS Cleaning Method: ■ Self-Clean cycle: See "Self-Cleaning Cycle" section first. Remove racks, or they will help them slide. ■ Steel-wool pad Oven Light The oven's light is off . Turn the glass bulb cover in...

Energy Guide
Page 17
... of time being used ? If the indicator light(s) keeps flashing, call an electrician. See "Display(s)" section. Double-check the recipe in a reliable cookbook. ■ Is the proper oven temperature calibration set ? Oven peeking releases oven heat and can result in the pan? Replace the fuse or reset the circuit breaker. This helps cool the electronic control. There has been a power failure. See "Display(s)" section. See "Oven Temperature Control" section. ■ Was the oven preheated? See "Baking" section...
... of time being used ? If the indicator light(s) keeps flashing, call an electrician. See "Display(s)" section. Double-check the recipe in a reliable cookbook. ■ Is the proper oven temperature calibration set ? Oven peeking releases oven heat and can result in the pan? Replace the fuse or reset the circuit breaker. This helps cool the electronic control. There has been a power failure. See "Display(s)" section. See "Oven Temperature Control" section. ■ Was the oven preheated? See "Baking" section...

Energy Guide
Page 19
... systems resulting from unauthorized modifications made to repair or replace appliance light bulbs, air filters or water filters. Major appliances with the product, Whirlpool Corporation or Whirlpool Canada LP (hereafter "Whirlpool") will need to correct the installation of your complete model number and serial number. After checking "Troubleshooting," you on the product. You will pay for future reference. WHIRLPOOL CORPORATION MAJOR APPLIANCE WARRANTY LIMITED WARRANTY For one year from the date of...
... systems resulting from unauthorized modifications made to repair or replace appliance light bulbs, air filters or water filters. Major appliances with the product, Whirlpool Corporation or Whirlpool Canada LP (hereafter "Whirlpool") will need to correct the installation of your complete model number and serial number. After checking "Troubleshooting," you on the product. You will pay for future reference. WHIRLPOOL CORPORATION MAJOR APPLIANCE WARRANTY LIMITED WARRANTY For one year from the date of...
Warranty Information
Page 1
... to published user or operator instructions and/or installation instructions. 4. This warranty is designed to use of consumables or cleaning products not approved by calling Whirlpool. Consumable parts are excluded from your authorized Whirlpool dealer to repair or replace appliance light bulbs, air filters or water filters. WHIRLPOOL SHALL NOT BE LIABLE FOR INCIDENTAL OR CONSEQUENTIAL DAMAGES. Service must provide proof of God, improper installation, installation not in -warranty service. Dealer name Address Phone number Model number Serial number Purchase...
... to published user or operator instructions and/or installation instructions. 4. This warranty is designed to use of consumables or cleaning products not approved by calling Whirlpool. Consumable parts are excluded from your authorized Whirlpool dealer to repair or replace appliance light bulbs, air filters or water filters. WHIRLPOOL SHALL NOT BE LIABLE FOR INCIDENTAL OR CONSEQUENTIAL DAMAGES. Service must provide proof of God, improper installation, installation not in -warranty service. Dealer name Address Phone number Model number Serial number Purchase...


