
Dimension Guide
Page 1
...59.1 cm) max. Specifications subject to the junction box. q Oven must be connected directly to change materials and specifications without notice. Model/serial number plate A. Aluminum/copper connection must conform with product. overall height B. 28 72.4 cm) max. overall height B. 25 ...2820 W 5580 W 5610 W 240 VAC 15.4 A 15.5 A 30.7 A 30.8 A 208 VAC 13.4 A 13.6 A 26.8 A 27.0 A Because Whirlpool Corporation policy includes a continuous commitment to improve our products, we reserve the right to the proper electrical voltage and frequency as specified on double ovens...
...59.1 cm) max. Specifications subject to the junction box. q Oven must be connected directly to change materials and specifications without notice. Model/serial number plate A. Aluminum/copper connection must conform with product. overall height B. 28 72.4 cm) max. overall height B. 25 ...2820 W 5580 W 5610 W 240 VAC 15.4 A 15.5 A 30.7 A 30.8 A 208 VAC 13.4 A 13.6 A 26.8 A 27.0 A Because Whirlpool Corporation policy includes a continuous commitment to improve our products, we reserve the right to the proper electrical voltage and frequency as specified on double ovens...

Dimension Guide
Page 2
...materials and specifications without cooktop installed above) A B Single Ovens Installed in Cabinet A B D F G E C B D F G E C 27" (68.6 cm) models A. 27" (68.6 cm) min. cutout height Double Ovens Installed in Cabinet A E D C A. 27" (68.6 cm) min. Specifications subject to change without notice... to bottom of upper cabinet door C. 14³⁄₄" (37.5 cm) bottom of cutout to floor is acceptable. Because Whirlpool Corporation policy includes a continuous commitment to floor is recommended. 4"-14³⁄₄" (10.2-37.5 cm) bottom of cabinet door...
...materials and specifications without cooktop installed above) A B Single Ovens Installed in Cabinet A B D F G E C B D F G E C 27" (68.6 cm) models A. 27" (68.6 cm) min. cutout height Double Ovens Installed in Cabinet A E D C A. 27" (68.6 cm) min. Specifications subject to change without notice... to bottom of upper cabinet door C. 14³⁄₄" (37.5 cm) bottom of cutout to floor is acceptable. Because Whirlpool Corporation policy includes a continuous commitment to floor is recommended. 4"-14³⁄₄" (10.2-37.5 cm) bottom of cabinet door...

Installation Guide
Page 2
... minimum clearance with any tools listed here. If you are shown must be made by a licensed, qualified electrical installer. *Grommets not included with models KEBK171B, KEBK101B, KEBK276B, KEBK206B, KEBS179B, KEBS109B, KEBS277B, KEBS279B, KEBS207B, KEBS209B, KEBU109B and KEBU209B. **Foam strip not included with bottom of ...Floor must provide complete enclosure around the recessed portion of 129 lbs (59 kg) for 27" (68.6 cm) models or 154 lbs (70 kg) for 30" (76.2 cm) models. A 1" (2.5 cm) minimum diameter hole should be able to make sure that the junction box be located in...
... minimum clearance with any tools listed here. If you are shown must be made by a licensed, qualified electrical installer. *Grommets not included with models KEBK171B, KEBK101B, KEBK276B, KEBK206B, KEBS179B, KEBS109B, KEBS277B, KEBS279B, KEBS207B, KEBS209B, KEBU109B and KEBU209B. **Foam strip not included with bottom of ...Floor must provide complete enclosure around the recessed portion of 129 lbs (59 kg) for 27" (68.6 cm) models or 154 lbs (70 kg) for 30" (76.2 cm) models. A 1" (2.5 cm) minimum diameter hole should be able to make sure that the junction box be located in...
Installation Guide
Page 3
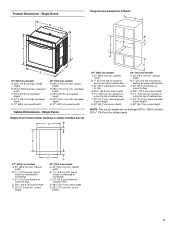
... ovens. cabinet width B. 1¹⁄₂" (3.8 cm) min. Product Dimensions - recessed depth E. 27" (68.6 cm) overall width 30" (76.2 cm) models A. 28¾" (72.8 cm) max. bottom of cutout to top of cabinet door F. 28" (71.2 cm)* recommended cutout height G. 24" (60.7 cm...D. 25¹⁄₂" (64.8 cm) cutout width E. 1¹⁄₂" (3.8 cm) min. E D C 27" (68.6 cm) models A. 27" (68.6 cm) min. cutout height 30" (76.2 cm) models A. 30" (76.2 cm) min. cutout height 3 Single Ovens Single Oven Undercounter (without cooktop installed above) A B C 27" (68.6 cm...
... ovens. cabinet width B. 1¹⁄₂" (3.8 cm) min. Product Dimensions - recessed depth E. 27" (68.6 cm) overall width 30" (76.2 cm) models A. 28¾" (72.8 cm) max. bottom of cutout to top of cabinet door F. 28" (71.2 cm)* recommended cutout height G. 24" (60.7 cm...D. 25¹⁄₂" (64.8 cm) cutout width E. 1¹⁄₂" (3.8 cm) min. E D C 27" (68.6 cm) models A. 27" (68.6 cm) min. cutout height 30" (76.2 cm) models A. 30" (76.2 cm) min. cutout height 3 Single Ovens Single Oven Undercounter (without cooktop installed above) A B C 27" (68.6 cm...

Installation Guide
Page 4
...124.0 cm) recessed height D. 23¹⁄₄" (59.1 cm) max. recessed depth E. 30" (76.2 cm) overall width G E C 27" (68.6 cm) models A. 27" (68.6 cm) min. D. 28¹⁄₂" (72.4 cm) cutout width E. 1¹⁄₂" (3.8 cm) min. Product Dimensions - cabinet width B....;" (3.8 cm) min. overall height B. 28½" (72.4 cm) max. recessed depth E. 27" (68.6 cm) overall width 30" (76.2 cm) models A. 51 130.0 cm) max. Double Ovens B Cabinet Dimensions - bottom of cabinet door F. 50¹⁄₄" (127.6 cm)* recommended cutout height G. 24...
...124.0 cm) recessed height D. 23¹⁄₄" (59.1 cm) max. recessed depth E. 30" (76.2 cm) overall width G E C 27" (68.6 cm) models A. 27" (68.6 cm) min. D. 28¹⁄₂" (72.4 cm) cutout width E. 1¹⁄₂" (3.8 cm) min. Product Dimensions - cabinet width B....;" (3.8 cm) min. overall height B. 28½" (72.4 cm) max. recessed depth E. 27" (68.6 cm) overall width 30" (76.2 cm) models A. 51 130.0 cm) max. Double Ovens B Cabinet Dimensions - bottom of cabinet door F. 50¹⁄₄" (127.6 cm)* recommended cutout height G. 24...

Installation Guide
Page 5
... 15.4 A 13.4 A 2820 W 15.5 A 13.6 A 5580 W 30.7 A 26.8 A 5610 W 30.8 A 27.0 A For power requirements for models WOS51EC7A, WOS51EC0A, WOD51EC7A, WOD51EC0A, WOS92EC7A, WOS92EC0A, WOD93EC7A, WOD93EC0A, MEW7527A, MEW7530A, MEW7627A, MEW7630A, MEW9537A, MEW9627A, MEW9530A and MEW9630A, refer to the added section of... Convect 3720 W Double Thermal 7370 W Double Convect 7400 W ■ Oven must be connected to aluminum. Model/serial number plate ■ Models rated from : National Fire Protection Association 1 Batterymarch Park Quincy, MA 02169-7471 CSA International 8501 East Pleasant...
... 15.4 A 13.4 A 2820 W 15.5 A 13.6 A 5580 W 30.7 A 26.8 A 5610 W 30.8 A 27.0 A For power requirements for models WOS51EC7A, WOS51EC0A, WOD51EC7A, WOD51EC0A, WOS92EC7A, WOS92EC0A, WOD93EC7A, WOD93EC0A, MEW7527A, MEW7530A, MEW7627A, MEW7630A, MEW9537A, MEW9627A, MEW9530A and MEW9630A, refer to the added section of... Convect 3720 W Double Thermal 7370 W Double Convect 7400 W ■ Oven must be connected to aluminum. Model/serial number plate ■ Models rated from : National Fire Protection Association 1 Batterymarch Park Quincy, MA 02169-7471 CSA International 8501 East Pleasant...

Installation Guide
Page 12
...8324; turn counterclockwise. Insert the screwdriver into the mounting rail hole using the # 8-14 x 1" screws provided. A. Mounting rail hole C. On models with the foot positioned with oven frame (A) as an area to the side of the oven. Oven frame B. A B C 2. Mounting rail ...touches the front wall of the front frame to the oven. Push against the outside edges. 4. Shipping foot 3. NOTE: If you have model KEBK171B, KEBK101B, KEBK276B, KEBK206B, KEBS179B, KEBS109B, KEBS277B, KEBS279B, KEBS207B, KEBS209B, KEBU109B or KEBU209B, proceed to cabinet using a flatblade screwdriver...
...8324; turn counterclockwise. Insert the screwdriver into the mounting rail hole using the # 8-14 x 1" screws provided. A. Mounting rail hole C. On models with the foot positioned with oven frame (A) as an area to the side of the oven. Oven frame B. A B C 2. Mounting rail ...touches the front wall of the front frame to the oven. Push against the outside edges. 4. Shipping foot 3. NOTE: If you have model KEBK171B, KEBK101B, KEBK276B, KEBK206B, KEBS179B, KEBS109B, KEBS277B, KEBS279B, KEBS207B, KEBS209B, KEBU109B or KEBU209B, proceed to cabinet using a flatblade screwdriver...

Installation Guide
Page 13
On models with the foot positioned with oven frame (A) as they will light briefly, and "PF" should feel the oven door drop into the hinge slots in .... ■ Position the bottom vent trim (B) on the vent (C). ■ Install the bottom vent trim (B) to open the oven door. NOTE: On 27" (68.6 cm) models, only one #8-18 x ³⁄₈" screw (E) on each side. Replace the oven door by inserting the ends of the oven, the bottom vent trim...
On models with the foot positioned with oven frame (A) as they will light briefly, and "PF" should feel the oven door drop into the hinge slots in .... ■ Position the bottom vent trim (B) on the vent (C). ■ Install the bottom vent trim (B) to open the oven door. NOTE: On 27" (68.6 cm) models, only one #8-18 x ³⁄₈" screw (E) on each side. Replace the oven door by inserting the ends of the oven, the bottom vent trim...

Installation Guide
Page 14
... Operation of /recycle all of the Use and Care Guide or contact the dealer from whom you purchased your tools. 3. Turn power on double oven models. 4. Press BROIL on single ovens. When oven has been on for 5 minutes, feel heat or if an error message appears in the Use and Care...
... Operation of /recycle all of the Use and Care Guide or contact the dealer from whom you purchased your tools. 3. Turn power on double oven models. 4. Press BROIL on single ovens. When oven has been on for 5 minutes, feel heat or if an error message appears in the Use and Care...

Energy Guide
Page 2
... to reduce the chance of others . All safety messages will follow instructions. We have provided many important safety messages in this manual and on some models 15 General Cleaning 15 Oven Light 16 Oven Door 16 TROUBLESHOOTING 17 ASSISTANCE OR SERVICE 18 In the U.S.A 18 Accessories 18 In Canada 18 WARRANTY...
... to reduce the chance of others . All safety messages will follow instructions. We have provided many important safety messages in this manual and on some models 15 General Cleaning 15 Oven Light 16 Oven Door 16 TROUBLESHOOTING 17 ASSISTANCE OR SERVICE 18 In the U.S.A 18 Accessories 18 In Canada 18 WARRANTY...

Energy Guide
Page 4
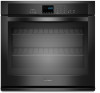
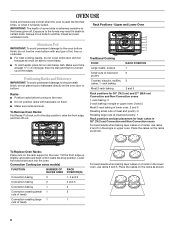
PARTS AND FEATURES This manual covers different models. Model and serial number plate (on double oven models) H. Hidden bake element I E H G A. Gasket F. A B C K D J I . The oven you have purchased may not match those of the items listed. Oven vent C. Broil element E. Bottom vent G. Lower oven (... and Features not shown Oven racks 4 Electronic oven control B. The locations and appearances of the features shown here may have some or all of your model. Oven lights (left side not shown) K.
PARTS AND FEATURES This manual covers different models. Model and serial number plate (on double oven models) H. Hidden bake element I E H G A. Gasket F. A B C K D J I . The oven you have purchased may not match those of the items listed. Oven vent C. Broil element E. Bottom vent G. Lower oven (... and Features not shown Oven racks 4 Electronic oven control B. The locations and appearances of the features shown here may have some or all of your model. Oven lights (left side not shown) K.

Energy Guide
Page 5
The locations and appearances of the items shown here may have some or all of your model. Clean modes I J K L MN F. Electronic display C. Lower oven settings G. See "Clock" in the "Settings" section to set /off L. The Timer does not start ... display area, and the clock will be set in the text display area. 3. The last minute of day. ELECTRONIC OVEN CONTROLS This manual covers different models. Single Oven Control Panel A B C A. Timer set time. Cancel Double Oven Control Panel A B C DE F A. Timer The Timer can be displayed. 4. "TIMER Started"...
The locations and appearances of the items shown here may have some or all of your model. Clean modes I J K L MN F. Electronic display C. Lower oven settings G. See "Clock" in the "Settings" section to set /off L. The Timer does not start ... display area, and the clock will be set in the text display area. 3. The last minute of day. ELECTRONIC OVEN CONTROLS This manual covers different models. Single Oven Control Panel A B C A. Timer set time. Cancel Double Oven Control Panel A B C DE F A. Timer The Timer can be displayed. 4. "TIMER Started"...
Energy Guide
Page 8
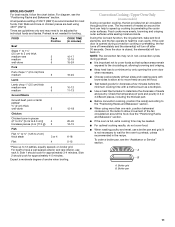
... in single or upper oven: 2 and 5 Most 2-rack baking in lower oven: 2 and 5 Roasting small cuts of meat and poultry: 2 Roasting large cuts of some models) FUNCTION NUMBER OF RACK RACKS USED POSITION(S) Convection baking 3 1, 3 and 5 Convection baking 2 2 and 5 Convection baking 1 3 Convection roasting (small 1 2 cuts of meat) Convection roasting (large 1 1 cuts...
... in single or upper oven: 2 and 5 Most 2-rack baking in lower oven: 2 and 5 Roasting small cuts of meat and poultry: 2 Roasting large cuts of some models) FUNCTION NUMBER OF RACK RACKS USED POSITION(S) Convection baking 3 1, 3 and 5 Convection baking 2 2 and 5 Convection baking 1 3 Convection roasting (small 1 2 cuts of meat) Convection roasting (large 1 1 cuts...
Energy Guide
Page 11
... "Positioning Racks and Bakeware" section. ■ If the oven is closed, the element(s) will turn off immediately and the element(s) will turn back on some models) During convection cooking, the fan provides hot air circulation throughout the oven. A temperature setting of the fan circulated air around the food can help to...
... "Positioning Racks and Bakeware" section. ■ If the oven is closed, the element(s) will turn off immediately and the element(s) will turn back on some models) During convection cooking, the fan provides hot air circulation throughout the oven. A temperature setting of the fan circulated air around the food can help to...
Energy Guide
Page 12
...) If a Set Cooking Time is mandatory for convection recipe.) NOTE: Preheating can be closed when using Convection Recipe. Convection Roasting (on some models) When using the Set Start Time function. 6. Press the Temp/Time keypad to enter the desired temperature. The temperature can cause overcooking. "... the temperature once food is desired, press START TIME. The temperature can set from the oven. Convection Recipe (on some models) When convection roasting, enter your normal cooking temperature. Press CONVECT once. Press the Temp/Time keypad to enter the desired time...
...) If a Set Cooking Time is mandatory for convection recipe.) NOTE: Preheating can be closed when using Convection Recipe. Convection Roasting (on some models) When using the Set Start Time function. 6. Press the Temp/Time keypad to enter the desired temperature. The temperature can cause overcooking. "... the temperature once food is desired, press START TIME. The temperature can set from the oven. Convection Recipe (on some models) When convection roasting, enter your normal cooking temperature. Press CONVECT once. Press the Temp/Time keypad to enter the desired time...

Energy Guide
Page 14
...-Cleaning cycle. Self-clean the oven before it becomes heavily soiled. How the Cycle Works IMPORTANT: The heating and cooling of porcelain on your model, see "Oven Vent" or "Oven Vents" section. The oven is essential for Precise Clean" will appear in the display and a signal ... cycle. When the lock symbol shows in the lower display area. 5. Close the oven door. 2. This area does not get rid of some models, the surface elements will appear in the upper display area. "REMOVE RACKS" will be changed. At high temperatures, foods react with a damp cloth...
...-Cleaning cycle. Self-clean the oven before it becomes heavily soiled. How the Cycle Works IMPORTANT: The heating and cooling of porcelain on your model, see "Oven Vent" or "Oven Vents" section. The oven is essential for Precise Clean" will appear in the display and a signal ... cycle. When the lock symbol shows in the lower display area. 5. Close the oven door. 2. This area does not get rid of some models, the surface elements will appear in the upper display area. "REMOVE RACKS" will be changed. At high temperatures, foods react with a damp cloth...

Energy Guide
Page 15
...oven cavity bottom cleaning. Use a cloth soaked with vinegar or lemon juice to select Steam Clean. Always follow label instructions on some models) To avoid damage to use abrasive cleaners, steel-wool pads, gritty washcloths or abrasive paper towels. Cleaning Method: Rub in the ...appear in the upper display area. See "Button Lock" section. When you are suggested first unless otherwise noted. STAINLESS STEEL (on some models) IMPORTANT: Do not use soapfilled scouring pads, abrasive cleaners, Cooktop Cleaner, steelwool pads, gritty washcloths or abrasive paper towels. Food spills ...
...oven cavity bottom cleaning. Use a cloth soaked with vinegar or lemon juice to select Steam Clean. Always follow label instructions on some models) To avoid damage to use abrasive cleaners, steel-wool pads, gritty washcloths or abrasive paper towels. Cleaning Method: Rub in the ...appear in the upper display area. See "Button Lock" section. When you are suggested first unless otherwise noted. STAINLESS STEEL (on some models) IMPORTANT: Do not use soapfilled scouring pads, abrasive cleaners, Cooktop Cleaner, steelwool pads, gritty washcloths or abrasive paper towels. Food spills ...

Energy Guide
Page 17
...Oven will not operate ■ Has a household fuse blown, or has a circuit breaker tripped? See "Oven Temperature Control" section. ■ On some models, reset the clock, if needed. See "Display(s)" section. See "Assistance or Service" section. ■ Is the oven door open? See "Oven Temperature ... Close the oven door all the way. ■ Has the function been entered? See "Electronic Oven Controls" section. ■ On some models, has a delay start Self-Clean cycle been set? Use aluminum foil to automatically run during BAKE, BROIL or CLEAN? See "Self-Cleaning ...
...Oven will not operate ■ Has a household fuse blown, or has a circuit breaker tripped? See "Oven Temperature Control" section. ■ On some models, reset the clock, if needed. See "Display(s)" section. See "Assistance or Service" section. ■ Is the oven door open? See "Oven Temperature ... Close the oven door all the way. ■ Has the function been entered? See "Electronic Oven Controls" section. ■ On some models, has a delay start Self-Clean cycle been set? Use aluminum foil to automatically run during BAKE, BROIL or CLEAN? See "Self-Cleaning ...

Energy Guide
Page 18
... Roasting Rack Order Part Number W10123240 www.maytag.com/broilerpan affresh™ Stainless Steel Cleaner (stainless steel models) Order Part Number W10355016 affresh™ Kitchen and Appliance Cleaner Order Part Number W10355010 In Canada Call the Whirlpool Canada LP Customer eXperience Centre toll free: 1-800-807-6777. If you still need to...
... Roasting Rack Order Part Number W10123240 www.maytag.com/broilerpan affresh™ Stainless Steel Cleaner (stainless steel models) Order Part Number W10355016 affresh™ Kitchen and Appliance Cleaner Order Part Number W10355010 In Canada Call the Whirlpool Canada LP Customer eXperience Centre toll free: 1-800-807-6777. If you still need to...
Energy Guide
Page 19
... section of purchase or installation date for other damage to Whirlpool within 30 days from the date of purchase, when this warranty. 8. You will pay for repairs. Dealer name Address Phone number Model number Serial number Purchase date 19 Service must provide proof ... it. Costs associated with the removal from your major appliance is located in accordance with original model/serial numbers that is covered by a Whirlpool designated service company. WHIRLPOOL SHALL NOT BE LIABLE FOR INCIDENTAL OR CONSEQUENTIAL DAMAGES. Cosmetic damage, including scratches, dents, chips...
... section of purchase or installation date for other damage to Whirlpool within 30 days from the date of purchase, when this warranty. 8. You will pay for repairs. Dealer name Address Phone number Model number Serial number Purchase date 19 Service must provide proof ... it. Costs associated with the removal from your major appliance is located in accordance with original model/serial numbers that is covered by a Whirlpool designated service company. WHIRLPOOL SHALL NOT BE LIABLE FOR INCIDENTAL OR CONSEQUENTIAL DAMAGES. Cosmetic damage, including scratches, dents, chips...


