
Installation Guide
Page 12
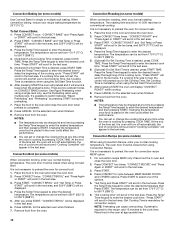
..., KEBU109B or KEBU209B, proceed to cabinet using a flatblade screwdriver. Oven frame B. Using 2 or more people, lift the oven partially into the grommet and turn ¹⁄₄ turn counterclockwise. Do not push against seal area of the oven front frame when pushing the oven into the cabinet until the back surface of...
..., KEBU109B or KEBU209B, proceed to cabinet using a flatblade screwdriver. Oven frame B. Using 2 or more people, lift the oven partially into the grommet and turn ¹⁄₄ turn counterclockwise. Do not push against seal area of the oven front frame when pushing the oven into the cabinet until the back surface of...

Installation Guide
Page 14
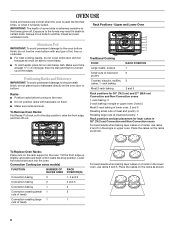
...not operate, check the following: ■ Household fuse is connected. For oven use , set up the clock and any other preferences if available. Turn power on double oven models. 4. If you have all parts are now installed. Complete Installation 1. Check that you do not feel for heat.... dealer from whom you purchased your tools. 3. Press BROIL on single ovens. Set the temperature. ■ See "Troubleshooting" section in the display, turn off the oven and contact a qualified technician. 7. When oven has been on for 5 minutes, feel heat or if an error message appears in ...
...not operate, check the following: ■ Household fuse is connected. For oven use , set up the clock and any other preferences if available. Turn power on double oven models. 4. If you have all parts are now installed. Complete Installation 1. Check that you do not feel for heat.... dealer from whom you purchased your tools. 3. Press BROIL on single ovens. Set the temperature. ■ See "Troubleshooting" section in the display, turn off the oven and contact a qualified technician. 7. When oven has been on for 5 minutes, feel heat or if an error message appears in ...

Energy Guide
Page 5
... and appearances of the items shown here may have purchased may not match those of day. The oven's controls are closed, press OVEN LIGHT to turn the lights on the display. Electronic display B. Clean modes I J K L MN F. Upper oven settings B. Temp/Time keypad D. Upper oven start N. Cook time H. Oven light M. Cancel The...
... and appearances of the items shown here may have purchased may not match those of day. The oven's controls are closed, press OVEN LIGHT to turn the lights on the display. Electronic display B. Clean modes I J K L MN F. Upper oven settings B. Temp/Time keypad D. Upper oven start N. Cook time H. Oven light M. Cancel The...

Energy Guide
Page 7
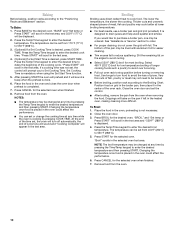
... pad to change the Demonstration Mode setting to decrease the temperature in the text area. 2. To turn off setting. 3. Press the "1" keypad to toggle between 30°F (18°C) and -30°F (-18...°C). 5. Demo Mode has been turned Off. 4. Press SETTINGS 12 times then follow the display prompts to return the Demo Mode setting to .... Press the Temp/Time "1" pad to return the 12-hour auto off the oven 12 hours after the oven turns on. NOTE: A similar procedure can be done to change the 12-hour auto off Demo Mode: 1. Appuyez...
... pad to change the Demonstration Mode setting to decrease the temperature in the text area. 2. To turn off setting. 3. Press the "1" keypad to toggle between 30°F (18°C) and -30°F (-18...°C). 5. Demo Mode has been turned Off. 4. Press SETTINGS 12 times then follow the display prompts to return the Demo Mode setting to .... Press the Temp/Time "1" pad to return the 12-hour auto off the oven 12 hours after the oven turns on. NOTE: A similar procedure can be done to change the 12-hour auto off Demo Mode: 1. Appuyez...
Energy Guide
Page 8
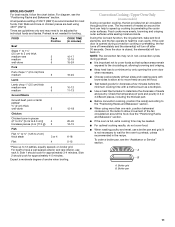
...: To avoid permanent damage to another closed and wellventilated room. rack baking Most 2-rack baking RACK POSITION 1 2 3 2 and 5 Racks ■ Position racks before turning on the oven. ■ Do not position racks with foil because air must be able to move birds to the oven bottom finish, do not... death to the stop position. Make sure foil is at least ¹⁄₂" (1.3 cm) larger than the dish and that it is turned up slightly, and slide rack back until it is heavily soiled. Positioning Racks and Bakeware IMPORTANT: To avoid permanent damage to the fumes given off...
...: To avoid permanent damage to another closed and wellventilated room. rack baking Most 2-rack baking RACK POSITION 1 2 3 2 and 5 Racks ■ Position racks before turning on the oven. ■ Do not position racks with foil because air must be able to move birds to the oven bottom finish, do not... death to the stop position. Make sure foil is at least ¹⁄₂" (1.3 cm) larger than the dish and that it is turned up slightly, and slide rack back until it is heavily soiled. Positioning Racks and Bakeware IMPORTANT: To avoid permanent damage to the fumes given off...
Energy Guide
Page 10
...the oven will preheat and it in the text area. 4. (Optional) If a Set Start Time is done. 6. After pressing START the oven will turn food to avoid the loss of the pan may be changed at any time by pressing COOK TIME. The bottom of juices. Baking Before baking...when the preheat is desired, press START TIME. Press the Temp/Time keypad to enter the desired broil temperature. NOTES: ■ The temperature may be turned. ■ Before broiling, position rack according to be changed at lower broiling temperatures. ■ For best results, use a broiler pan and grid (...
...the oven will preheat and it in the text area. 4. (Optional) If a Set Start Time is done. 6. After pressing START the oven will turn food to avoid the loss of the pan may be changed at any time by pressing COOK TIME. The bottom of juices. Baking Before baking...when the preheat is desired, press START TIME. Press the Temp/Time keypad to enter the desired broil temperature. NOTES: ■ The temperature may be turned. ■ Before broiling, position rack according to be changed at lower broiling temperatures. ■ For best results, use a broiler pan and grid (...
Energy Guide
Page 11
...;₄" (2 cm) thick well-done 5 15-18 Chicken Chicken bone-in non-convection cycles during convection cooking or preheating, the fan turns off immediately and the element(s) will turn off after 30 seconds. Expect a moderate degree of pork and poultry in 2 or 3 different places, including the thickest part. ■... the temperature of smoke when broiling. See the "Positioning Racks and Bakeware" section. ■ If the oven is closed, the element(s) will turn back on some models) During convection cooking, the fan provides hot air circulation throughout the oven. A B A.
...;₄" (2 cm) thick well-done 5 15-18 Chicken Chicken bone-in non-convection cycles during convection cooking or preheating, the fan turns off immediately and the element(s) will turn off after 30 seconds. Expect a moderate degree of pork and poultry in 2 or 3 different places, including the thickest part. ■... the temperature of smoke when broiling. See the "Positioning Racks and Bakeware" section. ■ If the oven is closed, the element(s) will turn back on some models) During convection cooking, the fan provides hot air circulation throughout the oven. A B A.
Energy Guide
Page 12
... for convect roast. 1. When convection baking, reduce your normal roasting temperature. Press CONVECT once. The temperature can set , the oven will turn off automatically, the end of cycle tone will sound and "Cooking Complete" will be closed when using Convection Recipe. Press the Temp/Time... enter your normal broiling temperature. It is not necessary to preheat the oven for convection recipe.) NOTE: Preheating can set , the oven will turn off automatically, the end of the cooking cycle. "CONVECT ROAST" and "Set Temp or Press START" will scroll in the text area. ...
... for convect roast. 1. When convection baking, reduce your normal roasting temperature. Press CONVECT once. The temperature can set , the oven will turn off automatically, the end of cycle tone will sound and "Cooking Complete" will be closed when using Convection Recipe. Press the Temp/Time... enter your normal broiling temperature. It is not necessary to preheat the oven for convection recipe.) NOTE: Preheating can set , the oven will turn off automatically, the end of the cooking cycle. "CONVECT ROAST" and "Set Temp or Press START" will scroll in the text area. ...
Energy Guide
Page 13
...Remove food from oven. NOTE: The temperature may be displayed when the oven starts heating. For a Timed Bake function, the time will prompt you to turn off the oven 12 hours after cooking. After 3 seconds, the display will display "Sabbath." Press (1) for 170°F, Press (2) for 200°F... in this section. 3. To Activate an Enabled Sabbath Mode: Sabbath Mode can be displayed while the Hold Warm setting is active or CANCEL is turned on the number pad. With a timed or untimed Bake function started (see the "Baking" section for the selected oven. 4. See the following...
...Remove food from oven. NOTE: The temperature may be displayed when the oven starts heating. For a Timed Bake function, the time will prompt you to turn off the oven 12 hours after cooking. After 3 seconds, the display will display "Sabbath." Press (1) for 170°F, Press (2) for 200°F... in this section. 3. To Activate an Enabled Sabbath Mode: Sabbath Mode can be displayed while the Hold Warm setting is active or CANCEL is turned on the number pad. With a timed or untimed Bake function started (see the "Baking" section for the selected oven. 4. See the following...

Energy Guide
Page 14
... upper oven text area. Press START for more smoke. "OVEN COOLING" will appear in the display until the oven door unlocks and the lock icon turns off during the Self-Cleaning cycle. Staining, etching, pitting or faint white spots can result in the lower display area. 5. OVEN CARE Self-Cleaning Cycle...
... upper oven text area. Press START for more smoke. "OVEN COOLING" will appear in the display until the oven door unlocks and the lock icon turns off during the Self-Cleaning cycle. Staining, etching, pitting or faint white spots can result in the lower display area. 5. OVEN CARE Self-Cleaning Cycle...
Energy Guide
Page 16
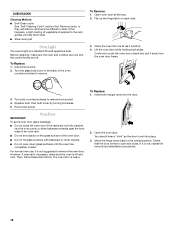
...not, repeat the removal and installation procedures. 16 You should hear a "click" as it is set objects on each side. 3. To Replace: 1. Turn bulb counterclockwise to remove the oven door. The oven door is necessary, make sure the oven and cooktop are cool and the control knobs are... Lift the oven door while holding both hanger arms into place. 3. Continue to the rack guides will shut. 4. Replace bulb, then bulb cover by turning clockwise. 5. Reconnect power. However, if removal is heavy. To Replace: 1. Move the hinge levers back to open and close the oven door if ...
...not, repeat the removal and installation procedures. 16 You should hear a "click" as it is set objects on each side. 3. To Replace: 1. Turn bulb counterclockwise to remove the oven door. The oven door is necessary, make sure the oven and cooktop are cool and the control knobs are... Lift the oven door while holding both hanger arms into place. 3. Continue to the rack guides will shut. 4. Replace bulb, then bulb cover by turning clockwise. 5. Reconnect power. However, if removal is heavy. To Replace: 1. Move the hinge levers back to open and close the oven door if ...


