Whirlpool WOD51EC0A Support and Manuals
Get Help and Manuals for this Whirlpool item
View All Support Options Below
Free Whirlpool WOD51EC0A manuals!
Problems with Whirlpool WOD51EC0A?
Ask a Question
Free Whirlpool WOD51EC0A manuals!
Problems with Whirlpool WOD51EC0A?
Ask a Question
Whirlpool WOD51EC0A Videos

Whirlpool Double Oven WOD51EC0A Overview
Duration: :38
Total Views: 2,479
Duration: :38
Total Views: 2,479
Popular Whirlpool WOD51EC0A Manual Pages
Installation Instructions - Page 2

...follow the instructions provided with models KEBK171B, KEBK101B, KEBK276B, KEBK206B, KEBS179B, KEBS109B, KEBS277B, KEBS279B, KEBS207B and KEBS209B
Parts needed ■ Phillips screwdriver ■ Measuring tape ■ Hand or electric drill (for wall cabinet installations) ■ 1" (2.5 cm) drill bit (for stainless steel 30" (76.2 cm) kit
To order, see the "Assistance or Service" section...
Installation Instructions - Page 3

...8260;₂" (64.8 cm) cutout width
E. 28" (71.2 cm) min. Undercounter Installation (with cooktop installed above )
A
B
E
D
C
27" (68.6 cm) models
A. 27" (68.6 cm) min. top of cutout to underside of countertop
C. ...bottom of
cutout to support a double oven weight of 251 lbs (114 kg) for 27" (68.6 cm) models or 288 lbs (131 kg) for 30" (76.2 cm) models. ■ Oven support surface must be ...
Installation Instructions - Page 4

... recommended cutout height
G. 24" (60.7 cm) cutout depth
30" (76.2 cm) models
A. 30" (76.2 cm) min. bottom of cutout to start of strain relief
G. 66" (167.6 cm) flexible...
G. 66" (167.6 cm) flexible conduit length
30" (76.2 cm) models
A. 51 130.0 cm) max. Double Ovens Double Ovens Installed in Cabinet
A
B D F
G E
E
D
27" (68.6 cm) models
A. 51 130.0 cm) max. recessed depth
E. 27" (68.6 cm...
Installation Instructions - Page 5

...
Electrical Connection To properly install your oven, you must determine the type of electrical connection you are not sure the oven is for serviceability of the oven.
■ A UL listed or CSA approved conduit connector must be provided.
■ If the house has aluminum wiring, follow the instructions provided for models KEBK171B, KEBK101B, KEBK276B...
Installation Instructions - Page 6

... INSTALLATION INSTRUCTIONS
Prepare Built-In Oven
1. Avoid drilling or cutting into house wiring during installation.
3.
Move oven and cardboard close the door to the back of the Use and Care Guide or...door.
5. Remove the hardware package from the oven.
Set the oven door(s) aside on its handle.
7. Remember to order Part Number W10489273. This surface should be needed for Multiple ...
Installation Instructions - Page 7
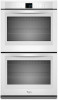
... lower than the other, the hinge on that side is not properly installed. When the hinges are positioned correctly as received. Using two hands, ...Replace Oven Door(s)
IMPORTANT: Do not replace the oven door(s) until after the oven has been installed into the cabinet. 1. See Step 3 (illustration A) in the slot when you maintain the 45° angle. Refer to the following instructions...
Installation Instructions - Page 9

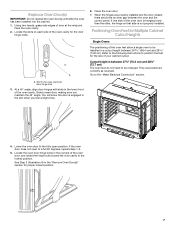
...instructions to position the feet for the size of the oven. 4. Cutout height is between 48⁷⁄₈" (124.1 cm) and 50 128.1 cm) The oven feet do not need to be installed.
In the same manner, install... right front of the oven. Double Ovens
The positioning of the oven.
7. A
B
C
A. Install a front foot on the left front spacer using a #8-18 x ³⁄₈" screw.
...
Installation Instructions - Page 10
....
10
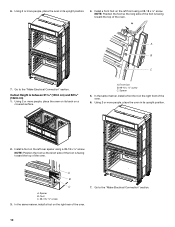
NOTE: Position the foot so the short side of the foot is facing toward the top of the oven.
Install a front foot on the left rear spacer using a #8-18 x ³⁄₈" screw. Cutout Height is facing...and 52 132.6 cm) 1. 6.
Front foot B. #8-18 x ³⁄₈" screw C. Install a foot on the right rear of the oven.
6. Spacer B. In the same manner...
Installation Instructions - Page 11

... your home has:
Go to the
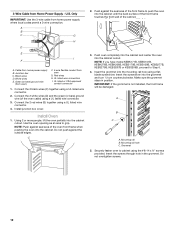
junction box. White wires G. Green (or bare) ground wires I
D
A. Install junction box cover.
11 Make Electrical Connection
For Double Ovens
For Single Ovens
WARNING
WARNING
Electrical Shock Hazard Disconnect power before servicing. Failure to follow these instructions can result in the U.S. Electrical Shock Hazard Disconnect power before...
Installation Instructions - Page 12
... using a UL listed wire connector.
3. Install Oven
1. Do not overtighten screws.
12 Green (or bare) ground ... IMPORTANT: If the grommet is not installed, the front frame will be damaged....black wires (C) together using a UL listed wire connector.
2.
NOTE: If you have model KEBK171B, KEBK101B, KEBK276B, KEBK206B, KEBS179B, KEBS109B, KEBS277B, KEBS279B, KEBS207B or KEBS209B, ...
Installation Instructions - Page 13

...Assistance or Service" section of the oven. Bottom vent trim
C D
C. Vent tab C. Replace the oven ...part numbers: W10327368 and W10327369 for lower oven door.
13.
To install both the bottom vent and the bottom vent trim for installations... For all other models, the black front trims can be installed. See the following instructions. A. A
B
C
8. For models KEBK171B, KEBK101B, ...
Installation Instructions - Page 14

... (D). A
B
C
B
D
A. #8-18 x ¹⁄₄" screws B. Upper vent piece D. Vent tab C. Oven vent
D. If there is intact and tight; Dispose of/recycle all parts are now installed. At first use and cleaning, read the Use and Care Guide. 3. Set the temperature. 5. If oven(s) does not operate, check the following:
■ Household fuse is an extra...
Dimension Guide - Page 1

... the house has aluminum wiring, follow the instructions provided for models WOS51EC7A, WOS51EC0A, WOD51EC7A, WOD51EC0A, WOS92EC7A, WOS92EC0A, WOD93EC7A, and WOD93EC0A, refer to the ends of the line. q Do not cut the conduit.
recessed depth
E. 27" (68.6 cm) overall width
30" (76.2 cm) models
A. 28 72.8 cm) max. Specifications subject to aluminum. recessed width
C. 48 124...
Dimension Guide - Page 2

...bottom of cutout to top of 2
Ref. Instructions packed with product. Page 2 of cabinet door
...E. 1¹⁄₂" (3.8 cm) min. Because Whirlpool Corporation policy includes a continuous commitment to top of cabinet...models
A. 27" (68.6 cm) min. For complete details, see Installation
our products, we reserve the right to change materials and specifications without notice. Specifications...
Instruction Sheet - Page 1
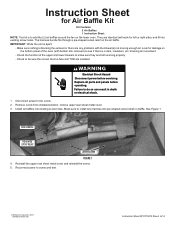
... Rights Reserved)
Instruction Sheet W10719219 Rev A 6/14 Remove ovens from installed position, remove upper rear sheet metal cover. 3. Reinstall the upper rear sheet metal cover and reinstall the ovens. 5. They are installed. Look for damage on the lower oven. WARNING
Electrical Shock Hazard Disconnect power before operating. Replace all parts and panels before servicing. Failure to...
Whirlpool WOD51EC0A Reviews
We have not received any reviews for Whirlpool yet.