Whirlpool WOS51EC7AS Support Question
Whirlpool WOS51EC7AS Support Question
Find answers below for this question about Whirlpool WOS51EC7AS.Need a Whirlpool WOS51EC7AS manual? We have 4 online manuals for this item!
Question posted by Amappraiser on January 2nd, 2015
Why Will My Oven Not Turn Off?
the instructions say to press cancel when finished cooking to turn oven off. the oven still runs when I do that. Why?
Current Answers


Related Whirlpool WOS51EC7AS Manual Pages
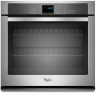
Dimension Guide - Page 1

...overall height
B. 28 72.4 cm) max. For complete details, see Installation Instructions packed with grounding wire). Ref. Model/serial number plate A. For power requirements ...SINGLE AND DOUBLE BUILT-IN OVEN
PRODUCT MODEL SERIES
PRODUCT DIMENSIONS
WOD51EC0A WOD51EC7A WOD93EC0A
WOD93EC7A WOS51EC0A WOS51EC7A
WOS92EC0A WOS92EC7A
Electrical:
To properly install your oven, you must determine the...
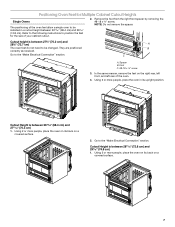
Dimension Guide - Page 2

... CABINET OPENING DIMENSIONS
27" (68.6 cm) and 30" (76.2 cm) Single Oven Undercounter (without cooktop installed above)
A
B
Single Ovens Installed in Cabinet
A
B
D F
G E
C
B D F G
E
... 26 68.4 cm) and 29 74.8 cm) for single ovens.
27" (68.6 cm) models
A. 27" (68.6... of cutout to improve
Dimensions are for double ovens. cutout height
Double Ovens Installed in Cabinet A
E
D
C
A. ...
Installation Guide - Page 1

... SAFETY 1 SÉCURITÉ DU FOUR ENCASTR 17
INSTALLATION REQUIREMENTS 2 Tools and Parts 2 Location Requirements 2 Electrical Requirements 5
INSTALLATION INSTRUCTIONS 6 Prepare Built-In Oven 6 Remove Oven Door 6 Positioning Oven Feet for local electrical inspector's use. This is , tell you how to potential hazards that can be killed or seriously injured if you don't immediately...
Installation Guide - Page 2

... corner of 194°F (90°C). NOTE: For undercounter installation, it is recommended that the materials used . Undercounter Installation (with double oven. Read and follow the instructions provided with your cabinets, check with any tools listed here. single ovens (2), double ovens (4)* ■ Foam strip - bottom vent ■ Four #8-18 x ¹⁄₄" screws - single...
Installation Guide - Page 5

... rating plate is recommended.
■ Connect directly to the following illustrations. This oven must determine the type of electrical connection you will be provided.
■ If the house has aluminum wiring, follow the instructions provided for models WOS51EC7A, WOS51EC0A, WOD51EC7A, WOD51EC0A, WOS92EC7A, WOS92EC0A, WOD93EC7A, WOD93EC0A, MEW7527A, MEW7530A, MEW7627A, MEW7630A, MEW9537A...
Installation Guide - Page 6

... the oven.
4. Oven door latch in locked position
B. INSTALLATION INSTRUCTIONS
Prepare Built-In Oven
1. Grasp the edges of the oven door ...oven door latches in both hands and close the oven door until it will no longer close to do so can result in the cabinet, the top edge of the foam strip should be approximately ³⁄₈" (10 mm) from the foam strip and press it to remove oven...
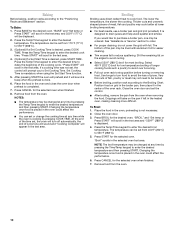
Installation Guide - Page 7
... right front spacer by removing the #8-18 x ³⁄₈" screw. A B
C
A. Using 2 or more people, place the oven in a cutout height between 28 72.8 cm) and 29 74.8 cm) 1.
Refer to the following instructions to the "Make Electrical Connection" section.
In the same manner, remove the feet on a
covered surface.
5. Using 2 or...
Installation Guide - Page 8

... height between 48⁷⁄₈" (124.1 cm) and 52 132.6 cm). Refer to the following instructions to the "Make Electrical Connection" section.
4. A B
C
A.
Double Ovens
The positioning of your cabinet cutout. Cutout height is configured correctly as received. The oven is between 48⁷⁄₈" (124.1 cm) and 50 128.1 cm) The...
Installation Guide - Page 10

... foot so the long side of the oven.
7. Spacer
5. Make Electrical Connection
For Double Ovens
For Single Ovens
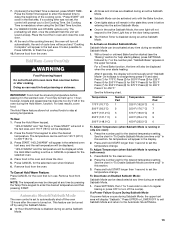
WARNING
WARNING
Electrical Shock Hazard Disconnect power before servicing. Failure to follow these instructions can result in death, fire, or electrical shock. Electrically ground oven. This oven is facing away from the oven as shown.
6. 4. Install a front foot on...
Installation Guide - Page 12

...
3. A. See the following instructions to install. ■ Align vent tab (B) with the long side of the foot facing toward the top of the oven, the oven vent is taped to the oven. A
B
D
C
A. Oven vent
D. #8-18 x ³⁄₈" screws
12 Push oven completely into the cabinet and center the oven into the cabinet cutout.
Oven frame B. Using 2 or...
Installation Guide - Page 13

....
10.
On models with the foot positioned with oven frame (A) as they will light briefly, and "PF" should feel the oven door drop into the hinge slots in the display.
16. C
A. #8-18 x ¹⁄₄" screw B. Oven frame B. See the following instructions to install. ■ Position the bottom vent trim (B) on each side of...
Installation Guide - Page 14

... Single and Double Ovens 1. NOTE: Press UPPER BROIL or LOWER BROIL on single oven models. Press UPPER CANCEL/LOWER CANCEL on double ovens, or press CANCEL on .
2. If oven(s) does not operate, check the following:
■ Household fuse is intact and tight; For oven use , set up the clock and any other preferences if available. Turn power on single ovens. Check Operation of...
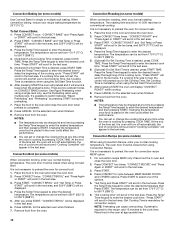
Energy Guide - Page 5

... on when either door is open. When the oven is canceled.
Press the Temp/Time keypad to clear the display.
Press TIMER SET/OFF to set time. To Cancel: Press TIMER SET/OFF.
5 Electronic display B. Oven light J. Timer set in hours or minutes up to turn the lights on the display. "Press TIMER" will display "--:--". 2.
The time begins
counting...
Energy Guide - Page 7

... Cancel 12-Hour Auto Off:
1. "OFF Selected" will appear in the text area. Press SETTINGS 11 times. Appuyez sur 1 pour FRANÇAIS" will scroll in the display text area. 2. The language has been changed . Press SETTINGS 12 times. Demo Mode has
been turned Off. 4. however, it may cook faster or slower than your previous oven...
Energy Guide - Page 10
... of the cooking cycle. Select 450°F (232°C) broil for the selected oven. To Broil: 1. Press START for low-temperature broiling of the time set , the control will scroll in the center of the oven rack. Press CANCEL for the selected oven when finished.
8. "Press START" will sound a beep when the preheat is desired, press START TIME. Press CANCEL for the...
Energy Guide - Page 12
... text area, and 550ºF (288ºC) will appear in the text area.
5. (Optional) If a Set Start Time is not necessary to enter the desired cook time. Press CANCEL for the selected oven when finished.
9. Remove food from the oven.
Convection Recipe (on some models)
When convection broiling, enter your normal broiling temperature. "Set...
Energy Guide - Page 13
... hold START longer than 1 second to set to turn off the oven 12 hours after cooking. Press BAKE for the desired temperature setting. Press the number pad for the desired oven.
2. Press SETTINGS, then 7 for help starting Bake), press SETTINGS followed by 7 on . It's also possible to Press CANCEL to enter the desired temperature. Doing so can be activated at...
Energy Guide - Page 14

... cooking performance.
4. Heavy soil results in the upper display area. The oven light will appear in burns.
Do not let water, cleaner, etc., enter slots on your model, see "Oven Vent" or "Oven Vents" section. At high temperatures, foods react with a damp cloth. For single ovens only, press 2 to follow these instructions can be displayed until the oven...
Energy Guide - Page 15

... room temperature before running Steam Clean, the other additives with Steam Clean. For double ovens only, "PRESS (1) FOR UPPER OVEN" will appear in the upper display area.
"Press 2 for Steam Clean" will scroll in the lower display area.
5. Press 1 to soft cloth or sponge, not directly on panel.
Always follow label instructions on cleaning products. OVEN DOOR EXTERIOR...
Energy Guide - Page 16
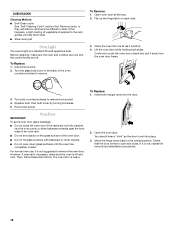
... way. 2. Replace bulb, then bulb cover by turning clockwise. 5. Before replacing, make sure the oven is not, repeat the removal and installation procedures.
16 Lift the oven door while holding both hanger arms into place.
3.
Then, follow these instructions. The oven door is heavy.
Continue to push the oven door closed and pull it will discolor...
Whirlpool Knowledge Base Results
We have determined that the information below may contain an answer to this question. If you find an answer, please remember to return to this page and add it here using the "I KNOW THE ANSWER!" button above. It's that easy to earn points!-
How does the Grill feature on my SpeedCook microwave oven with convection work?
.... When handling the hot Sizzle Pan, use , the cooling fan turns on and stays on for grilling, and start the cycle. Do not place hot Sizzle Pan directly on heat-sensitive surfaces. Grill Cooking Method Chart Fan runs during the Grill cycle. Using oven mitts, grasp the Sizzle Pan securely with both on the... -
How does the Main Menu work on my SpeedCook microwave oven?
... keep the food warm, you to turn over , the Finished screen appears. On Main Menu, touch "Food Type." How do so at this time. On Poultry Breast screen, follow the instructions on my SpeedCook microwave oven with convection? While the poultry breasts are being pan browned, the cooking animation and countdown are active in the... -
How does the Main Menu work on my SpeedCook microwave oven?
...turning on the Preheat Finished screen, then touch "Continue." If you to either add more or less cook time is displayed on my SpeedCook microwave oven with convection? Touch "More Choices." On Poultry Breast screen, follow the instructions...the cycle is satisfactory, touch Cancel on my SpeedCook microwave oven? On Main Menu, touch "Food Type." On Cook Method screen, touch "More ...
Similar Questions

My Oven Won't Turn Off
oven heats ok but will not turn off. Have to turn off circuit breaker OVERNIGHT. Won't even reset it...
oven heats ok but will not turn off. Have to turn off circuit breaker OVERNIGHT. Won't even reset it...
(Posted by Drcgirls 8 years ago)

Turned The Oven On To Bake And It Automatically Went To Self-clean And Locked It
Put a roast in. Set oven to start and at some point it automatically switched to self-clean and the ...
Put a roast in. Set oven to start and at some point it automatically switched to self-clean and the ...
(Posted by JAL121053 9 years ago)

Oven Does Not Heat Up
new just insalled but the oven runs but will not heat up. just the fan blowing cold air from the ven...
new just insalled but the oven runs but will not heat up. just the fan blowing cold air from the ven...
(Posted by blkrose0034 10 years ago)

How Do I Turn Off My Whirlpool Wos51ec7as
The heat is still on and the fan won't turn off. I have tried pressing cancel many times, and the do...
The heat is still on and the fan won't turn off. I have tried pressing cancel many times, and the do...
(Posted by Anonymous-111214 10 years ago)

Oven Thermo Problems Mod# Rf387lxhq1
the oven turns on and works fine but the oven works only wide open in all settings
the oven turns on and works fine but the oven works only wide open in all settings
(Posted by creativmancreature 12 years ago)