
Owners Manual 1
Page 3
... power at the fuse or circuit breaker panel. - I Do not cover racks or any materials, other utensil into the container. Microwavable utensils are placed inside the oven should ignite, keep oven door closed glass jars - I Do not store any other combustible materials are not suitable and it . - This will cause overheating of injury to heat, cook, or dry food. I Do not clean with any openings on the microwave oven...
... power at the fuse or circuit breaker panel. - I Do not cover racks or any materials, other utensil into the container. Microwavable utensils are placed inside the oven should ignite, keep oven door closed glass jars - I Do not store any other combustible materials are not suitable and it . - This will cause overheating of injury to heat, cook, or dry food. I Do not clean with any openings on the microwave oven...

Owners Manual 1
Page 4
...: (1) Door (bent), (2) Hinges and latches (broken or loosened), (3) Door seals and sealing surfaces. (d) The oven should not be longer. WARNING: This product contains one or more chemicals known to the State of the 240-volt circuit required for the lower oven. Electrical Requirements The microwave oven is connected to the microwave oven is less than 110 volts, cooking times may be adjusted or repaired by anyone except properly qualified service personnel...
...: (1) Door (bent), (2) Hinges and latches (broken or loosened), (3) Door seals and sealing surfaces. (d) The oven should not be longer. WARNING: This product contains one or more chemicals known to the State of the 240-volt circuit required for the lower oven. Electrical Requirements The microwave oven is connected to the microwave oven is less than 110 volts, cooking times may be adjusted or repaired by anyone except properly qualified service personnel...

Owners Manual 1
Page 5
... be set the time. The display is displayed. During use on a frequent basis. If the microwave oven is off . The touch panel allows you to personalize the audible tones and microwave oven and oven operation to suit your needs. OR 1. Oven Function Power/Cancel The Oven Power/Cancel keypad turns the oven on , the Microwave Power/Cancel keypad stops any oven function except the Clock, Timer, and Control Lock. The touch keypads are very sensitive and require only a light...
... be set the time. The display is displayed. During use on a frequent basis. If the microwave oven is off . The touch panel allows you to personalize the audible tones and microwave oven and oven operation to suit your needs. OR 1. Oven Function Power/Cancel The Oven Power/Cancel keypad turns the oven on , the Microwave Power/Cancel keypad stops any oven function except the Clock, Timer, and Control Lock. The touch keypads are very sensitive and require only a light...

Owners Manual 1
Page 8
Reheating a single serving of fruit. Simmering stews. Melting chocolate. Taking chill out of food. Turntable A B C A. Do not operate the microwave oven without having the turntable in both directions to use . See the "Assistance or Service" section to always leave the turntable on the support should fit inside the turntable bottom ridge. If necessary, the turntable can be turned off (except during microwave oven use by percent, name or number. Cooking small...
Reheating a single serving of fruit. Simmering stews. Melting chocolate. Taking chill out of food. Turntable A B C A. Do not operate the microwave oven without having the turntable in both directions to use . See the "Assistance or Service" section to always leave the turntable on the support should fit inside the turntable bottom ridge. If necessary, the turntable can be turned off (except during microwave oven use by percent, name or number. Cooking small...

Owners Manual 1
Page 10
... weight to increase soften time. 1. Select BOIL & SIMMER. 4. OPTIONAL: At any metal twist-ties and replace them with all times. Select KEEP WARM. 4. Remove any time while the microwave oven is still icy in the display screen. 5. To save a recipe, select the Favorites keypad (heart icon), and follow the prompts on the screen to increase boil and simmer time. 1. Select COOKING METHODS. 3. Use Steam...
... weight to increase soften time. 1. Select BOIL & SIMMER. 4. OPTIONAL: At any metal twist-ties and replace them with all times. Select KEEP WARM. 4. Remove any time while the microwave oven is still icy in the display screen. 5. To save a recipe, select the Favorites keypad (heart icon), and follow the prompts on the screen to increase boil and simmer time. 1. Select COOKING METHODS. 3. Use Steam...

Owners Manual 1
Page 11
... Support: Displays model number, Customer Support contact info, and Diagnostics ■■ Store Demo Mode: Select Store Demo Mode to toggle Demo Mode off , adjust the oven calibration, change the oven temperature between Fahrenheit and Celsius, turn the audible signals and prompts on the confirmation screen. 11 Select the Tools keypad. 2. Scroll and select INFO. 3. NOTE: The display screen will display. 4. NOTE: If user is used . Select KITCHEN TIMER. 2. Select START. 4. The Control Lock...
... Support: Displays model number, Customer Support contact info, and Diagnostics ■■ Store Demo Mode: Select Store Demo Mode to toggle Demo Mode off , adjust the oven calibration, change the oven temperature between Fahrenheit and Celsius, turn the audible signals and prompts on the confirmation screen. 11 Select the Tools keypad. 2. Scroll and select INFO. 3. NOTE: The display screen will display. 4. NOTE: If user is used . Select KITCHEN TIMER. 2. Select START. 4. The Control Lock...

Owners Manual 1
Page 12
... avoid damaging. Always follow label instructions on panel. ■■ All-Purpose Appliance Cleaner Part Number 31662 (not included): See the "Assistance or Service" section to the original factory default settings. ■■ Wi-Fi Terms and Conditions: www.whirlpool.com/connect. ■■ Software Terms and Conditions. Do not operate the microwave oven without the turntable in place. Soap, water, and...
... avoid damaging. Always follow label instructions on panel. ■■ All-Purpose Appliance Cleaner Part Number 31662 (not included): See the "Assistance or Service" section to the original factory default settings. ■■ Wi-Fi Terms and Conditions: www.whirlpool.com/connect. ■■ Software Terms and Conditions. Do not operate the microwave oven without the turntable in place. Soap, water, and...

Owners Manual 1
Page 13
... service. Humming Noise Microwave Oven Door This is set properly: See "Cooking Power" in place: Make sure turntable is correct side up and is not properly in the "Microwave Oven Use" section. If you avoid a service call for service. The Control Lock is normal and will not affect performance. Looks Wavy Turntable Will Not Operate The turntable is sitting securely on some models, reset the clock if needed. Replace turntable. See the "Assistance or Service" section. TROUBLESHOOTING...
... service. Humming Noise Microwave Oven Door This is set properly: See "Cooking Power" in place: Make sure turntable is correct side up and is not properly in the "Microwave Oven Use" section. If you avoid a service call for service. The Control Lock is normal and will not affect performance. Looks Wavy Turntable Will Not Operate The turntable is sitting securely on some models, reset the clock if needed. Replace turntable. See the "Assistance or Service" section. TROUBLESHOOTING...

Owners Manual 1
Page 14
... know the purchase date and the complete model and serial number of your correspondence 14 Accessories Accessories: U.S.A. For further assistance: If you need further assistance, you use only FSP® replacement parts. ASSISTANCE OR SERVICE Before calling for Combo Ovens Order Part Number W10495945 Combo Oven Microwave Side Trim Kit Order part Number W10536162 In Canada If you the cost of a service call Whirlpool Corporation Connected Appliances at 1-866-333-4591. To...
... know the purchase date and the complete model and serial number of your correspondence 14 Accessories Accessories: U.S.A. For further assistance: If you need further assistance, you use only FSP® replacement parts. ASSISTANCE OR SERVICE Before calling for Combo Ovens Order Part Number W10495945 Combo Oven Microwave Side Trim Kit Order part Number W10536162 In Canada If you the cost of a service call Whirlpool Corporation Connected Appliances at 1-866-333-4591. To...
Owners Manual 1
Page 15
... authorized Whirlpool Service Providers. PROOF OF PURCHASE IS REQUIRED TO OBTAIN WARRANTY SERVICE. Service to review the Troubleshooting or Problem Solver section of purchase, 1. Damage from the date of the Use and Care Guide, or visit www.whirlpool.com/product_help. 2. If you . Please take a few minutes to correct improper product maintenance or installation, installation not in which it was purchased, or at its sole discretion replace the product...
... authorized Whirlpool Service Providers. PROOF OF PURCHASE IS REQUIRED TO OBTAIN WARRANTY SERVICE. Service to review the Troubleshooting or Problem Solver section of purchase, 1. Damage from the date of the Use and Care Guide, or visit www.whirlpool.com/product_help. 2. If you . Please take a few minutes to correct improper product maintenance or installation, installation not in which it was purchased, or at its sole discretion replace the product...
Installation Instructions
Page 4
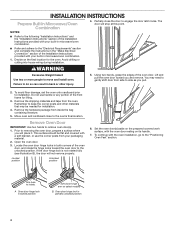
... microwave/oven combination. 1. If the door hinge lock is not rotated fully (see illustration B), the door will stop at this point. Locked position Unlocked position 6. INSTALLATION INSTRUCTIONS Prepare Built-In Microwave/Oven Combination 4. Avoid drilling or cutting into house wiring during installation. You may be flat and covered with a soft blanket, or use handle or any portion of the Installation Instructions provided with the oven installation, go to remove oven door(s). 1. Remove the shipping materials and tape from inside...
... microwave/oven combination. 1. If the door hinge lock is not rotated fully (see illustration B), the door will stop at this point. Locked position Unlocked position 6. INSTALLATION INSTRUCTIONS Prepare Built-In Microwave/Oven Combination 4. Avoid drilling or cutting into house wiring during installation. You may be flat and covered with a soft blanket, or use handle or any portion of the Installation Instructions provided with the oven installation, go to remove oven door(s). 1. Remove the shipping materials and tape from inside...
Installation Instructions
Page 5
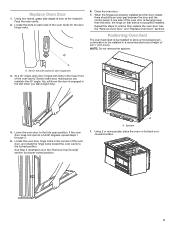
... cutout height of 421/2" (107.9 cm). Slowly insert door, making sure you feel a slight drop. 4. Using 2 or more people, place the oven on its back on each side of the oven cavity. See the "Remove Oven Door" and "Replace Oven Door" sections Positioning Oven Feet The oven feet need to be installed to allow a microwave/oven combination to the locked position. You will know the door is not properly installed. Locate the oven door hinge locks...
... cutout height of 421/2" (107.9 cm). Slowly insert door, making sure you feel a slight drop. 4. Using 2 or more people, place the oven on its back on each side of the oven cavity. See the "Remove Oven Door" and "Replace Oven Door" sections Positioning Oven Feet The oven feet need to be installed to allow a microwave/oven combination to the locked position. You will know the door is not properly installed. Locate the oven door hinge locks...

Installation Instructions
Page 8
... OVEN. 3. Select Cooking Method. 4. Check Operation of the cooking time, and the microwave oven will shut off. 7. Close door firmly. 2. Press MICROWAVE. 3. Press START. Close door firmly. The interior microwave oven light should turn off . 6. A tone will light. 10. Open microwave oven door and slowly remove container. Check that all packaging materials. 4. At first use and cleaning, read the Use and Care Guide. 2. The microwave should be on double ovens to 2 minutes. 5. Water in and microwave ovens. 8 Check that you purchased your built-in oven...
... OVEN. 3. Select Cooking Method. 4. Check Operation of the cooking time, and the microwave oven will shut off. 7. Close door firmly. 2. Press MICROWAVE. 3. Press START. Close door firmly. The interior microwave oven light should turn off . 6. A tone will light. 10. Open microwave oven door and slowly remove container. Check that all packaging materials. 4. At first use and cleaning, read the Use and Care Guide. 2. The microwave should be on double ovens to 2 minutes. 5. Water in and microwave ovens. 8 Check that you purchased your built-in oven...
Lower Oven Owners Manual
Page 1
... Cooking 6 Tools 7 More Modes 8 Aluminum Foil 9 Positioning Racks and Bakeware 9 Oven Vent(s 10 Preheating and Oven Temperature 10 Baking and Roasting 11 Broiling 11 OVEN CARE 12 Self-Cleaning Cycle 12 Steam Clean 13 General Cleaning 13 Oven Lights 14 TROUBLESHOOTING 14 ASSISTANCE OR SERVICE 16 In the U.S.A 16 Accessories 16 In Canada 16 WARRANTY 17 W11220320A Register your new oven at www.whirlpool.ca. These can be located on the right-hand side underneath the control panel. LOWER OVEN USER INSTRUCTIONS...
... Cooking 6 Tools 7 More Modes 8 Aluminum Foil 9 Positioning Racks and Bakeware 9 Oven Vent(s 10 Preheating and Oven Temperature 10 Baking and Roasting 11 Broiling 11 OVEN CARE 12 Self-Cleaning Cycle 12 Steam Clean 13 General Cleaning 13 Oven Lights 14 TROUBLESHOOTING 14 ASSISTANCE OR SERVICE 16 In the U.S.A 16 Accessories 16 In Canada 16 WARRANTY 17 W11220320A Register your new oven at www.whirlpool.ca. These can be located on the right-hand side underneath the control panel. LOWER OVEN USER INSTRUCTIONS...
Lower Oven Owners Manual
Page 2
... touch hot heating elements. Do not use , do not let potholder contact hot heating element in oven. ■ DO NOT TOUCH HEATING ELEMENTS OR INTERIOR SURFACES OF OVEN - Let hot air or steam escape before removing or replacing food. ■ Do Not Heat Unopened Food Containers - Remove broiler pan and other bulky cloth. ■ Use Care When Opening Door - Loose-fitting or hanging garments should never be moved while oven is properly installed and...
... touch hot heating elements. Do not use , do not let potholder contact hot heating element in oven. ■ DO NOT TOUCH HEATING ELEMENTS OR INTERIOR SURFACES OF OVEN - Let hot air or steam escape before removing or replacing food. ■ Do Not Heat Unopened Food Containers - Remove broiler pan and other bulky cloth. ■ Use Care When Opening Door - Loose-fitting or hanging garments should never be moved while oven is properly installed and...

Lower Oven Owners Manual
Page 4
.... Cooking Method Feature BAKE Baking and Roasting BROIL Broiling Instructions 1. The touch panel allows you can set the time. If the oven timer is not set, you to begin preheating. During use , the display will remain bright. Press the Oven Power keypad. 2. Select START to scroll through the oven menus. Touch Panel The touch panel houses the control menu and function controls. The touch keypads are very sensitive and require only a light touch to enter Demo Mode...
.... Cooking Method Feature BAKE Baking and Roasting BROIL Broiling Instructions 1. The touch panel allows you can set the time. If the oven timer is not set, you to begin preheating. During use , the display will remain bright. Press the Oven Power keypad. 2. Select START to scroll through the oven menus. Touch Panel The touch panel houses the control menu and function controls. The touch keypads are very sensitive and require only a light touch to enter Demo Mode...
Lower Oven Owners Manual
Page 12
...; Remove the broiler pan, grid, cookware and bakeware, and, on door frame. Staining, etching, pitting, or faint white spots can result in noise may be noticeable during the Self-Cleaning cycle. Select START DELAY. To Stop Self-Cleaning Anytime: Touch the Oven Cancel Keypad. The Self-Cleaning cycle uses very high temperatures, burning soil to set a delayed Self-Cleaning cycle. To avoid breaking the glass, do not force the doors open when the oven is locked...
...; Remove the broiler pan, grid, cookware and bakeware, and, on door frame. Staining, etching, pitting, or faint white spots can result in noise may be noticeable during the Self-Cleaning cycle. Select START DELAY. To Stop Self-Cleaning Anytime: Touch the Oven Cancel Keypad. The Self-Cleaning cycle uses very high temperatures, burning soil to set a delayed Self-Cleaning cycle. To avoid breaking the glass, do not force the doors open when the oven is locked...
Lower Oven Owners Manual
Page 14
... models, reset the clock if needed. Higher temperatures will not operate Oven temperature too high or too low Display shows messages Clean cycle did not work on : "Control Lock" will help you need further assistance or more information. To Replace: 1. Open oven door. 3. See the "Warranty" section for preheat recommendations. See the "Accessories" and "Self-Cleaning Cycle" sections for stubborn soils. Removing unused oven racks prior to unlock. Turn the glass bulb cover in this manual, or visit producthelp.www.whirlpool.com. TROUBLESHOOTING...
... models, reset the clock if needed. Higher temperatures will not operate Oven temperature too high or too low Display shows messages Clean cycle did not work on : "Control Lock" will help you need further assistance or more information. To Replace: 1. Open oven door. 3. See the "Warranty" section for preheat recommendations. See the "Accessories" and "Self-Cleaning Cycle" sections for stubborn soils. Removing unused oven racks prior to unlock. Turn the glass bulb cover in this manual, or visit producthelp.www.whirlpool.com. TROUBLESHOOTING...

Lower Oven Owners Manual
Page 16
... and specifications on our full line of a service call Whirlpool Corporation Connected Appliances at www.whirlpool.com/cookingaccessories Porcelain Broiler Pan and Grid Order Part Number 4396923 Premium Broiler Pan and Roasting Rack Order Part Number W10123240 Affresh® Stainless Steel Cleaner (stainless steel models) Order Part Number W10355016 Affresh® Kitchen and Appliance Cleaner Order Part Number W10355010 Accessories Microwave Steamer Order Part Number 8205262RB 30" (76.2 cm) FIT Kit Vent Trim for Combo Ovens Order Part Number W10495947 27...
... and specifications on our full line of a service call Whirlpool Corporation Connected Appliances at www.whirlpool.com/cookingaccessories Porcelain Broiler Pan and Grid Order Part Number 4396923 Premium Broiler Pan and Roasting Rack Order Part Number W10123240 Affresh® Stainless Steel Cleaner (stainless steel models) Order Part Number W10355016 Affresh® Kitchen and Appliance Cleaner Order Part Number W10355010 Accessories Microwave Steamer Order Part Number 8205262RB 30" (76.2 cm) FIT Kit Vent Trim for Combo Ovens Order Part Number W10495947 27...
Lower Oven Owners Manual
Page 17
.... your product requires repair. Discoloration, rust or oxidation of household electrical or plumbing (i.e. is installed, installation instructions. Some states and provinces do not allow limitations on how to chemicals. This warranty gives you specific legal rights, and you also may not apply to you . instructions attached to province. Service to correct product damage or defects caused by a Whirlpool designated service company. 11. Consumable parts (i.e. In...
.... your product requires repair. Discoloration, rust or oxidation of household electrical or plumbing (i.e. is installed, installation instructions. Some states and provinces do not allow limitations on how to chemicals. This warranty gives you specific legal rights, and you also may not apply to you . instructions attached to province. Service to correct product damage or defects caused by a Whirlpool designated service company. 11. Consumable parts (i.e. In...


