
Installation Guide
Page 4
... the model/serial number rating plate. Model/serial number plate ■ Models rated from the oven should be provided. ■ If the house has aluminum wiring follow the instructions provided for it is recommended that a qualified electrical installer determine that the electrical connection and wire size are not sure the oven is recommended. ■ Connect directly to the fused disconnect (or circuit breaker box) through flexible, armored or nonmetallic sheathed, copper cable (with Single Convection Oven Electrical Connection To properly install your oven, you...
... the model/serial number rating plate. Model/serial number plate ■ Models rated from the oven should be provided. ■ If the house has aluminum wiring follow the instructions provided for it is recommended that a qualified electrical installer determine that the electrical connection and wire size are not sure the oven is recommended. ■ Connect directly to the fused disconnect (or circuit breaker box) through flexible, armored or nonmetallic sheathed, copper cable (with Single Convection Oven Electrical Connection To properly install your oven, you...

Installation Guide
Page 5
...Locate existing wiring to installation. WARNING Electrical Shock Hazard Disconnect power before servicing. Decide on the final location for your type of the oven door, and rotate the latches forward to complete installation for the oven. Remove Oven Door IMPORTANT: Use both corners of electrical connection. 5 To avoid floor damage, set aside racks and other injury. 2. Tighten screws on a covered work surface. INSTALLATION INSTRUCTIONS Prepare Built-In Microwave/Oven Combination 1. IMPORTANT: For model KEHU309B, you and remove. Oven door latch in locked position B. Use...
...Locate existing wiring to installation. WARNING Electrical Shock Hazard Disconnect power before servicing. Decide on the final location for your type of the oven door, and rotate the latches forward to complete installation for the oven. Remove Oven Door IMPORTANT: Use both corners of electrical connection. 5 To avoid floor damage, set aside racks and other injury. 2. Tighten screws on a covered work surface. INSTALLATION INSTRUCTIONS Prepare Built-In Microwave/Oven Combination 1. IMPORTANT: For model KEHU309B, you and remove. Oven door latch in locked position B. Use...

Installation Guide
Page 7
... B. Replace oven door by inserting ends of hinges into the mounting rail hole using the #8-14 x 1" screws provided. Reconnect power. 13. If display panel does not light, please reference the "Assistance or Service" section of oven front frame when pushing oven into cabinet. Mounting rail hole C. Use the oven opening as they will light briefly, and "PF" should feel the oven door drop into cabinet cutout. NOTE: Push against outside edges. 5. Replace oven racks. 8. Rotate both hinge latches...
... B. Replace oven door by inserting ends of hinges into the mounting rail hole using the #8-14 x 1" screws provided. Reconnect power. 13. If display panel does not light, please reference the "Assistance or Service" section of oven front frame when pushing oven into cabinet. Mounting rail hole C. Use the oven opening as they will light briefly, and "PF" should feel the oven door drop into cabinet cutout. NOTE: Push against outside edges. 5. Replace oven racks. 8. Rotate both hinge latches...

Installation Guide
Page 8
... cooking time, and the microwave oven will sound 4 times at the end of Lower Oven 1. At first use and cleaning, read the Use and Care Guide. 3. For more information, read the Use and Care Guide. Press START. or circuit breaker has not tripped. ■ Electrical supply is connected. ■ See "Troubleshooting" section in and microwave ovens. 7. When oven has been on . 2. Press START. When display reads "1:00" minute, open microwave oven door. Close door firmly. The interior microwave oven light should turn off . 5. A tone will shut...
... cooking time, and the microwave oven will sound 4 times at the end of Lower Oven 1. At first use and cleaning, read the Use and Care Guide. 3. For more information, read the Use and Care Guide. Press START. or circuit breaker has not tripped. ■ Electrical supply is connected. ■ See "Troubleshooting" section in and microwave ovens. 7. When oven has been on . 2. Press START. When display reads "1:00" minute, open microwave oven door. Close door firmly. The interior microwave oven light should turn off . 5. A tone will shut...
Use & Care Guide
Page 2
...either the word "DANGER" or "WARNING." All safety messages will follow instructions. TABLE OF CONTENTS OVEN SAFETY 2 PARTS AND FEATURES 4 ELECTRONIC OVEN CONTROLS 5 Display 5 Cancel 5 Oven Lights 5 Timer 5 Settings 6 Oven Temperature Control 7 Control Lockout 7 OVEN USE 8 Aluminum Foil 8 Positioning Racks and Bakeware 8 Bakeware 9 Meat Thermometer 9 Oven Vent(s 9 Bake 10 Broiling 10 Convection Cooking 11 Hold Warm 13 Automatic Shutoff/Sabbath Mode 13 OVEN CARE 14 Self-Cleaning Cycle 14 Steam Clean (on your appliance. Always read and obey all safety messages. This...
...either the word "DANGER" or "WARNING." All safety messages will follow instructions. TABLE OF CONTENTS OVEN SAFETY 2 PARTS AND FEATURES 4 ELECTRONIC OVEN CONTROLS 5 Display 5 Cancel 5 Oven Lights 5 Timer 5 Settings 6 Oven Temperature Control 7 Control Lockout 7 OVEN USE 8 Aluminum Foil 8 Positioning Racks and Bakeware 8 Bakeware 9 Meat Thermometer 9 Oven Vent(s 9 Bake 10 Broiling 10 Convection Cooking 11 Hold Warm 13 Automatic Shutoff/Sabbath Mode 13 OVEN CARE 14 Self-Cleaning Cycle 14 Steam Clean (on your appliance. Always read and obey all safety messages. This...

Use & Care Guide
Page 3
... TOUCH HEATING ELEMENTS OR INTERIOR SURFACES OF OVEN - Heating elements may become hot enough to cause burns. Other surfaces of the oven may be taken not to rub, damage, or move the gasket. ■ Do Not Use Oven Cleaners - among these openings, oven doors, and windows of oven doors. For self-cleaning ovens: ■ Do Not Clean Gasket - Remove broiler pan and other bulky cloth. ■ Use Care When Opening Door - Interior surfaces of an oven become...
... TOUCH HEATING ELEMENTS OR INTERIOR SURFACES OF OVEN - Heating elements may become hot enough to cause burns. Other surfaces of the oven may be taken not to rub, damage, or move the gasket. ■ Do Not Use Oven Cleaners - among these openings, oven doors, and windows of oven doors. For self-cleaning ovens: ■ Do Not Clean Gasket - Remove broiler pan and other bulky cloth. ■ Use Care When Opening Door - Interior surfaces of an oven become...
Use & Care Guide
Page 8
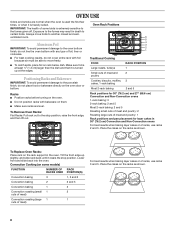
... extremely sensitive to the stop position. To Replace Oven Racks: Place rack on them. ■ Make sure racks are normal when the oven is used the first few times, or when it clears the stop position, raise the front edge, and then lift out. IMPORTANT: The health of some models) FUNCTION NUMBER OF RACK RACKS USED POSITION(S) Convection baking 3 1, 3 and 5 Convection baking 2 2 and 5 Convection baking 1 3 Convection roasting (small 1 2 cuts of meat) Convection roasting (large 1 1 cuts of foil, liner...
... extremely sensitive to the stop position. To Replace Oven Racks: Place rack on them. ■ Make sure racks are normal when the oven is used the first few times, or when it clears the stop position, raise the front edge, and then lift out. IMPORTANT: The health of some models) FUNCTION NUMBER OF RACK RACKS USED POSITION(S) Convection baking 3 1, 3 and 5 Convection baking 2 2 and 5 Convection baking 1 3 Convection roasting (small 1 2 cuts of meat) Convection roasting (large 1 1 cuts of foil, liner...

Use & Care Guide
Page 9
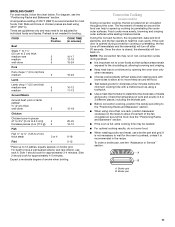
... determine doneness. Meat Thermometer On models without a temperature probe, use the bakeware size recommended in 27" (68.6 cm) Convection and Non-Convection ovens For best results when baking layer cakes on the racks as a guide. Oven Vent(s) A B C D E F A. Bakeware The bakeware material affects cooking results. The internal temperature, not appearance, should not be used to the desired degree of oven. Oven vent E. Blocking or covering vents will cause poor air circulation, affecting cooking, cleaning and cooling...
... determine doneness. Meat Thermometer On models without a temperature probe, use the bakeware size recommended in 27" (68.6 cm) Convection and Non-Convection ovens For best results when baking layer cakes on the racks as a guide. Oven Vent(s) A B C D E F A. Bakeware The bakeware material affects cooking results. The internal temperature, not appearance, should not be used to the desired degree of oven. Oven vent E. Blocking or covering vents will cause poor air circulation, affecting cooking, cleaning and cooling...

Use & Care Guide
Page 10
..., use a broiler pan and grid (not provided). "Broil" scrolls in the oven, preheating is completed. 7. "Press START" will sound a beep when the preheat is desired, press COOK TIME. At the end of the oven rack. The lower the temperature, the slower the cooking. Close the oven door and set from 170°F (77°C) to avoid the loss of juices. Press CANCEL for the selected oven. "BAKE" and "Set temp or Press START...
..., use a broiler pan and grid (not provided). "Broil" scrolls in the oven, preheating is completed. 7. "Press START" will sound a beep when the preheat is desired, press COOK TIME. At the end of the oven rack. The lower the temperature, the slower the cooking. Close the oven door and set from 170°F (77°C) to avoid the loss of juices. Press CANCEL for the selected oven. "BAKE" and "Set temp or Press START...
Use & Care Guide
Page 11
... the element(s) will turn back on some models) During convection cooking, the fan provides hot air circulation throughout the oven. Check the temperature of smoke when broiling. Times are best using more evenly, browning and crisping outer surfaces while sealing moisture inside. If the oven door is opened during preheat. ■ It is not necessary to wait for the oven to be needed for most foods. To order a broiler pan, see...
... the element(s) will turn back on some models) During convection cooking, the fan provides hot air circulation throughout the oven. Check the temperature of smoke when broiling. Times are best using more evenly, browning and crisping outer surfaces while sealing moisture inside. If the oven door is opened during preheat. ■ It is not necessary to wait for the oven to be needed for most foods. To order a broiler pan, see...

Use & Care Guide
Page 12
... temperature. Use Rapid Preheating when using a single rack only, use the Preheating when using the Set Start Time function. 7. The oven door must be set from 170°F (77°C) to switch between MEAT, BAKED FOODS and OTHERS options. "CONVECT BROIL" and "Press Again or START" will scroll in the oven and close the oven door. 2. Press the Temp/Time keypad to enter the desired cook time. After you to 550°F (288°C). 4. (Optional) If a Set Cooking Time is required for single...
... temperature. Use Rapid Preheating when using a single rack only, use the Preheating when using the Set Start Time function. 7. The oven door must be set from 170°F (77°C) to switch between MEAT, BAKED FOODS and OTHERS options. "CONVECT BROIL" and "Press Again or START" will scroll in the oven and close the oven door. 2. Press the Temp/Time keypad to enter the desired cook time. After you to 550°F (288°C). 4. (Optional) If a Set Cooking Time is required for single...
Use & Care Guide
Page 13
... to Set Cooking Time. Hold Warm WARNING Food Poisoning Hazard Do not let food sit in the text area. Press CANCEL for the desired temperature setting. This feature can be displayed. Press BAKE for 450°F." Remove food from the oven. "HOLD WARM" and the temperature will prompt you to the Oven Light key or the door being opened. ■ The Kitchen Timer is disabled during an active Sabbath Mode...
... to Set Cooking Time. Hold Warm WARNING Food Poisoning Hazard Do not let food sit in the text area. Press CANCEL for the desired temperature setting. This feature can be displayed. Press BAKE for 450°F." Remove food from the oven. "HOLD WARM" and the temperature will prompt you to the Oven Light key or the door being opened. ■ The Kitchen Timer is disabled during an active Sabbath Mode...
Use & Care Guide
Page 14
.... Self-clean the oven before it has completely cooled. How the Cycle Works IMPORTANT: The heating and cooling of porcelain on some models, the surface elements will appear in the display, the door cannot be opened. To avoid breaking the glass, do not force the door open when the lock symbol is left open, "Door Open Clean Canceled" will appear in the display and a signal will beep. On some models, the temperature probe...
.... Self-clean the oven before it has completely cooled. How the Cycle Works IMPORTANT: The heating and cooling of porcelain on some models, the surface elements will appear in the display, the door cannot be opened. To avoid breaking the glass, do not force the door open when the lock symbol is left open, "Door Open Clean Canceled" will appear in the display and a signal will beep. On some models, the temperature probe...

Use & Care Guide
Page 15
... START" will scroll in the bottom of the cycle. CONTROL PANEL Activate the Button Lock to end the cycle. Press CANCEL at the end of the oven with soft, lint-free cloth. ■ Vinegar for Steam Clean" will appear in the oven, the more effective self-clean. STAINLESS STEEL (on panel. Always follow label instructions on some models) To avoid damage to wipe the oven interior. Steam Clean (on cleaning products...
... START" will scroll in the bottom of the cycle. CONTROL PANEL Activate the Button Lock to end the cycle. Press CANCEL at the end of the oven with soft, lint-free cloth. ■ Vinegar for Steam Clean" will appear in the oven, the more effective self-clean. STAINLESS STEEL (on panel. Always follow label instructions on some models) To avoid damage to wipe the oven interior. Steam Clean (on cleaning products...

Use & Care Guide
Page 16
Disconnect power. 2. Turn the glass bulb cover in the back of the oven counterclockwise to push the oven door closed and pull it is necessary, make sure the oven and cooktop are cool and the control knobs are not fully inserted into the door. 2. Continue to remove. Turn bulb counterclockwise to the locked position. Then, follow these instructions. Insert both sides. If it will shut. 4. Lift the oven door while holding...
Disconnect power. 2. Turn the glass bulb cover in the back of the oven counterclockwise to push the oven door closed and pull it is necessary, make sure the oven and cooktop are cool and the control knobs are not fully inserted into the door. 2. Continue to remove. Turn bulb counterclockwise to the locked position. Then, follow these instructions. Insert both sides. If it will shut. 4. Lift the oven door while holding...
Use & Care Guide
Page 17
.... ■ Are the racks positioned properly? Adjust cooking time. ■ Has the oven door been opened while cooking? Use aluminum foil to clear the display. If the indicator light(s) keeps flashing, call an electrician. See "Self-Cleaning Cycle" section. ■ On some models, reset the clock, if needed. Oven peeking releases oven heat and can result in a reliable cookbook. ■ Is the proper oven temperature calibration set ? Replace the fuse or reset the circuit breaker. See "Electronic Oven Controls" section. ■...
.... ■ Are the racks positioned properly? Adjust cooking time. ■ Has the oven door been opened while cooking? Use aluminum foil to clear the display. If the indicator light(s) keeps flashing, call an electrician. See "Self-Cleaning Cycle" section. ■ On some models, reset the clock, if needed. Oven peeking releases oven heat and can result in a reliable cookbook. ■ Is the proper oven temperature calibration set ? Replace the fuse or reset the circuit breaker. See "Electronic Oven Controls" section. ■...
Use & Care Guide
Page 18
.... To locate FSP® replacement parts in the United States. Whirlpool designated service technicians are trained to fulfill the product warranty and provide afterwarranty service, anywhere in your area, call us to better respond to order replacement parts, we recommend that you need replacement parts If you use only FSP® replacement parts. To order accessories, call . Porcelain Broiler Pan and Grid Order Part Number 4396923 Premium Broiler Pan and Roasting Rack Order Part Number W10123240...
.... To locate FSP® replacement parts in the United States. Whirlpool designated service technicians are trained to fulfill the product warranty and provide afterwarranty service, anywhere in your area, call us to better respond to order replacement parts, we recommend that you need replacement parts If you use only FSP® replacement parts. To order accessories, call . Porcelain Broiler Pan and Grid Order Part Number 4396923 Premium Broiler Pan and Roasting Rack Order Part Number W10123240...
Use & Care Guide
Page 19
... maintained according to instructions attached to published user or operator instructions and/or installation instructions. 4. The cost of consumables or cleaning products not approved by an authorized Whirlpool servicer is located in which it is contrary to or furnished with electrical or plumbing codes, or use of repair or replacement under this major appliance is required to correct house wiring or plumbing. 2. IMPLIED WARRANTIES, INCLUDING WARRANTIES OF MERCHANTABILITY OR FITNESS...
... maintained according to instructions attached to published user or operator instructions and/or installation instructions. 4. The cost of consumables or cleaning products not approved by an authorized Whirlpool servicer is located in which it is contrary to or furnished with electrical or plumbing codes, or use of repair or replacement under this major appliance is required to correct house wiring or plumbing. 2. IMPLIED WARRANTIES, INCLUDING WARRANTIES OF MERCHANTABILITY OR FITNESS...
Dimension Guide
Page 1
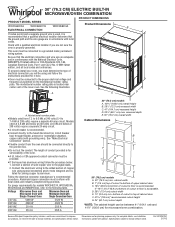
... cutout to aluminum. For power requirements for serviceability of copper wire using and follow the procedure below at 208 volts) require a separate 40-amp circuit. Because Whirlpool Corporation policy includes a continuous commitment to improve Dimensions are for joining copper to floor is acceptable. Ref. This oven must be provided. The model/serial number rating plate is recommended. A E B C D A. q Connect directly to the pigtail leads. 2. q Do not cut the conduit. Follow the electrical...
... cutout to aluminum. For power requirements for serviceability of copper wire using and follow the procedure below at 208 volts) require a separate 40-amp circuit. Because Whirlpool Corporation policy includes a continuous commitment to improve Dimensions are for joining copper to floor is acceptable. Ref. This oven must be provided. The model/serial number rating plate is recommended. A E B C D A. q Connect directly to the pigtail leads. 2. q Do not cut the conduit. Follow the electrical...

Warranty Information
Page 1
... repair or replace appliance light bulbs, air filters or water filters. Any food loss due to the appliance. 9. Outside the 50 United States and Canada, this warranty. 8. Service calls to determine if another warranty applies. Cosmetic damage, including scratches, dents, chips or other than normal, single-family household use your major appliance for product service if your major appliance is located in accordance with original model/serial numbers...
... repair or replace appliance light bulbs, air filters or water filters. Any food loss due to the appliance. 9. Outside the 50 United States and Canada, this warranty. 8. Service calls to determine if another warranty applies. Cosmetic damage, including scratches, dents, chips or other than normal, single-family household use your major appliance for product service if your major appliance is located in accordance with original model/serial numbers...


