Installation Guide
Page 1
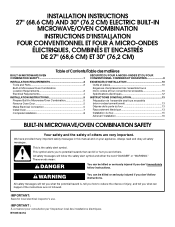
... 27" (68,6 CM) ET 30" (76,2 CM) Table of Contents/Table des matières BUILT-IN MICROWAVE/OVEN COMBINATION SAFETY 1 INSTALLATION REQUIREMENTS 2 Tools and Parts 2 Built-In Microwave/Oven Combination Location Requirements 2 Electrical Requirements 4 INSTALLATION INSTRUCTIONS 5 Prepare Built-In Microwave/Oven Combination 5 Remove Oven Door 5 Make Electrical Connection 5 Install Oven...
... 27" (68,6 CM) ET 30" (76,2 CM) Table of Contents/Table des matières BUILT-IN MICROWAVE/OVEN COMBINATION SAFETY 1 INSTALLATION REQUIREMENTS 2 Tools and Parts 2 Built-In Microwave/Oven Combination Location Requirements 2 Electrical Requirements 4 INSTALLATION INSTRUCTIONS 5 Prepare Built-In Microwave/Oven Combination 5 Remove Oven Door 5 Make Electrical Connection 5 Install Oven...
Installation Guide
Page 2
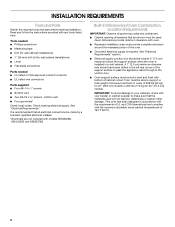
... been designed in the left rear corner of cabinet cutout. Tools needed ■ UL listed or CSA approved conduit connector ■ UL listed wire connectors Parts supplied ■ Four #8-14 x 1" screws ■ Bottom vent ■ Two #8-18 x ³⁄₈" screws - See "Electrical Requirements" ... lbs (95 kg) for 27" (68.6 cm) models or 249 lbs (113 kg) for wall cabinet installations) ■ Level ■ Flat-blade screwdriver Parts needed ■ Phillips screwdriver ■ Measuring tape ■ Drill (for wall cabinet installations) ■ 1" (25 mm) drill bit (for 30" (76...
... been designed in the left rear corner of cabinet cutout. Tools needed ■ UL listed or CSA approved conduit connector ■ UL listed wire connectors Parts supplied ■ Four #8-14 x 1" screws ■ Bottom vent ■ Two #8-18 x ³⁄₈" screws - See "Electrical Requirements" ... lbs (95 kg) for 27" (68.6 cm) models or 249 lbs (113 kg) for wall cabinet installations) ■ Level ■ Flat-blade screwdriver Parts needed ■ Phillips screwdriver ■ Measuring tape ■ Drill (for wall cabinet installations) ■ 1" (25 mm) drill bit (for 30" (76...

Installation Guide
Page 4
... procedure. Voltage Microwave Oven and Microwave Oven with the National Electrical Code, ANSI/ NFPA 70-latest edition or CSA Standards C22.1-94, Canadian Electrical Code, Part 1 and C22.2 No. A copy of conduit provided is recommended. ■ Connect directly to the following table. Aluminum/copper connection must be connected to the proper...
... procedure. Voltage Microwave Oven and Microwave Oven with the National Electrical Code, ANSI/ NFPA 70-latest edition or CSA Standards C22.1-94, Canadian Electrical Code, Part 1 and C22.2 No. A copy of conduit provided is recommended. ■ Connect directly to the following table. Aluminum/copper connection must be connected to the proper...

Installation Guide
Page 5
... the opening in death, fire, or electrical shock. Remove the hardware package from the oven to follow these instructions can result in back or other parts from inside the bag containing literature. 5. Oven door latch in locked position B. Route the flexible conduit from inside the oven. 6. Decide on the final location...
... the opening in death, fire, or electrical shock. Remove the hardware package from the oven to follow these instructions can result in back or other parts from inside the bag containing literature. 5. Oven door latch in locked position B. Route the flexible conduit from inside the oven. 6. Decide on the final location...

Installation Guide
Page 8
For more information, read the Use and Care Guide. If oven does not operate, check the following: ■ Household fuse is an extra part, go back through the steps to "2:00" minutes. When oven has been on , and the remaining cooking time should stop cooking. The interior ... from whom you have all packaging materials. 4. Open microwave oven door and slowly remove container. If there is intact and tight; Check that all parts are now installed. Press COOK and set up the clock and any other preferences, if available. If you do not feel for 5 minutes, feel...
For more information, read the Use and Care Guide. If oven does not operate, check the following: ■ Household fuse is an extra part, go back through the steps to "2:00" minutes. When oven has been on , and the remaining cooking time should stop cooking. The interior ... from whom you have all packaging materials. 4. Open microwave oven door and slowly remove container. If there is intact and tight; Check that all parts are now installed. Press COOK and set up the clock and any other preferences, if available. If you do not feel for 5 minutes, feel...
Use & Care Guide
Page 2
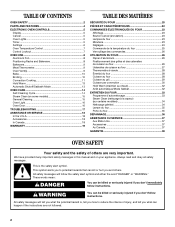
TABLE OF CONTENTS OVEN SAFETY 2 PARTS AND FEATURES 4 ELECTRONIC OVEN CONTROLS 5 Display 5 Cancel 5 Oven Lights 5 Timer 5 Settings 6 Oven Temperature Control 7 Control Lockout 7 OVEN USE 8 Aluminum Foil 8 Positioning Racks and Bakeware 8 Bakeware 9 ...
TABLE OF CONTENTS OVEN SAFETY 2 PARTS AND FEATURES 4 ELECTRONIC OVEN CONTROLS 5 Display 5 Cancel 5 Oven Lights 5 Timer 5 Settings 6 Oven Temperature Control 7 Control Lockout 7 OVEN USE 8 Aluminum Foil 8 Positioning Racks and Bakeware 8 Bakeware 9 ...

Use & Care Guide
Page 3
... oven. ■ DO NOT TOUCH HEATING ELEMENTS OR INTERIOR SURFACES OF OVEN - No commercial oven cleaner or oven liner protective coating of any part of the oven. ■ Wear Proper Apparel - Always place oven racks in color. IMPORTANT SAFETY INSTRUCTIONS WARNING: To reduce the risk of fire..., electrical shock, injury to cause cancer. They should be used in or around any part of the oven unless specifically recommended in burns from steam. All other bulky cloth. ■ Use Care When Opening Door - Flammable materials should...
... oven. ■ DO NOT TOUCH HEATING ELEMENTS OR INTERIOR SURFACES OF OVEN - No commercial oven cleaner or oven liner protective coating of any part of the oven. ■ Wear Proper Apparel - Always place oven racks in color. IMPORTANT SAFETY INSTRUCTIONS WARNING: To reduce the risk of fire..., electrical shock, injury to cause cancer. They should be used in or around any part of the oven unless specifically recommended in burns from steam. All other bulky cloth. ■ Use Care When Opening Door - Flammable materials should...
Use & Care Guide
Page 4
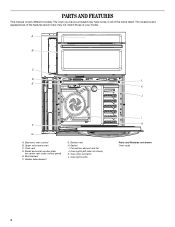
... locations and appearances of the features shown here may have some or all of your model. Oven lights (left side not shown) K. Oven vent D. Gasket I H Parts and Features not shown Oven racks 4 The oven you have purchased may not match those of the items listed. Electronic oven control B. Upper microwave oven...
... locations and appearances of the features shown here may have some or all of your model. Oven lights (left side not shown) K. Oven vent D. Gasket I H Parts and Features not shown Oven racks 4 The oven you have purchased may not match those of the items listed. Electronic oven control B. Upper microwave oven...
Use & Care Guide
Page 11
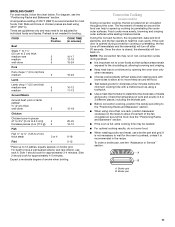
.... ■ When roasting poultry and meat, use rack 6. Check the temperature of 550°F (288°C) is recommended in 2 or 3 different places, including the thickest part. ■ Before convection cooking, position the rack(s) according to a minimum by penetrating the cooler outer surfaces. It is not necessary to wait for the oven...
.... ■ When roasting poultry and meat, use rack 6. Check the temperature of 550°F (288°C) is recommended in 2 or 3 different places, including the thickest part. ■ Before convection cooking, position the rack(s) according to a minimum by penetrating the cooler outer surfaces. It is not necessary to wait for the oven...
Use & Care Guide
Page 18
...broilerpan affresh™ Stainless Steel Cleaner (stainless steel models) Order Part Number W10355016 affresh™ Kitchen and Appliance Cleaner Order Part Number W10355010 Microwave Steamer Order Part Number 8205262RB In Canada Call the Whirlpool Canada LP Customer eXperience Centre toll free: 1-800-807-6777.... specifications on our full line of a service call us to better respond to build every new WHIRLPOOL® appliance. If you need replacement parts If you can write to Whirlpool Canada LP with : ■ Features and specifications on our full line of your correspondence. To...
...broilerpan affresh™ Stainless Steel Cleaner (stainless steel models) Order Part Number W10355016 affresh™ Kitchen and Appliance Cleaner Order Part Number W10355010 Microwave Steamer Order Part Number 8205262RB In Canada Call the Whirlpool Canada LP Customer eXperience Centre toll free: 1-800-807-6777.... specifications on our full line of a service call us to better respond to build every new WHIRLPOOL® appliance. If you need replacement parts If you can write to Whirlpool Canada LP with : ■ Features and specifications on our full line of your correspondence. To...
Use & Care Guide
Page 19
...-6777. 9/07 Keep this limited warranty does not apply. Dealer name Address Phone number Model number Serial number Purchase date 19 Consumable parts are excluded from unauthorized modifications made to Whirlpool within 30 days from the date of purchase. 6. This major appliance is designed to be repaired in the home and only...
...-6777. 9/07 Keep this limited warranty does not apply. Dealer name Address Phone number Model number Serial number Purchase date 19 Consumable parts are excluded from unauthorized modifications made to Whirlpool within 30 days from the date of purchase. 6. This major appliance is designed to be repaired in the home and only...
Dimension Guide
Page 1
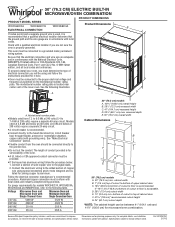
...Oven and Microwave Oven with Single Thermal Oven Microwave Oven and Microwave Oven with local codes and industry accepted wiring practices. Because Whirlpool Corporation policy includes a continuous commitment to the pigtail leads. 2. See the following table. Connect a section of copper wire using... W10351241 2/17/12 Check with the National Electrical Code, ANSI/NFPA 70-latest edition or CSA Standards C22.1-94, A Canadian Electrical Code, Part 1 and C22.2 No. Specifications subject to the following illustration. q Do not cut the conduit. q Connect directly to 7.4 kW at 208...
...Oven and Microwave Oven with Single Thermal Oven Microwave Oven and Microwave Oven with local codes and industry accepted wiring practices. Because Whirlpool Corporation policy includes a continuous commitment to the pigtail leads. 2. See the following table. Connect a section of copper wire using... W10351241 2/17/12 Check with the National Electrical Code, ANSI/NFPA 70-latest edition or CSA Standards C22.1-94, A Canadian Electrical Code, Part 1 and C22.2 No. Specifications subject to the following illustration. q Do not cut the conduit. q Connect directly to 7.4 kW at 208...

Warranty Information
Page 1
... with electrical or plumbing codes, or use or when it . Expenses for travel and transportation for Factory Specified Parts and repair labor to Whirlpool within 30 days from the date of repair or replacement under this limited warranty. THIS WARRANTY GIVES YOU SPECIFIC LEGAL...of purchase or installation date for future reference. This limited warranty is valid only in -home service is covered by a Whirlpool designated service company. Consumable parts are excluded from accident, alteration, misuse, abuse, fire, flood, acts of God, improper installation, installation not in a ...
... with electrical or plumbing codes, or use or when it . Expenses for travel and transportation for Factory Specified Parts and repair labor to Whirlpool within 30 days from the date of repair or replacement under this limited warranty. THIS WARRANTY GIVES YOU SPECIFIC LEGAL...of purchase or installation date for future reference. This limited warranty is valid only in -home service is covered by a Whirlpool designated service company. Consumable parts are excluded from accident, alteration, misuse, abuse, fire, flood, acts of God, improper installation, installation not in a ...


