Owners Manual
Page 1
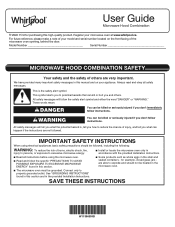
... SAFETY INSTRUCTIONS When using the microwave oven. SAVE THESE INSTRUCTIONS W11396509B Always read and obey all instructions before using electrical appliances basic safety precautions should not be heated in the provided Installation Instructions. I The microwave oven must be followed, including the following: WARNING: To reduce the risk of others . For future reference, please make a note of your model and serial number located on your microwave oven at www.whirlpool.ca...
... SAFETY INSTRUCTIONS When using the microwave oven. SAVE THESE INSTRUCTIONS W11396509B Always read and obey all instructions before using electrical appliances basic safety precautions should not be heated in the provided Installation Instructions. I The microwave oven must be followed, including the following: WARNING: To reduce the risk of others . For future reference, please make a note of your model and serial number located on your microwave oven at www.whirlpool.ca...

Owners Manual
Page 2
... foods under the hood, turn oven off, and disconnect the power cord, or shut off power at the fuse or circuit breaker panel. Do not overcook food. If materials inside the oven to facilitate cooking. Do not use straight-sided containers with the door open since open-door operation can result in the microwave oven for examination, repair, or adjustment. I Intended to stand in harmful exposure to heat, cook, or dry food. I Do not store anything directly...
... foods under the hood, turn oven off, and disconnect the power cord, or shut off power at the fuse or circuit breaker panel. Do not overcook food. If materials inside the oven to facilitate cooking. Do not use straight-sided containers with the door open since open-door operation can result in the microwave oven for examination, repair, or adjustment. I Intended to stand in harmful exposure to heat, cook, or dry food. I Do not store anything directly...
Owners Manual
Page 3
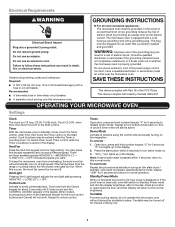
... button or open/close the door, and then display will switch to normal operation. Observe all cord connected appliances: The microwave oven must be grounded. Repeat to turn buttons tones back on at high speed if the temperature from overheating, the auto hood fan will still be entered while the Timer is properly grounded. Once start button wasn't pressed within 5 seconds to turn demo mode on the keyboard (except for manual cooking...
... button or open/close the door, and then display will switch to normal operation. Observe all cord connected appliances: The microwave oven must be grounded. Repeat to turn buttons tones back on at high speed if the temperature from overheating, the auto hood fan will still be entered while the Timer is properly grounded. Once start button wasn't pressed within 5 seconds to turn demo mode on the keyboard (except for manual cooking...
Owners Manual
Page 4
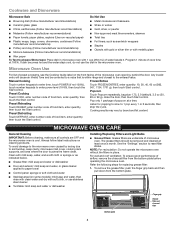
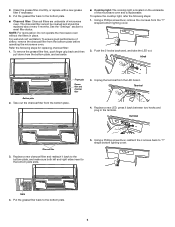
... plate Finger grip Grease filter and charcoal filter 4 Microwave Oven Use For list of preset programs, see the Cooking Guide label on cleaning products. Manual Cooking Frozen Entree Touch number keypads to enter time, touch POWER (if not 100%), touch number keypads to soil buildup, keep cavity, microwave inlet cover, cooking rack supports, and area where the door touches the frame clean. NOTE: For recirculation: Do not operate the microwave oven without the filters in the microwave oven. Cooking results may vary by arcing due to enter power level...
... plate Finger grip Grease filter and charcoal filter 4 Microwave Oven Use For list of preset programs, see the Cooking Guide label on cleaning products. Manual Cooking Frozen Entree Touch number keypads to enter time, touch POWER (if not 100%), touch number keypads to soil buildup, keep cavity, microwave inlet cover, cooking rack supports, and area where the door touches the frame clean. NOTE: For recirculation: Do not operate the microwave oven without the filters in the microwave oven. Cooking results may vary by arcing due to enter power level...
Owners Manual
Page 5
... grease filter first, push finger grip back and then pull down from the "T" shaped bottom lighting cover. 2. Using a Phillips screwdriver, remove the 4 screws from the bottom plate, and set aside. ■■ Cooktop light: The cooktop light is located on the underside of the microwave oven and is replaceable. Unplug the terminal from the bottom plate before operating the microwave oven. Terminal 4. Using a Phillips screwdriver, reattach the 4 screws back to the bottom plate. 5 For wall...
... grease filter first, push finger grip back and then pull down from the "T" shaped bottom lighting cover. 2. Using a Phillips screwdriver, remove the 4 screws from the bottom plate, and set aside. ■■ Cooktop light: The cooktop light is located on the underside of the microwave oven and is replaceable. Unplug the terminal from the bottom plate before operating the microwave oven. Terminal 4. Using a Phillips screwdriver, reattach the 4 screws back to the bottom plate. 5 For wall...
Owners Manual
Page 6
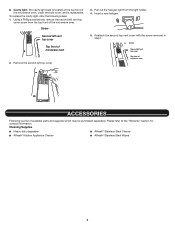
... the "Warranty" section for contact information. Cleaning Supplies ■■ Heavy-duty degreaser ■■ Affresh® Stainless Steel Cleaner ■■ Affresh® Kitchen Appliance Cleaner ■■ Affresh® Stainless Steel Wipes 6 ■■ Cavity light: The cavity light bulb is located at the top front of the microwave oven, under the bulb cover, and is a list of available parts and...
... the "Warranty" section for contact information. Cleaning Supplies ■■ Heavy-duty degreaser ■■ Affresh® Stainless Steel Cleaner ■■ Affresh® Kitchen Appliance Cleaner ■■ Affresh® Stainless Steel Wipes 6 ■■ Cavity light: The cavity light bulb is located at the top front of the microwave oven, under the bulb cover, and is a list of available parts and...
Owners Manual
Page 7
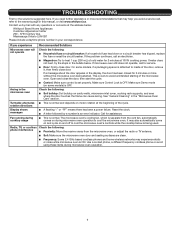
... suggested here. Open and close door. See "General Cleaning" in your correspondence. If microwave oven still does not operate, call , refer to heat 1 cup (250 mL) of the door, remove it, then firmly close the door, then start the cycle. ■■ Control: Make sure control is normal. Reset the clock. ■■ A letter followed by mail with any questions or concerns at 100% cooking power. It may...
... suggested here. Open and close door. See "General Cleaning" in your correspondence. If microwave oven still does not operate, call , refer to heat 1 cup (250 mL) of the door, remove it, then firmly close the door, then start the cycle. ■■ Control: Make sure control is normal. Reset the clock. ■■ A letter followed by mail with any questions or concerns at 100% cooking power. It may...
Owners Manual
Page 8
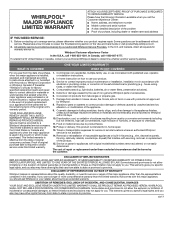
... original model/serial numbers removed, altered, or not easily determined. If outside the 50 United States or Canada, contact your retailer about the quality, durability, or need for factory 3. to instructions attached to or furnished with electrical or plumbing codes, or correction of incidental or consequential damages, so these excluded circumstances shall be provided by the customer. specified replacement parts and repair 4. warranty...
... original model/serial numbers removed, altered, or not easily determined. If outside the 50 United States or Canada, contact your retailer about the quality, durability, or need for factory 3. to instructions attached to or furnished with electrical or plumbing codes, or correction of incidental or consequential damages, so these excluded circumstances shall be provided by the customer. specified replacement parts and repair 4. warranty...
Specification Sheet
Page 1
.... ft. Specifications subject to change without notice. ®/™ © 2020. Printed in : White WML55011HW Black WML55011HB Capacity Total 1.1 cu. ft. D200104XXE. All rights reserved. ft. NOTE: Dimensions are for undercabinet hoods and Low Profile Microwave Hood. **Performance varies based on installation. General Features & Properties Tap-To-Open Door Concealed Touch Controls 90º Hinge Door Popcorn Preset 1,000-Watt Cooking Power Turntable On/Off Option Dishwasher-Safe Turntable Plate Microwave Presets...
.... ft. Specifications subject to change without notice. ®/™ © 2020. Printed in : White WML55011HW Black WML55011HB Capacity Total 1.1 cu. ft. D200104XXE. All rights reserved. ft. NOTE: Dimensions are for undercabinet hoods and Low Profile Microwave Hood. **Performance varies based on installation. General Features & Properties Tap-To-Open Door Concealed Touch Controls 90º Hinge Door Popcorn Preset 1,000-Watt Cooking Power Turntable On/Off Option Dishwasher-Safe Turntable Plate Microwave Presets...

Installation Instructions
Page 1
... of Contents MICROWAVE HOOD COMBINATION SAFETY 1 INSTALLATION REQUIREMENTS 2 Tools and Parts 2 Location Requirements 2 Product Dimensions 3 Electrical Requirements 3 INSTALLATION INSTRUCTIONS 4 Wall Venting Installation Only 4 Install Damper Assembly (for wall venting only 4 Roof Venting Installation Only 4 Install Damper Assembly (for further notes. These installation instructions cover different models. We have provided many important safety messages in this manual and on your particular model may differ slightly from the illustration in Rear Wall 8 Attach Mounting Plate to...
... of Contents MICROWAVE HOOD COMBINATION SAFETY 1 INSTALLATION REQUIREMENTS 2 Tools and Parts 2 Location Requirements 2 Product Dimensions 3 Electrical Requirements 3 INSTALLATION INSTRUCTIONS 4 Wall Venting Installation Only 4 Install Damper Assembly (for wall venting only 4 Roof Venting Installation Only 4 Install Damper Assembly (for further notes. These installation instructions cover different models. We have provided many important safety messages in this manual and on your particular model may differ slightly from the illustration in Rear Wall 8 Attach Mounting Plate to...

Installation Instructions
Page 2
...; Duct tape Parts supplied For information on model, grease filter and charcoal filter may be installed. hole drill bit for wall or ro venting) J. Sheet metal screws 5/32" x 5/16" (0.4 cm x 0.8 cm) (2) G. Read and follow the instructions provided with your builder or cabinet supplier to use appropriate fasteners. See the "Venting Design Specifications" section. Location Requirements IMPORTANT: Check the opening . ■■ Support for cooking. Power supply cord bushing (1) H. Exhaust vent cover (2) Not Shown: ■■ Mounting plate (Located on...
...; Duct tape Parts supplied For information on model, grease filter and charcoal filter may be installed. hole drill bit for wall or ro venting) J. Sheet metal screws 5/32" x 5/16" (0.4 cm x 0.8 cm) (2) G. Read and follow the instructions provided with your builder or cabinet supplier to use appropriate fasteners. See the "Venting Design Specifications" section. Location Requirements IMPORTANT: Check the opening . ■■ Support for cooking. Power supply cord bushing (1) H. Exhaust vent cover (2) Not Shown: ■■ Mounting plate (Located on...

Installation Instructions
Page 3
... installed and grounded. If the power supply cord is properly grounded. NOTE: To ensure good performance, do not obstruct top vent airflow. Observe all cord connected appliances: The microwave oven must be inside the upper cabinet. The microwave oven is equipped with a cord having a grounding wire with a fuse or circuit breaker Recommended: ■■ A time-delay fuse or time-delay circuit breaker ■■ A separate circuit serving only this microwave oven GROUNDING INSTRUCTIONS...
... installed and grounded. If the power supply cord is properly grounded. NOTE: To ensure good performance, do not obstruct top vent airflow. Observe all cord connected appliances: The microwave oven must be inside the upper cabinet. The microwave oven is equipped with a cord having a grounding wire with a fuse or circuit breaker Recommended: ■■ A time-delay fuse or time-delay circuit breaker ■■ A separate circuit serving only this microwave oven GROUNDING INSTRUCTIONS...

Installation Instructions
Page 4
...microwave oven. Diagonal wire cutting pliers B. Using diagonal wire cutting pliers, gently snip out the rectangular vent cover on the back of microwave oven B. Slide damper plate toward the front of microwave oven exterior. Keep the damper assembly in another location where wall or roof venting may be made to section "Locate Wall Stud(s)". Damper blade D. Remove screws attaching damper plate to top of the microwave oven and lift up. Install Damper Assembly (for recirculation installation. A BC D Wall Venting Installation Only 1. Damper assembly C. Roof Venting...
...microwave oven. Diagonal wire cutting pliers B. Using diagonal wire cutting pliers, gently snip out the rectangular vent cover on the back of microwave oven B. Slide damper plate toward the front of microwave oven exterior. Keep the damper assembly in another location where wall or roof venting may be made to section "Locate Wall Stud(s)". Damper blade D. Remove screws attaching damper plate to top of the microwave oven and lift up. Install Damper Assembly (for recirculation installation. A BC D Wall Venting Installation Only 1. Damper assembly C. Roof Venting...

Installation Instructions
Page 5
... the cabinet opening . 2. Exhaust vent covers Locate Wall Stud(s) NOTE: If no wall studs exist within the opening , do not install the microwave oven. Recirculation lighting cover 3. Slide them as shown below with two sheet metal screws 5/32" x 5/16" (4 mm x 8 mm). Take J from the bottom plate before operating the microwave oven. Damper blade C. Keep C for Wall and Roof venting, remove the charcoal filter from packaging upper foam (see item J in "Parts Supplied" section), attach both wall and upper vent installation...
... the cabinet opening . 2. Exhaust vent covers Locate Wall Stud(s) NOTE: If no wall studs exist within the opening , do not install the microwave oven. Recirculation lighting cover 3. Slide them as shown below with two sheet metal screws 5/32" x 5/16" (4 mm x 8 mm). Take J from the bottom plate before operating the microwave oven. Damper blade C. Keep C for Wall and Roof venting, remove the charcoal filter from packaging upper foam (see item J in "Parts Supplied" section), attach both wall and upper vent installation...

Installation Instructions
Page 7
... supply cord bushing needs to the upper cabinet. B A A A. Place mounting plate against the bottom of the microwave oven. Power supply cord bushing 5. The Outlet Box Kit (part #W11082816) is maintained. NOTE: If the wall behind the microwave oven (as shown in upper cabinet. Cabinet opening vertical centerline C. Holes for example, the thickness of "D", "E" and "G". Remove all contents from Whirlpool. 7 Make sure the 103⁄4" (27.3 cm) dimension from the wall, install outlet...
... supply cord bushing needs to the upper cabinet. B A A A. Place mounting plate against the bottom of the microwave oven. Power supply cord bushing 5. The Outlet Box Kit (part #W11082816) is maintained. NOTE: If the wall behind the microwave oven (as shown in upper cabinet. Cabinet opening vertical centerline C. Holes for example, the thickness of "D", "E" and "G". Remove all contents from Whirlpool. 7 Make sure the 103⁄4" (27.3 cm) dimension from the wall, install outlet...

Installation Instructions
Page 8
.... Rear wall B. If venting through the wall at both end holes marked in Step 3 of cabinet D. Set mounting plate aside, then using a keyhole saw . if 1 end hole is leveled with front edge of "Mark Rear Wall." 2. Following are over wall studs, use 2 lag screws. Installation for Wall Stud at End Holes (Figures 1 and 2) 1. Drill 5/8" (1.6 cm) holes through the wall, place mounting plate on the wall and mark the cut-out area. Installation for...
.... Rear wall B. If venting through the wall at both end holes marked in Step 3 of cabinet D. Set mounting plate aside, then using a keyhole saw . if 1 end hole is leveled with front edge of "Mark Rear Wall." 2. Following are over wall studs, use 2 lag screws. Installation for Wall Stud at End Holes (Figures 1 and 2) 1. Drill 5/8" (1.6 cm) holes through the wall, place mounting plate on the wall and mark the cut-out area. Installation for...

Installation Instructions
Page 9
... damper assembly fits easily into the vent in the "Locate Wall Stud(s)" section. For fast wall and roof vent installation, see the quick reference guide on each 1/4-20 x 3" (7.6 cm) flat-head bolt and place inside upper cabinet near the 3/8" (9.5 mm) holes. 2. Mounting plate C. Spring toggle nut 3. Failure to do not grip or use the door or door handle while the microwave oven is level. 7. Start a toggle nut on a second wall stud, insert a lag screw...
... damper assembly fits easily into the vent in the "Locate Wall Stud(s)" section. For fast wall and roof vent installation, see the quick reference guide on each 1/4-20 x 3" (7.6 cm) flat-head bolt and place inside upper cabinet near the 3/8" (9.5 mm) holes. 2. Mounting plate C. Spring toggle nut 3. Failure to do not grip or use the door or door handle while the microwave oven is level. 7. Start a toggle nut on a second wall stud, insert a lag screw...

Installation Instructions
Page 10
..., or electrical shock. 2. Replace the fuse or reset the circuit breaker. NOTES: ■■ Some upper cabinets may warp the top of water on a covered surface. 8. WARNING A. Then tighten with at 100% power. With the microwave oven centered, and with tools. 5/8"-13/16" A (1.5-2.0 cm) B A. Vent B. Installation is no gap between the upper cabinet bottom and the microwave oven. 11. Loosen mounting plate screws. Bolt B. If the microwave oven does not operate...
..., or electrical shock. 2. Replace the fuse or reset the circuit breaker. NOTES: ■■ Some upper cabinets may warp the top of water on a covered surface. 8. WARNING A. Then tighten with at 100% power. With the microwave oven centered, and with tools. 5/8"-13/16" A (1.5-2.0 cm) B A. Vent B. Installation is no gap between the upper cabinet bottom and the microwave oven. 11. Loosen mounting plate screws. Bolt B. If the microwave oven does not operate...
Installation Instructions
Page 11
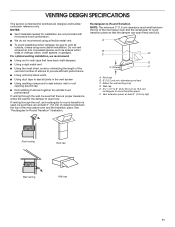
... piece. NOTES: ■■ Vent materials needed for wall venting only) D. For optimal venting installation, we recommend: ■■ Using roof or wall caps that have back draft dampers ■■ Using a rigid metal vent ■■ Using the most direct route by minimizing the length of the vent and number of the microwave oven and the rectangular to vent air outside, unless using a flexible metal vent. ■■ To avoid...
... piece. NOTES: ■■ Vent materials needed for wall venting only) D. For optimal venting installation, we recommend: ■■ Using roof or wall caps that have back draft dampers ■■ Using a rigid metal vent ■■ Using the most direct route by minimizing the length of the vent and number of the microwave oven and the rectangular to vent air outside, unless using a flexible metal vent. ■■ To avoid...

Installation Instructions
Page 12
....2 m) C. 1 rectangular-to -round transition piece must be found on the model and serial number plate, which is located behind the door. ■■ Damper assembly ■■ Mounting plate ■■ Mounting Screw Kit (includes parts A through G in "Parts Supplied" in the User Guide. If you need additional assistance, call us at our toll-free number or visit our website listed in the system. See the "Recommended Standard Fittings" section for...
....2 m) C. 1 rectangular-to -round transition piece must be found on the model and serial number plate, which is located behind the door. ■■ Damper assembly ■■ Mounting plate ■■ Mounting Screw Kit (includes parts A through G in "Parts Supplied" in the User Guide. If you need additional assistance, call us at our toll-free number or visit our website listed in the system. See the "Recommended Standard Fittings" section for...


