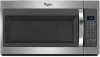
Whirlpool WMH31017FS Support and Manuals
Get Help and Manuals for this Whirlpool item
View All Support Options Below
Free Whirlpool WMH31017FS manuals!
Problems with Whirlpool WMH31017FS?
Ask a Question
Free Whirlpool WMH31017FS manuals!
Problems with Whirlpool WMH31017FS?
Ask a Question
Most Recent Whirlpool WMH31017FS Questions

Lightbulb Underneath Snapped Off At Base.
do I need to remove the entire metal panel underneath Seems like I cannot reach the bulb base to rem...
do I need to remove the entire metal panel underneath Seems like I cannot reach the bulb base to rem...
(Posted by sharonstrack 4 years ago)

New Microwave Oven Installed 5.20.17-----today, Blower Came On Without Pressing
New product installed 5.20.17. has been operating normally but today fan came on by itself. Help!!
New product installed 5.20.17. has been operating normally but today fan came on by itself. Help!!
(Posted by wdenmark 6 years ago)
Popular Whirlpool WMH31017FS Manual Pages
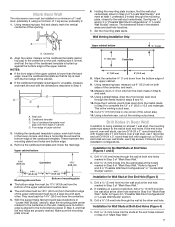
Installation Guide - Page 1
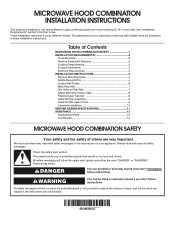
... . Table of Contents
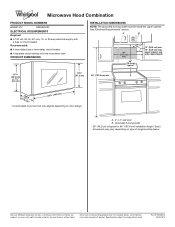
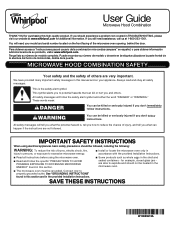
MICROWAVE HOOD COMBINATION SAFETY 1 INSTALLATION REQUIREMENTS 2
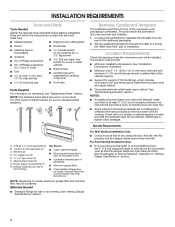
Tools and Parts 2 Remove Cardboard Template 2 Location Requirements 2 Product Dimensions 3 Electrical Requirements 3 INSTALLATION INSTRUCTIONS 4 Remove Mounting Plate 4 Rotate Blower Motor 4 Locate Wall Stud(s 6 Mark Rear Wall 7 Drill Holes in these installation instructions. Always read and obey...
Installation Guide - Page 2
...) diam. Sheet metal screws (2) G. The location must be combined.
Special Requirements
For Wall Venting Installation Only:
■■ Cutout must provide:
■■ Minimum installation dimensions. See User Instructions.)
NOTE: Depending on reordering, see "Replacement Parts" section. NOTES:
■■ If installing the microwave oven near a left sidewall, make sure...
Installation Guide - Page 4
... lower blower motor back into the microwave oven. Tape the microwave oven door closed so that exhaust ports face the back of the microwave oven, remove it and set it may be made to back of microwave oven exterior. NOTE: To avoid damage to top of microwave oven. Screws (in another location where wall or roof venting may...
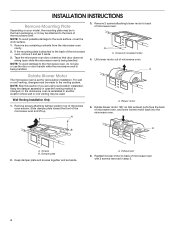
Installation Guide - Page 7
...Set the mounting plate aside. Centerline
2. Rear wall B. Cardboard template C. D. Front edge of the centerline, and mark.
10. These represent the mounting plate's end holes and bottom edge.
4. Make sure the mounting plate is the venting cutout area.
13. Drill Holes in "Locate Wall Stud(s)" section. Installation... are ideal hole locations.
7. With the support tabs facing forward ...
Installation Guide - Page 8
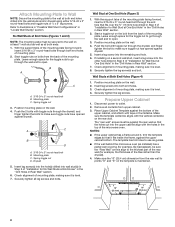
..., the thickness of the microwave oven. The template has trim lines to the thickest part of the rear wall (for example, tile backsplash), be against the bottom of the mounting plate. A
C
B
D
A. 3/16-24 x 3" round-head bolt B.
Refer to outlet. 2.
Mounting plate C. If installing on the rear wall. With the support tabs of the mounting...
Installation Guide - Page 10
...4. Save Installation Instructions for troubleshooting information. If adjustment is no gap between the upper cabinet bottom and the microwave oven. Vent B.
If the problem continues, ...7. Replace the fuse or reset the circuit breaker. Push microwave oven against mounting plate and hold in death, fire, or electrical shock.
2. A
2. Connect vent to the User Instructions for...
Installation Guide - Page 12
....2 cm) round vent should be found on the model and serial number plate, which is located behind the microwave oven door on the front facing of the microwave oven opening . To calculate the length of the system you will need , add the equivalent lengths of the installation hardware needs to use no more than three 90...
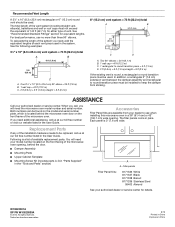
Dimension Guide - Page 1
... may vary depending on type of product will vary slightly depending on door design.
Ref. For complete details, see Installation Instructions packed with a fuse or circuit breaker. Specifications subject to change without notice.
Dimensions are for 66" (167.6 cm) installation height. W10823831A 06/30/2016
See "Electrical Requirements" section.
upper cabinet and...
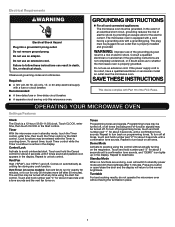
Use & Care Guide - Page 1
... or seriously injured if you don't follow the specific "PRECAUTIONS TO AVOID POSSIBLE EXPOSURE TO EXCESSIVE MICROWAVE ENERGY" found in the microwave oven. I Install or locate the microwave oven only in this manual and on the front facing of injury, and tell you still need your model and serial number located on your appliance.
Para obtener acceso a "Instrucciones para...
Use & Care Guide - Page 2

... qualified service personnel. I Do not let cord hang over a sink. Corrosive cleaning agents, such as water, coffee, or tea are placed inside the oven ignite, keep oven door closed, turn the fan on the microwave oven. I Do not immerse cord or plug in a wet basement, near a swimming pool, or similar locations.
SAVE THESE INSTRUCTIONS
PRECAUTIONS...
Use & Care Guide - Page 3
... a tone sounds and the vent fan turns on some models): Set vent fan to run for about 3 seconds until a confirmation tone sounds. Vent Fan
High ("SPd2"), low ("SPd1") and off at any button or open/close the door and the display will switch to whether the microwave oven is properly grounded.
Programming tones may be...
Use & Care Guide - Page 4

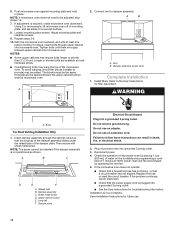
... grille, and secure with screw.
Popcorn
Touch POPCORN. Enter bag size in microwave oven with screws.
■■ Cavity light: The cavity light bulb is located behind the door. Pizza (reheat)
Touch PIZZA. Remove bulb cover screws, and open bulb cover and replace bulb.
Manual Cooking/Stage Cooking
Touch COOK TIME, touch number pads to enter time, touch COOK POWER (if...
Use & Care Guide - Page 5
...; Stainless Steel Wipes
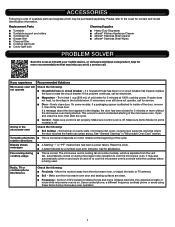
PROBLEM SOLVER
Scan the code at left with your mobile device, or visit www.whirlpool.com/product_help for 2 minutes at the beginning of the cycle. Try to inside of the microwave oven.
Make sure Control Lock is on cavity walls, microwave inlet cover, cooking rack supports, and area where the door touches the frame...
Use & Care Guide - Page 6

...take a few minutes to review the Troubleshooting or Problem Solver section of original consumer purchase. Commercial, non-residential, multiple-family use, or use your appliance will pay for service in remote locations where an authorized Whirlpool servicer is reported to correct defects in accordance with published user, operator or installation instructions.
2. gas.
7.
EXCLUSION OF...
Warranty Information - Page 1
... Parts and repair labor to review the Troubleshooting or Problem Solver section of inaccessible appliances or built-in -home repair.
13.
Proof of products from state to state or province to or furnished with published user, operator or installation instructions.
2. house wiring, fuses or water inlet hoses).
4. Conversion of original purchase date is required to obtain service...
Whirlpool WMH31017FS Reviews
We have not received any reviews for Whirlpool yet.