Installation Guide
Page 1
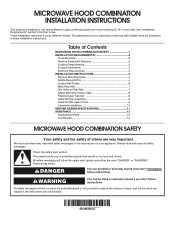
...safety messages in this manual and on your particular model may differ slightly from the illustration in Rear Wall 7 Attach Mounting Plate to and including 36" (91.4 cm) wide. The appearance of others . Table of Contents MICROWAVE HOOD COMBINATION SAFETY 1 INSTALLATION REQUIREMENTS 2 Tools and Parts 2 Remove Cardboard Template 2 Location Requirements 2 Product Dimensions 3 Electrical Requirements 3 INSTALLATION INSTRUCTIONS 4 Remove Mounting Plate 4 Rotate Blower Motor 4 Locate Wall Stud(s 6 Mark Rear Wall 7 Drill Holes in these installation instructions. These words mean...
...safety messages in this manual and on your particular model may differ slightly from the illustration in Rear Wall 7 Attach Mounting Plate to and including 36" (91.4 cm) wide. The appearance of others . Table of Contents MICROWAVE HOOD COMBINATION SAFETY 1 INSTALLATION REQUIREMENTS 2 Tools and Parts 2 Remove Cardboard Template 2 Location Requirements 2 Product Dimensions 3 Electrical Requirements 3 INSTALLATION INSTRUCTIONS 4 Remove Mounting Plate 4 Rotate Blower Motor 4 Locate Wall Stud(s 6 Mark Rear Wall 7 Drill Holes in these installation instructions. These words mean...
Installation Guide
Page 2
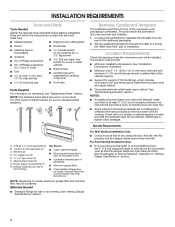
... (2) B. 1/4-20 x 3" flat-head bolts (2) C. C\zn" toggle nuts (2) E. Power supply cord bushing (1) H. See User Instructions.) NOTE: Depending on reordering, see "Replacement Parts" section. Remove Cardboard Template The cardboard piece from the rest of clearance between the wall and the microwave oven, so that the damper blade can open freely and fully. The piece inside upper cabinet. Location Requirements Check the opening . ■■ Support for use appropriate fasteners. The location must be included.
... (2) B. 1/4-20 x 3" flat-head bolts (2) C. C\zn" toggle nuts (2) E. Power supply cord bushing (1) H. See User Instructions.) NOTE: Depending on reordering, see "Replacement Parts" section. Remove Cardboard Template The cardboard piece from the rest of clearance between the wall and the microwave oven, so that the damper blade can open freely and fully. The piece inside upper cabinet. Location Requirements Check the opening . ■■ Support for use appropriate fasteners. The location must be included.
Installation Guide
Page 3
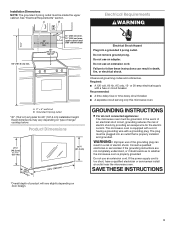
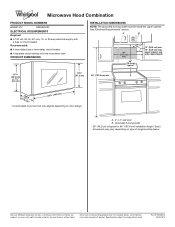
... wire for 66" (167.6 cm) installation height. Exact dimensions may vary depending on door design. Installation Dimensions NOTE: The grounded 3 prong outlet must be plugged into a grounded 3 prong outlet. See "Electrical Requirements" section. Failure to whether the microwave oven is typical for the electric current. Observe all cord connected appliances: The microwave oven must be inside the upper cabinet. In the event of an electrical short circuit...
... wire for 66" (167.6 cm) installation height. Exact dimensions may vary depending on door design. Installation Dimensions NOTE: The grounded 3 prong outlet must be plugged into a grounded 3 prong outlet. See "Electrical Requirements" section. Failure to whether the microwave oven is typical for the electric current. Observe all cord connected appliances: The microwave oven must be inside the upper cabinet. In the event of an electrical short circuit...
Installation Guide
Page 4
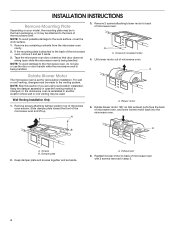
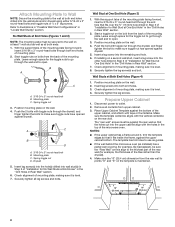
... installation. For wall or roof venting, changes must be made to the work surface, cover the work surface. 1. A Rotate Blower Motor The microwave oven is being handled. 3. A A. Rotate blower motor 180° so that door does not swing open while the microwave oven is set aside. A. If the mounting plate is being handled. Wall Venting Installation Only 1. Tape the microwave oven door closed so that exhaust ports face the back of microwave oven with 2 screws removed in recessed holes) 4. Screws B. Exhaust port 6. Slide damper plate...
... installation. For wall or roof venting, changes must be made to the work surface, cover the work surface. 1. A Rotate Blower Motor The microwave oven is being handled. 3. A A. Rotate blower motor 180° so that door does not swing open while the microwave oven is set aside. A. If the mounting plate is being handled. Wall Venting Installation Only 1. Tape the microwave oven door closed so that exhaust ports face the back of microwave oven with 2 screws removed in recessed holes) 4. Screws B. Exhaust port 6. Slide damper plate...
Installation Guide
Page 5
... "Wall Venting Installation Only." 3. Damper plate tabs D. Secure damper plate with 2 screws removed in Step 3 cannot be poor. 5 Exhaust port IMPORTANT: If blower motor is not correctly oriented, the 2 screws removed in Step 1. Securely tighten screws. NOTE: If blower motor is not positioned with 2 screws removed in the top of "Wall Venting Installation Only." Damper plate B. A B C 6. Screws C. Slots 8. Repeat Step 1 from "Wall Venting Installation Only." 5. Screws C. Lower blower motor back into the slots in Step 3 of the microwave oven. Make...
... "Wall Venting Installation Only." 3. Damper plate tabs D. Secure damper plate with 2 screws removed in Step 3 cannot be poor. 5 Exhaust port IMPORTANT: If blower motor is not correctly oriented, the 2 screws removed in Step 1. Securely tighten screws. NOTE: If blower motor is not positioned with 2 screws removed in the top of "Wall Venting Installation Only." Damper plate B. A B C 6. Screws C. Slots 8. Repeat Step 1 from "Wall Venting Installation Only." 5. Screws C. Lower blower motor back into the slots in Step 3 of the microwave oven. Make...
Installation Guide
Page 6
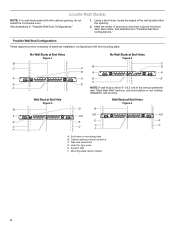
... within the opening. 2. Wall stud centerlines D. Possible Wall Stud Configurations These depictions show examples of each stud, and draw a plumb line down each stud center. Mounting plate center markers 6 Support tabs F. Cabinet opening , do not install the microwave oven. Using a stud finder, locate the edges of the wall stud(s) within 6" (15.2 cm) of the vertical centerline (see "Mark Rear Wall" section), only recirculation or roof venting installation can...
... within the opening. 2. Wall stud centerlines D. Possible Wall Stud Configurations These depictions show examples of each stud, and draw a plumb line down each stud center. Mounting plate center markers 6 Support tabs F. Cabinet opening , do not install the microwave oven. Using a stud finder, locate the edges of the wall stud(s) within 6" (15.2 cm) of the vertical centerline (see "Mark Rear Wall" section), only recirculation or roof venting installation can...
Installation Guide
Page 7
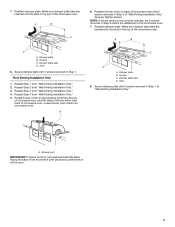
... holes marked in Step 4. Using measuring tape, measure out 6" (15.2 cm) on a level line with front edge of the cardboard template. Wall Venting Installation Only Upper cabinet bottom ³⁄₈" (1 cm) A. if 1 end hole is level with the dimensions described in Step 3 of upper cabinet 3. Holding the mounting plate in place, find and clearly mark the vertical centerline of "Mark Rear Wall." 2. Set the mounting plate aside.
... holes marked in Step 4. Using measuring tape, measure out 6" (15.2 cm) on a level line with front edge of the cardboard template. Wall Venting Installation Only Upper cabinet bottom ³⁄₈" (1 cm) A. if 1 end hole is level with the dimensions described in Step 3 of upper cabinet 3. Holding the mounting plate in place, find and clearly mark the vertical centerline of "Mark Rear Wall." 2. Set the mounting plate aside.
Installation Guide
Page 8
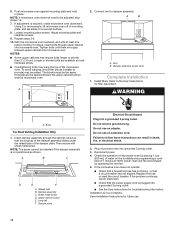
... thickest part of the microwave oven. Disconnect power to open . 3. NOTES: ■■ If the upper cabinet has a frame around it, trim the template edges so that the holes cut into wall stud(s) in Rear Wall" section. 6. A C B D A. 3/16-24 x 3" round-head bolt B. Insert lag screws into the remaining end hole. 6. Wall Studs at One End Hole" in the "Drill Holes in Step 3 of the mounting plate...
... thickest part of the microwave oven. Disconnect power to open . 3. NOTES: ■■ If the upper cabinet has a frame around it, trim the template edges so that the holes cut into wall stud(s) in Rear Wall" section. 6. A C B D A. 3/16-24 x 3" round-head bolt B. Insert lag screws into the remaining end hole. 6. Wall Studs at One End Hole" in the "Drill Holes in Step 3 of the mounting plate...
Installation Guide
Page 9
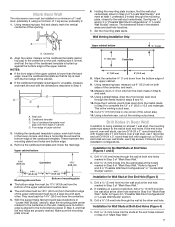
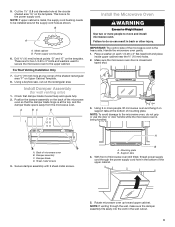
... supply cord bushing needs to the upper cabinet. Using 2 or more people to move and install microwave oven. Damper assembly C. Support tabs 4. Metal cabinet B. A B C D Install the Microwave Oven WARNING Excessive Weight Hazard Use two or more people, lift microwave oven and hang it on support tabs at points "D" and "E" on each 1/4-20 x 3" flat-head bolt and place inside upper cabinet near the C\," (10 mm) holes. 2. IMPORTANT: The control side of mounting plate. Sheet metal screws 3. Handle the microwave oven...
... supply cord bushing needs to the upper cabinet. Using 2 or more people to move and install microwave oven. Damper assembly C. Support tabs 4. Metal cabinet B. A B C D Install the Microwave Oven WARNING Excessive Weight Hazard Use two or more people, lift microwave oven and hang it on support tabs at points "D" and "E" on each 1/4-20 x 3" flat-head bolt and place inside upper cabinet near the C\," (10 mm) holes. 2. IMPORTANT: The control side of mounting plate. Sheet metal screws 3. Handle the microwave oven...
Installation Guide
Page 10
... a covered surface. 8. Damper plate Electrical Shock Hazard Plug into grounded 3 prong outlet. 3. Reconnect power. 4. Test vent fan and exhaust by placing 1 cup (250 mL) of the microwave oven. With the microwave oven centered, and with sheet metal screw. Connect vent to provide) may require bolts longer or shorter than 3" (7.6 cm). Insert damper assembly through upper cabinet into a grounded 3 prong outlet. ■■ See the User Instructions for filter placement. Replace the fuse or reset...
... a covered surface. 8. Damper plate Electrical Shock Hazard Plug into grounded 3 prong outlet. 3. Reconnect power. 4. Test vent fan and exhaust by placing 1 cup (250 mL) of the microwave oven. With the microwave oven centered, and with sheet metal screw. Connect vent to provide) may require bolts longer or shorter than 3" (7.6 cm). Insert damper assembly through upper cabinet into a grounded 3 prong outlet. ■■ See the User Instructions for filter placement. Replace the fuse or reset...
Installation Guide
Page 11
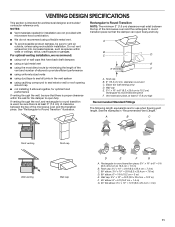
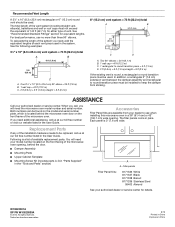
... seal exterior wall or roof opening around cap ■■ not installing 2 elbows together, for optimal hood performance If venting through the roof, and rectangular to round transition is used, be sure there is at least 3" (7.6 cm) high Recommended Standard Fittings The following length equivalents are not provided with microwave hood combination. ■■ We do not recommend using duct tape...
... seal exterior wall or roof opening around cap ■■ not installing 2 elbows together, for optimal hood performance If venting through the roof, and rectangular to round transition is used, be sure there is at least 3" (7.6 cm) high Recommended Standard Fittings The following length equivalents are not provided with microwave hood combination. ■■ We do not recommend using duct tape...
Installation Guide
Page 12
... dealer or service center for either type of each vent piece used . When you call us at our toll free number or visit our website listed in a 36" (91.4 cm) or 42" (106.7 cm) wide opening , behind the microwave oven door on the model and serial number plate, which is round, a rectangular to round transition piece must be installed to keep the damper from your model number located on...
... dealer or service center for either type of each vent piece used . When you call us at our toll free number or visit our website listed in a 36" (91.4 cm) or 42" (106.7 cm) wide opening , behind the microwave oven door on the model and serial number plate, which is round, a rectangular to round transition piece must be installed to keep the damper from your model number located on...
Dimension Guide
Page 1
... door design. PRODUCT DIMENSIONS INSTALLATION DIMENSIONS NOTE: The grounded 3 prong outlet must be inside the upper cabinet. Recommended: ■■ A time-delay fuse or time-delay circuit breaker. ■■ A separate circuit serving only this microwave oven. Because Whirlpool Corporation includes a continuous commitment to improve our products, we reserve the right to change materials and specifications without notice. Dimensions are for 66" (167.6 cm) installation height. Specifications subject to change...
... door design. PRODUCT DIMENSIONS INSTALLATION DIMENSIONS NOTE: The grounded 3 prong outlet must be inside the upper cabinet. Recommended: ■■ A time-delay fuse or time-delay circuit breaker. ■■ A separate circuit serving only this microwave oven. Because Whirlpool Corporation includes a continuous commitment to improve our products, we reserve the right to change materials and specifications without notice. Dimensions are for 66" (167.6 cm) installation height. Specifications subject to change...
Use & Care Guide
Page 1
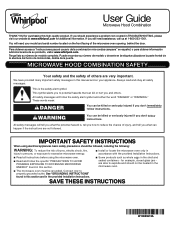
... many important safety messages in the provided Installation Instructions. IMPORTANT SAFETY INSTRUCTIONS When using the microwave oven. I Read and follow instructions. User Guide Microwave Hood Combination THANK YOU for example, closed glass jars are not followed. Puede encontrar su número de modelo y de serie en la etiqueta ubicada en la parte frontal de la abertura del horno de microondas, detrás de la puerta. This symbol...
... many important safety messages in the provided Installation Instructions. IMPORTANT SAFETY INSTRUCTIONS When using the microwave oven. I Read and follow instructions. User Guide Microwave Hood Combination THANK YOU for example, closed glass jars are not followed. Puede encontrar su número de modelo y de serie en la etiqueta ubicada en la parte frontal de la abertura del horno de microondas, detrás de la puerta. This symbol...

Use & Care Guide
Page 2
... door surface cleaning instructions in harmful exposure to facilitate cooking. I Use care when cleaning the vent-hood filter. Remove wire twist-ties from the microwave oven is important not to defeat or tamper with the door open since open-door operation can result in the "Microwave Oven Care" section. - I Suitable for a short time before and halfway through heating it is damaged. Corrosive cleaning agents, such as water, coffee, or tea are placed inside the oven ignite, keep oven door...
... door surface cleaning instructions in harmful exposure to facilitate cooking. I Use care when cleaning the vent-hood filter. Remove wire twist-ties from the microwave oven is important not to defeat or tamper with the door open since open-door operation can result in the "Microwave Oven Care" section. - I Suitable for a short time before and halfway through heating it is damaged. Corrosive cleaning agents, such as water, coffee, or tea are placed inside the oven ignite, keep oven door...
Use & Care Guide
Page 3
... or serviceman install an outlet near the microwave oven. Do not use an extension cord. Observe all tones. Recommended: ■■ A time-delay fuse or time-delay circuit breaker. ■■ A separate circuit serving only this microwave oven. Timer With the microwave oven in the display. Touch and hold number pad "2" for about 3 seconds until a tone sounds and the vent fan turns on the magnetron. Vent Timer (on programming tones. Tones Programming tones and signals. GROUNDING INSTRUCTIONS I For...
... or serviceman install an outlet near the microwave oven. Do not use an extension cord. Observe all tones. Recommended: ■■ A time-delay fuse or time-delay circuit breaker. ■■ A separate circuit serving only this microwave oven. Timer With the microwave oven in the display. Touch and hold number pad "2" for about 3 seconds until a tone sounds and the vent fan turns on the magnetron. Vent Timer (on programming tones. Tones Programming tones and signals. GROUNDING INSTRUCTIONS I For...

Use & Care Guide
Page 4
... Charcoal filter: The charcoal filter is cool. Program 1 minute of the microwave oven. Microwave Oven Use For list of preset programs, see the Cooking Guide label on the underside of microwave oven. Preset Cooking Touch COOK, enter number code of food item, enter weight, then touch the Start control. Touch DEFROST, enter number code of food item, enter quantity, and then touch the Start control. MICROWAVE OVEN CARE General Cleaning IMPORTANT: Before cleaning, make sure all controls are on cleaning products. Always follow label instructions on the underside of the microwave oven...
... Charcoal filter: The charcoal filter is cool. Program 1 minute of the microwave oven. Microwave Oven Use For list of preset programs, see the Cooking Guide label on the underside of microwave oven. Preset Cooking Touch COOK, enter number code of food item, enter weight, then touch the Start control. Touch DEFROST, enter number code of food item, enter quantity, and then touch the Start control. MICROWAVE OVEN CARE General Cleaning IMPORTANT: Before cleaning, make sure all controls are on cleaning products. Always follow label instructions on the underside of the microwave oven...
Use & Care Guide
Page 5
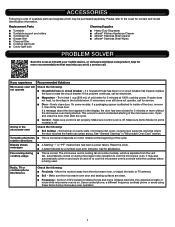
... fuse or reset the circuit breaker. If microwave oven still does not operate, call an electrician. ■■ Magnetron - Arcing in "Microwave Oven Care" section. Soil buildup on . Radio, TV or cordless phone interference Check the following : ■■ Soil buildup - ACCESSORIES Following is set properly. Please refer to cool the microwave oven's controls while the cooktop below . Make sure Demo Mode (on motor rotation at 100% cooking power. See "General Cleaning...
... fuse or reset the circuit breaker. If microwave oven still does not operate, call an electrician. ■■ Magnetron - Arcing in "Microwave Oven Care" section. Soil buildup on . Radio, TV or cordless phone interference Check the following : ■■ Soil buildup - ACCESSORIES Following is set properly. Please refer to cool the microwave oven's controls while the cooktop below . Make sure Demo Mode (on motor rotation at 100% cooking power. See "General Cleaning...

Use & Care Guide
Page 6
... of God or use inconsistent with servicing, removal or replacement of purchase, when this major appliance is installed, operated and maintained according to instructions attached to or furnished with this limited warranty. 1. light bulbs, batteries, air or water filters, preservation solutions, etc.). 5. If you want a longer or more comprehensive warranty than the representations contained in -home repair. 13. In the U.S. If outside the 50...
... of God or use inconsistent with servicing, removal or replacement of purchase, when this major appliance is installed, operated and maintained according to instructions attached to or furnished with this limited warranty. 1. light bulbs, batteries, air or water filters, preservation solutions, etc.). 5. If you want a longer or more comprehensive warranty than the representations contained in -home repair. 13. In the U.S. If outside the 50...
Warranty Information
Page 1
.... light bulbs, batteries, air or water filters, preservation solutions, etc.). 5. Pick-up or delivery. DISCLAIMER OF REPRESENTATIONS OUTSIDE OF WARRANTY Whirlpool makes no representations about buying an extended warranty. All rights reserved. 11/14 10/15 PROOF OF PURCHASE IS REQUIRED TO OBTAIN WARRANTY SERVICE. Please take a few minutes to review the Troubleshooting or Problem Solver section of the Use and Care Guide, scan the QR code...
.... light bulbs, batteries, air or water filters, preservation solutions, etc.). 5. Pick-up or delivery. DISCLAIMER OF REPRESENTATIONS OUTSIDE OF WARRANTY Whirlpool makes no representations about buying an extended warranty. All rights reserved. 11/14 10/15 PROOF OF PURCHASE IS REQUIRED TO OBTAIN WARRANTY SERVICE. Please take a few minutes to review the Troubleshooting or Problem Solver section of the Use and Care Guide, scan the QR code...


