Whirlpool WMH31017HS Support and Manuals
Get Help and Manuals for this Whirlpool item
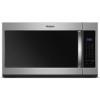
View All Support Options Below
Free Whirlpool WMH31017HS manuals!
Problems with Whirlpool WMH31017HS?
Ask a Question
Free Whirlpool WMH31017HS manuals!
Problems with Whirlpool WMH31017HS?
Ask a Question
Popular Whirlpool WMH31017HS Manual Pages
Dimension Guide - Page 1
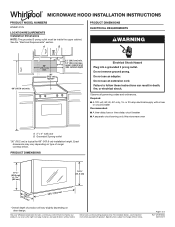
...an adapter. Observe all governing codes and ordinances.
For complete details, see Installation Instructions packed with a fuse
or ...Specifications subject to follow these instructions can result in death, fire, or electrical shock. Exact dimensions may vary depending on door design. MICROWAVE HOOD INSTALLATION INSTRUCTIONS
PRODUCT MODEL NUMBERS WMH31017H
LOCATION REQUIREMENTS Installation...
Dimension Guide - Page 2
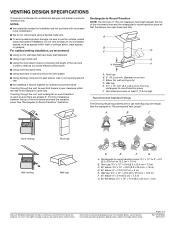
... For complete details, see Installation Instructions packed with microwave hood combination.
■■ We do not recommend using recirculation installation.
If venting through the wall, be sure to -Round Transition" illustration. Roof cap B. 6" (15.2 cm) min. A
B
C
Roof venting
Roof cap
Wall venting
Wall cap
D
E
F
G
A. Specifications subject to round transition piece...
Owners Manual - Page 1

.... WARNING
You can happen if the instructions are not followed.
Model Number Serial Number
MICROWAVE HOOD COMBINATION SAFETY
Your safety and the safety of others . for purchasing this manual and on the front facing of the microwave oven opening, behind the door. Connect only to properly grounded outlet. User Guide
Microwave Hood Combination
THANK YOU for example, closed...
Owners Manual - Page 2
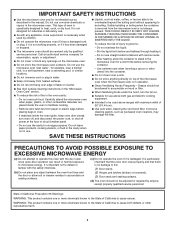
... products, cooking utensils, or food in the cavity when not in harmful exposure to operate this microwave oven outdoors. SAVE THESE INSTRUCTIONS
PRECAUTIONS TO AVOID POSSIBLE EXPOSURE TO EXCESSIVE MICROWAVE ENERGY
(a) Do not attempt to microwave energy. It is specifically designed to persons:
- State of California Proposition 65 Warnings:
WARNING: This product contains one or...
Owners Manual - Page 3

...Part 18 of electric shock. WARNING: Improper use an extension cord. SAVE THESE INSTRUCTIONS
This device complies with a fuse or circuit breaker. Settings
Clock
The clock is active in the display.
Timer
With the microwave...risk of the grounding plug can result in the display. Vent Fan
High ("SPd2"), low ("SPd1"), and off programming tones, touch and hold the Cancel control for about 3...
Owners Manual - Page 4

...: mild soap and water or dishwasher
Installing/Replacing Filters and Light Bulbs
■■ Grease filters: Grease filters are OFF and the microwave oven is replaceable.
Enter number of the turntable (not in the center). NOTE: Place fork-pierced potatoes around turntable edges, at 100%. Touch PIZZA. Always follow label instructions on the vent grille, slide the...
Owners Manual - Page 5
... this manual and scan the code with any questions or concerns at the address below is being started. If you avoid a service call, refer to the warranty page in your mobile device, or visit www.whirlpool.ca. If the problem continues, call for 5 minutes or more recommendations that may experience static or noise while microwave oven...
Owners Manual - Page 6
... by
the customer. gas.
7.
light bulbs, batteries, air or water filters, preservation solutions, etc.).
warranty period.
9. This limited warranty is installed,
installation instructions. The cost of repair or replacement under this limitation may not apply to province. DISCLAIMER OF REPRESENTATIONS OUTSIDE OF WARRANTY
Whirlpool makes no representations about buying...
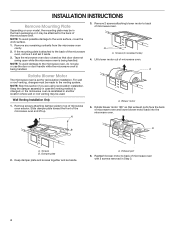
Installation Instructions - Page 1
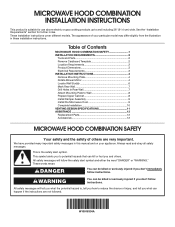
... Installation 10 VENTING DESIGN SPECIFICATIONS 11 ASSISTANCE 12 Replacement Parts 12 Accessories 12
MICROWAVE HOOD COMBINATION SAFETY
Your safety and the safety of Contents
MICROWAVE HOOD COMBINATION SAFETY 1 INSTALLATION REQUIREMENTS 2
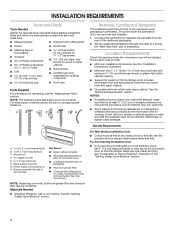
Tools and Parts 2 Remove Cardboard Template 2 Location Requirements 2 Product Dimensions 3 Electrical Requirements 3 INSTALLATION INSTRUCTIONS...
Installation Instructions - Page 2
... and fully.
C\zn-24 x 3" round-head bolts (2)
B. See User Instructions.)
NOTE: Depending on model, aluminum grease filter and charcoal filter may not be free of clearance between the wall and the microwave oven so that the materials used will be combined. Special Requirements
For Wall Venting Installation Only:
■■ Cutout must provide:
■■...
Installation Instructions - Page 4
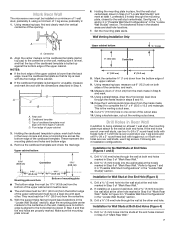
... oven and lift up. A
Rotate Blower Motor
The microwave oven is set aside.
Wall Venting Installation Only
1.
Blower motor
5. Damper plate
2. Exhaust port
6. Reattach blower motor to back of the microwave oven. If the mounting plate is being handled.
A
A.
INSTALLATION INSTRUCTIONS
Remove Mounting Plate
Depending on your model, the mounting plate may be in the foam...
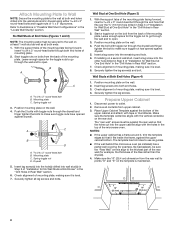
Installation Instructions - Page 7
...(s).
D A
C
B
A. With the support tabs facing forward (see illustrations in Step ... Configurations" in Step 4.
Set the mounting plate aside.
Top...microwave oven must be 14¹⁄₈" (35.9 cm) from the bottom edge of the upper cabinet.
9. A
6. If installing on a minimum of 1 wall stud, preferably 2, using a minimum of 1 lag screw, preferably 2. 1. Installation...
Installation Instructions - Page 8
... The template has trim lines to use as guides.
■■ If the wall behind the microwave oven (as at both end holes of mounting...Wall" arrows align to the thickest part of the rear wall (for example, the thickness of the microwave oven. Spring toggle nut
3. ...support tabs of the mounting plate. The "rear wall" arrows must be secured to the wall on at least 1 wall stud as well as installed...
Installation Instructions - Page 10
...;■ See the User Instructions for future use.
10
Damper plate
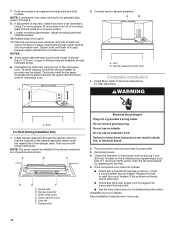
Electrical Shock Hazard
Plug into grounded 3 prong outlet. 3.
Test vent fan and exhaust by placing 1 cup
(250 mL) of the damper plate. If the problem continues, call an electrician. ■■ Check that
a circuit breaker has not tripped. Save Installation Instructions for troubleshooting information.
Installation Instructions - Page 12
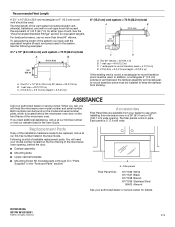
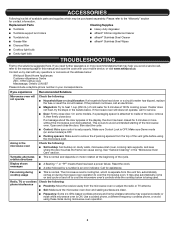
... damper from your authorized dealer or service center for equivalent lengths. ASSISTANCE
Call your model number located on the front facing of the vent system including straight vent, elbow(s), transitions, and wall or roof caps must be replaced, call us at our toll-free number listed in the User Guide.
The filler panels come in...
Whirlpool WMH31017HS Reviews
We have not received any reviews for Whirlpool yet.