Whirlpool WMH31017FS Support Question
Whirlpool WMH31017FS Support Question
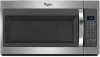
Find answers below for this question about Whirlpool WMH31017FS.Need a Whirlpool WMH31017FS manual? We have 4 online manuals for this item!
Question posted by sharonstrack on December 5th, 2019
Lightbulb Underneath Snapped Off At Base.
do I need to remove the entire metal panel underneath Seems like I cannot reach the bulb base to remov
Current Answers
Answer #1: Posted by Odin on December 5th, 2019 10:05 AM
Odin

Member since:
April 10th, 2010 Points: 41,236,700

Member since:
April 10th, 2010 Points: 41,236,700
Hope this is useful. Please don't forget to click the Accept This Answer button if you do accept it. My aim is to provide reliable helpful answers, not just a lot of them. See https://www.helpowl.com/profile/Odin.
Related Whirlpool WMH31017FS Manual Pages
Installation Guide - Page 1
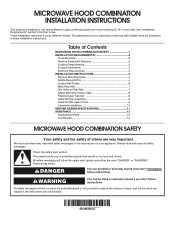
... Oven 9 Complete Installation 10 VENTING DESIGN SPECIFICATIONS 11 ASSISTANCE 12 Replacement Parts 12 Accessories 12
MICROWAVE HOOD COMBINATION SAFETY
Your safety and the safety of others . The appearance of your appliance.
All safety messages will follow instructions. Table of Contents
MICROWAVE HOOD COMBINATION SAFETY 1 INSTALLATION REQUIREMENTS 2
Tools and Parts 2 Remove...
Installation Guide - Page 2
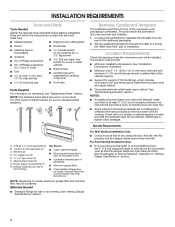
...your builder or cabinet supplier to back of microwave oven)
■■ Cardboard template (part of installation. Sheet metal screws (2) G. Materials Needed
■■ Standard fittings for Z\v" x...; Minimum installation dimensions. Washers (2)
D. Remove Cardboard Template
The cardboard piece from the
rest of the microwave oven packaging is perforated.
Damper assembly (for wall...
Installation Guide - Page 3
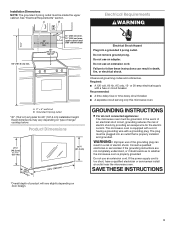
.... GROUNDING INSTRUCTIONS
I For all governing codes and ordinances.
If the power supply cord is properly grounded. Do not remove ground prong. Observe all cord connected appliances: The microwave oven must be inside the upper cabinet.
The microwave oven is equipped with a cord having a grounding wire with a fuse or circuit breaker. SAVE THESE INSTRUCTIONS
3 upper cabinet...
Installation Guide - Page 4
... venting may be used. Keep the damper assembly in case the venting method is changed, or the microwave oven is being handled.
3.
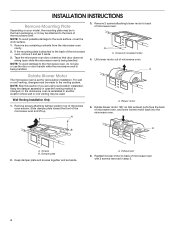
Remove any remaining contents from the microwave oven cavity.
2. Remove 2 screws attaching blower motor to back of microwave oven.
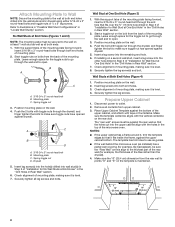
Wall Venting Installation Only
1. Blower motor
5. A. Rotate blower motor 180° so that door does not swing...
Installation Guide - Page 5
... D.
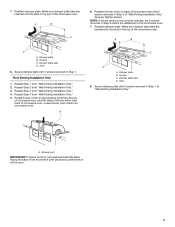
Damper plate B. Slots
8. Secure damper plate with 2 screws removed in Step 1. A
B
D
A. Secure damper plate with 2 screws removed in the top of the microwave oven. Lower blower motor back into the slots in Step 3 cannot be poor.
5 Screws C. Damper plate tabs D. Reattach blower motor to the microwave oven.
7. Reattach damper plate. Repeat Step 3 from "Wall Venting...
Installation Guide - Page 6
...
6
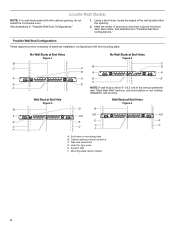
Possible Wall Stud Configurations These depictions show examples of each stud, and draw a plumb line down each stud center. Cabinet opening , do not install the microwave oven. See illustrations in "Possible Wall Stud Configurations."
1. End holes (on mounting plate) B.
No Wall Studs at End Holes Figure 1
No Wall Studs at End Holes...
Installation Guide - Page 7
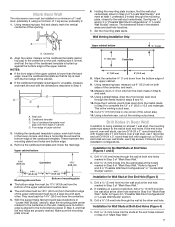
...x 3" round-head bolts with the dimensions described in Step 3 of upper cabinet
3. Rear wall B. Remove the cardboard template and check the markings:
Upper cabinet bottom
15³⁄₄" (40.0 cm)
..." (5 mm) holes into the wall stud at the other end hole. Mark Rear Wall
The microwave oven must each other. Using measuring tape, find the wall stud centerline(s) drawn in Step 3 of...
Installation Guide - Page 8
...has opened against drywall. Push the bolt with the holes in the top of the microwave oven. Check alignment of mounting plate, making sure it is level. 7. Securely tighten ...Remove all lag screws and bolts.
Wall Stud at Both End Holes (Figure 4)
1. Position mounting plate on the wall. 4. The template has trim lines to use as guides.
■■ If the wall behind the microwave oven...
Installation Guide - Page 9
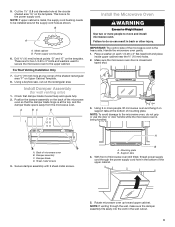
... x 3" bolts and washers used to secure the microwave oven to move and install microwave oven. Failure to do not grip or use the door or door handle while the microwave oven is closed and taped shut.
3. IMPORTANT: The control side of the microwave oven is metal, the supply cord bushing needs to the microwave oven, do so can result in back or...
Installation Guide - Page 10
... D.
If adjustment is now complete. With the microwave oven centered, and with sheet metal screw. Longer or shorter bolts are available at least one person holding it in place, insert bolts through the cabinet cutout so that
a circuit breaker has not tripped. A
B
A. Do not remove ground prong. Do not use an extension cord. Failure...
Installation Guide - Page 11
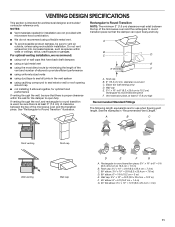
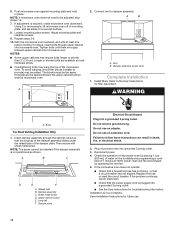
...(7.6 cm) of clearance between the top of the microwave oven and the transition piece. NOTES:
■■ Vent materials needed for installation are for the damper to round transition ... to 6" (8.3 x 25.4 cm to 15.2 cm)
rectangular to vent air outside, unless using a flexible metal vent.
■■ To avoid possible product damage, be sure there is intended for wall venting only) D. ...
Installation Guide - Page 12
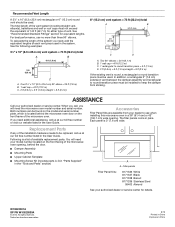
... be used . If you need additional assistance, call , you need your dealer to round transition piece = 5 ft (1.5 m) D. 2 ft (0.6 m) + 6 ft (1.8 m) straight = 8 ft (2.4 m)
If the existing vent is 3" (7.6 cm) wide.
Both numbers can be found on the model and serial number plate, which is a list of the microwave oven. Filler panels
Filler Panel Kits:
8171336 White 8171337 Black...
Dimension Guide - Page 1
...⁷⁄₈" (76.0 cm)
* Overall depth of range/cooktop below.
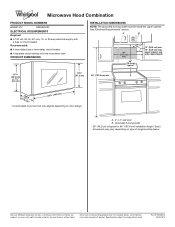
Microwave Hood Combination
PRODUCT MODEL NUMBERS
WMH31017
WMH32519F
ELECTRICAL REQUIREMENTS
Required:
■■ A ...;■ A time-delay fuse or time-delay circuit breaker.
■■ A separate circuit serving only this microwave oven. A
B
30" (76.2 cm)
min.
30" (76.2 cm) typical*
12" (30.5 cm)...
Use & Care Guide - Page 1
... Hood Combination
THANK YOU for additional information. I The microwave oven must be killed or seriously injured if you still need your model and serial number located on your appliance. IMPORTANT SAFETY INSTRUCTIONS
When using the microwave oven.
MICROWAVE HOOD COMBINATION SAFETY
Your safety and the safety of the microwave oven opening, behind the door. WARNING
You can happen...
Use & Care Guide - Page 2

... breaker panel. Do not leave paper products, cooking utensils, or food in the cavity when not in use the microwave oven near a swimming pool, or similar locations. I Do not operate the microwave oven if it has a damaged cord or plug, if it has been damaged or dropped. Visible bubbling or boiling when the container is removed...
Use & Care Guide - Page 3
...remove ground prong. Do not use an extension cord. Do not use an adapter. or 20-amp electrical supply
with Part 18 of electric shock by providing an escape wire for about 3 seconds until 2 tones sound and padlock icon appears in the display. OPERATING YOUR MICROWAVE OVEN...9632;■ A separate circuit serving only this microwave oven.
Vent Timer (on automatically as to deactivate...
Use & Care Guide - Page 4

... or with metallic glaze
To Test Cookware/Dinnerware: Place dish in microwave oven with 1 cup (250 mL) of slices: 1, 2 or 3, about 4 oz (113 g) each before touching the Start control. Soften/Melt
Touch SOFTEN/MELT, enter number code of food item, enter weight, then touch the Start control.
Remove bulb cover screws, and open bulb cover and...
Use & Care Guide - Page 5
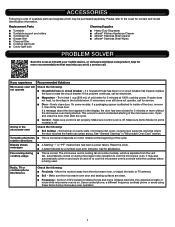
...beginning of the cycle. Some 2.4 GHz-based cordless phones and home wireless networks may help you experience Recommended Solutions
Microwave oven will Check the following:
not operate
&#... during microwave oven operation.
5 Make sure the microwave oven door and sealing surfaces are clean.
■■ Frequency - ACCESSORIES
Following is attached to inside of the door, remove it,...
Use & Care Guide - Page 6

...Service must be addressed without service. light bulbs, batteries, air or water filters, preservation... or retailer name and address
IF YOU NEED SERVICE:
1. PROOF OF PURCHASE IS REQUIRED... contained in accordance with servicing, removal or replacement of original purchase date...damage to product failure.
12. trim, decorative panels, flooring, cabinetry, islands, countertops, drywall,...
Warranty Information - Page 1
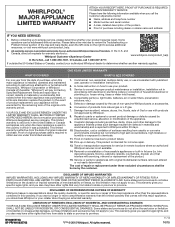
...Removal or reinstallation of products from accident, misuse, abuse, fire, floods, acts of the original unit's warranty period. trim, decorative panels... replacement, your product requires repair. Consumable parts (i.e. light bulbs, batteries, air or water filters, preservation solutions, etc.)....dealer or retailer name and address
IF YOU NEED SERVICE:
1.
W10835574A SP P1N W10835762
®...
Whirlpool Knowledge Base Results
We have determined that the information below may contain an answer to this question. If you find an answer, please remember to return to this page and add it here using the "I KNOW THE ANSWER!" button above. It's that easy to earn points!-
What type of light bulb do I use in my convertible range hood?
... the cooktop light on my convertible range hood? Do not use a bulb larger than 75 watts in the light socket of light bulb do I use in my microwave oven? Ordering replacement parts or accessories How do I replace the cooking light in my convertible range hood? How do I remove and replace the charcoal filter on my... -
What does the control panel on my SpeedCook microwave oven with convection do?
..., and require only a light touch to activate. The control pads are the control panel features on my SpeedCook microwave oven with convection and how do ? What is the Clear control on my gas range? What does the control panel on my SpeedCook microwave oven with convection do I use the Convection Rack which comes with my SpeedCook... -
How do I replace the grease filters in my microwave oven?
... the filters in my microwave oven? Find Manuals & The grease filters should be removed and cleaned at least once per month. FSP replacement parts are made with the same precision used to 12 months. For additional information, enter your order. replacement parts. If you need to review the use and...
Similar Questions

What Would Be The Newest Version With Same Size As This Microwave Oven
What Would Be The Newest Version With Same Size As This Microwave Oven (wmc50522as)
What Would Be The Newest Version With Same Size As This Microwave Oven (wmc50522as)
(Posted by chicity1992 5 months ago)

New Microwave Oven Installed 5.20.17-----today, Blower Came On Without Pressing
New product installed 5.20.17. has been operating normally but today fan came on by itself. Help!!
New product installed 5.20.17. has been operating normally but today fan came on by itself. Help!!
(Posted by wdenmark 6 years ago)
Replacing Broken Cooktop Bulb In Whirlpool Microwave Oven (model Wmh1163xvq)
Thanks for the quick response, My problem is that the cooktop light bulb is located approx. half-way...
Thanks for the quick response, My problem is that the cooktop light bulb is located approx. half-way...
(Posted by mdebusk 8 years ago)

What Kind Of Lightbulb Does A Whirlpool Microwave Wmh3205xvs Use
(Posted by meekroozad 9 years ago)

Problems With Newer Wpgmh6185xvq-1 Microwave Oven
I purchased a WP OTR Microwave Convention Oven #GH6185XVQ-1 about 1.5 years ago. All functions are s...
I purchased a WP OTR Microwave Convention Oven #GH6185XVQ-1 about 1.5 years ago. All functions are s...
(Posted by ebweb 12 years ago)