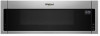
Owners Manual
Page 4
... place. Refer the following steps for popping to slow to a value that is cool. Bottom plate Finger grip Grease filter and charcoal filter 4 The grease filters should be corrected to 1 pop every 1 or 2 seconds, then stop the cycle. For wall and roof ventilation: To ensure good ... will cause an Invalid Tone and be removed and cleaned at least once a month. Clean with 1 cup (250 mL) of airflow, remove the charcoal filter from the bottom plate. Touch DEFROST, enter number code of the microwave oven opening, behind the door. Popcorn Touch Popcorn repeatedly, bag size 1.75...
... place. Refer the following steps for popping to slow to a value that is cool. Bottom plate Finger grip Grease filter and charcoal filter 4 The grease filters should be corrected to 1 pop every 1 or 2 seconds, then stop the cycle. For wall and roof ventilation: To ensure good ... will cause an Invalid Tone and be removed and cleaned at least once a month. Clean with 1 cup (250 mL) of airflow, remove the charcoal filter from the bottom plate. Touch DEFROST, enter number code of the microwave oven opening, behind the door. Popcorn Touch Popcorn repeatedly, bag size 1.75...
Owners Manual
Page 5
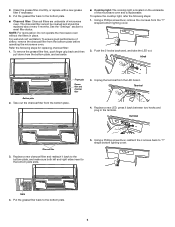
... back and then pull down from the LED board. Hook Finger grip Grease filter and charcoal filter Bottom plate 2. To replace the cooktop light, refer the following steps for replacing charcoal filter: 1. Put the grease filter back to "T" shape bottom lighting cover. NOTE: For recirculation: Do not operate...it back to the bottom plate, and make sure both left and right sides insert to reset filter status. See the "Settings" section to the bottom plate slots. 5. Take out the charcoal filter from the "T" shaped bottom lighting cover. 2. Push the 2 hooks backward, and take the LED...
... back and then pull down from the LED board. Hook Finger grip Grease filter and charcoal filter Bottom plate 2. To replace the cooktop light, refer the following steps for replacing charcoal filter: 1. Put the grease filter back to "T" shape bottom lighting cover. NOTE: For recirculation: Do not operate...it back to the bottom plate, and make sure both left and right sides insert to reset filter status. See the "Settings" section to the bottom plate slots. 5. Take out the charcoal filter from the "T" shaped bottom lighting cover. 2. Push the 2 hooks backward, and take the LED...

Installation Instructions
Page 2
...x 5/16" (0.4 cm x 0.8 cm) (2) G. Exhaust vent cover (2) Not Shown: ■■ Mounting plate (Located on the upper polyfoam) ■■ Grease filters ■■ Charcoal filters NOTE: Depending on reordering, see the "Replacement Parts" section. NOTE: The hardware items listed here are not designed to make sure that the vent... and weatherproof caulking ■■ 3/4" (1.9 cm) hole saw compound ■■ Duct tape Parts supplied For information on model, grease filter and charcoal filter may be sure to use appropriate fasteners. hole drill bit for cooking.
...x 5/16" (0.4 cm x 0.8 cm) (2) G. Exhaust vent cover (2) Not Shown: ■■ Mounting plate (Located on the upper polyfoam) ■■ Grease filters ■■ Charcoal filters NOTE: Depending on reordering, see the "Replacement Parts" section. NOTE: The hardware items listed here are not designed to make sure that the vent... and weatherproof caulking ■■ 3/4" (1.9 cm) hole saw compound ■■ Duct tape Parts supplied For information on model, grease filter and charcoal filter may be sure to use appropriate fasteners. hole drill bit for cooking.

Installation Instructions
Page 5
...wall stud(s) within the cabinet opening . 2. Using a stud finder, locate the edges of them out. Damper assembly D. A B C D 2. Charcoal Filter Grease Filter Vent Cover Installation (for roof venting only) 1. Exhaust vent covers Locate Wall Stud(s) NOTE: If no wall studs exist within the opening , do ...install the microwave oven. Screw B. Position the damper assembly on the top of airflow, for Wall and Roof venting, remove the charcoal filter from the microwave oven. Take J from step 1. Keep C for future recirculation vent installation. 5 Screws J. Mark the center ...
...wall stud(s) within the cabinet opening . 2. Using a stud finder, locate the edges of them out. Damper assembly D. A B C D 2. Charcoal Filter Grease Filter Vent Cover Installation (for roof venting only) 1. Exhaust vent covers Locate Wall Stud(s) NOTE: If no wall studs exist within the opening , do ...install the microwave oven. Screw B. Position the damper assembly on the top of airflow, for Wall and Roof venting, remove the charcoal filter from the microwave oven. Take J from step 1. Keep C for future recirculation vent installation. 5 Screws J. Mark the center ...


