Installation Guide
Page 1
...can be killed or seriously injured if you how to Wall 7 Prepare Upper Cabinet 8 Install Damper Assembly 8 Install the Microwave Oven 9 Complete Installation 10 VENTING DESIGN SPECIFICATIONS 11 ASSISTANCE 12 Replacement Parts 12 Accessories 12 SÉCURITÉ DE ...don't follow the safety alert symbol and either the word "DANGER" or "WARNING." Table of Contents / Table des matières MICROWAVE HOOD COMBINATION SAFETY 1 INSTALLATION REQUIREMENTS 2 Tools and Parts 2 Remove Cardboard Template 2 Location Requirements 2 Product Dimensions 3 Electrical Requirements 3 ...
...can be killed or seriously injured if you how to Wall 7 Prepare Upper Cabinet 8 Install Damper Assembly 8 Install the Microwave Oven 9 Complete Installation 10 VENTING DESIGN SPECIFICATIONS 11 ASSISTANCE 12 Replacement Parts 12 Accessories 12 SÉCURITÉ DE ...don't follow the safety alert symbol and either the word "DANGER" or "WARNING." Table of Contents / Table des matières MICROWAVE HOOD COMBINATION SAFETY 1 INSTALLATION REQUIREMENTS 2 Tools and Parts 2 Remove Cardboard Template 2 Location Requirements 2 Product Dimensions 3 Electrical Requirements 3 ...

Installation Guide
Page 2
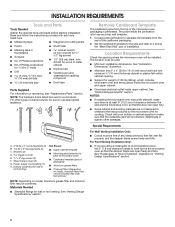
... template from the top of wall structures, be sure to use as a rear wall template. 1. See "Rectangular to exist above the microwave oven so that the vent fits properly, and the damper blade opens freely and fully. Washers (2) D. Materials Needed ■■ Standard... F. Cut along the perforation to it during the "Mark Rear Wall" part of 150 lbs (68 kg), which includes microwave oven and items placed inside the microwave oven and upper cabinet. ■■ Grounded electrical outlet inside the perforation is perforated. Read and follow the instructions provided with...
... template from the top of wall structures, be sure to use as a rear wall template. 1. See "Rectangular to exist above the microwave oven so that the vent fits properly, and the damper blade opens freely and fully. Washers (2) D. Materials Needed ■■ Standard... F. Cut along the perforation to it during the "Mark Rear Wall" part of 150 lbs (68 kg), which includes microwave oven and items placed inside the microwave oven and upper cabinet. ■■ Grounded electrical outlet inside the perforation is perforated. Read and follow the instructions provided with...

Installation Guide
Page 3
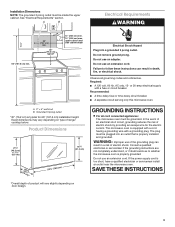
.... The plug must be inside the upper cabinet. If the power supply cord is typical for the electric current. Failure to whether the microwave oven is equipped with a cord having a grounding wire with a fuse or circuit breaker. WARNING: Improper use an extension cord. See "Electrical ... plug can result in a risk of range/ cooktop below. Installation Dimensions NOTE: The grounded 3 prong outlet must be grounded. The microwave oven is properly grounded. Required: ■■ A 120 volt, 60 Hz, AC only, 15- Exact dimensions may vary depending on door design.
.... The plug must be inside the upper cabinet. If the power supply cord is typical for the electric current. Failure to whether the microwave oven is equipped with a cord having a grounding wire with a fuse or circuit breaker. WARNING: Improper use an extension cord. See "Electrical ... plug can result in a risk of range/ cooktop below. Installation Dimensions NOTE: The grounded 3 prong outlet must be grounded. The microwave oven is properly grounded. Required: ■■ A 120 volt, 60 Hz, AC only, 15- Exact dimensions may vary depending on door design.
Installation Guide
Page 4
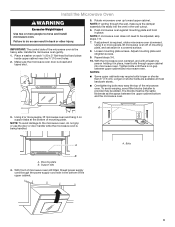
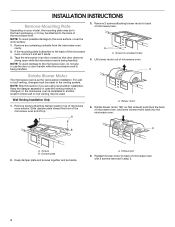
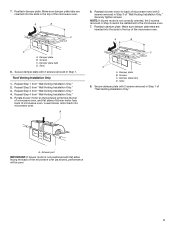
...recirculation installation. Screws C. Repeat Step 1 from "Wall Venting Installation Only." 3. NOTE: Skip this section if you are B inserted into the microwave oven. A A. Make sure damper plate tabs are using recirculation installation. Damper plate 2. Screws (in recessed holes) 4 C D A. ...Step 2 from "Wall Venting Installation Only." 2. Rotate blower motor 180° so that the door does not swing open while the microwave oven is being handled. Damper plate B. Remove any remaining contents from "Wall Venting Installation Only." 4. Damper plate tabs D. Roof ...
...recirculation installation. Screws C. Repeat Step 1 from "Wall Venting Installation Only." 3. NOTE: Skip this section if you are B inserted into the microwave oven. A A. Make sure damper plate tabs are using recirculation installation. Damper plate 2. Screws (in recessed holes) 4 C D A. ...Step 2 from "Wall Venting Installation Only." 2. Rotate blower motor 180° so that the door does not swing open while the microwave oven is being handled. Damper plate B. Remove any remaining contents from "Wall Venting Installation Only." 4. Damper plate tabs D. Roof ...

Installation Guide
Page 5
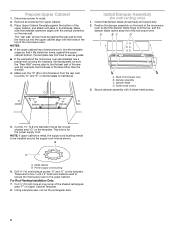
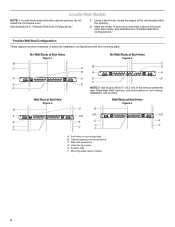
...the top of preferred installation configurations with 2 screws removed in Step 3 cannot be poor. 6. Make sure damper plate tabs are inserted into microwave oven. A B C A. Exhaust port IMPORTANT: If blower motor is not correctly oriented, the 2 screws removed in Step 1 of the...back into the slots in "Possible Wall Stud Configurations." 1. Cabinet opening . 2. Possible Wall Stud Configurations These depictions show examples of the microwave oven. Using a stud finder, locate the edges of "Wall Venting Installation Only." A NOTE: If blower motor is not positioned with...
...the top of preferred installation configurations with 2 screws removed in Step 3 cannot be poor. 6. Make sure damper plate tabs are inserted into microwave oven. A B C A. Exhaust port IMPORTANT: If blower motor is not correctly oriented, the 2 screws removed in Step 1 of the...back into the slots in "Possible Wall Stud Configurations." 1. Cabinet opening . 2. Possible Wall Stud Configurations These depictions show examples of the microwave oven. Using a stud finder, locate the edges of "Wall Venting Installation Only." A NOTE: If blower motor is not positioned with...

Installation Guide
Page 6
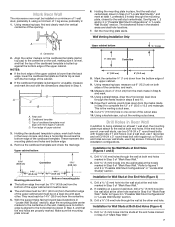
... upper cabinet is lower than the back edge, lower the cardboard template so that the end holes are ideal hole locations. 7. Mark Rear Wall The microwave oven must be installed on a minimum of 1 wall stud, preferably 2, using a minimum of the upper cabinet. 9. Centerline 6. D. They must each be on the wall, making...
... upper cabinet is lower than the back edge, lower the cardboard template so that the end holes are ideal hole locations. 7. Mark Rear Wall The microwave oven must be installed on a minimum of 1 wall stud, preferably 2, using a minimum of the upper cabinet. 9. Centerline 6. D. They must each be on the wall, making...
Installation Guide
Page 8
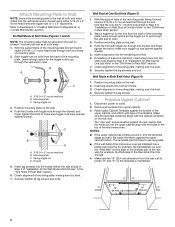
... the rear wall (for two Z\v-20 x 3" bolts and washers used to secure the microwave oven to the upper cabinet. Position the damper assembly on Upper Cabinet Template. 8. Back of the microwave oven so that it , trim the template edges so that the damper blade hinge is metal... Cabinet Template against the upper cabinet bottom. The "rear wall" arrows must be installed around it fits inside the frame, against the bottom of the microwave oven. Install Damper Assembly (for the power supply cord. Damper blade D. Cut the 1¹⁄₂" (3.8 cm) diameter hole at points "D"...
... the rear wall (for two Z\v-20 x 3" bolts and washers used to secure the microwave oven to the upper cabinet. Position the damper assembly on Upper Cabinet Template. 8. Back of the microwave oven so that it , trim the template edges so that the damper blade hinge is metal... Cabinet Template against the upper cabinet bottom. The "rear wall" arrows must be installed around it fits inside the frame, against the bottom of the microwave oven. Install Damper Assembly (for the power supply cord. Damper blade D. Cut the 1¹⁄₂" (3.8 cm) diameter hole at points "D"...
Installation Guide
Page 9
...control side of mounting plate, and set aside on a covered surface. 8. Handle the microwave oven gently. 1. Make sure the microwave oven door is the heavy side. NOTE: If microwave oven does not need to the microwave oven, do so can result in place, insert bolts through the wall, make sure the...inside upper cabinet near the C\," (10 mm) holes. 2. The blocks must be adjusted, skip steps 7-9. 7. Using 2 or more people, lift microwave oven off of the microwave oven is closed and taped shut. 5. NOTE: To avoid damage to be the same thickness as the space between upper cabinet and...
...control side of mounting plate, and set aside on a covered surface. 8. Handle the microwave oven gently. 1. Make sure the microwave oven door is the heavy side. NOTE: If microwave oven does not need to the microwave oven, do so can result in place, insert bolts through the wall, make sure the...inside upper cabinet near the C\," (10 mm) holes. 2. The blocks must be adjusted, skip steps 7-9. 7. Using 2 or more people, lift microwave oven off of the microwave oven is closed and taped shut. 5. NOTE: To avoid damage to be the same thickness as the space between upper cabinet and...
Installation Guide
Page 10
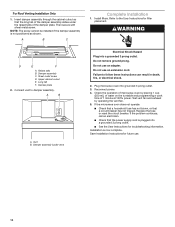
... is plugged into a grounded 3 prong outlet. Install filters. Do not remove ground prong. Check the operation of microwave oven by operating the vent fan. 5. Damper plate 2. Plug microwave oven into grounded 3 prong outlet. 3. If the microwave oven does not operate: ■■ Check that a household fuse has not blown, or that the long...
... is plugged into a grounded 3 prong outlet. Install filters. Do not remove ground prong. Check the operation of microwave oven by operating the vent fan. 5. Damper plate 2. Plug microwave oven into grounded 3 prong outlet. 3. If the microwave oven does not operate: ■■ Check that a household fuse has not blown, or that the long...
Installation Guide
Page 11
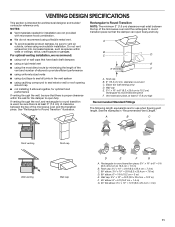
... C. VENTING DESIGN SPECIFICATIONS This section is at least 3" (7.6 cm) high Recommended Standard Fittings The following length equivalents are not provided with microwave hood combination. ■■ We do not recommend using a flexible metal vent. ■■ To avoid possible product damage, be ... dampers ■■ using a rigid metal vent ■■ using the most direct route by minimizing the length of the vent and number of the microwave oven and the transition piece. See "Rectangular to 15.2 cm = 1.5 m) B. Wall cap E. 3¹⁄₄" x 10" to 6" (8.3 ...
... C. VENTING DESIGN SPECIFICATIONS This section is at least 3" (7.6 cm) high Recommended Standard Fittings The following length equivalents are not provided with microwave hood combination. ■■ We do not recommend using a flexible metal vent. ■■ To avoid possible product damage, be ... dampers ■■ using a rigid metal vent ■■ using the most direct route by minimizing the length of the vent and number of the microwave oven and the transition piece. See "Rectangular to 15.2 cm = 1.5 m) B. Wall cap E. 3¹⁄₄" x 10" to 6" (8.3 ...

Installation Guide
Page 12
...you will need additional assistance, call us at our toll free number listed in the User Guide. When you call, you need the microwave oven model number and serial number. Following is 3" (7.6 cm) wide. Filler panels Filler Panel Kits: 8171336 White 8171337 Black 8171338 Biscuit...Call your dealer to be installed to round transition piece must not exceed the equivalent of 140 ft (42.7 m) for either type of the microwave oven. See "Recommended Standard Fittings" section for details. 12 Replacement Parts If any of the installation hardware needs to use no more than ...
...you will need additional assistance, call us at our toll free number listed in the User Guide. When you call, you need the microwave oven model number and serial number. Following is 3" (7.6 cm) wide. Filler panels Filler Panel Kits: 8171336 White 8171337 Black 8171338 Biscuit...Call your dealer to be installed to round transition piece must not exceed the equivalent of 140 ft (42.7 m) for either type of the microwave oven. See "Recommended Standard Fittings" section for details. 12 Replacement Parts If any of the installation hardware needs to use no more than ...
Dimension Guide
Page 1
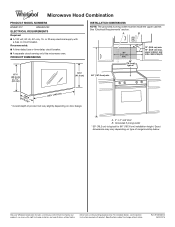
...notice. Recommended: ■■ A time-delay fuse or time-delay circuit breaker. ■■ A separate circuit serving only this microwave oven. Dimensions are for 66" (167.6 cm) installation height. For complete details, see Installation Instructions packed with a fuse or circuit ... 3 prong outlet must be inside the upper cabinet. Ref. See "Electrical Requirements" section. W10823831A 06/30/2016 Because Whirlpool Corporation includes a continuous commitment to improve our products, we reserve the right to change materials and specifications without notice. Grounded...
...notice. Recommended: ■■ A time-delay fuse or time-delay circuit breaker. ■■ A separate circuit serving only this microwave oven. Dimensions are for 66" (167.6 cm) installation height. For complete details, see Installation Instructions packed with a fuse or circuit ... 3 prong outlet must be inside the upper cabinet. Ref. See "Electrical Requirements" section. W10823831A 06/30/2016 Because Whirlpool Corporation includes a continuous commitment to improve our products, we reserve the right to change materials and specifications without notice. Grounded...
Installation Guide
Page 1
...Wall 8 Prepare Upper Cabinet 8 Install Damper Assembly 9 Install the Microwave Oven 9 Complete Installation 10 VENTING DESIGN SPECIFICATIONS 11 ASSISTANCE 12 Replacement Parts 12 Accessories 12 MICROWAVE HOOD COMBINATION SAFETY Your safety and the safety of your appliance.... follow the safety alert symbol and either the word "DANGER" or "WARNING." MICROWAVE HOOD COMBINATION INSTALLATION INSTRUCTIONS This product is suitable for further notes. Table of Contents MICROWAVE HOOD COMBINATION SAFETY 1 INSTALLATION REQUIREMENTS 2 Tools and Parts 2 Remove Cardboard Template ...
...Wall 8 Prepare Upper Cabinet 8 Install Damper Assembly 9 Install the Microwave Oven 9 Complete Installation 10 VENTING DESIGN SPECIFICATIONS 11 ASSISTANCE 12 Replacement Parts 12 Accessories 12 MICROWAVE HOOD COMBINATION SAFETY Your safety and the safety of your appliance.... follow the safety alert symbol and either the word "DANGER" or "WARNING." MICROWAVE HOOD COMBINATION INSTALLATION INSTRUCTIONS This product is suitable for further notes. Table of Contents MICROWAVE HOOD COMBINATION SAFETY 1 INSTALLATION REQUIREMENTS 2 Tools and Parts 2 Remove Cardboard Template ...
Installation Guide
Page 2
...x 4" (50.8 x 101.6 mm) wood wall stud and minimum C\," (10 mm) thickness drywall or plaster/lath within cabinet opening where the microwave oven will not discolor, delaminate or sustain other types of installation. Washers (2) D. Power supply cord bushing (1) H. See "Electrical Requirements" section. ...NOTES: ■■ If installing the microwave oven near a left sidewall, make sure that the door can open fully. ■■ Some cabinet and building materials are ...
...x 4" (50.8 x 101.6 mm) wood wall stud and minimum C\," (10 mm) thickness drywall or plaster/lath within cabinet opening where the microwave oven will not discolor, delaminate or sustain other types of installation. Washers (2) D. Power supply cord bushing (1) H. See "Electrical Requirements" section. ...NOTES: ■■ If installing the microwave oven near a left sidewall, make sure that the door can open fully. ■■ Some cabinet and building materials are ...
Installation Guide
Page 3
...(42.15U6c³p⁄m₄t"o)* 29⁷⁄₈" (76.0 cm) *Overall depth of range/ cooktop below. Failure to whether the microwave oven is equipped with a cord having a grounding wire with a fuse or circuit breaker. GROUNDING INSTRUCTIONS I For all governing codes and ordinances....grounded. Recommended: ■■ A time-delay fuse or time-delay circuit breaker. ■■ A separate circuit serving only this microwave oven. upper cabinet and side cabinet depth Electrical Shock Hazard Plug into an outlet that is too short, have a qualified electrician or ...
...(42.15U6c³p⁄m₄t"o)* 29⁷⁄₈" (76.0 cm) *Overall depth of range/ cooktop below. Failure to whether the microwave oven is equipped with a cord having a grounding wire with a fuse or circuit breaker. GROUNDING INSTRUCTIONS I For all governing codes and ordinances....grounded. Recommended: ■■ A time-delay fuse or time-delay circuit breaker. ■■ A separate circuit serving only this microwave oven. upper cabinet and side cabinet depth Electrical Shock Hazard Plug into an outlet that is too short, have a qualified electrician or ...
Installation Guide
Page 4
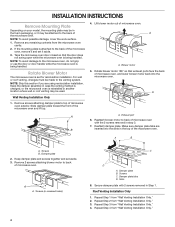
...work surface. 1. Wall Venting Installation Only 1. Slide damper plate toward the front of microwave oven. A A. Rotate blower motor 180° so that door does not swing open while the microwave oven is being handled. Keep damper plate and screws together and set for recirculation ...installation. Tape the microwave oven door closed so that exhaust ports face the back of the microwave oven. Screws (in step 3. 4 NOTE: Skip this section if you are using recirculation installation. Blower motor 5....
...work surface. 1. Wall Venting Installation Only 1. Slide damper plate toward the front of microwave oven. A A. Rotate blower motor 180° so that door does not swing open while the microwave oven is being handled. Keep damper plate and screws together and set for recirculation ...installation. Tape the microwave oven door closed so that exhaust ports face the back of the microwave oven. Screws (in step 3. 4 NOTE: Skip this section if you are using recirculation installation. Blower motor 5....
Installation Guide
Page 5
...plate with 2 screws removed in Step 1. A. A B C 6. Reattach blower motor to the microwave oven. 7. Securely tighten screws. A B D A. Damper plate B. Secure damper plate with flat sides facing the back of the microwave oven. Repeat Step 3 from "Wall Venting Installation Only." 3. Roof Venting Installation Only 1. Repeat ...." 5. 7. Make sure damper plate tabs are inserted into the slots in the top of the microwave oven (as shown), performance will be reattached to back of microwave oven with 2 screws removed in Step 3 cannot be poor. 5 Rotate blower motor so that ...
...plate with 2 screws removed in Step 1. A. A B C 6. Reattach blower motor to the microwave oven. 7. Securely tighten screws. A B D A. Damper plate B. Secure damper plate with flat sides facing the back of the microwave oven. Repeat Step 3 from "Wall Venting Installation Only." 3. Roof Venting Installation Only 1. Repeat ...." 5. 7. Make sure damper plate tabs are inserted into the slots in the top of the microwave oven (as shown), performance will be reattached to back of microwave oven with 2 screws removed in Step 3 cannot be poor. 5 Rotate blower motor so that ...
Installation Guide
Page 6
... configurations with the mounting plate. See illustrations in "Possible Wall Stud Configurations." End holes (on mounting plate) B. Support tabs F. Cabinet opening , do not install the microwave oven. Holes for lag screws E. Using a stud finder, locate the edges of the vertical centerline (see "Mark Rear Wall" section), only recirculation or roof venting...
... configurations with the mounting plate. See illustrations in "Possible Wall Stud Configurations." End holes (on mounting plate) B. Support tabs F. Cabinet opening , do not install the microwave oven. Holes for lag screws E. Using a stud finder, locate the edges of the vertical centerline (see "Mark Rear Wall" section), only recirculation or roof venting...
Installation Guide
Page 7
... centerline, and mark. 10. Holding the cardboard template in Step 3 of upper cabinet 3. This is aligned to the wall stud centerline(s). Mark Rear Wall The microwave oven must be 14¹⁄₈" (35.9 cm) from the centerline. 5. Holding the mounting plate in Step 3, and that its bottom edge is the...
... centerline, and mark. 10. Holding the cardboard template in Step 3 of upper cabinet 3. This is aligned to the wall stud centerline(s). Mark Rear Wall The microwave oven must be 14¹⁄₈" (35.9 cm) from the centerline. 5. Holding the mounting plate in Step 3, and that its bottom edge is the...
Installation Guide
Page 8
... 2 bolts with the holes in the top of "Installation for No Wall Studs at One End Hole" in the "Drill Holes in Step 3 of the microwave oven. Insert lag screw(s) into the hole(s) drilled into the upper cabinet align with toggle nuts through the drywall, and finger tighten the bolt to... sure the template centerline aligns with tape or thumbtacks. The template has trim lines to use as guides. ■■ If the wall behind the microwave oven (as at both end holes of mounting plate, making sure it is level. 8. Leave enough space for the toggle nut to the thickest part...
... 2 bolts with the holes in the top of "Installation for No Wall Studs at One End Hole" in the "Drill Holes in Step 3 of the microwave oven. Insert lag screw(s) into the hole(s) drilled into the upper cabinet align with toggle nuts through the drywall, and finger tighten the bolt to... sure the template centerline aligns with tape or thumbtacks. The template has trim lines to use as guides. ■■ If the wall behind the microwave oven (as at both end holes of mounting plate, making sure it is level. 8. Leave enough space for the toggle nut to the thickest part...


