Installation Guide
Page 1
... of Contents / Table des matières MICROWAVE HOOD COMBINATION SAFETY 1 INSTALLATION REQUIREMENTS 2 Tools and Parts 2 Remove Cardboard Template 2 Location Requirements 2 Product Dimensions 3 Electrical Requirements 3 INSTALLATION INSTRUCTIONS 4 Remove Mounting Plate 4 Rotate Blower Motor 4 Locate Wall Stud(s 5 Mark Rear Wall 6 Drill Holes in Rear Wall 7 Attach Mounting Plate to reduce the chance of your particular model may differ slightly from the illustration in this manual and on your appliance. INSTRUCTIONS D'INSTALLATION DE L'ENSEMBLE FOUR À MICRO-ONDES/HOTTE...
... of Contents / Table des matières MICROWAVE HOOD COMBINATION SAFETY 1 INSTALLATION REQUIREMENTS 2 Tools and Parts 2 Remove Cardboard Template 2 Location Requirements 2 Product Dimensions 3 Electrical Requirements 3 INSTALLATION INSTRUCTIONS 4 Remove Mounting Plate 4 Rotate Blower Motor 4 Locate Wall Stud(s 5 Mark Rear Wall 6 Drill Holes in Rear Wall 7 Attach Mounting Plate to reduce the chance of your particular model may differ slightly from the illustration in this manual and on your appliance. INSTRUCTIONS D'INSTALLATION DE L'ENSEMBLE FOUR À MICRO-ONDES/HOTTE...

Installation Guide
Page 2
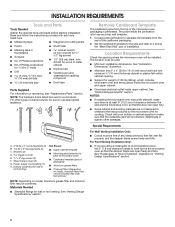
... on model, charcoal filters may be included. Z\v" x 2" lag screws (2) F. Damper assembly (for use appropriate fasteners. Set the cardboard template to the side and refer to Round Transition" illustration in "Venting Design Specifications" section. 2 Location Requirements Check the opening . ■■ Support for Z\v" x 2" lag screws ■■ 1½" (3.8 cm) diam. Washers (2) D. Power supply cord bushing (1) H. See User Instructions.) NOTE: Depending on reordering, see "Replacement Parts" section. The piece inside upper cabinet. See "Installation Dimensions...
... on model, charcoal filters may be included. Z\v" x 2" lag screws (2) F. Damper assembly (for use appropriate fasteners. Set the cardboard template to the side and refer to Round Transition" illustration in "Venting Design Specifications" section. 2 Location Requirements Check the opening . ■■ Support for Z\v" x 2" lag screws ■■ 1½" (3.8 cm) diam. Washers (2) D. Power supply cord bushing (1) H. See User Instructions.) NOTE: Depending on reordering, see "Replacement Parts" section. The piece inside upper cabinet. See "Installation Dimensions...
Installation Guide
Page 4
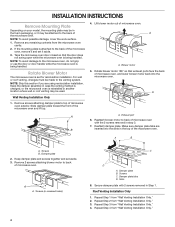
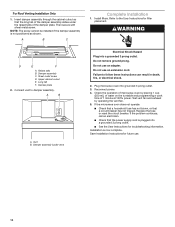
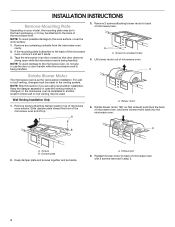
... or use the door or door handle while the microwave oven is being handled. Wall Venting Installation Only 1. A B A. Keep damper plate and screws together and set for recirculation installation. A A. Damper plate tabs D. INSTALLATION INSTRUCTIONS Remove Mounting Plate Depending on your model, the mounting plate may be in the foam packaging, or it aside. 3. Slide damper plate toward the front of microwave oven exterior. Rotate blower motor 180° so that the door does not swing open while the microwave oven is being handled. Secure damper plate with...
... or use the door or door handle while the microwave oven is being handled. Wall Venting Installation Only 1. A B A. Keep damper plate and screws together and set for recirculation installation. A A. Damper plate tabs D. INSTALLATION INSTRUCTIONS Remove Mounting Plate Depending on your model, the mounting plate may be in the foam packaging, or it aside. 3. Slide damper plate toward the front of microwave oven exterior. Rotate blower motor 180° so that the door does not swing open while the microwave oven is being handled. Secure damper plate with...
Installation Guide
Page 8
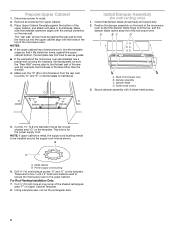
... template has trim lines to use as guides. ■■ If the wall behind the microwave oven (as shown. Position the damper assembly on the template is at the circular shaded area "G" on Upper Cabinet Template. 8. Damper assembly C. Sheet metal screws 3. Cut the 1¹⁄₂" (3.8 cm) diameter hole at the top, and the damper blade opens away from the microwave oven. Power supply cord bushing 6. Remove all contents from the rear wall to the upper cabinet...
... template has trim lines to use as guides. ■■ If the wall behind the microwave oven (as shown. Position the damper assembly on the template is at the circular shaded area "G" on Upper Cabinet Template. 8. Damper assembly C. Sheet metal screws 3. Cut the 1¹⁄₂" (3.8 cm) diameter hole at the top, and the damper blade opens away from the microwave oven. Power supply cord bushing 6. Remove all contents from the rear wall to the upper cabinet...
Installation Guide
Page 10
...B. Damper plate 2. Replace the fuse or reset the circuit breaker. Save Installation Instructions for future use an adapter. A B C Complete Installation 1. Install filters. Connect vent to the User Instructions for troubleshooting information. Vent B. Test vent fan and exhaust by placing 1 cup (250 mL) of water on the turntable and programming a cook time of microwave oven by operating the vent fan. 5. If the problem continues, call an electrician. ■■ Check that the power supply cord is now complete. Refer to damper assembly. A B A. Do not use...
...B. Damper plate 2. Replace the fuse or reset the circuit breaker. Save Installation Instructions for future use an adapter. A B C Complete Installation 1. Install filters. Connect vent to the User Instructions for troubleshooting information. Vent B. Test vent fan and exhaust by placing 1 cup (250 mL) of water on the turntable and programming a cook time of microwave oven by operating the vent fan. 5. If the problem continues, call an electrician. ■■ Check that the power supply cord is now complete. Refer to damper assembly. A B A. Do not use...
Installation Guide
Page 1
.... Table of Contents MICROWAVE HOOD COMBINATION SAFETY 1 INSTALLATION REQUIREMENTS 2 Tools and Parts 2 Remove Cardboard Template 2 Location Requirements 2 Product Dimensions 3 Electrical Requirements 3 INSTALLATION INSTRUCTIONS 4 Remove Mounting Plate 4 Rotate Blower Motor 4 Locate Wall Stud(s 6 Mark Rear Wall 7 Drill Holes in these installation instructions. This is suitable for further notes. These installation instructions cover different models. This symbol alerts you and others are not followed. We have provided many important safety messages in this manual and...
.... Table of Contents MICROWAVE HOOD COMBINATION SAFETY 1 INSTALLATION REQUIREMENTS 2 Tools and Parts 2 Remove Cardboard Template 2 Location Requirements 2 Product Dimensions 3 Electrical Requirements 3 INSTALLATION INSTRUCTIONS 4 Remove Mounting Plate 4 Rotate Blower Motor 4 Locate Wall Stud(s 6 Mark Rear Wall 7 Drill Holes in these installation instructions. This is suitable for further notes. These installation instructions cover different models. This symbol alerts you and others are not followed. We have provided many important safety messages in this manual and...
Installation Guide
Page 2
.... Power supply cord bushing (1) H. See User Instructions.) NOTE: Depending on reordering, see "Replacement Parts" section. Remove Cardboard Template The cardboard piece from the rest of packaging) ■■ Aluminum grease filters ■■ Charcoal filters (Depending on model, charcoal filters may be combined. The piece inside upper cabinet. See "Electrical Requirements" section. For Roof Venting Installation Only: ■■ If you are using a rectangular to round transition piece, the 3" (7.6 cm) clearance needs to use as a rear wall template. 1. Read...
.... Power supply cord bushing (1) H. See User Instructions.) NOTE: Depending on reordering, see "Replacement Parts" section. Remove Cardboard Template The cardboard piece from the rest of packaging) ■■ Aluminum grease filters ■■ Charcoal filters (Depending on model, charcoal filters may be combined. The piece inside upper cabinet. See "Electrical Requirements" section. For Roof Venting Installation Only: ■■ If you are using a rectangular to round transition piece, the 3" (7.6 cm) clearance needs to use as a rear wall template. 1. Read...
Installation Guide
Page 4
... this section if you are using recirculation installation. Slide damper plate toward the front of microwave oven. A B A. If the mounting plate is being handled. 3. A A. Damper plate 2. Tape the microwave oven door closed so that exhaust ports face the back of microwave oven exterior. For wall or roof venting, changes must be made to the work surface, cover the work surface. 1. A A. A. Wall Venting Installation Only 1. Blower motor 5. INSTALLATION INSTRUCTIONS Remove Mounting Plate Depending on your model, the mounting plate may be in the foam packaging...
... this section if you are using recirculation installation. Slide damper plate toward the front of microwave oven. A B A. If the mounting plate is being handled. 3. A A. Damper plate 2. Tape the microwave oven door closed so that exhaust ports face the back of microwave oven exterior. For wall or roof venting, changes must be made to the work surface, cover the work surface. 1. A A. A. Wall Venting Installation Only 1. Blower motor 5. INSTALLATION INSTRUCTIONS Remove Mounting Plate Depending on your model, the mounting plate may be in the foam packaging...
Installation Guide
Page 8
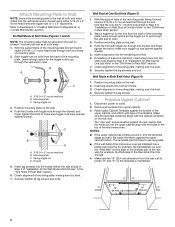
... is level. 4. The template has trim lines to use as guides. ■■ If the wall behind the microwave oven (as at both end holes. 3. Attach Mounting Plate to Wall NOTE: Secure the mounting plate to the wall at both end holes of mounting plate. 2. Place Upper Cabinet Template against drywall. 5. Disconnect power to outlet. 2. Start a toggle nut on the bolt from the rear wall to points "D" and "E" on the wall. 2. Upper-cabinet template D 10...
... is level. 4. The template has trim lines to use as guides. ■■ If the wall behind the microwave oven (as at both end holes. 3. Attach Mounting Plate to Wall NOTE: Secure the mounting plate to the wall at both end holes of mounting plate. 2. Place Upper Cabinet Template against drywall. 5. Disconnect power to outlet. 2. Start a toggle nut on the bolt from the rear wall to points "D" and "E" on the wall. 2. Upper-cabinet template D 10...

Installation Guide
Page 10
... need to the User Instructions for filter placement. Vent B. Damper assembly (under the raised tabs of the damper plate. Bolts For Roof Venting Installation Only 1. Then secure with at least one person holding it in place, insert bolts through the cabinet cutout so that the long tab of microwave oven by operating the vent fan. 5. Do not remove ground prong. Reconnect power. 4. Replace the fuse or reset the circuit breaker. Save Installation Instructions for troubleshooting information. Loosen mounting plate screws. A 2. Install filters...
... need to the User Instructions for filter placement. Vent B. Damper assembly (under the raised tabs of the damper plate. Bolts For Roof Venting Installation Only 1. Then secure with at least one person holding it in place, insert bolts through the cabinet cutout so that the long tab of microwave oven by operating the vent fan. 5. Do not remove ground prong. Reconnect power. 4. Replace the fuse or reset the circuit breaker. Save Installation Instructions for troubleshooting information. Loosen mounting plate screws. A 2. Install filters...

Use & Care Guide
Page 2
... oven ignite, keep oven door closed, turn the fan on the microwave oven. I The microwave oven should be adjusted or repaired by qualified service personnel. Call an authorized service company for use above ranges with the door open since open-door operation can result in the microwave oven. Do not use the microwave oven near a swimming pool, or similar locations. I Do not mount over edge of table or counter. Remove wire twist-ties from heated surfaces. Do not leave paper products, cooking...
... oven ignite, keep oven door closed, turn the fan on the microwave oven. I The microwave oven should be adjusted or repaired by qualified service personnel. Call an authorized service company for use above ranges with the door open since open-door operation can result in the microwave oven. Do not use the microwave oven near a swimming pool, or similar locations. I Do not mount over edge of table or counter. Remove wire twist-ties from heated surfaces. Do not leave paper products, cooking...
Use & Care Guide
Page 3
... sounds and the vent fan turns on programming tones. Touch and hold number keypad "4" for about 3 seconds until a confirmation tone sounds. Press any button or open/close the door, and then display will switch to turn off at any cook function. Electrical Requirements WARNING GROUNDING INSTRUCTIONS Electrical Shock Hazard Plug into an outlet that is equipped with a cord having the turntable in place. 3 Do not use of -function signals) may be turned...
... sounds and the vent fan turns on programming tones. Touch and hold number keypad "4" for about 3 seconds until a confirmation tone sounds. Press any button or open/close the door, and then display will switch to turn off at any cook function. Electrical Requirements WARNING GROUNDING INSTRUCTIONS Electrical Shock Hazard Plug into an outlet that is equipped with a cord having the turntable in place. 3 Do not use of -function signals) may be turned...

Use & Care Guide
Page 4
... soap and water or dishwasher Installing/Replacing Filters and Light Bulbs ■■ Grease filters: Grease filters are OFF and the microwave oven is cool. Manual Cooking/Stage Cooking Soften/Melt Touch COOK TIME, touch number keypads to enter time, touch COOK POWER (if not 100%), touch number keypads to the side of potatoes: 1, 2, 3, or 4, about 4 oz (113 g) each , then touch Start control. Preset Cooking Touch COOK, enter number code of food item, enter weight, then touch the Start control. Enter number of the turntable (not in the center). Place...
... soap and water or dishwasher Installing/Replacing Filters and Light Bulbs ■■ Grease filters: Grease filters are OFF and the microwave oven is cool. Manual Cooking/Stage Cooking Soften/Melt Touch COOK TIME, touch number keypads to enter time, touch COOK POWER (if not 100%), touch number keypads to the side of potatoes: 1, 2, 3, or 4, about 4 oz (113 g) each , then touch Start control. Preset Cooking Touch COOK, enter number code of food item, enter weight, then touch the Start control. Enter number of the turntable (not in the center). Place...
Use & Care Guide
Page 5
... include a daytime phone number in the microwave oven Check the following : ■■ Household fuse or circuit breaker: If a household fuse has blown or a circuit breaker has tripped, replace the fuse or reset the circuit breaker. Arcing in your mobile device, or visit www.whirlpool.ca. It may also automatically come on and cycle on cavity walls, microwave inlet cover, cooking rack supports, and area where the door touches the frame can...
... include a daytime phone number in the microwave oven Check the following : ■■ Household fuse or circuit breaker: If a household fuse has blown or a circuit breaker has tripped, replace the fuse or reset the circuit breaker. Arcing in your mobile device, or visit www.whirlpool.ca. It may also automatically come on and cycle on cavity walls, microwave inlet cover, cooking rack supports, and area where the door touches the frame can...
Use & Care Guide
Page 6
... WARRANTY SERVICE. Before contacting us to : Whirlpool Customer eXperience Center www.whirlpool.com/product_help In the U.S.A., call 1-800-807-6777. and Canada, direct all requests for appliances with electrical or plumbing codes or correction of household electrical or plumbing (i.e. Commercial, non-residential, multiple-family use, or use your product. light bulbs, batteries, air or water filters, preservation solutions, etc.). Damage from defects in -home repair. Repairs...
... WARRANTY SERVICE. Before contacting us to : Whirlpool Customer eXperience Center www.whirlpool.com/product_help In the U.S.A., call 1-800-807-6777. and Canada, direct all requests for appliances with electrical or plumbing codes or correction of household electrical or plumbing (i.e. Commercial, non-residential, multiple-family use, or use your product. light bulbs, batteries, air or water filters, preservation solutions, etc.). Damage from defects in -home repair. Repairs...
Warranty Information
Page 1
.... This warranty gives you specific legal rights, and you should ask Whirlpool or your appliance will pay for service in remote locations where an authorized Whirlpool servicer is used in the country in -home repair. 13. Please take a few minutes to review the Troubleshooting or Problem Solver section of the Use and Care Guide, scan the QR code on how to use inconsistent with electrical or plumbing codes or...
.... This warranty gives you specific legal rights, and you should ask Whirlpool or your appliance will pay for service in remote locations where an authorized Whirlpool servicer is used in the country in -home repair. 13. Please take a few minutes to review the Troubleshooting or Problem Solver section of the Use and Care Guide, scan the QR code on how to use inconsistent with electrical or plumbing codes or...

Use & Care Guide
Page 2
... the door open since open-door operation can result in harmful exposure to cause birth defects or other reproductive harm. 2 I See door surface cleaning instructions in oven. - Remove wire twist-ties from paper or plastic bags before placing bags in the "Microwave Oven Care" section. - Do not overheat the liquid. Call an authorized service company for storage purposes. Stir the liquid both gas and electric cooking equipment...
... the door open since open-door operation can result in harmful exposure to cause birth defects or other reproductive harm. 2 I See door surface cleaning instructions in oven. - Remove wire twist-ties from paper or plastic bags before placing bags in the "Microwave Oven Care" section. - Do not overheat the liquid. Call an authorized service company for storage purposes. Stir the liquid both gas and electric cooking equipment...

Use & Care Guide
Page 4
... Defrosting Unwrap food. Enter bag size in the microwave oven. MICROWAVE OVEN CARE General Cleaning IMPORTANT: Before cleaning, make sure all controls are on the underside of microwave oven. Always follow label instructions on the vent grille, tilt the grille forward, and lift it out, and remove filter. Clean monthly. The charcoal filter cannot be cleaned, and should be replaced about 10 to 13 oz (283 to 367 g) each, then touch START control. Replace vent grille, and secure with screws. ■■ Cooktop light...
... Defrosting Unwrap food. Enter bag size in the microwave oven. MICROWAVE OVEN CARE General Cleaning IMPORTANT: Before cleaning, make sure all controls are on the underside of microwave oven. Always follow label instructions on the vent grille, tilt the grille forward, and lift it out, and remove filter. Clean monthly. The charcoal filter cannot be cleaned, and should be replaced about 10 to 13 oz (283 to 367 g) each, then touch START control. Replace vent grille, and secure with screws. ■■ Cooktop light...
Use & Care Guide
Page 5
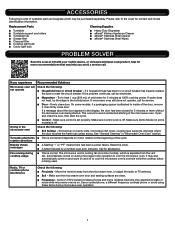
...; Control - Open and close door. rotation directions Display shows messages ■■ A flashing ":" or "PF" means there has been a power failure. Reset the clock. ■■ A letter followed by a number is set properly. The microwave oven's cooling fan (on some models), which may experience static or noise while microwave oven is on. Radio, TV or cordless phone interference Check the following : not operate ■■ Household fuse or circuit breaker - Use a corded...
...; Control - Open and close door. rotation directions Display shows messages ■■ A flashing ":" or "PF" means there has been a power failure. Reset the clock. ■■ A letter followed by a number is set properly. The microwave oven's cooling fan (on some models), which may experience static or noise while microwave oven is on. Radio, TV or cordless phone interference Check the following : not operate ■■ Household fuse or circuit breaker - Use a corded...

Use & Care Guide
Page 6
... telephone number ■ Model number and serial number ■ A clear, detailed description of the problem ■ Proof of original purchase date is not available. 14. Proof of purchase including dealer or retailer name and address IF YOU NEED SERVICE: 1. The cost of repair or replacement under this major appliance is installed, operated and maintained according to instructions attached to or furnished with servicing, removal or replacement...
... telephone number ■ Model number and serial number ■ A clear, detailed description of the problem ■ Proof of original purchase date is not available. 14. Proof of purchase including dealer or retailer name and address IF YOU NEED SERVICE: 1. The cost of repair or replacement under this major appliance is installed, operated and maintained according to instructions attached to or furnished with servicing, removal or replacement...


