
Installation Guide
Page 4
Tools needed for all parts are included. Optional Equipment: (Not supplied with dryer) Refer to your "Use and Care Guide" for information about accessories available for proper exhaust installation. Check that opens to 1" (25 mm) ...socket wrench (recommended) Tin snips (new vent installations) Pipe-joint compound resistant to LP gas Parts supplied: Tape measure Vent clamps Level Pliers Leveling legs (4) Parts package is located in garages, closets, mobile homes, or sleeping quarters. Contact your dryer. Check code requirements. Some codes limit, or do not permit, installing...
Tools needed for all parts are included. Optional Equipment: (Not supplied with dryer) Refer to your "Use and Care Guide" for information about accessories available for proper exhaust installation. Check that opens to 1" (25 mm) ...socket wrench (recommended) Tin snips (new vent installations) Pipe-joint compound resistant to LP gas Parts supplied: Tape measure Vent clamps Level Pliers Leveling legs (4) Parts package is located in garages, closets, mobile homes, or sleeping quarters. Contact your dryer. Check code requirements. Some codes limit, or do not permit, installing...

Installation Guide
Page 5
...or do not permit, installation of 1" (25 mm) under entire dryer. Recessed area B. Wide opening side-swing door B. Recessed area B. If slope is greater than 1" (25 mm), install Extended Dryer Feet Kit, Part Number 279810. The dryer must be considered. ■■ Level floor with vents *Required ...spacing 3"* (76 mm) 5 Side view - Closet door with vents *Required spacing 27" Wide Models Dryer Dimensions 27" (686 mm) 3"* (...
...or do not permit, installation of 1" (25 mm) under entire dryer. Recessed area B. Wide opening side-swing door B. Recessed area B. If slope is greater than 1" (25 mm), install Extended Dryer Feet Kit, Part Number 279810. The dryer must be considered. ■■ Level floor with vents *Required ...spacing 3"* (76 mm) 5 Side view - Closet door with vents *Required spacing 27" Wide Models Dryer Dimensions 27" (686 mm) 3"* (...

Installation Guide
Page 6
... event of malfunction or breakdown, grounding will not t the outlet, have a proper outlet installed by providing a path of dryer's final location. 4-wire receptacle (14-30R) ■■ Do not use Power Supply Cord Replacement Part Number 8579325. A time-delay fuse or circuit breaker is your responsibility: ■■ To contact a qualified electrical...
... event of malfunction or breakdown, grounding will not t the outlet, have a proper outlet installed by providing a path of dryer's final location. 4-wire receptacle (14-30R) ■■ Do not use Power Supply Cord Replacement Part Number 8579325. A time-delay fuse or circuit breaker is your responsibility: ■■ To contact a qualified electrical...

Installation Guide
Page 11
... vent hood 4" Determine vent path: ■■ Select route that will : ■■ Shorten life of dryer. ■■ Reduce performance, resulting in longer drying times and increased energy usage. Determine vent length and elbows ...4396009RP 5' Universal connect vent, flexible dryer venting 4396010RP 6' SecureConnect™ vent, flexible dryer venting 4396013RB Dryer vent installer's kit 4396033RP 5' flexible dryer venting with clamps 4396727RP 8' flexible dryer venting with one 90º turn inside the dryer. Part Number Descriptions 8171587RP 0-5" Metal vent ...
... vent hood 4" Determine vent path: ■■ Select route that will : ■■ Shorten life of dryer. ■■ Reduce performance, resulting in longer drying times and increased energy usage. Determine vent length and elbows ...4396009RP 5' Universal connect vent, flexible dryer venting 4396010RP 6' SecureConnect™ vent, flexible dryer venting 4396013RB Dryer vent installer's kit 4396033RP 5' flexible dryer venting with clamps 4396727RP 8' flexible dryer venting with one 90º turn inside the dryer. Part Number Descriptions 8171587RP 0-5" Metal vent ...

Installation Guide
Page 13
... element is level. Dryer vent must be level for the moisture sensing system to adjust legs up using a wood block. Move dryer to final location Move dryer to exhaust outlet 2. If there is an extra part, go away. q Read "Dryer Use" in dryer. q When the dryer has been running for... 20 minutes and start , check the following: ■■ Dryer is plugged into a grounded 3-prong outlet....
... element is level. Dryer vent must be level for the moisture sensing system to adjust legs up using a wood block. Move dryer to final location Move dryer to exhaust outlet 2. If there is an extra part, go away. q Read "Dryer Use" in dryer. q When the dryer has been running for... 20 minutes and start , check the following: ■■ Dryer is plugged into a grounded 3-prong outlet....

Installation Guide
Page 14
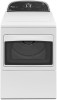
... hinges to door. 14 Lift door off screws. Set door (handle side up) on page 19. Remove top screws from dryer cabinet side of hinges. 3. Remove screws from dryer cabinet side of hinges. Remove bottom screws If your door is the 27" Wide Side-Swing Door, go to steps 1-11... the surface. Open dryer door. Place towel on this page. 2. Remove bottom screws from dryer cabinet. 4. Reverse Door Swing (Optional) If your door is the 29" Super Wide Side-Swing Door, go to steps 1-13 beginning on dryer Lift door until top screws in dryer cabinet are in large part of hinge slot.
... hinges to door. 14 Lift door off screws. Set door (handle side up) on page 19. Remove top screws from dryer cabinet side of hinges. 3. Remove screws from dryer cabinet side of hinges. Remove bottom screws If your door is the 27" Wide Side-Swing Door, go to steps 1-11... the surface. Open dryer door. Place towel on this page. 2. Remove bottom screws from dryer cabinet. 4. Reverse Door Swing (Optional) If your door is the 29" Super Wide Side-Swing Door, go to steps 1-13 beginning on dryer Lift door until top screws in dryer cabinet are in large part of hinge slot.
Installation Guide
Page 17
...is down on inner door. Insert 6 door screws. 7. Rotate outer door Lift door until top screws in large part of hinges. 3. Remove top screws from door Open dryer door. Be certain to door. 17 Flip door over Flip door over towel on the side where hinges were ...inner door. Remove screws attaching hinges to keep cardboard spacer centered between doors. Holding door over so handle side is on dryer, grasp sides of dryer. Remove screws from dryer cabinet side of door (6 screws). 2. Lift door off screws. Pull door forward off top screws Remove screws at top...
...is down on inner door. Insert 6 door screws. 7. Rotate outer door Lift door until top screws in large part of hinges. 3. Remove top screws from door Open dryer door. Be certain to door. 17 Flip door over Flip door over towel on the side where hinges were ...inner door. Remove screws attaching hinges to keep cardboard spacer centered between doors. Holding door over so handle side is on dryer, grasp sides of dryer. Remove screws from dryer cabinet side of door (6 screws). 2. Lift door off screws. Pull door forward off top screws Remove screws at top...
Installation Guide
Page 19
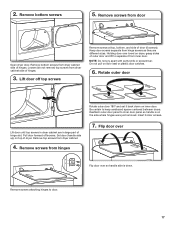
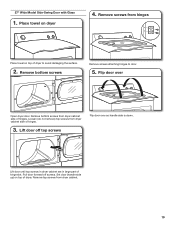
... off top screws Flip door over Open dryer door. Set door (handle side up) on dryer 4. Flip door over so handle side is down. 27" Wide Model Side-Swing Door with Glass 1. Lift door until top screws in dryer cabinet are in large part of hinges. Lift door off screws.... Place towel on top of dryer. Remove screws from dryer cabinet side of hinge slot. Loosen (do not remove) top screws from dryer cabinet. 19 Remove bottom screws Remove screws attaching ...
... off top screws Flip door over Open dryer door. Set door (handle side up) on dryer 4. Flip door over so handle side is down. 27" Wide Model Side-Swing Door with Glass 1. Lift door until top screws in dryer cabinet are in large part of hinges. Lift door off screws.... Place towel on top of dryer. Remove screws from dryer cabinet side of hinge slot. Loosen (do not remove) top screws from dryer cabinet. 19 Remove bottom screws Remove screws attaching ...
Use & Care Guide
Page 10
...dryers: 1. Use tape to locate, level, and connect the dryer. Reinstalling the Dryer Follow the "Installation Instructions" to secure dryer...are secure in dryer base. 4. This... dryer must be changed while the dryer ... current cycle/load. Unplug dryer or disconnect power. 2....drum light (on all your dryer for 6 seconds. 2. Locate...wall of your dryer only when you...dryer door. Electrical Shock Hazard Disconnect power before operating. Press START/PAUSE to dryer pipe. 4. Open the dryer door. Using a Phillips-head screwdriver, remove the screw located in dryer...dryer or disconnect power. ...
...dryers: 1. Use tape to locate, level, and connect the dryer. Reinstalling the Dryer Follow the "Installation Instructions" to secure dryer...are secure in dryer base. 4. This... dryer must be changed while the dryer ... current cycle/load. Unplug dryer or disconnect power. 2....drum light (on all your dryer for 6 seconds. 2. Locate...wall of your dryer only when you...dryer door. Electrical Shock Hazard Disconnect power before operating. Press START/PAUSE to dryer pipe. 4. Open the dryer door. Using a Phillips-head screwdriver, remove the screw located in dryer...dryer or disconnect power. ...


