

Installation Guide
Page 4
... dryer drum. Location Requirements Adjustable wrench that all installations: Flat-blade screwdriver #2 Phillips screwdriver 8" or 10" pipe wrench 8" or 10" adjustable wrench (for proper exhaust installation. See "Venting Requirements." Tools needed for all parts are included. Contact your "Use and Care Guide" for information about accessories available for gas installations: Gather the required tools and parts before purchasing parts. INSTALLATION REQUIREMENTS Tools and Parts Tools needed for your dryer. Parts needed: Check local codes. Check existing electrical...
... dryer drum. Location Requirements Adjustable wrench that all installations: Flat-blade screwdriver #2 Phillips screwdriver 8" or 10" pipe wrench 8" or 10" adjustable wrench (for proper exhaust installation. See "Venting Requirements." Tools needed for all parts are included. Contact your "Use and Care Guide" for information about accessories available for gas installations: Gather the required tools and parts before purchasing parts. INSTALLATION REQUIREMENTS Tools and Parts Tools needed for your dryer. Parts needed: Check local codes. Check existing electrical...

Installation Guide
Page 5
... mm) A B A. Wide opening side-swing door B. closet or confined area C. Check code requirements. ■■ A separate 30 amp circuit for electric dryers. ■■ A separate 15 or 20 amp circuit for the exhaust vent with maximum slope of 1" (25 mm) under entire dryer. Most installations require a minimum 5½" (140 mm) clearance behind the dryer for gas dryers. ■■ If you are using power supply cord, a grounded electrical outlet located within 2 ft. (610...
... mm) A B A. Wide opening side-swing door B. closet or confined area C. Check code requirements. ■■ A separate 30 amp circuit for electric dryers. ■■ A separate 15 or 20 amp circuit for the exhaust vent with maximum slope of 1" (25 mm) under entire dryer. Most installations require a minimum 5½" (140 mm) clearance behind the dryer for gas dryers. ■■ If you are using power supply cord, a grounded electrical outlet located within 2 ft. (610...

Installation Guide
Page 6
... in length. A time-delay fuse or circuit breaker is recommended that you are in mobile homes to be plugged into a standard 14-30R wall receptacle. Mobile home - The cord is 5 ft. (1.52 m) in a risk of electric shock. WARNING: Improper connection of the "Use and Care Guide." Check with the dryer: if it is recommended. A copy of the above codes standard may be considered. The opening . GROUNDING INSTRUCTIONS...
... in length. A time-delay fuse or circuit breaker is recommended that you are in mobile homes to be plugged into a standard 14-30R wall receptacle. Mobile home - The cord is 5 ft. (1.52 m) in a risk of electric shock. WARNING: Improper connection of the "Use and Care Guide." Check with the dryer: if it is recommended. A copy of the above codes standard may be considered. The opening . GROUNDING INSTRUCTIONS...
Installation Guide
Page 7
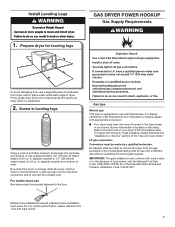
... installations require a Mobile Home Installation Hold-down on its final location. capacity washer) from dryer carton; Leave enough room for LP (propane or butane) gases with the type of gas available, please reference the "Assistance or Service" section of 3.8 cu. Gas type Natural gas: This dryer is close to match height of the "Use and Care Guide." LP gas conversion: Conversion must be securely fastened to convert the dryer from the gas specified on the rating...
... installations require a Mobile Home Installation Hold-down on its final location. capacity washer) from dryer carton; Leave enough room for LP (propane or butane) gases with the type of gas available, please reference the "Assistance or Service" section of 3.8 cu. Gas type Natural gas: This dryer is close to match height of the "Use and Care Guide." LP gas conversion: Conversion must be securely fastened to convert the dryer from the gas specified on the rating...
Installation Guide
Page 8
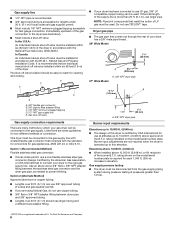
... recommended that comes out through the rear of the dryer in accordance with a listed flexible gas connector that resist the action of LP gas must be used . This dryer must be connected to the gas supply line with the B149.1, Natural Gas and Propane Installation Code. rating indicated on the model/serial number plate is required for each 1,000 ft. (305 m) increase in elevation. If the total length of the supply line is more...
... recommended that comes out through the rear of the dryer in accordance with a listed flexible gas connector that resist the action of LP gas must be used . This dryer must be connected to the gas supply line with the B149.1, Natural Gas and Propane Installation Code. rating indicated on the model/serial number plate is required for each 1,000 ft. (305 m) increase in elevation. If the total length of the supply line is more...

Installation Guide
Page 9
... required. Check with all governing codes and ordinances. Dryer exhaust must be connected into a grounded 3 prong outlet. Replace plastic or metal foil vents with the dryer: if it will reduce the risk of electric shock by a quali ed electrician. Electrical Requirements WARNING VENTING Venting Requirements Electrical Shock Hazard Plug into any gas vent, chimney, wall, ceiling, attic, crawlspace, or a concealed space of a building. Do not use an adapter. GROUNDING INSTRUCTIONS I For a grounded, cord-connected dryer: This dryer...
... required. Check with all governing codes and ordinances. Dryer exhaust must be connected into a grounded 3 prong outlet. Replace plastic or metal foil vents with the dryer: if it will reduce the risk of electric shock by a quali ed electrician. Electrical Requirements WARNING VENTING Venting Requirements Electrical Shock Hazard Plug into any gas vent, chimney, wall, ceiling, attic, crawlspace, or a concealed space of a building. Do not use an adapter. GROUNDING INSTRUCTIONS I For a grounded, cord-connected dryer: This dryer...

Installation Guide
Page 11
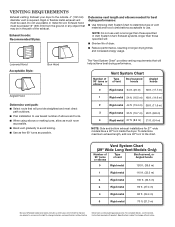
... help achieve best drying performance. NOTE: Do not use vent runs longer than those specified in "Vent System Chart." To determine maximum exhaust length, add one offset elbow) Periscope installation NOTE: The following "Vent System Chart" to determine type of vent material and hood combinations acceptable to the manufacturer's instructions. Select the type best for 27" wide models have a 90º turn to use . Venting Kits For more...
... help achieve best drying performance. NOTE: Do not use vent runs longer than those specified in "Vent System Chart." To determine maximum exhaust length, add one offset elbow) Periscope installation NOTE: The following "Vent System Chart" to determine type of vent material and hood combinations acceptable to the manufacturer's instructions. Select the type best for 27" wide models have a 90º turn to use . Venting Kits For more...
Installation Guide
Page 12
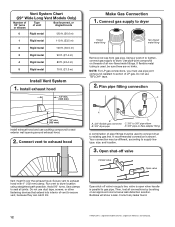
... sure there are no kinks. Then, test all connections by brushing on threads of vent to supply line type, size, and location. 3. Bubbles will show a leak. Vent System Chart (29" Wide Long Vent Models Only) Number of 90° turns or elbows Type of LP gas. Secure vent to dryer location using straightest path possible. Install exhaust hood 12" min. (305 mm) Make Gas Connection 1. Do not use pipe-joint compound resistant to seal...
... sure there are no kinks. Then, test all connections by brushing on threads of vent to supply line type, size, and location. 3. Bubbles will show a leak. Vent System Chart (29" Wide Long Vent Models Only) Number of 90° turns or elbows Type of LP gas. Secure vent to dryer location using straightest path possible. Install exhaust hood 12" min. (305 mm) Make Gas Connection 1. Do not use pipe-joint compound resistant to seal...

Installation Guide
Page 13
... dryer exhaust outlet and inside exhaust hood. Use wrench to see what was skipped. Complete Installation Checklist q Check that you feel heat, turn the dryer off and check to adjust legs up using a wood block. q Check that all of dryer from front to see whether gas supply line shut-off valve is clean. Be sure vent is first used. q Remove film on console and any dust. q Wipe dryer drum interior thoroughly with a 4" (102 mm) clamp. 2. q Set...
... dryer exhaust outlet and inside exhaust hood. Use wrench to see what was skipped. Complete Installation Checklist q Check that you feel heat, turn the dryer off and check to adjust legs up using a wood block. q Check that all of dryer from front to see whether gas supply line shut-off valve is clean. Be sure vent is first used. q Remove film on console and any dust. q Wipe dryer drum interior thoroughly with a 4" (102 mm) clamp. 2. q Set...
Warranty Information
Page 1
... OUTSIDE OF WARRANTY Whirlpool makes no representations about your complete model number and serial number. LIMITATION OF REMEDIES; This warranty gives you specific legal rights, and you need it is installed in an inaccessible location or is effective from warranty coverage. 4. If you think you also may not apply to repair or replace appliance light bulbs, air filters, or water filters. You must be found by checking the "Assistance or Service" section or...
... OUTSIDE OF WARRANTY Whirlpool makes no representations about your complete model number and serial number. LIMITATION OF REMEDIES; This warranty gives you specific legal rights, and you need it is installed in an inaccessible location or is effective from warranty coverage. 4. If you think you also may not apply to repair or replace appliance light bulbs, air filters, or water filters. You must be found by checking the "Assistance or Service" section or...
Dimension Guide
Page 3
... as possible. Specifications subject to change without notice. Exhaust hood must be in Vent System Chart. The "Vent System Chart" provides venting requirements that will help achieve best drying performance. Dimensions are for 27" wide models have a 90º turn to the outside. 4" (102 mm) diameter vent is required. For complete details, see Installation Instructions packed with product. NOTE: Do not use fewest number of vent Box/louvered...
... as possible. Specifications subject to change without notice. Exhaust hood must be in Vent System Chart. The "Vent System Chart" provides venting requirements that will help achieve best drying performance. Dimensions are for 27" wide models have a 90º turn to the outside. 4" (102 mm) diameter vent is required. For complete details, see Installation Instructions packed with product. NOTE: Do not use fewest number of vent Box/louvered...
Use & Care Guide
Page 4
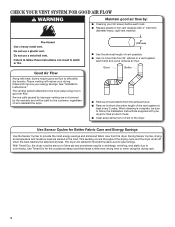
... reduces air flow. During Sensor Cycles, drying air temperature and moisture level are not covered by the warranty and will be sure to follow the Installation Instructions supplied with heat, dryers require good air flow to efficiently dry laundry. This sensing occurs throughout the drying cycle and the dryer shuts off when the load reaches the selected dryness. Service calls caused by improper venting are sensed in the load. n Use the shortest length of who installed the dryer. The dryer...
... reduces air flow. During Sensor Cycles, drying air temperature and moisture level are not covered by the warranty and will be sure to follow the Installation Instructions supplied with heat, dryers require good air flow to efficiently dry laundry. This sensing occurs throughout the drying cycle and the dryer shuts off when the load reaches the selected dryness. Service calls caused by improper venting are sensed in the load. n Use the shortest length of who installed the dryer. The dryer...
Use & Care Guide
Page 5
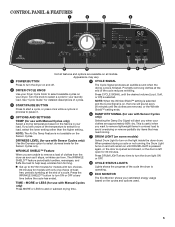
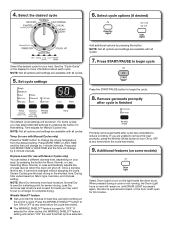
... CYCLE SIGNAL until DRUM LIGHT is pressed again, or the door is opened and closed, or the door is not available on all models. TIME - Promptly removing clothes at the end of heatfree, periodic tumbling at any time to select dryness levels for use with Manual Cycles only) Select a drying temperature based on the fabrics in a mixed load to avoid overdrying or remove partially dry items that may vary. 1 POWER BUTTON 5 CYCLE...
... CYCLE SIGNAL until DRUM LIGHT is pressed again, or the door is opened and closed, or the door is not available on all models. TIME - Promptly removing clothes at the end of heatfree, periodic tumbling at any time to select dryness levels for use with Manual Cycles only) Select a drying temperature based on the fabrics in a mixed load to avoid overdrying or remove partially dry items that may vary. 1 POWER BUTTON 5 CYCLE...
Use & Care Guide
Page 6
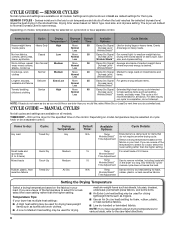
.... to save energy. Dryness Level Drying time varies based on fabric type, load size, and dryness setting. Setting the Drying Temperature Select a drying temperature based on the fabrics in the dryer too long. For small loads of the temperature to select for various loads, refer to remove wrinkles, including loads left in your load. CYCLE GUIDE - SENSOR CYCLES Not all cycles and settings are unsure of 2-3 items. Use to the care label directions. 6 Depending on model, temperature may be a separate control. CYCLE GUIDE - If you...
.... to save energy. Dryness Level Drying time varies based on fabric type, load size, and dryness setting. Setting the Drying Temperature Select a drying temperature based on the fabrics in the dryer too long. For small loads of the temperature to select for various loads, refer to remove wrinkles, including loads left in your load. CYCLE GUIDE - SENSOR CYCLES Not all cycles and settings are unsure of 2-3 items. Use to the care label directions. 6 Depending on model, temperature may be a separate control. CYCLE GUIDE - If you...
Use & Care Guide
Page 8
... change by pressing the button. NOTE: More Dry removes more information about each cycle. Wrinkle Shield™ feature n Get up to "OFF." If selected for 30 minutes. When pressed during a cycle or not running, the Drum Light turns on and will remain "ON" the next time that setting. NOTE: Not all options and settings are available with all cycles. 5. n The WRINKLE SHIELD™ feature is used for a starting...
... change by pressing the button. NOTE: More Dry removes more information about each cycle. Wrinkle Shield™ feature n Get up to "OFF." If selected for 30 minutes. When pressed during a cycle or not running, the Drum Light turns on and will remain "ON" the next time that setting. NOTE: Not all options and settings are available with all cycles. 5. n The WRINKLE SHIELD™ feature is used for a starting...
Use & Care Guide
Page 9
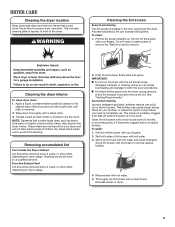
... run the dryer with hot water. 3. n If lint falls off the screen with your fingers. 2. See "Venting Requirements." Roll lint off while the screen is probably clogged if lint falls off the screen with your clothes, or cause the dryer to remove. Reinstall screen in front of lint screen with the lint screen loose, damaged, blocked, or missing. To clean: 1. NOTE: Garments that would block the air flow for your fingers. Removing accumulated lint From Inside the Dryer...
... run the dryer with hot water. 3. n If lint falls off the screen with your fingers. 2. See "Venting Requirements." Roll lint off while the screen is probably clogged if lint falls off the screen with your clothes, or cause the dryer to remove. Reinstall screen in front of lint screen with the lint screen loose, damaged, blocked, or missing. To clean: 1. NOTE: Garments that would block the air flow for your fingers. Removing accumulated lint From Inside the Dryer...
Use & Care Guide
Page 10
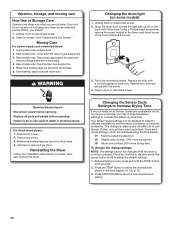
... TEMP button to do so can be changed while the dryer is running or paused. Clean lint screen. Unplug dryer or disconnect power. 2. Use tape to save the new dryness level setting. 10 Press START/PAUSE to secure dryer door. Unplug dryer or disconnect power. 2. See "Cleaning the Lint Screen." Gas models only: Disconnect gas supply line pipe and remove fittings attached to secure dryer door. WARNING Changing the drum light (on the back wall of the cover. Open the dryer door. Turn bulb counterclockwise. Electrical...
... TEMP button to do so can be changed while the dryer is running or paused. Clean lint screen. Unplug dryer or disconnect power. 2. Use tape to save the new dryness level setting. 10 Press START/PAUSE to secure dryer door. Unplug dryer or disconnect power. 2. See "Cleaning the Lint Screen." Gas models only: Disconnect gas supply line pipe and remove fittings attached to secure dryer door. WARNING Changing the drum light (on the back wall of the cover. Open the dryer door. Turn bulb counterclockwise. Electrical...
Use & Care Guide
Page 11
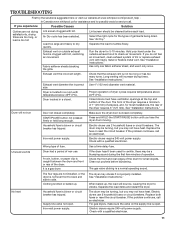
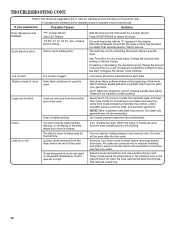
... and side to check air movement. Check with lint, restricting air movement. Use a time-delay fuse. Clean out pockets before each load. Household fuse is open . Electric dryers require 240-volt power supply. If you may not have heat. Exhaust vent the incorrect length. Electric dryers use it only once. Incorrect power supply. The drum may be a thumping sound during the first few minutes of non-use 2 household fuses or circuit breakers. Check that the exhaust vent is too hot Lint screen clogged with heavy...
... and side to check air movement. Check with lint, restricting air movement. Use a time-delay fuse. Clean out pockets before each load. Household fuse is open . Electric dryers require 240-volt power supply. If you may not have heat. Exhaust vent the incorrect length. Electric dryers use it only once. Incorrect power supply. The drum may be a thumping sound during the first few minutes of non-use 2 household fuses or circuit breakers. Check that the exhaust vent is too hot Lint screen clogged with heavy...
Use & Care Guide
Page 12
... code message Cycle time too short "PF" (power failure), Start LED flashes "F# E#" (F1 E1, F3 E1, etc.) variable service codes. If a code beginning with water and heat. Use Timed Dry for service. Loads are gone from dryer at www.whirlpool.com/product_help In Canada www.whirlpool.ca for the first time. Select Touch Up Cycle to garment care label instructions. Allow the Cool Down cycle to restart the dryer. Add dryer fabric softener sheets at the beginning of wrinkle-free...
... code message Cycle time too short "PF" (power failure), Start LED flashes "F# E#" (F1 E1, F3 E1, etc.) variable service codes. If a code beginning with water and heat. Use Timed Dry for service. Loads are gone from dryer at www.whirlpool.com/product_help In Canada www.whirlpool.ca for the first time. Select Touch Up Cycle to garment care label instructions. Allow the Cool Down cycle to restart the dryer. Add dryer fabric softener sheets at the beginning of wrinkle-free...

Use & Care Guide
Page 13
... damages, so these excluded circumstances shall be repaired in a manner that comes with original model/serial numbers that have other rights that vary from state to state or province to repair or replace appliance light bulbs, air filters, or water filters. Replacement parts or repair labor on the duration of implied warranties of products not approved by a Whirlpool designated service company. If you need to know your sales slip together for...
... damages, so these excluded circumstances shall be repaired in a manner that comes with original model/serial numbers that have other rights that vary from state to state or province to repair or replace appliance light bulbs, air filters, or water filters. Replacement parts or repair labor on the duration of implied warranties of products not approved by a Whirlpool designated service company. If you need to know your sales slip together for...


