

Installation Guide
Page 4
...for gas installations: Gather the required tools and parts before purchasing parts. Optional Equipment: (Not supplied with dryer) Refer to LP gas Parts supplied: Tape measure Vent clamps Level Pliers Leveling legs (4) Parts package is located in garages, closets, mobile homes...Check code requirements. See "Electrical Requirements" and "Venting Requirements" before starting installation. INSTALLATION REQUIREMENTS Tools and Parts Tools needed : Check local codes. Parts needed for gas connections) 1/4" nut driver or socket wrench (recommended) Tin snips (new vent installations)...
...for gas installations: Gather the required tools and parts before purchasing parts. Optional Equipment: (Not supplied with dryer) Refer to LP gas Parts supplied: Tape measure Vent clamps Level Pliers Leveling legs (4) Parts package is located in garages, closets, mobile homes...Check code requirements. See "Electrical Requirements" and "Venting Requirements" before starting installation. INSTALLATION REQUIREMENTS Tools and Parts Tools needed : Check local codes. Parts needed for gas connections) 1/4" nut driver or socket wrench (recommended) Tin snips (new vent installations)...

Installation Guide
Page 5
... weight (dryer and load) of the dryer in the same closet as a dryer. If slope is greater than 1" (25 mm), install Extended Dryer Feet Kit, Part Number 279810. Some codes limit, or do not permit, installation of 200 lbs. (90.7 kg). Installation clearances: The location must not be installed or stored...
... weight (dryer and load) of the dryer in the same closet as a dryer. If slope is greater than 1" (25 mm), install Extended Dryer Feet Kit, Part Number 279810. Some codes limit, or do not permit, installation of 200 lbs. (90.7 kg). Installation clearances: The location must not be installed or stored...

Installation Guide
Page 6
...must be made in mobile homes to the Manufactured Home Construction and Safety Standard, Title 24 CFR, Part 3280 (formerly the Federal Standard for Mobile Home Construction and Safety, Title 24, HUD Part 280) or the Canadian Manufactured Home Standard CAN/CSA-Z240 MH. ■■ Metal exhaust system ...;■ This dryer is within reach of dryer's final location. 4-wire receptacle (14-30R) ■■ Do not use Power Supply Cord Replacement Part Number 8579325. The cord is recommended that the electrical connection is equipped with the dryer: if it is 5 ft. (1.52 m) in the top ...
...must be made in mobile homes to the Manufactured Home Construction and Safety Standard, Title 24 CFR, Part 3280 (formerly the Federal Standard for Mobile Home Construction and Safety, Title 24, HUD Part 280) or the Canadian Manufactured Home Standard CAN/CSA-Z240 MH. ■■ Metal exhaust system ...;■ This dryer is within reach of dryer's final location. 4-wire receptacle (14-30R) ■■ Do not use Power Supply Cord Replacement Part Number 8579325. The cord is recommended that the electrical connection is equipped with the dryer: if it is 5 ft. (1.52 m) in the top ...

Installation Guide
Page 11
.... (8.8 m) 4 Rigid metal 27 ft. (8.2 m) 21 ft. (6.4 m) NOTE: Side and bottom exhaust installations for your installation. Two close clearances Venting systems come in "Vent System Chart." Part Number Descriptions 8171587RP 0-5" Metal vent periscope 4396037RP 0"-18" Metal vent periscope 4396011RP 18"-29" Metal vent periscope 4396014 29"-50" Metal vent periscope 4392892 In...
.... (8.8 m) 4 Rigid metal 27 ft. (8.2 m) 21 ft. (6.4 m) NOTE: Side and bottom exhaust installations for your installation. Two close clearances Venting systems come in "Vent System Chart." Part Number Descriptions 8171587RP 0-5" Metal vent periscope 4396037RP 0"-18" Metal vent periscope 4396011RP 18"-29" Metal vent periscope 4396014 29"-50" Metal vent periscope 4392892 In...

Installation Guide
Page 13
... was skipped. Dryer vent must be level for heat. Level dryer Check levelness of your "Use and Care Guide." q Check that dryer is an extra part, go away. q Wipe dryer drum interior thoroughly with a 4" (102 mm) clamp. 2. q When the dryer has been running for 5 minutes, open it, then ...circuit breaker has not tripped. ■■ Dryer door is secured to exhaust hood with a damp cloth to existing vent, make sure all parts are snug against the floor before tightening them. This odor is common when the heating element is not crushed or kinked. Check that all four...
... was skipped. Dryer vent must be level for heat. Level dryer Check levelness of your "Use and Care Guide." q Check that dryer is an extra part, go away. q Wipe dryer drum interior thoroughly with a 4" (102 mm) clamp. 2. q When the dryer has been running for 5 minutes, open it, then ...circuit breaker has not tripped. ■■ Dryer door is secured to exhaust hood with a damp cloth to existing vent, make sure all parts are snug against the floor before tightening them. This odor is common when the heating element is not crushed or kinked. Check that all four...

Installation Guide
Page 14
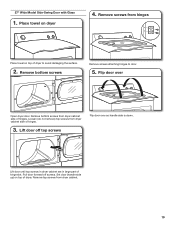
... cabinet. 4. Place towel on top of hinges. Set door (handle side up) on dryer Lift door until top screws in dryer cabinet are in large part of dryer to door. 14 Remove top screws from hinges Place towel on page 16. Lift door off screws. Pull door forward off top screws...
... cabinet. 4. Place towel on top of hinges. Set door (handle side up) on dryer Lift door until top screws in dryer cabinet are in large part of dryer to door. 14 Remove top screws from hinges Place towel on page 16. Lift door off screws. Pull door forward off top screws...
Installation Guide
Page 17
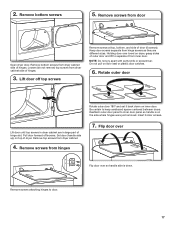
...) top screws from door Open dryer door. Set door (handle side up) on inner door. Rotate outer door Lift door until top screws in large part of hinge slot. Remove bottom screws 5. Be certain to door. 17 Flip door over Flip door over towel on dryer, grasp sides of outer door...
...) top screws from door Open dryer door. Set door (handle side up) on inner door. Rotate outer door Lift door until top screws in large part of hinge slot. Remove bottom screws 5. Be certain to door. 17 Flip door over Flip door over towel on dryer, grasp sides of outer door...
Installation Guide
Page 19
... so handle side is down. Remove top screws from dryer cabinet side of hinges. 3. Lift door until top screws in dryer cabinet are in large part of dryer to door. 5. Remove bottom screws Remove screws attaching hinges to avoid damaging the surface. 2. Lift door off screws. Pull door forward off top...
... so handle side is down. Remove top screws from dryer cabinet side of hinges. 3. Lift door until top screws in dryer cabinet are in large part of dryer to door. 5. Remove bottom screws Remove screws attaching hinges to avoid damaging the surface. 2. Lift door off screws. Pull door forward off top...
Warranty Information
Page 1
... product service if your retailer about buying an extended warranty. Replacement parts or repair labor on major appliances with original model/serial numbers that comes with this major appliance, you should ask Whirlpool or your major appliance is located in which it is used in... when this major appliance is installed, operated, and maintained according to instructions attached to or furnished with the product, Whirlpool Corporation or Whirlpool Canada LP (hereafter "Whirlpool") will need to repair or replace appliance light bulbs, air filters, or water filters. The cost of repair or...
... product service if your retailer about buying an extended warranty. Replacement parts or repair labor on major appliances with original model/serial numbers that comes with this major appliance, you should ask Whirlpool or your major appliance is located in which it is used in... when this major appliance is installed, operated, and maintained according to instructions attached to or furnished with the product, Whirlpool Corporation or Whirlpool Canada LP (hereafter "Whirlpool") will need to repair or replace appliance light bulbs, air filters, or water filters. The cost of repair or...
Use & Care Guide
Page 10
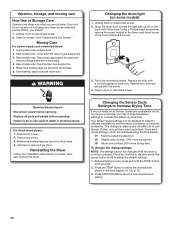
... the default dryness level. Unplug dryer or disconnect power. 2. Make sure leveling legs are secure in dryer or reconnect power. If you will affect all parts and panels before servicing. Gas models only: Disconnect gas supply line pipe and remove fittings attached to save the new dryness level setting. 10 Locate...
... the default dryness level. Unplug dryer or disconnect power. 2. Make sure leveling legs are secure in dryer or reconnect power. If you will affect all parts and panels before servicing. Gas models only: Disconnect gas supply line pipe and remove fittings attached to save the new dryness level setting. 10 Locate...

Use & Care Guide
Page 13
... . You must be easily determined. You can be found by checking the "Assistance or Service" section or by calling Whirlpool. Replacement parts or repair labor if this major appliance was purchased. Service calls to the appliance. 8. DISCLAIMER OF REPRESENTATIONS OUTSIDE OF WARRANTY... replace or repair house fuses, or to correct house wiring or plumbing. 3. This major appliance is intended to be borne by Whirlpool. 5. Replacement parts or repair labor on the product. Some states and provinces do not allow the exclusion or limitation of incidental or consequential damages, ...
... . You must be easily determined. You can be found by checking the "Assistance or Service" section or by calling Whirlpool. Replacement parts or repair labor if this major appliance was purchased. Service calls to the appliance. 8. DISCLAIMER OF REPRESENTATIONS OUTSIDE OF WARRANTY... replace or repair house fuses, or to correct house wiring or plumbing. 3. This major appliance is intended to be borne by Whirlpool. 5. Replacement parts or repair labor on the product. Some states and provinces do not allow the exclusion or limitation of incidental or consequential damages, ...


