
Warranty Information
Page 1
... warranty. All rights reserved. ® Registered Trademark/TM Trademark of Whirlpool, U.S.A. 11/11 Printed in which it was purchased. Service must be borne by an authorized Whirlpool servicer is not available. 10. Consumable parts are excluded from accident, alteration, misuse, abuse, fire, flood, acts...limited warranty does not cover: 1. Repairs when your correspondence. Repairs to parts or systems resulting from unauthorized modifications made to correct defects in materials or workmanship and is reported to Whirlpool within 30 days from the date of purchase. 6. The removal and ...
... warranty. All rights reserved. ® Registered Trademark/TM Trademark of Whirlpool, U.S.A. 11/11 Printed in which it was purchased. Service must be borne by an authorized Whirlpool servicer is not available. 10. Consumable parts are excluded from accident, alteration, misuse, abuse, fire, flood, acts...limited warranty does not cover: 1. Repairs when your correspondence. Repairs to parts or systems resulting from unauthorized modifications made to correct defects in materials or workmanship and is reported to Whirlpool within 30 days from the date of purchase. 6. The removal and ...

Use & Care Guide
Page 3
... or replacing food. ■ Do Not Heat Unopened Food Containers - During and after use of the oven. ■ Clean Only Parts Listed in Manual. ■ Before Self-Cleaning the Oven - Remove broiler pan and other flammable materials contact heating elements or interior surfaces...is equipped with ventilating hood - ■ Clean Ventilating Hoods Frequently - No commercial oven cleaner or oven liner protective coating of any part of undersized utensils will also improve efficiency. ■ Never Leave Surface Units Unattended at High Heat Settings - TO CHECK IF THE...
... or replacing food. ■ Do Not Heat Unopened Food Containers - During and after use of the oven. ■ Clean Only Parts Listed in Manual. ■ Before Self-Cleaning the Oven - Remove broiler pan and other flammable materials contact heating elements or interior surfaces...is equipped with ventilating hood - ■ Clean Ventilating Hoods Frequently - No commercial oven cleaner or oven liner protective coating of any part of undersized utensils will also improve efficiency. ■ Never Leave Surface Units Unattended at High Heat Settings - TO CHECK IF THE...
Use & Care Guide
Page 6
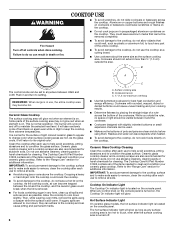
...It will glow. Refer to the cooktop, do not use abrasive cleaners, cleaning pads or harsh chemicals for stubborn soils. The Cooktop Care Kit Part Number 31605 contains all soils. COOKTOP USE ■ To avoid scratches, do not cook foods directly on the console panel. B A The control...surface. Surface cooking area B. Ceramic glass cooktop cleaner and a cooktop scraper are also recommended for the surface of the cookware. When any part of pots and pans are also recommended for cleaning. Hot Surface Indicator Light On ceramic glass models, the hot surface indicator light is ...
...It will glow. Refer to the cooktop, do not use abrasive cleaners, cleaning pads or harsh chemicals for stubborn soils. The Cooktop Care Kit Part Number 31605 contains all soils. COOKTOP USE ■ To avoid scratches, do not cook foods directly on the console panel. B A The control...surface. Surface cooking area B. Ceramic glass cooktop cleaner and a cooktop scraper are also recommended for the surface of the cookware. When any part of pots and pans are also recommended for cleaning. Hot Surface Indicator Light On ceramic glass models, the hot surface indicator light is ...

Use & Care Guide
Page 9
... normal cooking mode (not Sabbath Mode compliant). Press and hold the TIMER keypad for 5 seconds. Press BAKE. 2. Press and hold the TIMER keypad for only part of the cycle. "SAb" will turn on when the oven door is Sabbath compliant. Press the "up " or "down " arrow pads to enter a temperature other...
... normal cooking mode (not Sabbath Mode compliant). Press and hold the TIMER keypad for 5 seconds. Press BAKE. 2. Press and hold the TIMER keypad for only part of the cycle. "SAb" will turn on when the oven door is Sabbath compliant. Press the "up " or "down " arrow pads to enter a temperature other...
Use & Care Guide
Page 13
..., water and a soft cloth or sponge are in direction of our website at www.whirlpool.com. These spills may occur to avoid damaging. ■ affresh™ Stainless Steel Cleaner Part Number W10355016: See the "Accessories" section for scratches. COOKTOP CONTROLS To avoid damage to... Cooktop Scraper uses razor blades. Light to wear oven mitts while cleaning the cooktop. ■ affresh™ Kitchen and Appliance Cleaner Part Number W10355010 (not included): See the "Accessories" section for more information. At high temperatures, foods react with Cooktop Cleaner, Cleaning ...
..., water and a soft cloth or sponge are in direction of our website at www.whirlpool.com. These spills may occur to avoid damaging. ■ affresh™ Stainless Steel Cleaner Part Number W10355016: See the "Accessories" section for scratches. COOKTOP CONTROLS To avoid damage to... Cooktop Scraper uses razor blades. Light to wear oven mitts while cleaning the cooktop. ■ affresh™ Kitchen and Appliance Cleaner Part Number W10355010 (not included): See the "Accessories" section for more information. At high temperatures, foods react with Cooktop Cleaner, Cleaning ...

Use & Care Guide
Page 15
...any vinegar residue. Level the range. Adjust cooking time. Oven peeking releases oven heat and can visit our website at www.whirlpool.com/cookingaccessories. Oven was incorrect. Mineral deposits will collect on bottom. See "Positioning Racks and Bakeware" section. Be sure that... Drip Pan Cleaner Order Part Number 31617A Gourmet Griddle Order Part Number 4396096RB Standard Flat Oven Rack Order Part Number W10268578 Porcelain Broiler Pan and Grid Order Part Number 4396923 Premium Broil Pan and Roasting Rack Order Part Number W10123240 www.whirlpool.com/broilerpan 15 SOLUTIONS ...
...any vinegar residue. Level the range. Adjust cooking time. Oven peeking releases oven heat and can visit our website at www.whirlpool.com/cookingaccessories. Oven was incorrect. Mineral deposits will collect on bottom. See "Positioning Racks and Bakeware" section. Be sure that... Drip Pan Cleaner Order Part Number 31617A Gourmet Griddle Order Part Number 4396096RB Standard Flat Oven Rack Order Part Number W10268578 Porcelain Broiler Pan and Grid Order Part Number 4396923 Premium Broil Pan and Roasting Rack Order Part Number W10123240 www.whirlpool.com/broilerpan 15 SOLUTIONS ...
Use & Care Guide
Page 16
... date of purchase, when this major appliance is operated and maintained according to instructions attached to or furnished with the product, Whirlpool Corporation or Whirlpool Canada LP (hereafter "Whirlpool") will pay for future reference. Repairs to parts or systems resulting from warranty coverage. 3. Major appliances with any questions or concerns at the number below...
... date of purchase, when this major appliance is operated and maintained according to instructions attached to or furnished with the product, Whirlpool Corporation or Whirlpool Canada LP (hereafter "Whirlpool") will pay for future reference. Repairs to parts or systems resulting from warranty coverage. 3. Major appliances with any questions or concerns at the number below...
Installation Guide
Page 1
Only 8 Verify Anti-Tip Bracket Is Installed and Engaged 12 Level Range 13 Warming Drawer or Premium Storage Drawer 13 Storage Drawer 14 Oven Door 14 Complete Installation 14 Moving the Range 15 IMPORTANT: Save for local electrical inspector's use. Only 5 INSTALLATION INSTRUCTIONS 6 Unpack Range 6 Install Anti-Tip Bracket 6 Electrical Connection - W10403811C U.S.A. U.S.A. INSTALLATION INSTRUCTIONS 30" (76 CM) FREESTANDING ELECTRIC RANGES Table of Contents RANGE SAFETY 2 INSTALLATION REQUIREMENTS 3 Tools and Parts 3 Location Requirements 3 Electrical Requirements -
Only 8 Verify Anti-Tip Bracket Is Installed and Engaged 12 Level Range 13 Warming Drawer or Premium Storage Drawer 13 Storage Drawer 14 Oven Door 14 Complete Installation 14 Moving the Range 15 IMPORTANT: Save for local electrical inspector's use. Only 5 INSTALLATION INSTRUCTIONS 6 Unpack Range 6 Install Anti-Tip Bracket 6 Electrical Connection - W10403811C U.S.A. U.S.A. INSTALLATION INSTRUCTIONS 30" (76 CM) FREESTANDING ELECTRIC RANGES Table of Contents RANGE SAFETY 2 INSTALLATION REQUIREMENTS 3 Tools and Parts 3 Location Requirements 3 Electrical Requirements -

Installation Guide
Page 3
... ranges. Anti-tip bracket B. #12 x 1⁵⁄₈" screws (2) ■ Anti-tip bracket must be securely mounted to floor or wall. Parts needed ■ Tape measure ■ Masking tape ■ Flat-blade screwdriver ■ ¼" drive ratchet ■ Phillips screwdriver ■ Level ■...9632; It is not applicable, use with upturned ends. ■ A UL listed strain relief. Location Requirements IMPORTANT: Observe all parts are shown must conform to floor. This oven has been designed in accordance with the requirements of flooring may require longer screws ...
... ranges. Anti-tip bracket B. #12 x 1⁵⁄₈" screws (2) ■ Anti-tip bracket must be securely mounted to floor or wall. Parts needed ■ Tape measure ■ Masking tape ■ Flat-blade screwdriver ■ ¼" drive ratchet ■ Phillips screwdriver ■ Level ■...9632; It is not applicable, use with upturned ends. ■ A UL listed strain relief. Location Requirements IMPORTANT: Observe all parts are shown must conform to floor. This oven has been designed in accordance with the requirements of flooring may require longer screws ...

Installation Guide
Page 6
... without anti-tip bracket installed and engaged. Front leveling leg 6 Do not remove the shipping base at this time. Shipping base 4. B A. Remove oven racks and parts package from inside the storage drawer or warming drawer. 2. Slide range back so rear range foot is taped inside oven. 3. Re-engage anti-tip bracket...
... without anti-tip bracket installed and engaged. Front leveling leg 6 Do not remove the shipping base at this time. Shipping base 4. B A. Remove oven racks and parts package from inside the storage drawer or warming drawer. 2. Slide range back so rear range foot is taped inside oven. 3. Re-engage anti-tip bracket...

Installation Guide
Page 9
...: 3-wire direct ³⁄₈" (1.0 cm) And you will be Go to Section: connecting to remove the ground-link screw from the back of range. Part of the ground link under the screw. 3. Allow enough slack to easily attach the wiring to : 4-wire receptacle (NEMA type 14-50R) A UL listed, 250...
...: 3-wire direct ³⁄₈" (1.0 cm) And you will be Go to Section: connecting to remove the ground-link screw from the back of range. Part of the ground link under the screw. 3. Allow enough slack to easily attach the wiring to : 4-wire receptacle (NEMA type 14-50R) A UL listed, 250...

Installation Guide
Page 11
... 1 (black) wires to the range with 10-32 hex nuts. 8. Allow enough slack to easily attach the wiring to the terminal block. Setscrew C. Terminal block B. Part of the ground link under the screw. 3. Ground-link screw 2. Terminal block B. Securely tighten setscrew to the terminal block - 20 lbs-in. (2.3 N-m) Wire Awg Torque...
... 1 (black) wires to the range with 10-32 hex nuts. 8. Allow enough slack to easily attach the wiring to the terminal block. Setscrew C. Terminal block B. Part of the ground link under the screw. 3. Ground-link screw 2. Terminal block B. Securely tighten setscrew to the terminal block - 20 lbs-in. (2.3 N-m) Wire Awg Torque...

Installation Guide
Page 14
...Range" section. 5. See the Use and Care Guide or User Instructions for heat. Insert both sides. A A. Lift up the front of /recycle all parts are placed in the drawer. Repeat on surface burners and oven. If there is heavy. Dry thoroughly with a soft cloth. Read the "Range Use"...drawer glide. 3. Pull the storage drawer straight back to see which step was skipped. 2. Engage drawer glide. The oven door is an extra part, go back through the steps to the drawer stop notch 2. Pinch the hinge latch between two fingers and pull forward. NOTE: When properly installed,...
...Range" section. 5. See the Use and Care Guide or User Instructions for heat. Insert both sides. A A. Lift up the front of /recycle all parts are placed in the drawer. Repeat on surface burners and oven. If there is heavy. Dry thoroughly with a soft cloth. Read the "Range Use"...drawer glide. 3. Pull the storage drawer straight back to see which step was skipped. 2. Engage drawer glide. The oven door is an extra part, go back through the steps to the drawer stop notch 2. Pinch the hinge latch between two fingers and pull forward. NOTE: When properly installed,...

Installation Guide
Page 15
.... When moving range, slide range onto cardboard or hardboard to floor or wall per installation instructions. Electrical Shock Hazard Disconnect power before operating. Replace all parts and panels before servicing. Complete cleaning or maintenance. 4. See the "Verify Anti-Tip Bracket Is Installed and Engaged" section. 5.
.... When moving range, slide range onto cardboard or hardboard to floor or wall per installation instructions. Electrical Shock Hazard Disconnect power before operating. Replace all parts and panels before servicing. Complete cleaning or maintenance. 4. See the "Verify Anti-Tip Bracket Is Installed and Engaged" section. 5.


