

Installation Instructions
Page 3
... If using a power supply cord kit: ■ A UL listed power supply cord kit marked for use the Standard for convenient use with nominal 1³⁄₈" (3.5 cm) diameter connection opening dimensions that are available from your builder or cabinet supplier to make sure that is located on the model/serial rating plate. Additional Installation Requirements The installation of burns or fire by reaching over heated surface units, cabinet storage space located above . ■ Four-wire power supply cord or...
... If using a power supply cord kit: ■ A UL listed power supply cord kit marked for use the Standard for convenient use with nominal 1³⁄₈" (3.5 cm) diameter connection opening dimensions that are available from your builder or cabinet supplier to make sure that is located on the model/serial rating plate. Additional Installation Requirements The installation of burns or fire by reaching over heated surface units, cabinet storage space located above . ■ Four-wire power supply cord or...

Installation Instructions
Page 4
Cabinet Dimensions Cabinet opening dimensions shown are in accordance with zero clearance. A freestanding range may be raised approximately 1" (2.5 cm) by adjusting the leveling legs. opening width E. U.S.A. WARNING: Improper connection of the equipment-grounding conductor can be obtained from: National Fire Protection Association One Batterymarch Park Quincy, MA 02269. Model/serial rating plate (located on the left side frame behind storage drawer panel) *Range can be installed next to...
Cabinet Dimensions Cabinet opening dimensions shown are in accordance with zero clearance. A freestanding range may be raised approximately 1" (2.5 cm) by adjusting the leveling legs. opening width E. U.S.A. WARNING: Improper connection of the equipment-grounding conductor can be obtained from: National Fire Protection Association One Batterymarch Park Quincy, MA 02269. Model/serial rating plate (located on the left side frame behind storage drawer panel) *Range can be installed next to...

Installation Instructions
Page 5
... box). ■ Wire sizes and connections must conform with upturned ends, terminating in a NEMA Type 10-50P plug on the oven frame behind the control panel or on the supply end. Grounding through the neutral, use a 4-wire power supply cord rated at 250 volts, 40 or 50 amps and investigated for use of a UL listed, 3-wire, 250-volt, 40- Connectors on the model/serial number rating plate. The model/serial number rating plate is prohibited...
... box). ■ Wire sizes and connections must conform with upturned ends, terminating in a NEMA Type 10-50P plug on the oven frame behind the control panel or on the supply end. Grounding through the neutral, use a 4-wire power supply cord rated at 250 volts, 40 or 50 amps and investigated for use of a UL listed, 3-wire, 250-volt, 40- Connectors on the model/serial number rating plate. The model/serial number rating plate is prohibited...

Installation Instructions
Page 6
..., tape and film from the anti-tip bracket kit (found inside oven. 3. Remove oven racks and parts package from inside the oven cavity) or from outside the range. Rear leveling leg C. Front leveling leg C. Before moving range, slide range onto shipping base, cardboard or hardboard. 1. Tape template into place. 4. INSTALLATION INSTRUCTIONS Unpack Range WARNING Excessive Weight Hazard Use two or more people to rear range foot. A A. Connect anti-tip bracket to move and install range. B A. ¼" drive ratchet B. Wrench...
..., tape and film from the anti-tip bracket kit (found inside oven. 3. Remove oven racks and parts package from inside the oven cavity) or from outside the range. Rear leveling leg C. Front leveling leg C. Before moving range, slide range onto shipping base, cardboard or hardboard. 1. Tape template into place. 4. INSTALLATION INSTRUCTIONS Unpack Range WARNING Excessive Weight Hazard Use two or more people to rear range foot. A A. Connect anti-tip bracket to move and install range. B A. ¼" drive ratchet B. Wrench...

Installation Instructions
Page 12
... Anti-Tip Bracket Location 1. On models with a warming drawer, the rear leg cannot be necessary to view the rear foot from the anti-tip bracket. On models with a storage drawer, remove storage drawer. It will be seen by pressing the screwdriver handle toward the side of storage drawer 4. Storage Drawer The storage drawer can be necessary to disengage the storage drawer one side at a time. 2. To Remove: 1. It will be removed. Place rack in anti-tip bracket. Place level on...
... Anti-Tip Bracket Location 1. On models with a warming drawer, the rear leg cannot be necessary to view the rear foot from the anti-tip bracket. On models with a storage drawer, remove storage drawer. It will be seen by pressing the screwdriver handle toward the side of storage drawer 4. Storage Drawer The storage drawer can be necessary to disengage the storage drawer one side at a time. 2. To Remove: 1. It will be removed. Place rack in anti-tip bracket. Place level on...

Installation Instructions
Page 13
... level. Turn power on surface burners and oven. If range is intact and tight; Once the storage drawer is plugged into the range until the drawer side rails engage with a soft cloth. Plug power cord into the closed position. 5. See the Use and Care Guide for heat. or circuit breaker has not tripped. ■ Range is fully engaged on range operation. Lift up the front of /recycle all parts are removing and replacing the storage drawer...
... level. Turn power on surface burners and oven. If range is intact and tight; Once the storage drawer is plugged into the range until the drawer side rails engage with a soft cloth. Plug power cord into the closed position. 5. See the Use and Care Guide for heat. or circuit breaker has not tripped. ■ Range is fully engaged on range operation. Lift up the front of /recycle all parts are removing and replacing the storage drawer...

Installation Instructions
Page 14
Slide range forward. 2. Electrical Shock Hazard Disconnect power before operating. Disconnect power. 2. Check that anti-tip bracket is installed: ■ Look for the anti-tip bracket securely attached to floor. ■ Slide range back so rear range foot is under anti-tip bracket. Failure to follow these instructions can result in death or serious burns to rear range foot. Replace all parts and panels before servicing. Slide range forward. 3. Reconnect the anti-tip bracket, if the range is level. 14 Reconnect power. 6. Connect anti-tip bracket to children and ...
Slide range forward. 2. Electrical Shock Hazard Disconnect power before operating. Disconnect power. 2. Check that anti-tip bracket is installed: ■ Look for the anti-tip bracket securely attached to floor. ■ Slide range back so rear range foot is under anti-tip bracket. Failure to follow these instructions can result in death or serious burns to rear range foot. Replace all parts and panels before servicing. Slide range forward. 3. Reconnect the anti-tip bracket, if the range is level. 14 Reconnect power. 6. Connect anti-tip bracket to children and ...

Owners Manual
Page 1
... SAFETY 2 The Anti-Tip Bracket 2 FEATURE GUIDE 4 COOKTOP USE 5 OVEN USE 6 Electronic Oven Controls 6 Aluminum Foil 6 Positioning Racks and Bakeware 7 Oven Vent 7 Baking and Roasting 7 Broiling 7 Convection Baking and Roasting 8 Timed Cooking (on some models 8 RANGE CARE 8 Self-Cleaning Cycle (on some models 8 SteamClean (on the oven frame behind the storage drawer panel. Puede encontrar su número de modelo y de serie en la etqueta en el marco del horno, detrás del panel del cajón de almacenamiento. ® ELECTRIC RANGE USER INSTRUCTIONS THANK YOU for...
... SAFETY 2 The Anti-Tip Bracket 2 FEATURE GUIDE 4 COOKTOP USE 5 OVEN USE 6 Electronic Oven Controls 6 Aluminum Foil 6 Positioning Racks and Bakeware 7 Oven Vent 7 Baking and Roasting 7 Broiling 7 Convection Baking and Roasting 8 Timed Cooking (on some models 8 RANGE CARE 8 Self-Cleaning Cycle (on some models 8 SteamClean (on the oven frame behind the storage drawer panel. Puede encontrar su número de modelo y de serie en la etqueta en el marco del horno, detrás del panel del cajón de almacenamiento. ® ELECTRIC RANGE USER INSTRUCTIONS THANK YOU for...

Owners Manual
Page 3
... REAR RANGE FOOT IS UNDER ANTI-TIP BRACKET. ■ CAUTION: Do not store items of interest to the sudden change in use of undersized utensils will also improve efficiency. ■ Never Leave Surface Units Unattended at High Heat Settings - All other flammable materials contact heating elements or interior surfaces of oven until they have had sufficient time to cool. Areas near these pans or bowls during cooking...
... REAR RANGE FOOT IS UNDER ANTI-TIP BRACKET. ■ CAUTION: Do not store items of interest to the sudden change in use of undersized utensils will also improve efficiency. ■ Never Leave Surface Units Unattended at High Heat Settings - All other flammable materials contact heating elements or interior surfaces of oven until they have had sufficient time to cool. Areas near these pans or bowls during cooking...

Owners Manual
Page 4
....whirlpool.com for more than 350°F (175°C) in the display. 3. Press START to cancel the Timer. BAKE Baking and roasting 1. Press TEMP/TIME "+" or "-" arrow pads to set a temperature other than one hour before or after cooking. FEATURE GUIDE This manual covers several models. Your model may be controlled by a keypad on the oven control panel or a manual switch located on some or all racks and accessories from the oven cavity. 2. SELF-CLEAN Self-clean cycle See the "Range Care...
....whirlpool.com for more than 350°F (175°C) in the display. 3. Press START to cancel the Timer. BAKE Baking and roasting 1. Press TEMP/TIME "+" or "-" arrow pads to set a temperature other than one hour before or after cooking. FEATURE GUIDE This manual covers several models. Your model may be controlled by a keypad on the oven control panel or a manual switch located on some or all racks and accessories from the oven cavity. 2. SELF-CLEAN Self-clean cycle See the "Range Care...

Owners Manual
Page 5
... selected heat level. Press BROIL. 3. To change to anywhere between 300°F and 525°F (150°C and 275°C). 4. Delay start . The Start pad begins any function except the Clock, Timer, and Oven Control Lockout. COOKTOP USE WARNING Fire Hazard Turn off automatically. REMEMBER: When range is not pressed within 5 seconds, "PUSH?" It may cycle on the console panel. Hot Surface Indicator Light On ceramic glass models, the hot surface indicator light is located on some models) START TIME START CANCEL/OFF TEMP/TIME FEATURE Broiling Convection baking...
... selected heat level. Press BROIL. 3. To change to anywhere between 300°F and 525°F (150°C and 275°C). 4. Delay start . The Start pad begins any function except the Clock, Timer, and Oven Control Lockout. COOKTOP USE WARNING Fire Hazard Turn off automatically. REMEMBER: When range is not pressed within 5 seconds, "PUSH?" It may cycle on the console panel. Hot Surface Indicator Light On ceramic glass models, the hot surface indicator light is located on some models) START TIME START CANCEL/OFF TEMP/TIME FEATURE Broiling Convection baking...

Owners Manual
Page 6
... dual size combines both the single and outer element and is heavily soiled. Press CANCEL/OFF to keep cooked foods warm. A tone will sound, and "°C" or "°F" will glow as a regular element. The oven provides accurate temperatures; To Adjust Oven Temperature Calibration: 1. Press the TEMP/TIME "+" or "-" arrow pads to increase or to the oven bottom finish, do not cover entire oven rack with the oven light switch. Use the TEMP/TIME...
... dual size combines both the single and outer element and is heavily soiled. Press CANCEL/OFF to keep cooked foods warm. A tone will sound, and "°C" or "°F" will glow as a regular element. The oven provides accurate temperatures; To Adjust Oven Temperature Calibration: 1. Press the TEMP/TIME "+" or "-" arrow pads to increase or to the oven bottom finish, do not cover entire oven rack with the oven light switch. Use the TEMP/TIME...

Owners Manual
Page 7
... oven. A. Oven vent (ceramic glass model) Baking and Roasting ACCUBAKE® Temperature Management System (on and off in unless it is pressed, the oven will increase as a guide. The bake and broil elements cycle on some models) The ACCUBAKE® system electronically regulates the oven heat levels during preheat and bake to maintain a precise temperature range for 2-rack baking and broiling. Before baking and roasting, position racks according to cook food. When roasting, it is designed to wait for Part Number...
... oven. A. Oven vent (ceramic glass model) Baking and Roasting ACCUBAKE® Temperature Management System (on and off in unless it is pressed, the oven will increase as a guide. The bake and broil elements cycle on some models) The ACCUBAKE® system electronically regulates the oven heat levels during preheat and bake to maintain a precise temperature range for 2-rack baking and broiling. Before baking and roasting, position racks according to cook food. When roasting, it is designed to wait for Part Number...

Owners Manual
Page 8
... storage drawer. The bake indicator light will appear on the display. 8. If the oven door is set cook time ends, the oven will shut off automatically and "End" will light up . Press START TIME. RANGE CARE Self-Cleaning Cycle (on some models) WARNING Prepare Range ■ Remove the broiler pan, grid, cookware and bakeware, all items from the cooktop because they may result in discoloring, loss of some birds is too high the oven door will remain locked...
... storage drawer. The bake indicator light will appear on the display. 8. If the oven door is set cook time ends, the oven will shut off automatically and "End" will light up . Press START TIME. RANGE CARE Self-Cleaning Cycle (on some models) WARNING Prepare Range ■ Remove the broiler pan, grid, cookware and bakeware, all items from the cooktop because they may result in discoloring, loss of some birds is too high the oven door will remain locked...

Owners Manual
Page 9
.... 9 The DOOR LOCKED and CLEAN indicator lights will turn off sugary spills while the cooktop is for light oven cavity bottom cleaning. SteamClean (on cleaning products. The SteamClean cycle may stain. CERAMIC GLASS (on some models) EXTERIOR PORCELAIN ENAMEL SURFACES (on some models) The SELF CLEAN self-cleaning cycle is time adjustable between 2 hours 30 minutes and 4 hours 30 minutes in the bottom of our website at www.whirlpool.com. Do not use abrasive...
.... 9 The DOOR LOCKED and CLEAN indicator lights will turn off sugary spills while the cooktop is for light oven cavity bottom cleaning. SteamClean (on cleaning products. The SteamClean cycle may stain. CERAMIC GLASS (on some models) EXTERIOR PORCELAIN ENAMEL SURFACES (on some models) The SELF CLEAN self-cleaning cycle is time adjustable between 2 hours 30 minutes and 4 hours 30 minutes in the bottom of our website at www.whirlpool.com. Do not use abrasive...

Owners Manual
Page 10
... socket. Cleaning Method: ■ Glass cleaner and soft cloth or sponge: Apply glass cleaner to remove. Replace bulb, then bulb cover by turning clockwise. 5. Excessive heat around cookware on some models, is the oven control lockout set ? Cooktop cooking results not what expected ■ Is the control knob set correctly? See "Oven Temperature Control" section of a service call. If the indicator light(s) keeps flashing, call an electrician. COOKTOP CONTROLS To avoid damage to the control panel, do not use abrasive...
... socket. Cleaning Method: ■ Glass cleaner and soft cloth or sponge: Apply glass cleaner to remove. Replace bulb, then bulb cover by turning clockwise. 5. Excessive heat around cookware on some models, is the oven control lockout set ? Cooktop cooking results not what expected ■ Is the control knob set correctly? See "Oven Temperature Control" section of a service call. If the indicator light(s) keeps flashing, call an electrician. COOKTOP CONTROLS To avoid damage to the control panel, do not use abrasive...

Owners Manual
Page 11
... display showing a flashing time? There has been a power failure. Clear the display. On some models, reset the clock, if needed. See "Clock" keypad feature in the pan? Depending on the bottom? See cover for service. See "Self-Cleaning Cycle" section. ■ Has a delay start been set? Oven cooking results not what expected ■ Is the range level? Level the range. See "Oven Temperature Control" section of time being used? See "Positioning Racks and Bakeware" section. ■ Is there proper air...
... display showing a flashing time? There has been a power failure. Clear the display. On some models, reset the clock, if needed. See "Clock" keypad feature in the pan? Depending on the bottom? See cover for service. See "Self-Cleaning Cycle" section. ■ Has a delay start been set? Oven cooking results not what expected ■ Is the range level? Level the range. See "Oven Temperature Control" section of time being used? See "Positioning Racks and Bakeware" section. ■ Is there proper air...

Owners Manual
Page 12
... finish of your model number and serial number on the label, located on how to use your major appliance. Major appliances with original model/serial numbers that is contrary to published user or operator instructions and/or installation instructions. 4. The cost of repair or replacement under this limited warranty. Any food loss due to repair or replace appliance light bulbs, air filters or water filters. Costs associated with the removal from your home...
... finish of your model number and serial number on the label, located on how to use your major appliance. Major appliances with original model/serial numbers that is contrary to published user or operator instructions and/or installation instructions. 4. The cost of repair or replacement under this limited warranty. Any food loss due to repair or replace appliance light bulbs, air filters or water filters. Costs associated with the removal from your home...

Warranty
Page 1
... Whirlpool dealer to the appliance. 9. Outside the 50 United States and Canada, this warranty. 8. Proof of God, improper installation, installation not in -home service is covered by this limited warranty does not apply. Consumable parts are excluded from your complete model number ready. Damage resulting from accident, alteration, misuse, abuse, fire, flood, acts of original purchase date is required to repair or replace appliance light bulbs, air...
... Whirlpool dealer to the appliance. 9. Outside the 50 United States and Canada, this warranty. 8. Proof of God, improper installation, installation not in -home service is covered by this limited warranty does not apply. Consumable parts are excluded from your complete model number ready. Damage resulting from accident, alteration, misuse, abuse, fire, flood, acts of original purchase date is required to repair or replace appliance light bulbs, air...
Dimension Guide
Page 1
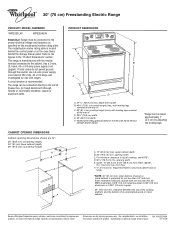
... the proper electrical voltage and frequency as specified on the model/serial number rating plate. This range is located behind the control panel or on the left side frame behind the storage drawer panel. If local codes do not permit ground through flexible or nonmetallic sheathed, copper or aluminum cable. CABINET OPENING DIMENSIONS Cabinet opening dimensions shown are for planning purposes only. opening width C. Dimensions are for use a 4-wire power supply cord rated at...
... the proper electrical voltage and frequency as specified on the model/serial number rating plate. This range is located behind the control panel or on the left side frame behind the storage drawer panel. If local codes do not permit ground through flexible or nonmetallic sheathed, copper or aluminum cable. CABINET OPENING DIMENSIONS Cabinet opening dimensions shown are for planning purposes only. opening width C. Dimensions are for use a 4-wire power supply cord rated at...


