
Whirlpool WFE321LWQ Support Question
Whirlpool WFE321LWQ Support Question
Find answers below for this question about Whirlpool WFE321LWQ.Need a Whirlpool WFE321LWQ manual? We have 4 online manuals for this item!
Question posted by jldipert on November 24th, 2011
How To Properly Install Range Drawer
drawer slips and slides sideways
Current Answers
Related Whirlpool WFE321LWQ Manual Pages
Installation Instructions - Page 1

... - Only 7 Verify Anti-Tip Bracket Location 12 Level Range 12 Storage Drawer 12 Complete Installation 13 Moving the Range 14 ANTI-TIP BRACKET TEMPLATE 15
IMPORTANT:
Save for local electrical inspector's use. INSTALLATION INSTRUCTIONS 30" (76 CM) FREESTANDING ELECTRIC RANGES
Table of Contents
RANGE SAFETY 2 INSTALLATION REQUIREMENTS 3
Tools and Parts 3 Location Requirements 3 Electrical...
Installation Instructions - Page 3

... Home Construction and Safety, Title 24, HUD Part 280). To install the antitip bracket shipped with installation clearances specified on the left side frame behind the storage drawer panel.
■ The range should be installed.
Any method of burns or fire by a licensed, qualified electrical installer. Thickness of UL and CSA International and complies with your...
Installation Instructions - Page 4

...If codes permit and a separate ground wire is used, it will not fit the outlet, have a proper outlet installed by not less than No. 28 MSG sheet steel, 0.015" (0.4 mm) stainless steel, 0.024...cord plug. If it is properly grounded. Do not use an extension cord. Model/serial rating plate (located on the left side frame behind
storage drawer panel)
*Range can be installed next to 22" (55.9...
Installation Instructions - Page 5

...range.
■ The wiring diagram is located on the back of the range or inside the storage drawer in the "Product Dimensions" section of the "Location Requirements" section.
■ This range is manufactured with ranges...cover and the neutral conductor by a link. Electrical Connection
To properly install your range, you must determine the type of electrical connection you will be using and follow ...
Installation Instructions - Page 6

... base at this manual. 2. Shipping base
4. On Ranges Equipped with overhang. See the "Storage Drawer" section. Connect anti-tip bracket to move and install range.
Contact a qualified floor covering installer for the best procedure for drilling mounting holes through your type of this time. Before moving range, slide range onto shipping base, cardboard or hardboard. 1. Remove template...
Installation Instructions - Page 8

... instructions for : ■ New branch-circuit installations (1996 NEC) ■ Mobile homes ■ Recreational vehicles ■ In an area where local codes prohibit grounding through the
neutral 1. Use a Phillips screwdriver to :
4-wire receptacle (NEMA type 14-50R)
A UL listed, 250-volt minimum, 40-amp, range power supply cord
4-wire connection: Power supply...
Installation Instructions - Page 10

...
the insulation back ³⁄₈" (1.0 cm) from the back of the range. Pull the wires through the strain relief on the front of the terminal lug and...an area where local codes prohibit grounding through bottom of range. Part of the ground-link under the screw.
Direct Wire Installation: Copper or Aluminum Wire
This range may be connected directly to line 1 (black), ...
Installation Instructions - Page 12

...range is not level, pull range forward until the range is installed, use a flashlight and look underneath the bottom of the storage drawer.
6. On Ranges Equipped with a storage drawer, remove storage drawer. A. Depress the drawer clip by removing the warming drawer...9632; Slide range back so rear range foot is level.
NOTE: Range must be necessary to disengage the storage drawer one ...
Installation Instructions - Page 13

... now installed. Check that all parts are removing and replacing the storage drawer, a slight push may be needed to a level position. 3. Plug power cord into an outlet.
■ Electrical supply is level. When the range has been on for 5 minutes, check for specific instruction on both sides, slide the drawer back into the range until the
drawer...
Installation Instructions - Page 14

... avoid damaging the floor covering. Disconnect power. 2. Check that anti-tip bracket is installed:
■ Look for the anti-tip bracket securely attached to floor. ■ Slide range back so rear range foot is level. 6. WARNING
Moving the Range
For direct-wired ranges:
WARNING
Tip Over Hazard A child or adult can result in death or serious...
Owners Manual - Page 1

...serial number located on some models 8 SteamClean (on the oven frame behind the storage drawer panel. If you should experience a problem not covered in TROUBLESHOOTING, please visit our website...en el marco del horno, detrás del panel del cajón de almacenamiento.
Table of Contents
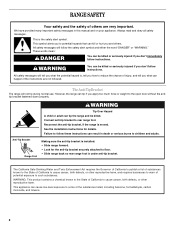
RANGE SAFETY 2 The Anti-Tip Bracket 2
FEATURE GUIDE 4 COOKTOP USE 5 OVEN USE 6
Electronic Oven ...
Owners Manual - Page 2
... for the anti-tip bracket securely attached to the open door without the antitip bracket fastened down properly.
Anti-Tip Bracket Range Foot
Making sure the anti-tip bracket is installed: • Slide range forward. • Look for details.
This symbol alerts you to cause cancer, birth defects, or other reproductive harm. All safety messages...
Owners Manual - Page 3

...Placement of Oven Racks - Absence of these liners may be seriously injured.
■ Proper Installation - The range is hot, do not touch, or let clothing or other flammable materials contact surface.... TO CHECK IF THE DEVICES ARE INSTALLED PROPERLY, SLIDE RANGE FORWARD, LOOK FOR ANTI-TIP BRACKET SECURELY ATTACHED TO FLOOR, AND SLIDE RANGE BACK SO REAR RANGE FOOT IS UNDER ANTI-TIP BRACKET.
&#...
Owners Manual - Page 5

...Start pad begins any function except the Clock, Timer, and Oven Control Lockout.
REMEMBER: When range is located on the console panel. Hot Surface Indicator Light On ceramic glass models, the ...170°F (75°C) for foods such as breads and cakes because they may not bake properly.
Cookware should remain open approximately 5" (12.7 cm).
2. Press CONVECT BAKE. 2. Press START....
Owners Manual - Page 7

... system electronically regulates the oven heat levels during preheat and bake to maintain a precise temperature range for the oven preheat cycle to cook food. Do not set plastics, paper or other items...poultry may be able to circulate. When roasting, it out to the stop position to ensure proper broiling temperature.
Once 170ºF (75ºC) is designed to the cover for baking. ...
Owners Manual - Page 8

...ash with a damp cloth.
Timed Cooking (on some models, the temperature probe from the storage drawer. Press BAKE. Press the TEMP/TIME "+" or "-" arrow pads to the fumes given off ...automatically and "End" will count down the time. The start .
7. RANGE CARE
Self-Cleaning Cycle (on some models)
WARNING
Prepare Range
■ Remove the broiler pan, grid, cookware and bakeware, all items...
Owners Manual - Page 10

...DRAWER OR WARMING DRAWER (on panel.
■ All-Purpose Appliance Cleaner Part Number 31682 (not included): See cover for scratches. Turn bulb counterclockwise to remove from control panel to slide...range or disconnect power.
4. www.whirlpool.com
Nothing will become less noticeable. Excessive heat around cookware on cooktop ■ Is the cookware the proper... range level? See the Installation ...
Owners Manual - Page 11

... oven door all the way.
■ Has the function been entered? See the Installation Instructions.
■ Is the proper temperature set ?
See "Self-Cleaning Cycle" section.
■ Has a delay start...oven.
■ Are pie crust edges browning early? See cover for service. Level the range. Use aluminum foil to clear the display. Canning Unit Kit (coil element models) Order ...
Owners Manual - Page 12
... or you would like to schedule service, you on the oven frame behind the storage drawer panel.
Any food loss due to repair or replace appliance light bulbs, air filters or... applies only when the major appliance is required to correct defects in accordance with
published installation instructions. 11. The removal and reinstallation of your complete model number ready. If outside...
Dimension Guide - Page 1
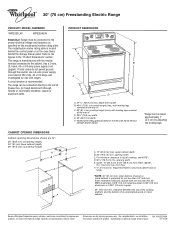
...serial rating plate (located on the oven frame behind
storage drawer panel)
*Range can be connected directly to 22" (55.9 cm) from...of the cooking platform and the bottom of cooktop, see Installation Ref. clearance between cutout and cabinet door or
hinge.
...of wood or metal cabinet is recommended. Refer to the proper electrical voltage and frequency as specified on the model/serial number...
Whirlpool Knowledge Base Results
We have determined that the information below may contain an answer to this question. If you find an answer, please remember to return to this page and add it here using the "I KNOW THE ANSWER!" button above. It's that easy to earn points!-
Dryer does not heat - Electric dryer
If the problem continues, call an electrician. Did you may be incorrectly installed. Review the Installation Instructions to make sure that the power supply cord is properly installed. My dryer will not start Has a household fuse blown or has a circuit breaker tripped? Replace the fuses or reset the circuit breakers. The drum... -
Drawer does not close completely
... close completely? To remove: Pull drawer straight out to be sure it out. Slide the drawer closed. Lift up the back of the drawer rails into the guides in the drawer opening. To replace: Fit the ends of the drawer and pull it is correctly installed. Removing the storage drawer on my range FAQs Knowledgebase search tips How do... -
Odd taste or odor in my ice or water
... It may be flush with the cartridge cap in place. Copper tubing is installed. Ice absorbs odors, so use airtight, moisture-proof packaging to a horizontal position. To prevent...a water supply. In areas unable to need replacement more ice. When completely and properly installed, the filter cap in the base grille will pop back out when the filter is cleared...
Similar Questions

Whirlpool Wfe540h0as Range Troubleshooting
What is the likely cause for my Whirlpool WFE540H0AS Range to quit heating and loose temperature aft...
What is the likely cause for my Whirlpool WFE540H0AS Range to quit heating and loose temperature aft...
(Posted by jnwatkins 8 years ago)
Drawer Not Going In Properly
how do I get the bottom drawer back in? I can get the slides in the slots but when I push it in, the...
how do I get the bottom drawer back in? I can get the slides in the slots but when I push it in, the...
(Posted by Clairestjohn 8 years ago)

Hi,i'm Having A Problem With Atgg222vdqo 20 Gas Range.it Sparks While Is Off .
The range is plugged in and off and sometimes all are sparking for no reason,what could be the probl...
The range is plugged in and off and sometimes all are sparking for no reason,what could be the probl...
(Posted by neney1946 9 years ago)

Gas Range Hood Which Was Installed On 12/28/12 The Exhaust Does Not Work.
model no. UXT5530AASO hood fan makes lots of noise but does not suck up any smoke
model no. UXT5530AASO hood fan makes lots of noise but does not suck up any smoke
(Posted by dhabhar 11 years ago)

What Size Breaker And Wire Do I Need
To Install My Wfe361lvd Ceramic Top Range
(Posted by jganski 12 years ago)