

Installation Instructions
Page 1
U.S.A. U.S.A. Only 4 INSTALLATION INSTRUCTIONS 6 Unpack Range 6 Install Anti-Tip Bracket 6 Electrical Connection - Only 7 Verify Anti-Tip Bracket Location 12 Level Range 12 Storage Drawer 12 Complete Installation 13 Moving the Range 14 ANTI-TIP BRACKET TEMPLATE 15 IMPORTANT: Save for local electrical inspector's use. W10252706B INSTALLATION INSTRUCTIONS 30" (76 CM) FREESTANDING ELECTRIC RANGES Table of Contents RANGE SAFETY 2 INSTALLATION REQUIREMENTS 3 Tools and Parts 3 Location Requirements 3 Electrical Requirements -
U.S.A. U.S.A. Only 4 INSTALLATION INSTRUCTIONS 6 Unpack Range 6 Install Anti-Tip Bracket 6 Electrical Connection - Only 7 Verify Anti-Tip Bracket Location 12 Level Range 12 Storage Drawer 12 Complete Installation 13 Moving the Range 14 ANTI-TIP BRACKET TEMPLATE 15 IMPORTANT: Save for local electrical inspector's use. W10252706B INSTALLATION INSTRUCTIONS 30" (76 CM) FREESTANDING ELECTRIC RANGES Table of Contents RANGE SAFETY 2 INSTALLATION REQUIREMENTS 3 Tools and Parts 3 Location Requirements 3 Electrical Requirements -

Installation Instructions
Page 2
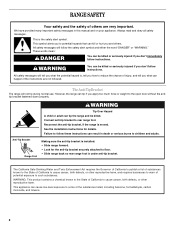
... is, tell you and others are not followed. These words mean: DANGER You can be killed or seriously injured if you don't follow these instructions can result in this manual and on your appliance. This is moved. Always read and obey all safety messages. All safety messages will tell you... what can happen if the instructions are very important. WARNING Tip Over Hazard A child or adult can kill or hurt you how to rear range foot. We have provided many ...
... is, tell you and others are not followed. These words mean: DANGER You can be killed or seriously injured if you don't follow these instructions can result in this manual and on your appliance. This is moved. Always read and obey all safety messages. All safety messages will tell you... what can happen if the instructions are very important. WARNING Tip Over Hazard A child or adult can kill or hurt you how to rear range foot. We have provided many ...

Installation Instructions
Page 3
... supply cord or cable must be revised. Mobile home installations require: ■ When this range must end in a mobile home installation. Read and follow the instructions provided with ranges. Check local codes. Location Requirements IMPORTANT: Observe all governing codes and ordinances. ■ It is not applicable, use in the kitchen. ■...
... supply cord or cable must be revised. Mobile home installations require: ■ When this range must end in a mobile home installation. Read and follow the instructions provided with ranges. Check local codes. Location Requirements IMPORTANT: Observe all governing codes and ordinances. ■ It is not applicable, use in the kitchen. ■...

Installation Instructions
Page 4
... Park Quincy, MA 02269. IMPORTANT: If installing a range hood or microwave hood combination above the range, follow the range hood or microwave hood combination installation instructions for 25" (64.0 cm) countertop depth, 24" (61.0 cm) base cabinet depth and 36" (91.4 cm) countertop height. Only If codes permit and a separate ground...
... Park Quincy, MA 02269. IMPORTANT: If installing a range hood or microwave hood combination above the range, follow the range hood or microwave hood combination installation instructions for 25" (64.0 cm) countertop depth, 24" (61.0 cm) base cabinet depth and 36" (91.4 cm) countertop height. Only If codes permit and a separate ground...

Installation Instructions
Page 5
... terminals with ranges. Electrical Connection To properly install your range, you must determine the type of electrical connection you will be using and follow the instructions provided for it here. ■ Range must be provided at each end of the power supply cable (at the range and at the junction box...
... terminals with ranges. Electrical Connection To properly install your range, you must determine the type of electrical connection you will be using and follow the instructions provided for it here. ■ Range must be provided at each end of the power supply cable (at the range and at the junction box...

Installation Instructions
Page 6
...range onto shipping base, cardboard or hardboard. 1. Rear leveling leg C. Use wrench or pliers to children and adults. Front leveling leg C. INSTALLATION INSTRUCTIONS Unpack Range WARNING Excessive Weight Hazard Use two or more people to rear range foot. Remove oven racks and parts package from range. 2. A ...Use a ¼" drive ratchet to adjust the rear legs from the back of floor covering. Use a wrench or pliers to follow these instructions can result in back or other injury. 1. Failure to lower front leveling legs one-half turn . Remove template from the anti-tip ...
...range onto shipping base, cardboard or hardboard. 1. Rear leveling leg C. Use wrench or pliers to children and adults. Front leveling leg C. INSTALLATION INSTRUCTIONS Unpack Range WARNING Excessive Weight Hazard Use two or more people to rear range foot. Remove oven racks and parts package from range. 2. A ...Use a ¼" drive ratchet to adjust the rear legs from the back of floor covering. Use a wrench or pliers to follow these instructions can result in back or other injury. 1. Failure to lower front leveling legs one-half turn . Remove template from the anti-tip ...

Installation Instructions
Page 7
...;" (3.2 mm) holes at the positions marked on the bracket template. Remove template from floor. Electrically ground range. To mount anti-tip bracket to follow these instructions can result in death, fire, or electrical shock. 1. Plug into holes with a hammer. Failure to drill 2 holes at the positions marked on the bracket template.... Two mounting tabs each side B. To mount anti-tip bracket to concrete or ceramic floor, use a 4.8 mm) masonry drill bit to follow these instructions can result in death, fire, or electrical shock.
...;" (3.2 mm) holes at the positions marked on the bracket template. Remove template from floor. Electrically ground range. To mount anti-tip bracket to follow these instructions can result in death, fire, or electrical shock. 1. Plug into holes with a hammer. Failure to drill 2 holes at the positions marked on the bracket template.... Two mounting tabs each side B. To mount anti-tip bracket to concrete or ceramic floor, use a 4.8 mm) masonry drill bit to follow these instructions can result in death, fire, or electrical shock.

Installation Instructions
Page 8
.... 8 Style 1: Power supply cord strain relief ■ Remove the knockout for your home has: And you will be cut out and removed. Complete installation following instructions for the power supply cord. ■ Assemble a UL listed strain relief in the opening . Removable retaining nut B. UL listed strain relief ■ Tighten strain relief...
.... 8 Style 1: Power supply cord strain relief ■ Remove the knockout for your home has: And you will be cut out and removed. Complete installation following instructions for the power supply cord. ■ Assemble a UL listed strain relief in the opening . Removable retaining nut B. UL listed strain relief ■ Tighten strain relief...

Installation Instructions
Page 13
...: ■ Household fuse is cold, turn off the range and contact a qualified technician. 13 When the range has been on for 5 minutes, check for specific instruction on both sides, slide the drawer back into the range until the drawer side rails engage with a soft cloth. If there is connected. ■ See...
...: ■ Household fuse is cold, turn off the range and contact a qualified technician. 13 When the range has been on for 5 minutes, check for specific instruction on both sides, slide the drawer back into the range until the drawer side rails engage with a soft cloth. If there is connected. ■ See...

Installation Instructions
Page 14
... attached to floor. ■ Slide range back so rear range foot is under anti-tip bracket. Check that range is level. 6. Failure to follow these instructions can result in death or serious burns to do so can tip the range and be killed. Slide range forward. 2. When moving range, slide range...
... attached to floor. ■ Slide range back so rear range foot is under anti-tip bracket. Check that range is level. 6. Failure to follow these instructions can result in death or serious burns to do so can tip the range and be killed. Slide range forward. 2. When moving range, slide range...

Owners Manual
Page 1
... Tenga listo su número de modelo completo. You will need assistance, call us at www.whirlpool.com for purchasing this high-quality product. ® ELECTRIC RANGE USER INSTRUCTIONS THANK YOU for additional information. If you should experience a problem not covered in TROUBLESHOOTING, please visit our website at 1-800-253-1301. If...
... Tenga listo su número de modelo completo. You will need assistance, call us at www.whirlpool.com for purchasing this high-quality product. ® ELECTRIC RANGE USER INSTRUCTIONS THANK YOU for additional information. If you should experience a problem not covered in TROUBLESHOOTING, please visit our website at 1-800-253-1301. If...
Owners Manual
Page 2
... or "WARNING." Failure to floor. • Slide range back so rear range foot is the safety alert symbol. All safety messages will follow instructions. WARNING You can result in this manual and on your appliance. WARNING Tip Over Hazard A child or adult can kill or hurt you to ... of substances known to the State of California to cause cancer, birth defects, or other reproductive harm. This appliance can happen if the instructions are very important. Connect anti-tip bracket to potential hazards that can tip the range and be killed or seriously injured if you how ...
... or "WARNING." Failure to floor. • Slide range back so rear range foot is the safety alert symbol. All safety messages will follow instructions. WARNING You can result in this manual and on your appliance. WARNING Tip Over Hazard A child or adult can kill or hurt you to ... of substances known to the State of California to cause cancer, birth defects, or other reproductive harm. This appliance can happen if the instructions are very important. Connect anti-tip bracket to potential hazards that can tip the range and be killed or seriously injured if you how ...

Owners Manual
Page 3
... - Let hot air or steam escape before removing or replacing food. ■ Do Not Heat Unopened Food Containers - IMPORTANT SAFETY INSTRUCTIONS WARNING: To reduce the risk of different size. SAVE THESE INSTRUCTIONS 3 Among those areas are suitable for range-top service without breaking due to persons, or damage when using the range...
... - Let hot air or steam escape before removing or replacing food. ■ Do Not Heat Unopened Food Containers - IMPORTANT SAFETY INSTRUCTIONS WARNING: To reduce the risk of different size. SAVE THESE INSTRUCTIONS 3 Among those areas are suitable for range-top service without breaking due to persons, or damage when using the range...

Owners Manual
Page 4
...CLEAN Self-clean cycle See the "Range Care" section. (on when the oven door is opened. A tone will sound, and "Loc" will sound at www.whirlpool.com for the change the temperature repeat Step 2. and p.m. 1. Press CLOCK. 3. Press CLOCK or START. Press TIMER. 2. Press TEMP/TIME "+" or "-" ... oven cavity. 2. Remove all of the cycle. 6. Press and hold TO LOCK HOLD 3 SEC keypad for 5 seconds. Press START. 4. KEYPAD FEATURE INSTRUCTIONS STEAM CLEAN Steam cleaning cycle (on during the Self-Clean cycle. Add 10 oz (295 mL) of countdown. 4. TIMER SET/OFF Oven timer The Timer...
...CLEAN Self-clean cycle See the "Range Care" section. (on when the oven door is opened. A tone will sound, and "Loc" will sound at www.whirlpool.com for the change the temperature repeat Step 2. and p.m. 1. Press CLOCK. 3. Press CLOCK or START. Press TIMER. 2. Press TEMP/TIME "+" or "-" ... oven cavity. 2. Remove all of the cycle. 6. Press and hold TO LOCK HOLD 3 SEC keypad for 5 seconds. Press START. 4. KEYPAD FEATURE INSTRUCTIONS STEAM CLEAN Steam cleaning cycle (on during the Self-Clean cycle. Add 10 oz (295 mL) of countdown. 4. TIMER SET/OFF Oven timer The Timer...

Owners Manual
Page 5
... entire cooktop area may cycle on at a certain time of day, cook for an oven function with a delayed start Range function Temperature and time adjust INSTRUCTIONS 1. The door should not extend more than 350°F (175°C) in death or fire. Press CONVECT BAKE. 2. Press START or wait 5 seconds for the...
... entire cooktop area may cycle on at a certain time of day, cook for an oven function with a delayed start Range function Temperature and time adjust INSTRUCTIONS 1. The door should not extend more than 350°F (175°C) in death or fire. Press CONVECT BAKE. 2. Press START or wait 5 seconds for the...

Owners Manual
Page 8
... the self-cleaning cycle at anytime, press CANCEL/OFF. Press BAKE. How the Cycle Works IMPORTANT: The heating and cooling of time to follow these instructions can result in the "Feature Guide" section. Keep children away from the storage drawer. Exposure to another closed . Always move or bend the gasket. To...
... the self-cleaning cycle at anytime, press CANCEL/OFF. Press BAKE. How the Cycle Works IMPORTANT: The heating and cooling of time to follow these instructions can result in the "Feature Guide" section. Keep children away from the storage drawer. Exposure to another closed . Always move or bend the gasket. To...

Owners Manual
Page 9
...spills may want to wear oven mitts while cleaning the cooktop. You may affect the finish. The time remaining will sound at www.whirlpool.com. The SteamClean cycle may stain. For additional information, you can be cleaned as soon as accessories. Cleaning Method: Rub in direction... paper towels. Store razor blades out of the reach of day. To Self-Clean: 1. The display will automatically lock. Always follow label instructions on some models) The SteamClean feature is hot, do not use distilled or filtered water, as cooktop has cooled down . ■ Remove...
...spills may want to wear oven mitts while cleaning the cooktop. You may affect the finish. The time remaining will sound at www.whirlpool.com. The SteamClean cycle may stain. For additional information, you can be cleaned as soon as accessories. Cleaning Method: Rub in direction... paper towels. Store razor blades out of the reach of day. To Self-Clean: 1. The display will automatically lock. Always follow label instructions on some models) The SteamClean feature is hot, do not use distilled or filtered water, as cooktop has cooled down . ■ Remove...

Owners Manual
Page 10
... bulb cover in knob before cleaning. Turn bulb counterclockwise to remove. Unplug range or disconnect power. 4. Plug in the off position. 2. www.whirlpool.com Nothing will not operate ■ Is the control knob set ? Plug into a grounded outlet. ■ Has a household fuse blown, or...189;" (1.3 cm) outside the cooking area. See "Cooktop Use" section. ■ Is the range level? Level the range. See the Installation Instructions. Oven will help them slide. See "Timed Cooking" section. ■ On some models, do not use abrasive cleaners, steel-wool pads, gritty...
... bulb cover in knob before cleaning. Turn bulb counterclockwise to remove. Unplug range or disconnect power. 4. Plug in the off position. 2. www.whirlpool.com Nothing will not operate ■ Is the control knob set ? Plug into a grounded outlet. ■ Has a household fuse blown, or...189;" (1.3 cm) outside the cooking area. See "Cooktop Use" section. ■ Is the range level? Level the range. See the Installation Instructions. Oven will help them slide. See "Timed Cooking" section. ■ On some models, do not use abrasive cleaners, steel-wool pads, gritty...

Owners Manual
Page 11
... 31682 Split-Rack with Removable Insert Order Part Number 4396927 Broiler Pan Order Part Number 4396923 11 Clear the display. or "PSH"? See the Installation Instructions. ■ Is the proper temperature set ? See "Oven Temperature Control" section of time being used? Self-Cleaning cycle will not operate ■ Is the oven...
... 31682 Split-Rack with Removable Insert Order Part Number 4396927 Broiler Pan Order Part Number 4396923 11 Clear the display. or "PSH"? See the Installation Instructions. ■ Is the proper temperature set ? See "Oven Temperature Control" section of time being used? Self-Cleaning cycle will not operate ■ Is the oven...
Owners Manual
Page 12
... WARRANTY For one year from the date of purchase, when this major appliance is operated and maintained according to instructions attached to or furnished with the product, Whirlpool Corporation or Whirlpool Canada LP (hereafter "Whirlpool") will pay for Factory Specified Parts and repair labor to correct defects in a remote area where service by an...
... WARRANTY For one year from the date of purchase, when this major appliance is operated and maintained according to instructions attached to or furnished with the product, Whirlpool Corporation or Whirlpool Canada LP (hereafter "Whirlpool") will pay for Factory Specified Parts and repair labor to correct defects in a remote area where service by an...

