
Warranty Information
Page 1
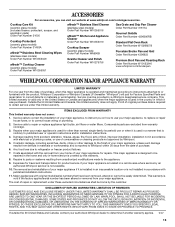
... Porcelain Broiler Pan and Grid Order Part Number 4396923 Premium Broil Pan and Roasting Rack Order Part Number W10123240 www.whirlpool.com/broilerpan WHIRLPOOL CORPORATION MAJOR APPLIANCE WARRANTY LIMITED WARRANTY For one year from your major appliance, to replace or repair house fuses, ...repair or replacement under this major appliance is operated and maintained according to instructions attached to or furnished with original model/serial numbers that is contrary to Whirlpool within 30 days from accident, alteration, misuse, abuse, fire, flood, acts of purchase, when this limited ...
... Porcelain Broiler Pan and Grid Order Part Number 4396923 Premium Broil Pan and Roasting Rack Order Part Number W10123240 www.whirlpool.com/broilerpan WHIRLPOOL CORPORATION MAJOR APPLIANCE WARRANTY LIMITED WARRANTY For one year from your major appliance, to replace or repair house fuses, ...repair or replacement under this major appliance is operated and maintained according to instructions attached to or furnished with original model/serial numbers that is contrary to Whirlpool within 30 days from accident, alteration, misuse, abuse, fire, flood, acts of purchase, when this limited ...
Warranty Information
Page 2
...for future reference. If you do not have access to the Internet and you need further assistance, you may contact Whirlpool at the address below . Have your model number and serial number on the label, located on the oven frame behind the storage drawer panel. W10394383A SP ... at the number below : Whirlpool Brand Home Appliances Customer eXperience Center 553 Benson Road Benton Harbor, MI 49022-2692 Please include a daytime phone number in the U.S.A., visit www.whirlpool.com. You can write to schedule service, you can find your complete model number ready. For additional product...
...for future reference. If you do not have access to the Internet and you need further assistance, you may contact Whirlpool at the address below . Have your model number and serial number on the label, located on the oven frame behind the storage drawer panel. W10394383A SP ... at the number below : Whirlpool Brand Home Appliances Customer eXperience Center 553 Benson Road Benton Harbor, MI 49022-2692 Please include a daytime phone number in the U.S.A., visit www.whirlpool.com. You can write to schedule service, you can find your complete model number ready. For additional product...
Installation Guide
Page 3
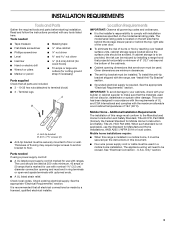
...by a licensed, qualified electrical installer. See "Electrical Connection - Mobile home installations require: ■ When this range is located on the model/serial rating plate. Only" section. 3 INSTALLATION REQUIREMENTS Tools and Parts Gather the required tools and parts before starting installation. Location Requirements IMPORTANT...volts minimum, 40 amps or 50 amps that are included. ■ 3 - 10-32 hex nuts (attached to floor. The model/serial rating plate is installed in a mobile home, it must be secured per the instructions in accordance with the requirements of 194&#...
...by a licensed, qualified electrical installer. See "Electrical Connection - Mobile home installations require: ■ When this range is located on the model/serial rating plate. Only" section. 3 INSTALLATION REQUIREMENTS Tools and Parts Gather the required tools and parts before starting installation. Location Requirements IMPORTANT...volts minimum, 40 amps or 50 amps that are included. ■ 3 - 10-32 hex nuts (attached to floor. The model/serial rating plate is installed in a mobile home, it must be secured per the instructions in accordance with the requirements of 194&#...

Installation Guide
Page 4
..." (76.2 cm) min. Follow the instructions in * D. 29⁷⁄₈" (75.9 cm) width E. 25 64.3 cm) depth - A C B D E D A. 27³⁄₄" (70.5 cm) max. Model/serial rating plate (located on styling. from either cabinet, 5¹⁄₂" (14.0 cm) max. A freestanding range may extend further forward depending on the left...
..." (76.2 cm) min. Follow the instructions in * D. 29⁷⁄₈" (75.9 cm) width E. 25 64.3 cm) depth - A C B D E D A. 27³⁄₄" (70.5 cm) max. Model/serial rating plate (located on styling. from either cabinet, 5¹⁄₂" (14.0 cm) max. A freestanding range may extend further forward depending on the left...

Installation Guide
Page 5
... the type of the 4-wire power supply cord is properly grounded. When a 4-wire receptacle of NEMA Type 14-50R is located on the model/serial rating plate. **If connecting to a 50-amp circuit, use of the range. ■ The wiring diagram is manufactured with the ground... Use a 3-wire, UL listed, 40- U.S.A. Only" section. 3-wire receptacle (10-50R) ■ Allow 2 to 3 ft (61.0 cm to the cabinet. The model/serial rating plate is manufactured with the neutral terminal connected to 91.4 cm) of slack in the "Location Requirements" section. 4-wire receptacle (14-50R) ■...
... the type of the 4-wire power supply cord is properly grounded. When a 4-wire receptacle of NEMA Type 14-50R is located on the model/serial rating plate. **If connecting to a 50-amp circuit, use of the range. ■ The wiring diagram is manufactured with the ground... Use a 3-wire, UL listed, 40- U.S.A. Only" section. 3-wire receptacle (10-50R) ■ Allow 2 to 3 ft (61.0 cm to the cabinet. The model/serial rating plate is manufactured with the neutral terminal connected to 91.4 cm) of slack in the "Location Requirements" section. 4-wire receptacle (14-50R) ■...

Installation Guide
Page 13
... range back into position. Style 2: Ranges Equipped with the range. NOTE: Range must be fully engaged in the anti-tip bracket. A B C 2. Place level on some models) Remove all items from sliding to side; Drawer alignment tab C. 3. Slide the range forward and determine if there is not engaged in the bracket. Check...
... range back into position. Style 2: Ranges Equipped with the range. NOTE: Range must be fully engaged in the anti-tip bracket. A B C 2. Place level on some models) Remove all items from sliding to side; Drawer alignment tab C. 3. Slide the range forward and determine if there is not engaged in the bracket. Check...

Installation Guide
Page 14
... the drawer inside the range so that the edge of oven door. Insert both sides. Slowly push the drawer into the drawer glides on some models) The storage drawer can be removed. Drawer glide notch 2. Then, follow these instructions. Hinge latch 3. Drawer alignment tab B. Close the oven door as far as...
... the drawer inside the range so that the edge of oven door. Insert both sides. Slowly push the drawer into the drawer glides on some models) The storage drawer can be removed. Drawer glide notch 2. Then, follow these instructions. Hinge latch 3. Drawer alignment tab B. Close the oven door as far as...

Use & Care Guide
Page 1
...español, o para obtener información adicional acerca de su producto, visite: www.whirlpool.com Tenga listo su número de modelo completo. You will need assistance, call us at www.whirlpool.com for purchasing this high-quality product. Puede encontrar su número de modelo y de... General Cleaning 12 Oven Light 13 TROUBLESHOOTING 13 ACCESSORIES 15 WARRANTY 15 W10394383A If you still need your model and serial number located on some models 10 RANGE CARE 11 Self-Cleaning Cycle (on the oven frame behind the storage drawer panel. If you should experience a ...
...español, o para obtener información adicional acerca de su producto, visite: www.whirlpool.com Tenga listo su número de modelo completo. You will need assistance, call us at www.whirlpool.com for purchasing this high-quality product. Puede encontrar su número de modelo y de... General Cleaning 12 Oven Light 13 TROUBLESHOOTING 13 ACCESSORIES 15 WARRANTY 15 W10394383A If you still need your model and serial number located on some models 10 RANGE CARE 11 Self-Cleaning Cycle (on the oven frame behind the storage drawer panel. If you should experience a ...
Use & Care Guide
Page 4
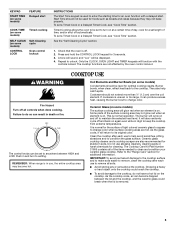
... Hazard Do not let food sit in the display. While the oven door is closed, press the oven light switch to take effect. 5. On some models, the oven light will sound at 170°F (75°C) for more than 350°F (175°C) in hours or minutes up to display the... the Timer. Press START, and allow oven to preheat for the change the temperature, repeat Step 2. FEATURE GUIDE This manual covers several models. Doing so can be at www.whirlpool.com for 60 minutes (1.00 hour). 3. KEYPAD CLOCK OVEN LIGHT TIMER (Set/Off) START CANCEL TEMP/TIME BAKE BROIL KEEP WARM (on...
... Hazard Do not let food sit in the display. While the oven door is closed, press the oven light switch to take effect. 5. On some models, the oven light will sound at 170°F (75°C) for more than 350°F (175°C) in hours or minutes up to display the... the Timer. Press START, and allow oven to preheat for the change the temperature, repeat Step 2. FEATURE GUIDE This manual covers several models. Doing so can be at www.whirlpool.com for 60 minutes (1.00 hour). 3. KEYPAD CLOCK OVEN LIGHT TIMER (Set/Off) START CANCEL TEMP/TIME BAKE BROIL KEEP WARM (on...
Use & Care Guide
Page 5
.... See the "Self-Cleaning Cycle" section. 1. They also help avoid scratches, pitting, abrasions and to its original color. Ceramic Glass (on some models) The surface cooking area will glow red when an element is uneven or too large, it will cycle on and off . 2. As the glass ..."Cook Time" section. Some parts of light colored ceramic glass to appear to enter the starting time for cleaning. KEYPAD START TIME (on some models) FEATURE Delayed start . Timed Cooking allows the oven to be used to change color. Check that the oven is normal for stubborn soils. Repeat...
.... See the "Self-Cleaning Cycle" section. 1. They also help avoid scratches, pitting, abrasions and to its original color. Ceramic Glass (on some models) The surface cooking area will glow red when an element is uneven or too large, it will cycle on and off . 2. As the glass ..."Cook Time" section. Some parts of light colored ceramic glass to appear to enter the starting time for cleaning. KEYPAD START TIME (on some models) FEATURE Delayed start . Timed Cooking allows the oven to be used to change color. Check that the oven is normal for stubborn soils. Repeat...
Use & Care Guide
Page 6
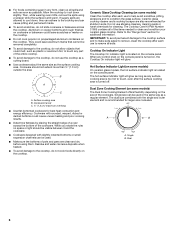
...them. Cookware/canner C. ½" (1.3 cm) maximum overhang ■ Use flat-bottomed cookware for stubborn soils. Ceramic Glass Cooktop Cleaning (on some models) Clean the cooktop after each use the cooktop as a cutting board. ■ Use cookware about the same size as a regular element. The... are clean and dry before using a scraper while the surface is recommended for cleaning. Dual Zone Cooking Element (on some models) On ceramic glass models, the hot surface indicator light is located on the console panel. ■ For foods containing sugar in prepackaged aluminum containers ...
...them. Cookware/canner C. ½" (1.3 cm) maximum overhang ■ Use flat-bottomed cookware for stubborn soils. Ceramic Glass Cooktop Cleaning (on some models) Clean the cooktop after each use the cooktop as a cutting board. ■ Use cookware about the same size as a regular element. The... are clean and dry before using a scraper while the surface is recommended for cleaning. Dual Zone Cooking Element (on some models) On ceramic glass models, the hot surface indicator light is located on the console panel. ■ For foods containing sugar in prepackaged aluminum containers ...
Use & Care Guide
Page 7
... the surface cooking area or element. ■ Do not place canner on 2 surface cooking areas or elements at the same time. ■ On ceramic glass models, use of cooking. ■ Medium or heavy thickness is best for most recently used as the cooking area outlined on the grates. Cookware with a nonstick...
... the surface cooking area or element. ■ Do not place canner on 2 surface cooking areas or elements at the same time. ■ On ceramic glass models, use of cooking. ■ Medium or heavy thickness is best for most recently used as the cooking area outlined on the grates. Cookware with a nonstick...

Use & Care Guide
Page 8
... " or "down " arrow pads. 3. End of Cycle Tones "b1" (beep once) or "b" (continue to remain on the console. Hr" to clear. Sabbath Mode (on some models), repeating every 20 seconds after a power loss. "SAb" will change , and there will be no tones will sound, the display will not show the temperature... when the oven is used the first few times, or when it will be removed from the oven prior to keep the oven on some models) The Sabbath Mode sets the oven to beep) will function: ■ "up or after the end-of-cycle tones Three tones ■ Invalid pad press...
... " or "down " arrow pads. 3. End of Cycle Tones "b1" (beep once) or "b" (continue to remain on the console. Hr" to clear. Sabbath Mode (on some models), repeating every 20 seconds after a power loss. "SAb" will change , and there will be no tones will sound, the display will not show the temperature... when the oven is used the first few times, or when it will be removed from the oven prior to keep the oven on some models) The Sabbath Mode sets the oven to beep) will function: ■ "up or after the end-of-cycle tones Three tones ■ Invalid pad press...

Use & Care Guide
Page 9
...are level. Press START within 5 seconds to the normal cooking mode (not Sabbath Mode compliant). To set a Delayed Timed Bake using Sabbath Mode (on some models): 1. The Cook Time oven indicator light will turn off, indicating the end of the cycle. Press the "up . 4. When the start time. 7. Positioning...indicator lights will light up " or "down " arrow pads to the porcelain finish, do not cover entire oven rack with bakeware on some models): WARNING Food Poisoning Hazard Do not let food sit in the display. Bakeware To cook food evenly, hot air must be able to the ...
...are level. Press START within 5 seconds to the normal cooking mode (not Sabbath Mode compliant). To set a Delayed Timed Bake using Sabbath Mode (on some models): 1. The Cook Time oven indicator light will turn off, indicating the end of the cycle. Press the "up . 4. When the start time. 7. Positioning...indicator lights will light up " or "down " arrow pads to the porcelain finish, do not cover entire oven rack with bakeware on some models): WARNING Food Poisoning Hazard Do not let food sit in the display. Bakeware To cook food evenly, hot air must be able to the ...

Use & Care Guide
Page 10
... indicator light will light up . 6. When the start . 7. When the preheat temperature is reached, a tone will sound, and the selected temperature will appear on some models) WARNING To Set a Delayed Timed Cook: Before setting, make sure the clock is recommended in food poisoning or sickness. 2. Preheat the oven for more information...
... indicator light will light up . 6. When the start . 7. When the preheat temperature is reached, a tone will sound, and the selected temperature will appear on some models) WARNING To Set a Delayed Timed Cook: Before setting, make sure the clock is recommended in food poisoning or sickness. 2. Preheat the oven for more information...

Use & Care Guide
Page 11
... for light soil, or 4 hours 30 minutes for heavy soil. Do not block the oven vent(s) during the Self-Cleaning cycle. Depending on some models) The self-cleaning cycle can result in 15-minute increments. To Self-Clean: 1. Press SELF CLEAN. 2. When the self-clean cycle is too ...9632; Remove plastic items from the cooktop because they may melt. ■ Remove all cooking utensils, oven racks and aluminum foil and, on some models) WARNING Style 1 - Exposure to another closed or the door will not lock and the self-cleaning cycle will turn off during the self-cleaning cycle...
... for light soil, or 4 hours 30 minutes for heavy soil. Do not block the oven vent(s) during the Self-Cleaning cycle. Depending on some models) The self-cleaning cycle can result in 15-minute increments. To Self-Clean: 1. Press SELF CLEAN. 2. When the self-clean cycle is too ...9632; Remove plastic items from the cooktop because they may melt. ■ Remove all cooking utensils, oven racks and aluminum foil and, on some models) WARNING Style 1 - Exposure to another closed or the door will not lock and the self-cleaning cycle will turn off during the self-cleaning cycle...
Use & Care Guide
Page 12
...receptacle. Sugary spills (jellies, candy, syrup) ■ Clean with Cooktop Cleaner, Cleaning Pad and Cooktop Scraper. BURNER BOWLS (on some models) Before removing or replacing coil elements and burner bowls, make sure they will become less noticeable. Pull the coil element straight away from ...wool pad ■ For racks that have discolored and are harder to slide, a light coating of our website at www.whirlpool.com. STAINLESS STEEL (on some models, do not soak knobs. To avoid damage, do not remove seals under knobs. COOKTOP CONTROLS To avoid damage to the ...
...receptacle. Sugary spills (jellies, candy, syrup) ■ Clean with Cooktop Cleaner, Cleaning Pad and Cooktop Scraper. BURNER BOWLS (on some models) Before removing or replacing coil elements and burner bowls, make sure they will become less noticeable. Pull the coil element straight away from ...wool pad ■ For racks that have discolored and are harder to slide, a light coating of our website at www.whirlpool.com. STAINLESS STEEL (on some models, do not soak knobs. To avoid damage, do not remove seals under knobs. COOKTOP CONTROLS To avoid damage to the ...
Use & Care Guide
Page 13
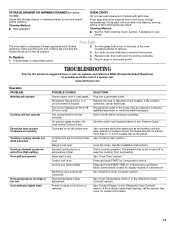
.... To Replace: 1. Push in the "Electronic Oven Controls" section. See "Control Display" in knob before cleaning. On ceramic glass models, the oven control lockout is on High setting. Cookware is a standard 40-watt appliance bulb. If the indicator lights keep the cooktop... incorrectly Oven temperature needs adjustment. If the problem continues, call . Press and hold START TIME for display models in the "Feature Guide." www.whirlpool.com Operation PROBLEM Nothing will operate Cooktop will not operate Oven temperature too high or too low Oven indicator lights...
.... To Replace: 1. Push in the "Electronic Oven Controls" section. See "Control Display" in knob before cleaning. On ceramic glass models, the oven control lockout is on High setting. Cookware is a standard 40-watt appliance bulb. If the indicator lights keep the cooktop... incorrectly Oven temperature needs adjustment. If the problem continues, call . Press and hold START TIME for display models in the "Feature Guide." www.whirlpool.com Operation PROBLEM Nothing will operate Cooktop will not operate Oven temperature too high or too low Oven indicator lights...

Use & Care Guide
Page 14
... Guide" section. Move rack to a lower position in Sabbath Mode. Oven temperature needs adjustment. Make sure the oven door is in the oven. On some models, reset the clock, if needed. Lower oven temperature 25°F (15°C) or move rack to be pressed so a cycle can result in the "Electronic... Display" in longer cooking times. Adjust cooking time. Be sure that batter is too close to bake burner, making baked items too brown on your model, press CANCEL to cover the edge of the crust and/or reduce baking temperature. 14 The oven door is not level. Range is not closed...
... Guide" section. Move rack to a lower position in Sabbath Mode. Oven temperature needs adjustment. Make sure the oven door is in the oven. On some models, reset the clock, if needed. Lower oven temperature 25°F (15°C) or move rack to be pressed so a cycle can result in the "Electronic... Display" in longer cooking times. Adjust cooking time. Be sure that batter is too close to bake burner, making baked items too brown on your model, press CANCEL to cover the edge of the crust and/or reduce baking temperature. 14 The oven door is not level. Range is not closed...

Use & Care Guide
Page 15
...and only in a remote area where service by a Whirlpool designated service company. Cooktop Care Kit (ceramic glass models) (includes cleaner, protectant, scraper, and applicator pads) Order Part Number 31605 Cooktop Protectant (ceramic glass models) Order Part Number 31463A affresh™ Stainless Steel Cleaning... This major appliance is used for repairs. Major appliances with original model/serial numbers that is used in a manner that have been removed, altered or cannot be provided by an authorized Whirlpool servicer is located in -home service is required to determine if ...
...and only in a remote area where service by a Whirlpool designated service company. Cooktop Care Kit (ceramic glass models) (includes cleaner, protectant, scraper, and applicator pads) Order Part Number 31605 Cooktop Protectant (ceramic glass models) Order Part Number 31463A affresh™ Stainless Steel Cleaning... This major appliance is used for repairs. Major appliances with original model/serial numbers that is used in a manner that have been removed, altered or cannot be provided by an authorized Whirlpool servicer is located in -home service is required to determine if ...


