

Installation Instructions
Page 1
... follow instructions. ONLY Para una versión de estas instrucciones en español, visite www.Whirlpool.com TABLE OF CONTENTS DRYER SAFETY 1 INSTALLATION REQUIREMENTS 2 Tools and Parts 2 Optional Equipment 3 Location Requirements 3 ELECTRIC DRYER POWER HOOKUP 5 Electrical Requirements 5 Electrical Connection 6 VENTING 11 Venting Requirements 11 Plan Vent System 12 Install Vent System 13 INSTALL LEVELING LEGS...
... follow instructions. ONLY Para una versión de estas instrucciones en español, visite www.Whirlpool.com TABLE OF CONTENTS DRYER SAFETY 1 INSTALLATION REQUIREMENTS 2 Tools and Parts 2 Optional Equipment 3 Location Requirements 3 ELECTRIC DRYER POWER HOOKUP 5 Electrical Requirements 5 Electrical Connection 6 VENTING 11 Venting Requirements 11 Plan Vent System 12 Install Vent System 13 INSTALL LEVELING LEGS...

Installation Instructions
Page 2
... whom you purchased your Use and Care Guide. 2 NOTE: Do not use leveling legs supplied with dryer if installing on a pedestal. Check existing electrical supply and venting. Long inlet hose E. Check that all parts are included. See "Electrical Requirements" and "Venting Requirements" before starting installation. "Y" connector C. Parts needed Check local codes. For further...
... whom you purchased your Use and Care Guide. 2 NOTE: Do not use leveling legs supplied with dryer if installing on a pedestal. Check existing electrical supply and venting. Long inlet hose E. Check that all parts are included. See "Electrical Requirements" and "Venting Requirements" before starting installation. "Y" connector C. Parts needed Check local codes. For further...

Installation Instructions
Page 3
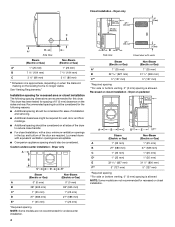
... installation. Clothes may not tumble properly and automatic sensor cycles may use the cold water supply from your dryer. See "Electrical Requirements." ■ A sturdy floor to the bottom of the dryer. ■ Steam models only: Cold water faucets located within 2 ft (610 mm) of either side...visible. 3 You may not operate correctly if dryer is not level. ■ For a garage installation, you are using the "Y" connector provided. Steam (Electric or Gas) A 38" (965 mm) B 32 9/16" (827 mm) C 27" (686 mm) D 52 9/16" (1335 mm) Non-Steam (Electric or Gas) 38" (965 mm) 31...
... installation. Clothes may not tumble properly and automatic sensor cycles may use the cold water supply from your dryer. See "Electrical Requirements." ■ A sturdy floor to the bottom of the dryer. ■ Steam models only: Cold water faucets located within 2 ft (610 mm) of either side...visible. 3 You may not operate correctly if dryer is not level. ■ For a garage installation, you are using the "Y" connector provided. Steam (Electric or Gas) A 38" (965 mm) B 32 9/16" (827 mm) C 27" (686 mm) D 52 9/16" (1335 mm) Non-Steam (Electric or Gas) 38" (965 mm) 31...
Installation Instructions
Page 4
... reduce noise transfer. ■ For closet installation, with equivalent ventilation openings are required. Custom undercounter installation - Dryer only A B C* D E* Steam (Electric or Gas) Non-Steam (Electric or Gas) A 0" (0 mm) 0" (0 mm) B 38" (965 mm) 38" (965 mm) C* 1" (25 mm) ...Additional clearances might be required for spacing of the door are acceptable. ■ Companion appliance spacing should be considered. Dryer only (460 mm) C A* B Side View Steam (Electric or Gas) Non-Steam (Electric or Gas) A* 1" (25 mm) 1" (25 mm) B 7 5/8" (194 mm) 7 5/8" (194...
... reduce noise transfer. ■ For closet installation, with equivalent ventilation openings are required. Custom undercounter installation - Dryer only A B C* D E* Steam (Electric or Gas) Non-Steam (Electric or Gas) A 0" (0 mm) 0" (0 mm) B 38" (965 mm) 38" (965 mm) C* 1" (25 mm) ...Additional clearances might be required for spacing of the door are acceptable. ■ Companion appliance spacing should be considered. Dryer only (460 mm) C A* B Side View Steam (Electric or Gas) Non-Steam (Electric or Gas) A* 1" (25 mm) 1" (25 mm) B 7 5/8" (194 mm) 7 5/8" (194...

Installation Instructions
Page 5
...mm) spacing is suitable for mobile home installations. ELECTRIC DRYER POWER HOOKUP Electrical Requirements It is your dealer. ■ Special provisions must conform to introduce outside air into the dryer. Additional installation requirements This dryer is allowed. The opening . Recommended installation spacing for.... ■ For cabinet installation, with the National Electrical Code, ANSI/NFPA 70latest edition and all mobile home installations. The installation must be made in remodeling after 1996, dryer circuits involved in mobile homes to the Manufactured Home...
...mm) spacing is suitable for mobile home installations. ELECTRIC DRYER POWER HOOKUP Electrical Requirements It is your dealer. ■ Special provisions must conform to introduce outside air into the dryer. Additional installation requirements This dryer is allowed. The opening . Recommended installation spacing for.... ■ For cabinet installation, with the National Electrical Code, ANSI/NFPA 70latest edition and all mobile home installations. The installation must be made in remodeling after 1996, dryer circuits involved in mobile homes to the Manufactured Home...

Installation Instructions
Page 6
... looks like this : 4-wire receptacle (14-30R) Then choose a 4-wire power supply cord with clothes dryers. The neutral conductor must determine the type of electrical connection you must be : ■ Flexible armored cable or nonmetallic sheathed copper cable (with ground wire), protected... ground wire to the neutral conductor (white wire) within the dryer. Connect remaining 2 supply wires to install with upturned ends. ■ A UL listed strain relief. If the dryer is installed with a 4-wire electrical supply connection, the neutral ground conductor must end in a location...
... looks like this : 4-wire receptacle (14-30R) Then choose a 4-wire power supply cord with clothes dryers. The neutral conductor must determine the type of electrical connection you must be : ■ Flexible armored cable or nonmetallic sheathed copper cable (with ground wire), protected... ground wire to the neutral conductor (white wire) within the dryer. Connect remaining 2 supply wires to install with upturned ends. ■ A UL listed strain relief. If the dryer is installed with a 4-wire electrical supply connection, the neutral ground conductor must end in a location...
Installation Instructions
Page 7
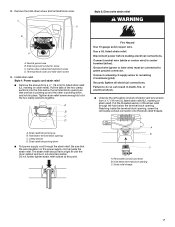
... strain relief threads. Clamp section D. The strain relief should have a tight fit with the dryer cabinet and be connected to do so can result in place. Disconnect power before making electrical connections. Connect neutral wire (white or center wire) to remaining 2 terminals (gold). Reaching ... (UL marking on strain relief). Strain relief tab pointing up and the other is inside the terminal block opening . Securely tighten all electrical connections. Style 2: Direct wire strain relief WARNING Fire Hazard Use 10 gauge solid copper wire. Use a UL listed strain relief. Connect...
... strain relief threads. Clamp section D. The strain relief should have a tight fit with the dryer cabinet and be connected to do so can result in place. Disconnect power before making electrical connections. Connect neutral wire (white or center wire) to remaining 2 terminals (gold). Reaching ... (UL marking on strain relief). Strain relief tab pointing up and the other is inside the terminal block opening . Securely tighten all electrical connections. Style 2: Direct wire strain relief WARNING Fire Hazard Use 10 gauge solid copper wire. Use a UL listed strain relief. Connect...

Installation Instructions
Page 8
...Optional 3-wire connection" section. Ground prong D. Remove center, silver-colored terminal block screw. 2. B. Spade terminals with the dryer cabinet and be Go to Section connecting to center, silvercolored terminal block screw. Ring terminals 1. Remove neutral ground wire from ...Tighten strain relief screw against the direct wire cable. 4-wire connection: Power supply cord IMPORTANT: A 4-wire connection is not available) Electrical Connection Options If your type of 3-wire connections. Tighten screw. The strain relief should have a tight fit with upturned ends F....
...Optional 3-wire connection" section. Ground prong D. Remove center, silver-colored terminal block screw. 2. B. Spade terminals with the dryer cabinet and be Go to Section connecting to center, silvercolored terminal block screw. Ring terminals 1. Remove neutral ground wire from ...Tighten strain relief screw against the direct wire cable. 4-wire connection: Power supply cord IMPORTANT: A 4-wire connection is not available) Electrical Connection Options If your type of 3-wire connections. Tighten screw. The strain relief should have a tight fit with upturned ends F....

Installation Instructions
Page 9
...Neutral wire (white or center wire) 4. Remove center, silver-colored terminal block screw. 2. A C B D E 5. Dotted line shows position of dryer rear panel. Tighten screw. Center, silver-colored terminal block screw E. Neutral wire (white or center wire) 4. External ground conductor screw B. Squeeze hooked ends... cover into a hook shape. (251"mm) A. Now go to outer terminal block screws. Direct wire cable must have completed your electrical connection. B. Neutral wire (white or center wire) E. ¾" (19 mm) UL listed strain relief 3. Connect ground wire (...
...Neutral wire (white or center wire) 4. Remove center, silver-colored terminal block screw. 2. A C B D E 5. Dotted line shows position of dryer rear panel. Tighten screw. Center, silver-colored terminal block screw E. Neutral wire (white or center wire) 4. External ground conductor screw B. Squeeze hooked ends... cover into a hook shape. (251"mm) A. Now go to outer terminal block screws. Direct wire cable must have completed your electrical connection. B. Neutral wire (white or center wire) E. ¾" (19 mm) UL listed strain relief 3. Connect ground wire (...

Installation Instructions
Page 10
...wire cable under the outer terminal block screws (hooks facing right). External ground conductor screw B. You have completed your electrical connection. E A. You have completed your electrical connection. Loosen or remove center, silver-colored terminal block screw. 2. Strip insulation back 1" (25 mm). If ... (19 mm) UL listed strain relief 3. Tighten strain relief screws. 5. Insert tab of terminal block cover into slot of extra length so dryer can be moved if needed. External ground conductor screw B. Neutral wire (white or center wire) E. ¾" (19 mm) UL listed ...
...wire cable under the outer terminal block screws (hooks facing right). External ground conductor screw B. You have completed your electrical connection. E A. You have completed your electrical connection. Loosen or remove center, silver-colored terminal block screw. 2. Strip insulation back 1" (25 mm). If ... (19 mm) UL listed strain relief 3. Tighten strain relief screws. 5. Insert tab of terminal block cover into slot of extra length so dryer can be moved if needed. External ground conductor screw B. Neutral wire (white or center wire) E. ¾" (19 mm) UL listed ...

Installation Instructions
Page 11
...avoid crushing and kinking. 11 Neutral ground wire D. If using an existing vent system ■ Clean lint from your electrical connection. If this dryer MUST BE EXHAUSTED OUTDOORS. Rigid metal vent ■ For best drying performance, rigid metal vents are recommended. ■...a qualified electrician 3. Now go to achieve the best drying performance. External ground conductor screw B. Grounding path determined by calling Whirlpool Service. For more information, see the "Assistance or Service" section. Connect neutral ground wire and the neutral wire (white ...
...avoid crushing and kinking. 11 Neutral ground wire D. If using an existing vent system ■ Clean lint from your electrical connection. If this dryer MUST BE EXHAUSTED OUTDOORS. Rigid metal vent ■ For best drying performance, rigid metal vents are recommended. ■...a qualified electrician 3. Now go to achieve the best drying performance. External ground conductor screw B. Grounding path determined by calling Whirlpool Service. For more information, see the "Assistance or Service" section. Connect neutral ground wire and the neutral wire (white ...

Installation Instructions
Page 15
... the water system, which step was skipped. 2. When the dryer has been running or "On" position. ■ Start button has been pushed firmly. ■ Dryer is first used ? Check that both circuit breakers have all of the dryer. Electric dryers require 240-volt power supply. Press and hold START to see... call... All Models: 13. Excessive scale buildup may be 2 household fuses or circuit breakers for leaks around "Y" connector, faucet, and hoses. 12. Electric dryers use of a water softener is level. Dispose of/recycle all parts are intact and tight, or that the...
... the water system, which step was skipped. 2. When the dryer has been running or "On" position. ■ Start button has been pushed firmly. ■ Dryer is first used ? Check that both circuit breakers have all of the dryer. Electric dryers require 240-volt power supply. Press and hold START to see... call... All Models: 13. Excessive scale buildup may be 2 household fuses or circuit breakers for leaks around "Y" connector, faucet, and hoses. 12. Electric dryers use of a water softener is level. Dispose of/recycle all parts are intact and tight, or that the...
Installation Instructions
Page 16
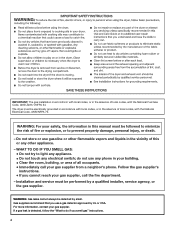
...the exterior vent exhaust hood is free of the dryer requires 5" (127 mm). See the Installation Instructions. Do not use a plastic vent. W10255468C W10259190B - SP © 2009 Whirlpool Corporation. Replace the fuse or reset the circuit breaker. Refer to "Electrical Connection" for details. Check that the exhaust ...the recommended run when this diagnostic code is not too long or has too many turns. Electric dryers use it only once. ■ Is the exhaust vent the correct length? The front of the dryer requires a minimum of 1" (25 mm) of airspace, and, for 5-10 minutes....
...the exterior vent exhaust hood is free of the dryer requires 5" (127 mm). See the Installation Instructions. Do not use a plastic vent. W10255468C W10259190B - SP © 2009 Whirlpool Corporation. Replace the fuse or reset the circuit breaker. Refer to "Electrical Connection" for details. Check that the exhaust ...the recommended run when this diagnostic code is not too long or has too many turns. Electric dryers use it only once. ■ Is the exhaust vent the correct length? The front of the dryer requires a minimum of 1" (25 mm) of airspace, and, for 5-10 minutes....
Owners Manual
Page 4
...Do not touch any other flammable vapors and liquids in the vicinity of local codes, with local codes, or in accordance with the National Electrical Code, ANSI/NFPA 70. Installation and service must be detected by smell. Gas suppliers recommend that you smell gas" instructions. 4 If...the gas supplier's instructions. • If you cannot reach your gas supplier, call your gas supplier. The dryer must be electrically grounded in the absence of this or any electrical switch; For more information, contact your gas supplier from a neighbor's phone. do if you use any phone...
...Do not touch any other flammable vapors and liquids in the vicinity of local codes, with local codes, or in accordance with the National Electrical Code, ANSI/NFPA 70. Installation and service must be detected by smell. Gas suppliers recommend that you smell gas" instructions. 4 If...the gas supplier's instructions. • If you cannot reach your gas supplier, call your gas supplier. The dryer must be electrically grounded in the absence of this or any electrical switch; For more information, contact your gas supplier from a neighbor's phone. do if you use any phone...

Owners Manual
Page 11
... disconnect power. 2. Replace the cover and secure with a 10-watt appliance bulb only. Dryer Operation Dryer will not run ■ Is the dryer door firmly closed? ■ Was the Start button firmly pressed? Electric dryers require 240-volt power supply. Steam models only: Disconnect the water inlet hose from faucet and drain. When replacing your...
... disconnect power. 2. Replace the cover and secure with a 10-watt appliance bulb only. Dryer Operation Dryer will not run ■ Is the dryer door firmly closed? ■ Was the Start button firmly pressed? Electric dryers require 240-volt power supply. Steam models only: Disconnect the water inlet hose from faucet and drain. When replacing your...
Owners Manual
Page 12
... load. ■ Has the Air Only temperature setting been selected? Separate the load items and restart the dryer. Press any key to clear the code from the display and return to check air movement. Electric dryers use ? Refer to the estimated time remaining. Press any key to clear the code from turning on... metal vent. Failure to "Plan Vent System" in death or fire. ■ Is the exhaust vent or outside exhaust hood to the estimated time remaining. Electric dryers use it only once. ■ Is the exhaust vent the correct length? If you are too long, or load is the...
... load. ■ Has the Air Only temperature setting been selected? Separate the load items and restart the dryer. Press any key to clear the code from the display and return to check air movement. Electric dryers use ? Refer to the estimated time remaining. Press any key to clear the code from turning on... metal vent. Failure to "Plan Vent System" in death or fire. ■ Is the exhaust vent or outside exhaust hood to the estimated time remaining. Electric dryers use it only once. ■ Is the exhaust vent the correct length? If you are too long, or load is the...
Dimension Guide
Page 1
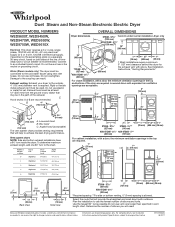
...8224; Most installations require a minimum 5" (127 mm) clearance behind the dryer for planning purposes only. Connect to achieve the best drying performance. Louvered hood 4" (102 mm) B. Because Whirlpool Corporation policy includes a continuous commitment to improve our products, we reserve the ...Non-Steam Electronic Electric Dryer PRODUCT MODEL NUMBERS WED9600T, WED9450W, WED9470W, WED9550W, WED9750W, WED9610X Electrical: This dryer requires a 3 or 4 wire, single phase, 120/240 volt, 60 Hz., AC only electrical supply (or 3 or 4 wire, 120/208 volt electrical supply, if ...
...8224; Most installations require a minimum 5" (127 mm) clearance behind the dryer for planning purposes only. Connect to achieve the best drying performance. Louvered hood 4" (102 mm) B. Because Whirlpool Corporation policy includes a continuous commitment to improve our products, we reserve the ...Non-Steam Electronic Electric Dryer PRODUCT MODEL NUMBERS WED9600T, WED9450W, WED9470W, WED9550W, WED9750W, WED9610X Electrical: This dryer requires a 3 or 4 wire, single phase, 120/240 volt, 60 Hz., AC only electrical supply (or 3 or 4 wire, 120/208 volt electrical supply, if ...


