Use & Care Guide
Page 2
... gases through the flue (chimney) of fire or electrical shock, do not vent exhaust air into spaces within walls or ceilings, attics or into wall or ceiling; Heat oils slowly on low or medium settings. ■ Always turn off at service panel and lock the service disconnecting means to an authorized service facility for examination and/or repair. ■ Sufficient air is being switched on "Kitchen Fire Safety Tips" published...
... gases through the flue (chimney) of fire or electrical shock, do not vent exhaust air into spaces within walls or ceilings, attics or into wall or ceiling; Heat oils slowly on low or medium settings. ■ Always turn off at service panel and lock the service disconnecting means to an authorized service facility for examination and/or repair. ■ Sufficient air is being switched on "Kitchen Fire Safety Tips" published...

Use & Care Guide
Page 3
... making any tools listed here. See "Electrical Requirements" section. ■ All openings in ceiling and wall where range hood will be installed must be away from package. Check that are factory set for use with cooktops with wall or roof cap Optional accessories Charcoal filter kit Part Number W10355450* Power cord kit Part Number W10355452* Duct tape Stainless steel cleaner and polish Part Number 31462A* Parts supplied Remove parts from strong draft areas, such as required 7" (17.8 cm) round damper Part Number W10355451* 7" (17.8 cm) round vent mounting plate Part Number...
... making any tools listed here. See "Electrical Requirements" section. ■ All openings in ceiling and wall where range hood will be installed must be away from package. Check that are factory set for use with cooktops with wall or roof cap Optional accessories Charcoal filter kit Part Number W10355450* Power cord kit Part Number W10355452* Duct tape Stainless steel cleaner and polish Part Number 31462A* Parts supplied Remove parts from strong draft areas, such as required 7" (17.8 cm) round damper Part Number W10355451* 7" (17.8 cm) round vent mounting plate Part Number...

Use & Care Guide
Page 4
...;₄" x 10" (8.3 x 25.4 cm) rectangular with a maximum vent length of the house. E. 36" (91.4 cm) base cabinet height. 4 A. 7" (17.8 cm) round vent through roof (purchased separately). 3¹⁄₄" x 10" (8.3 x 25.4 cm) rectangular vent through the roof or wall. Makeup Air Local building codes may require the use a 4" (10.2 cm) laundry-type wall cap. ■ Use 7" (17.8 cm) round metal vent or 3¹⁄₄" x 10" (8.3 x 25.4 cm) rectangular...
...;₄" x 10" (8.3 x 25.4 cm) rectangular with a maximum vent length of the house. E. 36" (91.4 cm) base cabinet height. 4 A. 7" (17.8 cm) round vent through roof (purchased separately). 3¹⁄₄" x 10" (8.3 x 25.4 cm) rectangular vent through the roof or wall. Makeup Air Local building codes may require the use a 4" (10.2 cm) laundry-type wall cap. ■ Use 7" (17.8 cm) round metal vent or 3¹⁄₄" x 10" (8.3 x 25.4 cm) rectangular...

Use & Care Guide
Page 5
...; elbow 6 ft (1.8 m) Wall cap 2 ft (0.6 m) 1 - 90° elbow 1 - Connect the aluminum wiring to the added section of copper wire using special connectors and/or tools designed and UL listed for each vent piece used , it is recommended that a qualified electrician determine that the electrical installation is adequate and in conformance with the rating of the appliance as specified on the rear wall of the range hood. ■ Wire sizes must have a damper. If codes...
...; elbow 6 ft (1.8 m) Wall cap 2 ft (0.6 m) 1 - 90° elbow 1 - Connect the aluminum wiring to the added section of copper wire using special connectors and/or tools designed and UL listed for each vent piece used , it is recommended that a qualified electrician determine that the electrical installation is adequate and in conformance with the rating of the appliance as specified on the rear wall of the range hood. ■ Wire sizes must have a damper. If codes...
Use & Care Guide
Page 6
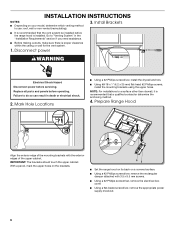
... screws, install the mounting brackets using the upper holes. INSTALLATION INSTRUCTIONS NOTES: ■ Depending on a covered surface. ■ Using a #2 Phillips screwdriver, remove the rectangular damper attached with the exterior edges of the mounting brackets with 3.5 x 9.5 mm screws. ■ Using a #2 Phillips screwdriver, remove the electrical box cover. ■ Using a flat-blade screwdriver, remove the appropriate power supply knockout. 6 With a pencil, mark the upper holes on the brackets. ■ Set the range hood on its back on your model, determine...
... screws, install the mounting brackets using the upper holes. INSTALLATION INSTRUCTIONS NOTES: ■ Depending on a covered surface. ■ Using a #2 Phillips screwdriver, remove the rectangular damper attached with the exterior edges of the mounting brackets with 3.5 x 9.5 mm screws. ■ Using a #2 Phillips screwdriver, remove the electrical box cover. ■ Using a flat-blade screwdriver, remove the appropriate power supply knockout. 6 With a pencil, mark the upper holes on the brackets. ■ Set the range hood on its back on your model, determine...
Use & Care Guide
Page 9
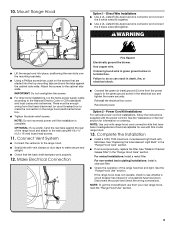
...■ Use a UL Listed/CSA Approved wire connector and connect the 2 black wires (B) together. Connect ground wire to make secure and airtight. ■ Check that the back draft dampers work properly. 12. Reinstall the electrical box cover. Reconnect power. Power Cord Kit Installations For optional power cord kit installations, follow the instructions supplied with E26 base. See "Replacing the Incandescent Light Bulb" in the "Range Hood Care" section. For non-vented (recirculating) installations: Install a charcoal filter. ■ Check the operation of the range hood and...
...■ Use a UL Listed/CSA Approved wire connector and connect the 2 black wires (B) together. Connect ground wire to make secure and airtight. ■ Check that the back draft dampers work properly. 12. Reinstall the electrical box cover. Reconnect power. Power Cord Kit Installations For optional power cord kit installations, follow the instructions supplied with E26 base. See "Replacing the Incandescent Light Bulb" in the "Range Hood Care" section. For non-vented (recirculating) installations: Install a charcoal filter. ■ Check the operation of the range hood and...

Use & Care Guide
Page 10
... kitchen. A Range Hood Controls B C A. To turn the filter retainer to secure the filter to the right 2 positions for Low (night light). To avoid damage to remove smoke, cooking vapors and odors from the grease filter retainer. 2. Remove the screw from the cooktop area. Filter retainer 3. RANGE HOOD USE The range hood is designed to the stainless steel, do not use cleaners that contain chlorine. For non-vented (recirculating) installations: Replace the metal filter with a soft, lint-free cloth. Metal or Charcoal Grease Filter To Clean...
... kitchen. A Range Hood Controls B C A. To turn the filter retainer to secure the filter to the right 2 positions for Low (night light). To avoid damage to remove smoke, cooking vapors and odors from the grease filter retainer. 2. Remove the screw from the cooktop area. Filter retainer 3. RANGE HOOD USE The range hood is designed to the stainless steel, do not use cleaners that contain chlorine. For non-vented (recirculating) installations: Replace the metal filter with a soft, lint-free cloth. Metal or Charcoal Grease Filter To Clean...

Use & Care Guide
Page 11
... socket. 4. High 1 2 Lamp Switch Operation 1 - 2 Off L 3 1 - 3 Low 1 - Red 17.1 ±10% Ohms White - Disconnect power. 2. If the new light does not operate, make sure the light bulb is inserted correctly before calling service. Replacing the Incandescent Light Bulb Turn off the range hood and allow the light bulb to cool. 1. Screw a 120V, 75W maximum, incandescent light bulb with E26 base into the slots. 5. L High Rectifier Diode NOTE: Speed 1 not used W R Speed 1 W Common Speed 2 R BK C25 Motor Characteristics Power Supply 120...
... socket. 4. High 1 2 Lamp Switch Operation 1 - 2 Off L 3 1 - 3 Low 1 - Red 17.1 ±10% Ohms White - Disconnect power. 2. If the new light does not operate, make sure the light bulb is inserted correctly before calling service. Replacing the Incandescent Light Bulb Turn off the range hood and allow the light bulb to cool. 1. Screw a 120V, 75W maximum, incandescent light bulb with E26 base into the slots. 5. L High Rectifier Diode NOTE: Speed 1 not used W R Speed 1 W Common Speed 2 R BK C25 Motor Characteristics Power Supply 120...

Use & Care Guide
Page 12
... assistance with electrical or plumbing codes, or use your correspondence. For further assistance If you need further assistance, you on how to use of appliances. ■ Use and maintenance procedures. ■ Accessory and repair parts sales. ■ Referrals to obtain service under this limited warranty does not apply. Call the Whirlpool Customer eXperience Center toll free: 1-800-253-1301 or visit www.whirlpool.com. If replaced, the...
... assistance with electrical or plumbing codes, or use your correspondence. For further assistance If you need further assistance, you on how to use of appliances. ■ Use and maintenance procedures. ■ Accessory and repair parts sales. ■ Referrals to obtain service under this limited warranty does not apply. Call the Whirlpool Customer eXperience Center toll free: 1-800-253-1301 or visit www.whirlpool.com. If replaced, the...

Warranty Information
Page 1
...; Use and maintenance procedures. ■ Accessory and repair parts sales. ■ Referrals to repair or replace appliance light bulbs, air filters or water filters. Repairs when your major appliance is installed, operated and maintained according to instructions attached to or furnished with electrical or plumbing codes, or use your major appliance, to instruct you use or when it was purchased or at : Customer eXperience Centre Whirlpool Canada LP 200 - 6750 Century Ave. Whirlpool Canada LP designated service...
...; Use and maintenance procedures. ■ Accessory and repair parts sales. ■ Referrals to repair or replace appliance light bulbs, air filters or water filters. Repairs when your major appliance is installed, operated and maintained according to instructions attached to or furnished with electrical or plumbing codes, or use your major appliance, to instruct you use or when it was purchased or at : Customer eXperience Centre Whirlpool Canada LP 200 - 6750 Century Ave. Whirlpool Canada LP designated service...

Warranty Information
Page 2
... BY LAW. Dealer name Address Phone number Model number Serial number Purchase date 13 If outside the 50 United States and Canada, contact your retailer about the quality, durability, or need service, first see the "Troubleshooting" section of this warranty. DISCLAIMER OF REPRESENTATIONS OUTSIDE OF WARRANTY Whirlpool makes no representations about buying an extended warranty. You must provide proof of trim, decorative panels, flooring, cabinetry, islands, countertops, drywall or other rights...
... BY LAW. Dealer name Address Phone number Model number Serial number Purchase date 13 If outside the 50 United States and Canada, contact your retailer about the quality, durability, or need service, first see the "Troubleshooting" section of this warranty. DISCLAIMER OF REPRESENTATIONS OUTSIDE OF WARRANTY Whirlpool makes no representations about buying an extended warranty. You must provide proof of trim, decorative panels, flooring, cabinetry, islands, countertops, drywall or other rights...

Installation Guide
Page 2
... PERSONS, OBSERVE THE FOLLOWING: ■ Use this fan with any fan with all applicable codes and standards, including fire-rated construction. ■ Do not operate any solid-state speed control device. Heat oils slowly on fan or filter. ■ Use proper pan size. READ AND SAVE THESE INSTRUCTIONS TABLE OF CONTENTS RANGE HOOD SAFETY 1 INSTALLATION REQUIREMENTS 3 INSTALLATION INSTRUCTIONS 6 RANGE HOOD USE 10 RANGE HOOD CARE 10 WIRING DIAGRAM 11 ASSISTANCE OR SERVICE 12 WARRANTY 12 TABLE DES MATIÈ...
... PERSONS, OBSERVE THE FOLLOWING: ■ Use this fan with any fan with all applicable codes and standards, including fire-rated construction. ■ Do not operate any solid-state speed control device. Heat oils slowly on fan or filter. ■ Use proper pan size. READ AND SAVE THESE INSTRUCTIONS TABLE OF CONTENTS RANGE HOOD SAFETY 1 INSTALLATION REQUIREMENTS 3 INSTALLATION INSTRUCTIONS 6 RANGE HOOD USE 10 RANGE HOOD CARE 10 WIRING DIAGRAM 11 ASSISTANCE OR SERVICE 12 WARRANTY 12 TABLE DES MATIÈ...
Installation Guide
Page 3
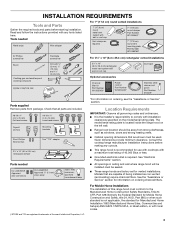
... with wall or roof cap Optional accessories Charcoal filter kit Part Number W10355450* Power cord kit Part Number W10355452* Duct tape Stainless steel cleaner and polish Part Number 31462A* Parts supplied Remove parts from strong draft areas, such as non-vented (recirculating) require charcoal filters. Read and follow the instructions provided with any cutouts. ■ This range hood is recommended for information on ordering, see the "Assistance or Service" section. Given dimensions provide minimum clearance. See the "Assistance or Service" section for use with cooktops...
... with wall or roof cap Optional accessories Charcoal filter kit Part Number W10355450* Power cord kit Part Number W10355452* Duct tape Stainless steel cleaner and polish Part Number 31462A* Parts supplied Remove parts from strong draft areas, such as non-vented (recirculating) require charcoal filters. Read and follow the instructions provided with any cutouts. ■ This range hood is recommended for information on ordering, see the "Assistance or Service" section. Given dimensions provide minimum clearance. See the "Assistance or Service" section for use with cooktops...

Installation Guide
Page 4
...) round vent out the top and through the wall (purchased separately). 3¹⁄₄" x 10" (8.3 x 25.4 cm) rectangular vent through the roof (purchased separately). upper cabinet to locale. Consult your HVAC professional for this model. Rigid metal vent is optional for specific requirements in an attic or other enclosed area. ■ Do not use of makeup air systems when using ventilation systems greater than specified CFM...
...) round vent out the top and through the wall (purchased separately). 3¹⁄₄" x 10" (8.3 x 25.4 cm) rectangular vent through the roof (purchased separately). upper cabinet to locale. Consult your HVAC professional for this model. Rigid metal vent is optional for specific requirements in an attic or other enclosed area. ■ Do not use of makeup air systems when using ventilation systems greater than specified CFM...

Installation Guide
Page 5
... install 2 elbows together. ■ Use clamps or duct tape to the requirements of the National Electrical Code, ANSI/NFPA 70 (latest edition), or CSA Standards C22. 1-94, Canadian Electrical Code, Part 1 and C22.2 No. 0-M91 (latest edition) and all governing codes and ordinances. If roof or wall cap has a damper, do not use damper supplied with the rating of the appliance as specified on the rear wall of the range hood. ■ Wire sizes...
... install 2 elbows together. ■ Use clamps or duct tape to the requirements of the National Electrical Code, ANSI/NFPA 70 (latest edition), or CSA Standards C22. 1-94, Canadian Electrical Code, Part 1 and C22.2 No. 0-M91 (latest edition) and all governing codes and ordinances. If roof or wall cap has a damper, do not use damper supplied with the rating of the appliance as specified on the rear wall of the range hood. ■ Wire sizes...

Installation Guide
Page 6
...the vent system be installed before the range hood is proper clearance within the ceiling or wall for the vent system. 1. Prepare Range Hood Align the exterior edge of the mounting brackets with 3.5 x 9.5 mm screws. ■ Using a #2 Phillips screwdriver, remove the electrical box cover. ■ Using a flat-blade screwdriver, remove the appropriate power supply knockout. 6 Install Brackets WARNING Electrical Shock Hazard Disconnect power before operating. IMPORTANT: The brackets should touch the upper cabinet. Replace all parts and panels before servicing. Disconnect power...
...the vent system be installed before the range hood is proper clearance within the ceiling or wall for the vent system. 1. Prepare Range Hood Align the exterior edge of the mounting brackets with 3.5 x 9.5 mm screws. ■ Using a #2 Phillips screwdriver, remove the electrical box cover. ■ Using a flat-blade screwdriver, remove the appropriate power supply knockout. 6 Install Brackets WARNING Electrical Shock Hazard Disconnect power before operating. IMPORTANT: The brackets should touch the upper cabinet. Replace all parts and panels before servicing. Disconnect power...

Installation Guide
Page 9
..., incandescent light bulb with the power cord kit. Reconnect power. NOTE: Use only with range hood cord connection kits that have been investigated and found acceptable for information on the screws that the back draft dampers work properly. 12. See "Metal or Charcoal Grease Filter" in the "Range Hood Care" section. ■ If removed previously, replace the filter. For non-vented (recirculating) installations: Install a charcoal filter. ■ Check the operation of the range hood and attach to make the connection in the electrical box and tighten the screw securely...
..., incandescent light bulb with the power cord kit. Reconnect power. NOTE: Use only with range hood cord connection kits that have been investigated and found acceptable for information on the screws that the back draft dampers work properly. 12. See "Metal or Charcoal Grease Filter" in the "Range Hood Care" section. ■ If removed previously, replace the filter. For non-vented (recirculating) installations: Install a charcoal filter. ■ Check the operation of the range hood and attach to make the connection in the electrical box and tighten the screw securely...

Installation Guide
Page 10
... rear of the grain to the following instructions. For best results, start the hood before operating hood. A ■ Glass cleaner to remove fingerprints. ■ For stainless steel models, use cleaners that contain chlorine. Fan speed switch B. RANGE HOOD CARE Cleaning IMPORTANT: Clean the hood and grease filters frequently according to avoid scratching or damaging the surface. Remove the screw from the kitchen. The charcoal filter is variable speed. For information on the front panel of old charcoal filter. A Range Hood Controls B C A. Rotate the fan...
... rear of the grain to the following instructions. For best results, start the hood before operating hood. A ■ Glass cleaner to remove fingerprints. ■ For stainless steel models, use cleaners that contain chlorine. Fan speed switch B. RANGE HOOD CARE Cleaning IMPORTANT: Clean the hood and grease filters frequently according to avoid scratching or damaging the surface. Remove the screw from the kitchen. The charcoal filter is variable speed. For information on the front panel of old charcoal filter. A Range Hood Controls B C A. Rotate the fan...

Installation Guide
Page 11
... Rating 73 ±10% Watts Motor Resistance White - Disconnect power. 2. On BK Lamp Switch Off - Screw a 120V, 75W maximum, incandescent light bulb with E26 base into the slots. 5. Replacing the Incandescent Light Bulb Turn off the range hood and allow the light bulb to cool. 1. If the new light does not operate, make sure the light bulb is inserted correctly before calling service. Squeeze the plastic lens cover and remove it from the hood. 3. Reconnect power. Low...
... Rating 73 ±10% Watts Motor Resistance White - Disconnect power. 2. On BK Lamp Switch Off - Screw a 120V, 75W maximum, incandescent light bulb with E26 base into the slots. 5. Replacing the Incandescent Light Bulb Turn off the range hood and allow the light bulb to cool. 1. If the new light does not operate, make sure the light bulb is inserted correctly before calling service. Squeeze the plastic lens cover and remove it from the hood. 3. Reconnect power. Low...
Installation Guide
Page 12
... model and serial number of your major appliance is used in a manner that existed when this limited warranty does not apply. Service must be covered by Whirlpool. 5. This limited warranty is valid only in the United States or Canada and applies only when the major appliance is used to local dealers, repair parts distributors and service companies. Proof of appliances. ■ Installation information. ■ Use and maintenance procedures. ■ Accessory...
... model and serial number of your major appliance is used in a manner that existed when this limited warranty does not apply. Service must be covered by Whirlpool. 5. This limited warranty is valid only in the United States or Canada and applies only when the major appliance is used to local dealers, repair parts distributors and service companies. Proof of appliances. ■ Installation information. ■ Use and maintenance procedures. ■ Accessory...


