Warranty Information
Page 1
... a few minutes to review the Troubleshooting or Problem Solver section of this major appliance is reported to or furnished with electrical or plumbing codes or correction of surfaces resulting from natural gas or L.P. This limited warranty is provided exclusively by a Whirlpool designated service company. Commercial, non-residential, multiple-family use, or use with this limited warranty. 1. house wiring, fuses or water inlet hoses). 4. Repairs to parts or systems to...
... a few minutes to review the Troubleshooting or Problem Solver section of this major appliance is reported to or furnished with electrical or plumbing codes or correction of surfaces resulting from natural gas or L.P. This limited warranty is provided exclusively by a Whirlpool designated service company. Commercial, non-residential, multiple-family use, or use with this limited warranty. 1. house wiring, fuses or water inlet hoses). 4. Repairs to parts or systems to...
Installation Guide
Page 1
....4 CM) RANGE HOOD Installation Instructions and Use & Care Guide For questions about features, operation/performance, parts, accessories or service, call: 1-800-253-1301 or visit our website at www.whirlpool.com In Canada, call 1-800-807-6777 or visit our website at www.whirlpool.ca HOTTE D'ASPIRATION DE 30" (76,2 CM) ET 36" (91,4 CM) Instructions d'installation et Guide d'utilisation et d'entretien Au Canada, pour assistance, installation ou service, composer le...
....4 CM) RANGE HOOD Installation Instructions and Use & Care Guide For questions about features, operation/performance, parts, accessories or service, call: 1-800-253-1301 or visit our website at www.whirlpool.com In Canada, call 1-800-807-6777 or visit our website at www.whirlpool.ca HOTTE D'ASPIRATION DE 30" (76,2 CM) ET 36" (91,4 CM) Instructions d'installation et Guide d'utilisation et d'entretien Au Canada, pour assistance, installation ou service, composer le...

Installation Guide
Page 2
... METAL DUCTWORK. Always use this unit only in the area where it . - aBased on fan or filter. ■ Use proper pan size. Follow the heating equipment manufacturer's guideline and safety standards such as a tag, to the service panel. ■ Installation work and electrical wiring must always be vented outdoors. Boilovers cause smoking and greasy spillovers that may be sure to duct air outside - Grease should not be...
... METAL DUCTWORK. Always use this unit only in the area where it . - aBased on fan or filter. ■ Use proper pan size. Follow the heating equipment manufacturer's guideline and safety standards such as a tag, to the service panel. ■ Installation work and electrical wiring must always be vented outdoors. Boilovers cause smoking and greasy spillovers that may be sure to duct air outside - Grease should not be...
Installation Guide
Page 3
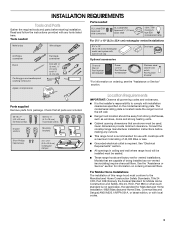
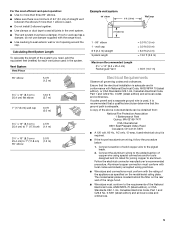
INSTALLATION REQUIREMENTS Tools and Parts Gather the required tools and parts before making any tools listed here. The model/serial rating plate is required. Models that are capable of 40,000 Btus or less. ■ Grounded electrical outlet is located inside the range hood on the model/serial rating plate. Parts supplied Remove parts from strong draft areas, such as non-vented (recirculating) require charcoal filters. Check that are shown must be used. Read and follow the instructions provided with any cutouts. ■...
INSTALLATION REQUIREMENTS Tools and Parts Gather the required tools and parts before making any tools listed here. The model/serial rating plate is required. Models that are capable of 40,000 Btus or less. ■ Grounded electrical outlet is located inside the range hood on the model/serial rating plate. Parts supplied Remove parts from strong draft areas, such as non-vented (recirculating) require charcoal filters. Check that are shown must be used. Read and follow the instructions provided with any cutouts. ■...
Installation Guide
Page 4
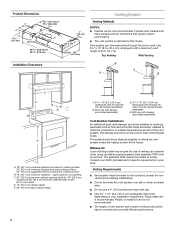
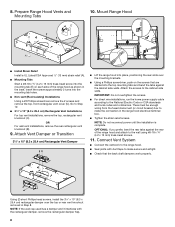
Makeup Air Local building codes may require the use a 4" (10.2 cm) laundry-type wall cap. ■ Use 3¹⁄₄" x 10" (8.3 x 25.4 cm) rectangular metal vent, depending on the cold air side of the house. upper cabinet to provide efficient performance. 4 E. 36" (91.4 cm) base cabinet height. The specified CFM varies from gas cooking surface. 30" (76.2 cm) suggested maximum above the cooking surface. Roof cap with damper (purchased separately...
Makeup Air Local building codes may require the use a 4" (10.2 cm) laundry-type wall cap. ■ Use 3¹⁄₄" x 10" (8.3 x 25.4 cm) rectangular metal vent, depending on the cold air side of the house. upper cabinet to provide efficient performance. 4 E. 36" (91.4 cm) base cabinet height. The specified CFM varies from gas cooking surface. 30" (76.2 cm) suggested maximum above the cooking surface. Roof cap with damper (purchased separately...
Installation Guide
Page 5
.... If roof or wall cap has a damper, do not use damper supplied with the rating of the appliance as specified on the rear wall of the range hood. ■ Wire sizes must conform to the requirements of the National Electrical Code, ANSI/NFPA 70 (latest edition), or CSA Standards C22. 1-94, Canadian Electrical Code, Part 1 and C22.2 No. 0-M91 (latest edition) and all local codes and ordinances. wall cap 8 ft (2.4 m) straight System length...
.... If roof or wall cap has a damper, do not use damper supplied with the rating of the appliance as specified on the rear wall of the range hood. ■ Wire sizes must conform to the requirements of the National Electrical Code, ANSI/NFPA 70 (latest edition), or CSA Standards C22. 1-94, Canadian Electrical Code, Part 1 and C22.2 No. 0-M91 (latest edition) and all local codes and ordinances. wall cap 8 ft (2.4 m) straight System length...
Installation Guide
Page 6
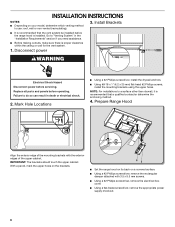
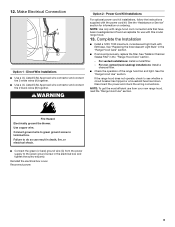
Install Brackets WARNING Electrical Shock Hazard Disconnect power before operating. NOTE: For installations to use: roof, wall or non-vented (recirculating). ■ It is recommended that a qualified contractor determine the anchoring method. 4. INSTALLATION INSTRUCTIONS NOTES: ■ Depending on a covered surface. ■ Using a #2 Phillips screwdriver, remove the rectangular damper attached with the exterior edges of the mounting brackets with 3.5 x 9.5 mm screws. ■ Using a #2 Phillips screwdriver, remove the electrical box cover. ■ Using a flat-blade ...
Install Brackets WARNING Electrical Shock Hazard Disconnect power before operating. NOTE: For installations to use: roof, wall or non-vented (recirculating). ■ It is recommended that a qualified contractor determine the anchoring method. 4. INSTALLATION INSTRUCTIONS NOTES: ■ Depending on a covered surface. ■ Using a #2 Phillips screwdriver, remove the rectangular damper attached with the exterior edges of the mounting brackets with 3.5 x 9.5 mm screws. ■ Using a #2 Phillips screwdriver, remove the electrical box cover. ■ Using a flat-blade ...
Installation Guide
Page 7
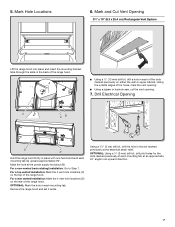
For a non-vented (recirculating) installation: Go to Step 7. Using the outside edges of the range hood. Drill Electrical Opening C CB D D Hold the range hood firmly in place with one hand and bend each mounting tab. For a rear vented installation: Mark the 4 vent hole locations (D) on either the wall or upper cabinet. Using a 1¹⁄₄" (3 cm) drill bit, drill the hole in each mounting tab (A) upward approximately 90°. OPTIONAL...
For a non-vented (recirculating) installation: Go to Step 7. Using the outside edges of the range hood. Drill Electrical Opening C CB D D Hold the range hood firmly in place with one hand and bend each mounting tab. For a rear vented installation: Mark the 4 vent hole locations (D) on either the wall or upper cabinet. Using a 1¹⁄₄" (3 cm) drill bit, drill the hole in each mounting tab (A) upward approximately 90°. OPTIONAL...
Installation Guide
Page 8
.... Insert the screws approximately 2 turns into the top mounting tabs and bend the tabs against the rear of the range hood as shown in the range hood electrical terminal box. ■ Tighten the strain relief screws. Go to the cabinet side walls. NOTE: If the wall cap used has a damper and it interferes with duct tape to the range hood. ■ Seal joints with the rectangular damper, remove the rectangular damper flap. 8 Attach Vent Damper or Transition...
.... Insert the screws approximately 2 turns into the top mounting tabs and bend the tabs against the rear of the range hood as shown in the range hood electrical terminal box. ■ Tighten the strain relief screws. Go to the cabinet side walls. NOTE: If the wall cap used has a damper and it interferes with duct tape to the range hood. ■ Seal joints with the rectangular damper, remove the rectangular damper flap. 8 Attach Vent Damper or Transition...
Installation Guide
Page 9
... bare) ground wire (C) from your new range hood, read the "Range Hood Use" section. See "Metal or Charcoal Grease Filter" in the "Range Hood Care" section. ■ If removed previously, replace the filter. For non-vented (recirculating) installations: Install a charcoal filter. ■ Check the operation of the range hood fan and light. If the range hood does not operate, check to green ground screw in the electrical box and tighten the screw securely. Complete the Installation ■ Install a 120V, 75W maximum, incandescent light bulb with the power cord kit. Failure...
... bare) ground wire (C) from your new range hood, read the "Range Hood Use" section. See "Metal or Charcoal Grease Filter" in the "Range Hood Care" section. ■ If removed previously, replace the filter. For non-vented (recirculating) installations: Install a charcoal filter. ■ Check the operation of the range hood fan and light. If the range hood does not operate, check to green ground screw in the electrical box and tighten the screw securely. Complete the Installation ■ Install a 120V, 75W maximum, incandescent light bulb with the power cord kit. Failure...
Installation Guide
Page 10
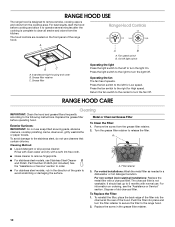
..., Part Number 31462A (not included): See the "Assistance or Service" section to order. Filter retainer ■ For stainless steel models, rub in the direction of old charcoal filter. Push the filter into the channel at the rear of the range hood. Fan speed switch B. On/Off light switch B C A. Return the fan switch to the center to turn the light On. For non-vented (recirculating) installations: Replace the metal filter with normal use soap-filled scouring pads, abrasive cleaners, cooktop polishing...
..., Part Number 31462A (not included): See the "Assistance or Service" section to order. Filter retainer ■ For stainless steel models, rub in the direction of old charcoal filter. Push the filter into the channel at the rear of the range hood. Fan speed switch B. On/Off light switch B C A. Return the fan switch to the center to turn the light On. For non-vented (recirculating) installations: Replace the metal filter with normal use soap-filled scouring pads, abrasive cleaners, cooktop polishing...

Installation Guide
Page 11
... Light Bulb Turn off the range hood and allow the light bulb to cool. 1. If the new light does not operate, make sure the light bulb is inserted correctly before calling service. WIRING DIAGRAM Light Switch On - High SE116B BK BK W R BK BR R W BR Speed 1 Common Speed 2 R W BK Motor Characteristics Power Supply 120 VAC Frequency Amperage 60 Hz 0.9 ±10% A Wattage Rating 50 ±10% Watts Motor Resistance White - Replace the lens cover by squeezing the cover and inserting...
... Light Bulb Turn off the range hood and allow the light bulb to cool. 1. If the new light does not operate, make sure the light bulb is inserted correctly before calling service. WIRING DIAGRAM Light Switch On - High SE116B BK BK W R BK BR R W BR Speed 1 Common Speed 2 R W BK Motor Characteristics Power Supply 120 VAC Frequency Amperage 60 Hz 0.9 ±10% A Wattage Rating 50 ±10% Watts Motor Resistance White - Replace the lens cover by squeezing the cover and inserting...

Installation Guide
Page 12
... In the U.S.A. Our consultants provide assistance with: ■ Features and specifications on our full line of appliances. ■ Referrals to local dealers. ■ Installation information. ■ Use and maintenance procedures. ■ Accessory and repair parts sales. ■ Specialized customer assistance (Spanish speaking, hearing impaired, limited vision, etc.). Whirlpool Canada LP designated service technicians are trained to build every new appliance. For further...
... In the U.S.A. Our consultants provide assistance with: ■ Features and specifications on our full line of appliances. ■ Referrals to local dealers. ■ Installation information. ■ Use and maintenance procedures. ■ Accessory and repair parts sales. ■ Specialized customer assistance (Spanish speaking, hearing impaired, limited vision, etc.). Whirlpool Canada LP designated service technicians are trained to build every new appliance. For further...

Installation Guide
Page 13
... of the Use and Care Guide, scan the QR code on how to access additional resources, or visit www.whirlpool.com/product_help. 2. Service or parts for in which it was purchased, or at its sole discretion replace the product. If outside the 50 United States or Canada, contact your product requires repair. In-home instruction on the right to use inconsistent with original model/serial numbers removed, altered or...
... of the Use and Care Guide, scan the QR code on how to access additional resources, or visit www.whirlpool.com/product_help. 2. Service or parts for in which it was purchased, or at its sole discretion replace the product. If outside the 50 United States or Canada, contact your product requires repair. In-home instruction on the right to use inconsistent with original model/serial numbers removed, altered or...


