Use and Care Guide
Page 1
or visit our website at... www.whirlpool.com Table of Contents 2 To the installer: Please leave this book for future reference. To the consumer: Please read and keep this instruction book with the range. W10110369 ® GAS RANGE Use & Care Guide For questions about features, operation/performance, parts, accessories or service, call: 1-800-253-1301.
or visit our website at... www.whirlpool.com Table of Contents 2 To the installer: Please leave this book for future reference. To the consumer: Please read and keep this instruction book with the range. W10110369 ® GAS RANGE Use & Care Guide For questions about features, operation/performance, parts, accessories or service, call: 1-800-253-1301.
Use and Care Guide
Page 2
...Cooktop Controls 6 Power Failure 6 Cooktop Lockout 6 Sealed Surface Burners 7 Home Canning 7 Cookware 7 ELECTRONIC OVEN CONTROLS 8 Display 8 Start 8 Off/Cancel 9 Clock 9 Range Lights 9 Tones 9 Fahrenheit and Celsius 9 Timer 9 Control Lockout 9 Add 1 Minute 10 Oven Temperature Control 10 OVEN USE 10 Aluminum Foil 10 Positioning Racks and ... 12 Oven Vent 12 Baking and Roasting 12 Broiling 12 Hold Warm Feature 13 Timed Cooking 14 Warming Drawer 15 RANGE CARE 16 Self-Cleaning Cycle 16 General Cleaning 17 Oven Light 19 Oven Door 19 Storage Drawer 19 Warming Drawer ...
...Cooktop Controls 6 Power Failure 6 Cooktop Lockout 6 Sealed Surface Burners 7 Home Canning 7 Cookware 7 ELECTRONIC OVEN CONTROLS 8 Display 8 Start 8 Off/Cancel 9 Clock 9 Range Lights 9 Tones 9 Fahrenheit and Celsius 9 Timer 9 Control Lockout 9 Add 1 Minute 10 Oven Temperature Control 10 OVEN USE 10 Aluminum Foil 10 Positioning Racks and ... 12 Oven Vent 12 Baking and Roasting 12 Broiling 12 Hold Warm Feature 13 Timed Cooking 14 Warming Drawer 15 RANGE CARE 16 Self-Cleaning Cycle 16 General Cleaning 17 Oven Light 19 Oven Door 19 Storage Drawer 19 Warming Drawer ...
Use and Care Guide
Page 3
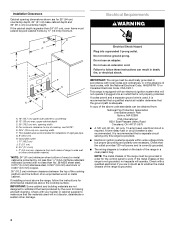
..., or other reproductive harm, and requires businesses to warn of others . This appliance can be performed by a qualified installer, service agency or the gas supplier. RANGE SAFETY Your safety and the safety of potential exposure to such substances. WARNING: This product contains a chemical known to the State of the substances listed...
..., or other reproductive harm, and requires businesses to warn of others . This appliance can be performed by a qualified installer, service agency or the gas supplier. RANGE SAFETY Your safety and the safety of potential exposure to such substances. WARNING: This product contains a chemical known to the State of the substances listed...
Use and Care Guide
Page 4
... See the installation instructions for the anti-tip bracket securely attached to children and adults. IMPORTANT SAFETY INSTRUCTIONS WARNING: To reduce the risk of a range - Doing so blocks air flow through the oven and may also trap heat, causing a fire hazard. children climbing on the backguard of fire,... other flammable vapors and liquids. Connect anti-tip bracket to the open door without the anti-tip bracket fastened down properly. Keep range area clear and free from the misuse of local codes, with materials such as aluminum foil. TO CHECK IF THE DEVICES ARE ...
... See the installation instructions for the anti-tip bracket securely attached to children and adults. IMPORTANT SAFETY INSTRUCTIONS WARNING: To reduce the risk of a range - Doing so blocks air flow through the oven and may also trap heat, causing a fire hazard. children climbing on the backguard of fire,... other flammable vapors and liquids. Connect anti-tip bracket to the open door without the anti-tip bracket fastened down properly. Keep range area clear and free from the misuse of local codes, with materials such as aluminum foil. TO CHECK IF THE DEVICES ARE ...
Use and Care Guide
Page 5
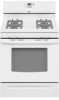
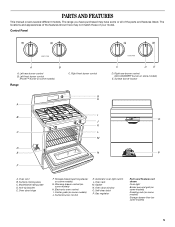
... front burner control (Power™ burner on some models) G. Self-clean latch P. The locations and appearances of the features shown here may have some models) Range C. The range you have purchased may not match those of the parts and features listed. Control Panel A B A. Right rear burner control (ACCUSIMMER® burner on some...
... front burner control (Power™ burner on some models) G. Self-clean latch P. The locations and appearances of the features shown here may have some models) Range C. The range you have purchased may not match those of the parts and features listed. Control Panel A B A. Right rear burner control (ACCUSIMMER® burner on some...
Use and Care Guide
Page 6
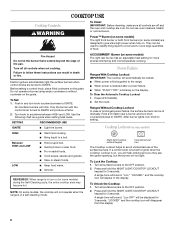
...the edge of prolonged power failure, the surface burners can be displayed for 3 seconds. All 4 surface burners will not operate when the range is blinking on the grate. Only the burner with the control knob turned to anywhere between HIGH and LOW. s When power is on... Before setting a control knob, place filled cookware on the display. Push in use oven cleaners, bleach or rust removers. Ranges Without Cooktop Lockout In case of the pan. REMEMBER: When range is first supplied to a boil. "Loc," "LOCKED," and the cooktop icon will disappear from the display. 6 s ...
...the edge of prolonged power failure, the surface burners can be displayed for 3 seconds. All 4 surface burners will not operate when the range is blinking on the grate. Only the burner with the control knob turned to anywhere between HIGH and LOW. s When power is on... Before setting a control knob, place filled cookware on the display. Push in use oven cleaners, bleach or rust removers. Ranges Without Cooktop Lockout In case of the pan. REMEMBER: When range is first supplied to a boil. "Loc," "LOCKED," and the cooktop icon will disappear from the display. 6 s ...
Use and Care Guide
Page 8
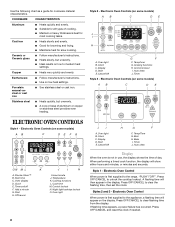
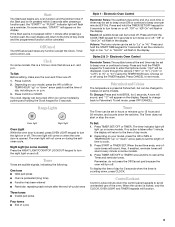
... display D. Start H. Night light/cooktop lockout O. Temp/Time G. Electronic Oven Control When power is first supplied to medium heat settings. Press OFF/CANCEL to the range, "PUSH"/"OFF". Electronic Oven Control When power is first supplied to unlock the cooktop lockout. s Medium or heavy thickness is not in the display. s Maintains...
... display D. Start H. Night light/cooktop lockout O. Temp/Time G. Electronic Oven Control When power is first supplied to medium heat settings. Press OFF/CANCEL to the range, "PUSH"/"OFF". Electronic Oven Control When power is first supplied to unlock the cooktop lockout. s Medium or heavy thickness is not in the display. s Maintains...
Use and Care Guide
Page 9
... once per minute (rEP On). will return to set in the display. Press TIMER SET/OFF or TIMER. and p.m. The clock display can be canceled. Range Lights Oven light Night light Oven Light While the oven door is taken after the end-of-cycle tones Three tones s Invalid pad press Four...
... once per minute (rEP On). will return to set in the display. Press TIMER SET/OFF or TIMER. and p.m. The clock display can be canceled. Range Lights Oven light Night light Oven Light While the oven door is taken after the end-of-cycle tones Three tones s Invalid pad press Four...
Use and Care Guide
Page 12
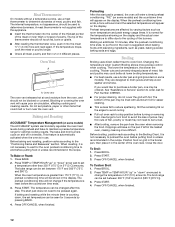
...to end before the countdown time ends. 3. s Trim excess fat to determine doneness of meat, poultry and fish. To Custom Broil: 1. The broil range can be set temperature can be lined with foil. Press OFF/CANCEL when finished. 12 Meat Thermometer On models without a temperature probe, use a meat...food. s Pull out oven rack to put food in intervals. Position food on and off in the oven is not necessary to maintain a precise temperature range for 5 seconds by varying factors such as yeast, baking powder, baking soda and eggs. To Broil: 1. Oven Vent A A. Oven vent The ...
...to end before the countdown time ends. 3. s Trim excess fat to determine doneness of meat, poultry and fish. To Custom Broil: 1. The broil range can be set temperature can be lined with foil. Press OFF/CANCEL when finished. 12 Meat Thermometer On models without a temperature probe, use a meat...food. s Pull out oven rack to put food in intervals. Position food on and off in the oven is not necessary to maintain a precise temperature range for 5 seconds by varying factors such as yeast, baking powder, baking soda and eggs. To Broil: 1. Oven Vent A A. Oven vent The ...
Use and Care Guide
Page 13
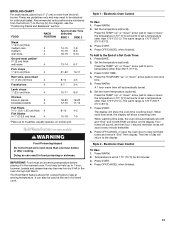
... then four 1-second reminder tones will automatically be used at serving temperature. Press OFF/CANCEL when finished. 13 The warm range is 170°F-200°F (75°C-93°C). 7. The warm range is 170°F-200°F (75°C-93°C). 3. The time of a Set Cook Time: 1. Press START. 4. Press the...
... then four 1-second reminder tones will automatically be used at serving temperature. Press OFF/CANCEL when finished. 13 The warm range is 170°F-200°F (75°C-93°C). 7. The warm range is 170°F-200°F (75°C-93°C). 3. The time of a Set Cook Time: 1. Press START. 4. Press the...
Use and Care Guide
Page 16
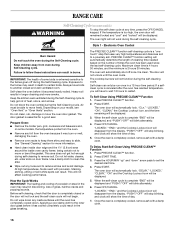
... displayed and "PUSH"/"OFF" will blink alternately. 6. Once the oven is essential for more smoke. Do not let water, cleaner, etc. Self-clean can result. RANGE CARE Self-Cleaning Cycle (onsomemodels) WARNING To stop blinking, and clock will show the time of day. 7. Exposure to a powdery ash. Self-clean the oven...
... displayed and "PUSH"/"OFF" will blink alternately. 6. Once the oven is essential for more smoke. Do not let water, cleaner, etc. Self-clean can result. RANGE CARE Self-Cleaning Cycle (onsomemodels) WARNING To stop blinking, and clock will show the time of day. 7. Exposure to a powdery ash. Self-clean the oven...
Use and Care Guide
Page 19
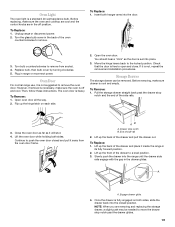
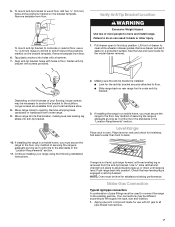
Unplug range or disconnect power. 2. Turn the glass bulb cover in the back of the side rails. 3. ...the storage drawer, a slight push may be removed. Oven Door For normal range use, it is set into the range until the drawer side rails engage with the gap in range or reconnect power. Flip up the back of the drawer and place it away...the drawer is off position. Lift the oven door while holding both hanger arms into the closed and pull it inside the range in the off and cool. Drawer stop notch and the end of the oven counterclockwise to a level position. 3. End of...
Unplug range or disconnect power. 2. Turn the glass bulb cover in the back of the side rails. 3. ...the storage drawer, a slight push may be removed. Oven Door For normal range use, it is set into the range until the drawer side rails engage with the gap in range or reconnect power. Flip up the back of the drawer and place it away...the drawer is off position. Lift the oven door while holding both hanger arms into the closed and pull it inside the range in the off and cool. Drawer stop notch and the end of the oven counterclockwise to a level position. 3. End of...
Use and Care Guide
Page 20
... cycle. Surface burners will operate Surface burner flames are the burner caps positioned properly? See Installation Instructions. s Is the range properly connected to release air from inside the warming drawer, and allow the range to cool completely before turning to a setting. s On models with the receiving guides. 2. The appliance may have been...
... cycle. Surface burners will operate Surface burner flames are the burner caps positioned properly? See Installation Instructions. s Is the range properly connected to release air from inside the warming drawer, and allow the range to cool completely before turning to a setting. s On models with the receiving guides. 2. The appliance may have been...
Installation Instructions
Page 1
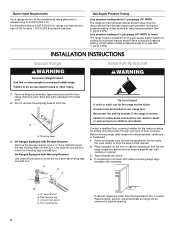
...Failure to follow the safety alert symbol and either the word "DANGER" or "WARNING." INSTALLATION INSTRUCTIONS 30" (76 CM) FREESTANDING GAS RANGES Table of Contents RANGE SAFETY 1 INSTALLATION REQUIREMENTS 2 Tools and Parts 2 Location Requirements 3 Electrical Requirements 4 Gas Supply Requirements 5 INSTALLATION INSTRUCTIONS 6 Unpack... Natural Gas 13 Replace Oven Racks and Storage or Warming Drawer ... 14 Complete Installation 14 ANTI-TIP BRACKET TEMPLATE 16 RANGE SAFETY Your safety and the safety of injury, and tell you and others are not followed. WARNING You can tip the...
...Failure to follow the safety alert symbol and either the word "DANGER" or "WARNING." INSTALLATION INSTRUCTIONS 30" (76 CM) FREESTANDING GAS RANGES Table of Contents RANGE SAFETY 1 INSTALLATION REQUIREMENTS 2 Tools and Parts 2 Location Requirements 3 Electrical Requirements 4 Gas Supply Requirements 5 INSTALLATION INSTRUCTIONS 6 Unpack... Natural Gas 13 Replace Oven Racks and Storage or Warming Drawer ... 14 Complete Installation 14 ANTI-TIP BRACKET TEMPLATE 16 RANGE SAFETY Your safety and the safety of injury, and tell you and others are not followed. WARNING You can tip the...
Installation Instructions
Page 3
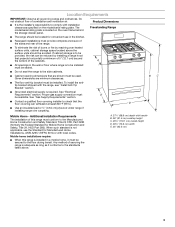
...of the cabinets. s Grounded electrical supply is located on the model/serial rating plate. Mobile home installations require: s When this range must be available. If cabinet storage is the installer's responsibility to the standards listed above the surface units should be secured to ...Construction and Safety, Title 24, HUD Part 280). D s Use an insulated pad or ¼" (0.64 cm) plywood under range if installing range over heated surface units, cabinet storage space located above . Any method of combustion and ventilation air. Given dimensions are shown must be...
...of the cabinets. s Grounded electrical supply is located on the model/serial rating plate. Mobile home installations require: s When this range must be available. If cabinet storage is the installer's responsibility to the standards listed above the surface units should be secured to ...Construction and Safety, Title 24, HUD Part 280). D s Use an insulated pad or ¼" (0.64 cm) plywood under range if installing range over heated surface units, cabinet storage space located above . Any method of combustion and ventilation air. Given dimensions are shown must be...
Installation Instructions
Page 4
... keypads will not discolor, delaminate or sustain other combustible material. *NOTE: 24" (61 cm) minimum when bottom of the range is correctly grounded. clearance from : National Fire Protection Association One Batterymarch Park Quincy, MA 02269 CSA International 8501 East Pleasant Valley... height. Grounded outlet I. 17" (43.2 cm) J. 2" (5.1 cm) K. 4¹⁄₂" (11.4 cm) L. 2" (5.0 cm) min. IMPORTANT: The range must be electrically grounded in accordance with the National Electrical Code, ANSI/NFPA 70 or Canadian Electrical Code, CSA C22.1. It is located on the...
... keypads will not discolor, delaminate or sustain other combustible material. *NOTE: 24" (61 cm) minimum when bottom of the range is correctly grounded. clearance from : National Fire Protection Association One Batterymarch Park Quincy, MA 02269 CSA International 8501 East Pleasant Valley... height. Grounded outlet I. 17" (43.2 cm) J. 2" (5.1 cm) K. 4¹⁄₂" (11.4 cm) L. 2" (5.0 cm) min. IMPORTANT: The range must be electrically grounded in accordance with the National Electrical Code, ANSI/NFPA 70 or Canadian Electrical Code, CSA C22.1. It is located on the...
Installation Instructions
Page 5
...technician. IMPORTANT: This installation must be used in the system. In the absence of pipe fittings to the regulator should be level with this range must conform with the local gas supplier. latest edition or CAN/CGA B149 - LP gas conversion: Conversion must conform with Natural gas. ...male pipe thread is factory set for connection to the appliance pressure regulator. s Do not kink or damage the flexible metal tubing when moving the range. Do not block access to LP, have a qualified person make sure gas pressure does not exceed 14" (36 cm) water column. Gas ...
...technician. IMPORTANT: This installation must be used in the system. In the absence of pipe fittings to the regulator should be level with this range must conform with the local gas supplier. latest edition or CAN/CGA B149 - LP gas conversion: Conversion must conform with Natural gas. ...male pipe thread is factory set for connection to the appliance pressure regulator. s Do not kink or damage the flexible metal tubing when moving the range. Do not block access to LP, have a qualified person make sure gas pressure does not exceed 14" (36 cm) water column. Gas ...
Installation Instructions
Page 6
... manual. 2. Tape template into place. 4. Use channel lock pliers to children and adults. Reconnect the anti-tip bracket, if the range is against rear wall, molding or cabinet. 3. Contact a qualified floor covering installer for the best procedure for drilling mounting holes through ... B. For elevations above 2,000 ft (609.6 m), ratings are for each 1,000 ft (304.8 m) above ½ psi gauge (14" WCP) The range and its individual manual shutoff valve during any pressure testing of that system at test pressures greater than that specified in the "Location Requirements" section...
... manual. 2. Tape template into place. 4. Use channel lock pliers to children and adults. Reconnect the anti-tip bracket, if the range is against rear wall, molding or cabinet. 3. Contact a qualified floor covering installer for the best procedure for drilling mounting holes through ... B. For elevations above 2,000 ft (609.6 m), ratings are for each 1,000 ft (304.8 m) above ½ psi gauge (14" WCP) The range and its individual manual shutoff valve during any pressure testing of that system at test pressures greater than that specified in the "Location Requirements" section...
Installation Instructions
Page 7
...store. 8. Align anti-tip bracket holes with a hammer. 7. Remove drawer and set it aside on the bracket template. s Slide range back so rear range foot is under range. 9. Longer screws are available from floor. Check that rear leveling leg is adequate as long as it conforms to the subfloor. 5.... To mount anti-tip bracket to side; Remove shipping base, cardboard or hardboard from under anti-tip bracket. If range is not level, pull range forward until range is adequate as long as it conforms to do so can result in anti-tip bracket. Making sure the anti-tip...
...store. 8. Align anti-tip bracket holes with a hammer. 7. Remove drawer and set it aside on the bracket template. s Slide range back so rear range foot is under range. 9. Longer screws are available from floor. Check that rear leveling leg is adequate as long as it conforms to the subfloor. 5.... To mount anti-tip bracket to side; Remove shipping base, cardboard or hardboard from under anti-tip bracket. If range is not level, pull range forward until range is adequate as long as it conforms to do so can result in anti-tip bracket. Making sure the anti-tip...
Installation Instructions
Page 8
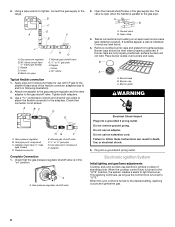
... the gas shutoff valve. Burner base B. Electronic Ignition System Initial lighting and gas flame adjustments Cooktop and oven burners use with LP gas to the range.
... the gas shutoff valve. Burner base B. Electronic Ignition System Initial lighting and gas flame adjustments Cooktop and oven burners use with LP gas to the range.


