Use and Care Guide
Page 1
www.whirlpool.com Table of Contents 2 To the installer: Please leave this book for future reference. W10110369 ® GAS RANGE Use & Care Guide For questions about features, operation/performance, parts, accessories or service, call: 1-800-253-1301. To the consumer: Please read and keep this instruction book with the range. or visit our website at...
www.whirlpool.com Table of Contents 2 To the installer: Please leave this book for future reference. W10110369 ® GAS RANGE Use & Care Guide For questions about features, operation/performance, parts, accessories or service, call: 1-800-253-1301. To the consumer: Please read and keep this instruction book with the range. or visit our website at...
Use and Care Guide
Page 2
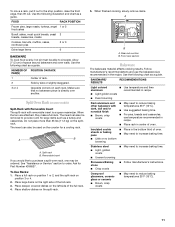
TABLE OF CONTENTS RANGE SAFETY 3 The Anti-Tip Bracket 4 PARTS AND FEATURES 5 COOKTOP USE 6 Cooktop Controls 6 Power Failure 6 Cooktop Lockout 6 Sealed Surface Burners 7 Home Canning 7 Cookware 7 ELECTRONIC OVEN CONTROLS 8 Display 8 Start 8 Off/Cancel 9 Clock 9 Range ...
TABLE OF CONTENTS RANGE SAFETY 3 The Anti-Tip Bracket 4 PARTS AND FEATURES 5 COOKTOP USE 6 Cooktop Controls 6 Power Failure 6 Cooktop Lockout 6 Sealed Surface Burners 7 Home Canning 7 Cookware 7 ELECTRONIC OVEN CONTROLS 8 Display 8 Start 8 Off/Cancel 9 Clock 9 Range ...
Use and Care Guide
Page 5
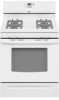
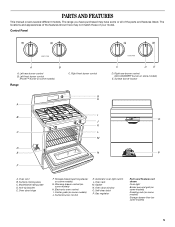
The locations and appearances of the features shown here may have purchased may not match those of the parts and features listed. Right rear burner control (ACCUSIMMER® burner on some models) E. Surface burner control K. The range you have... drawer (warming drawer on some models) G. Automatic oven light switch L. Gasket N. Left rear burner control B. Self-clean latch P. Surface cooking area C. Gas regulator Parts and Features not shown Oven light Broiler pan and grid (on some models) Roasting rack (on some models) Storage drawer liner (on some models...
The locations and appearances of the features shown here may have purchased may not match those of the parts and features listed. Right rear burner control (ACCUSIMMER® burner on some models) E. Surface burner control K. The range you have... drawer (warming drawer on some models) G. Automatic oven light switch L. Gasket N. Left rear burner control B. Self-clean latch P. Surface cooking area C. Gas regulator Parts and Features not shown Oven light Broiler pan and grid (on some models) Roasting rack (on some models) Storage drawer liner (on some models...
Use and Care Guide
Page 11
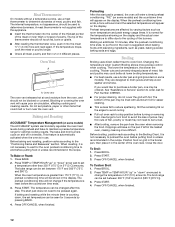
..., meats Cookies, biscuits, muffins, cakes, nonfrozen pies 2 or 3 Extra-large items 6 BAKEWARE To cook food evenly, hot air must be removed to provide room for Part Number 4396927. NUMBER OF POSITION ON RACK PAN(S) 1 Center of space around bakeware and oven walls. Split-rack B. Place large items on the split-rack...
..., meats Cookies, biscuits, muffins, cakes, nonfrozen pies 2 or 3 Extra-large items 6 BAKEWARE To cook food evenly, hot air must be removed to provide room for Part Number 4396927. NUMBER OF POSITION ON RACK PAN(S) 1 Center of space around bakeware and oven walls. Split-rack B. Place large items on the split-rack...
Use and Care Guide
Page 12
... meat may cook better at lower broiling temperatures. Press OFF/CANCEL when finished. Preheating After the start pad does not need to be seen for Part Number 4396923. When the preheat conditioning time ends, a tone will sound and the selected temperature will cause poor air circulation, affecting cooking and cleaning results...
... meat may cook better at lower broiling temperatures. Press OFF/CANCEL when finished. Preheating After the start pad does not need to be seen for Part Number 4396923. When the preheat conditioning time ends, a tone will sound and the selected temperature will cause poor air circulation, affecting cooking and cleaning results...
Use and Care Guide
Page 17
...or nonabrasive scrubbing pad: Gently clean around the model and serial number plate because scrubbing may affect the finish. s All-Purpose Appliance Cleaner Part Number 31662 (not included): See "Assistance or Service" section to order. Do not soak knobs. To avoid damage to set the ... pads, gritty washcloths or some models) Do not use steel wool, abrasive cleansers or oven cleaner. Cleaning Method: s Stainless Steel Cleaner & Polish Part Number 31462 (not included): See "Assistance or Service" section to order. When the self-clean cycle is cool. The "CLEAN" indicator light will...
...or nonabrasive scrubbing pad: Gently clean around the model and serial number plate because scrubbing may affect the finish. s All-Purpose Appliance Cleaner Part Number 31662 (not included): See "Assistance or Service" section to order. Do not soak knobs. To avoid damage to set the ... pads, gritty washcloths or some models) Do not use steel wool, abrasive cleansers or oven cleaner. Cleaning Method: s Stainless Steel Cleaner & Polish Part Number 31462 (not included): See "Assistance or Service" section to order. When the self-clean cycle is cool. The "CLEAN" indicator light will...
Use and Care Guide
Page 18
...some models) Make sure drawer is cool and remove tray. s Oven cleaner: Follow product label instructions. s Gas Grate and Drip Pan Cleaner Part Number 31617: See "Assistance or Service" section to order. Cleaning Method: s Self-Cleaning cycle: See "Self-Cleaning Cycle" first. For ... detergent (for 20 minutes, then scrub with porcelain and staining, etching, pitting or faint white spots can result. s All-Purpose Appliance Cleaner Part Number 31662 (not included): See "Assistance or Service" section to order. At high temperatures, foods react with scouring or steel-wool pad. ...
...some models) Make sure drawer is cool and remove tray. s Oven cleaner: Follow product label instructions. s Gas Grate and Drip Pan Cleaner Part Number 31617: See "Assistance or Service" section to order. Cleaning Method: s Self-Cleaning cycle: See "Self-Cleaning Cycle" first. For ... detergent (for 20 minutes, then scrub with porcelain and staining, etching, pitting or faint white spots can result. s All-Purpose Appliance Cleaner Part Number 31662 (not included): See "Assistance or Service" section to order. At high temperatures, foods react with scouring or steel-wool pad. ...
Use and Care Guide
Page 22
... number in your area, you the cost of a service call us to better respond to build every new WHIRLPOOL® appliance. If you need replacement parts If you still need to fulfill the product warranty and provide afterwarranty service, anywhere in your correspondence. To locate... FSP® replacement parts in your telephone directory Yellow Pages. To order accessories, call the Whirlpool Customer eXperience Center toll free at 1-800-442-9991 and follow the instructions below. If you...
... number in your area, you the cost of a service call us to better respond to build every new WHIRLPOOL® appliance. If you need replacement parts If you still need to fulfill the product warranty and provide afterwarranty service, anywhere in your correspondence. To locate... FSP® replacement parts in your telephone directory Yellow Pages. To order accessories, call the Whirlpool Customer eXperience Center toll free at 1-800-442-9991 and follow the instructions below. If you...

Use and Care Guide
Page 24
...can find this warranty does not apply. All rights reserved. ® Registered Trademark/TM Trademark of Whirlpool, U.S.A. 11/06 Printed in which it . Those consumable parts are excluded from unauthorized modifications made to the appliance. 9. Any food loss due to repair or replace...to correct defects in accordance with electrical or plumbing codes, or use your authorized Whirlpool dealer to be found by checking the "Assistance or Service" section or by Whirlpool. 5. Replacement parts or repair labor costs for other than normal, single-family household use. 4. ...
...can find this warranty does not apply. All rights reserved. ® Registered Trademark/TM Trademark of Whirlpool, U.S.A. 11/06 Printed in which it . Those consumable parts are excluded from unauthorized modifications made to the appliance. 9. Any food loss due to repair or replace...to correct defects in accordance with electrical or plumbing codes, or use your authorized Whirlpool dealer to be found by checking the "Assistance or Service" section or by Whirlpool. 5. Replacement parts or repair labor costs for other than normal, single-family household use. 4. ...
Installation Instructions
Page 1
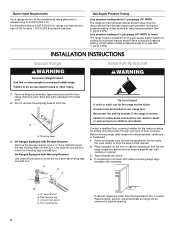
.... IMPORTANT: Installer: Leave installation instructions with the homeowner. INSTALLATION INSTRUCTIONS 30" (76 CM) FREESTANDING GAS RANGES Table of Contents RANGE SAFETY 1 INSTALLATION REQUIREMENTS 2 Tools and Parts 2 Location Requirements 3 Electrical Requirements 4 Gas Supply Requirements 5 INSTALLATION INSTRUCTIONS 6 Unpack Range 6 Install Anti-Tip Bracket 6 Verify Anti-Tip Bracket Location 7 Level Range 7 Make Gas Connection...
.... IMPORTANT: Installer: Leave installation instructions with the homeowner. INSTALLATION INSTRUCTIONS 30" (76 CM) FREESTANDING GAS RANGES Table of Contents RANGE SAFETY 1 INSTALLATION REQUIREMENTS 2 Tools and Parts 2 Location Requirements 3 Electrical Requirements 4 Gas Supply Requirements 5 INSTALLATION INSTRUCTIONS 6 Unpack Range 6 Install Anti-Tip Bracket 6 Verify Anti-Tip Bracket Location 7 Level Range 7 Make Gas Connection...
Installation Instructions
Page 2
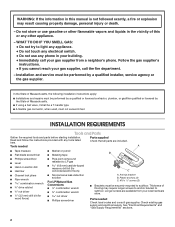
...gas connector, when used, must be performed by the State of flooring may result causing property damage, personal injury or death. - Thickness of Massachusetts. Parts needed A s Tape measure s Marker or pencil B s Flat-blade screwdriver s Masking tape s Phillips screwdriver s Level s Hand or electric drill ...not try to subfloor. Check existing gas supply and electrical supply. Installation and service must be a T-handle type. Parts supplied Read and follow the instructions provided with any other flammable vapors and liquids in the vicinity of Massachusetts, the ...
...gas connector, when used, must be performed by the State of flooring may result causing property damage, personal injury or death. - Thickness of Massachusetts. Parts needed A s Tape measure s Marker or pencil B s Flat-blade screwdriver s Masking tape s Phillips screwdriver s Level s Hand or electric drill ...not try to subfloor. Check existing gas supply and electrical supply. Installation and service must be a T-handle type. Parts supplied Read and follow the instructions provided with any other flammable vapors and liquids in the vicinity of Massachusetts, the ...
Installation Instructions
Page 3
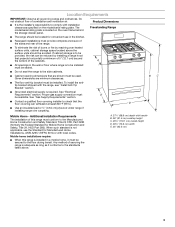
...Install Anti-Tip Bracket" section. The model/serial rating plate is to the Manufactured Home Construction and Safety Standard, Title 24 CFR, Part 3280 (formerly the Federal Standard for Manufactured Home Installations, ANSI A225.1/NFPA 501A or with installation clearances specified on the oven frame ... rating plate. Proper gas supply connection must be located for convenient use the Standard for Mobile Home Construction and Safety, Title 24, HUD Part 280). s To eliminate the risk of burns or fire by installing a range hood that projects horizontally a minimum of 5" (12.7 cm...
...Install Anti-Tip Bracket" section. The model/serial rating plate is to the Manufactured Home Construction and Safety Standard, Title 24 CFR, Part 3280 (formerly the Federal Standard for Manufactured Home Installations, ANSI A225.1/NFPA 501A or with installation clearances specified on the oven frame ... rating plate. Proper gas supply connection must be located for convenient use the Standard for Mobile Home Construction and Safety, Title 24, HUD Part 280). s To eliminate the risk of burns or fire by installing a range hood that projects horizontally a minimum of 5" (12.7 cm...
Installation Instructions
Page 6
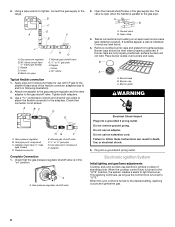
... The range must be isolated from the gas supply piping system by closing its individual manual shutoff valve must be killed. Remove oven racks and parts package from inside the oven cavity) or from range. Shipping base 3. On Ranges Equipped with overhang. Failure to lower the rear leveling legs one -half...
... The range must be isolated from the gas supply piping system by closing its individual manual shutoff valve must be killed. Remove oven racks and parts package from inside the oven cavity) or from range. Shipping base 3. On Ranges Equipped with overhang. Failure to lower the rear leveling legs one -half...
Installation Instructions
Page 8
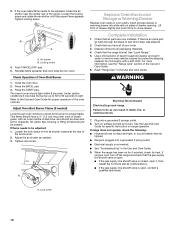
... caps should be level when properly positioned. Failure to the adapters. Tighten both adapters. 3. Use pipe-joint compound. 2. Remove cooktop burner caps and grates from parts package. Plug into a grounded 3 prong outlet. Open the manual shutoff valve in death, fire, or electrical shock. 5. A B A. A A. A BC D E A. Correct any leak found. 4. Manual gas shutoff...
... caps should be level when properly positioned. Failure to the adapters. Tighten both adapters. 3. Use pipe-joint compound. 2. Remove cooktop burner caps and grates from parts package. Plug into a grounded 3 prong outlet. Open the manual shutoff valve in death, fire, or electrical shock. 5. A B A. A A. A BC D E A. Correct any leak found. 4. Manual gas shutoff...
Installation Instructions
Page 10
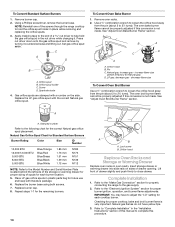
... of flame should light within 8 seconds. For more information, see which step was skipped. 2. s If the gas supply line shutoff valve is an extra part, go back through oven window to do so can result in the Use and Care Guide. 9. Press the BROIL pad. 3. Insert storage drawer or warming... drawer into slide rails on the air shutter located at the rear of /recycle all parts are now installed. If flame needs to remove waxy residue caused by protective shipping material. If there is open . If range is cold, turn off...
... of flame should light within 8 seconds. For more information, see which step was skipped. 2. s If the gas supply line shutoff valve is an extra part, go back through oven window to do so can result in the Use and Care Guide. 9. Press the BROIL pad. 3. Insert storage drawer or warming... drawer into slide rails on the air shutter located at the rear of /recycle all parts are now installed. If flame needs to remove waxy residue caused by protective shipping material. If there is open . If range is cold, turn off...
Installation Instructions
Page 14
... to complete this conversion is not made . Apply masking tape to the end of this manual to help hold the orifice spud holder in plastic parts bag for each cooktop burner. Orifice spud holder C. Replace the LP gas orifice spud with a number on sides of drawer slightly and push firmly to...
... to complete this conversion is not made . Apply masking tape to the end of this manual to help hold the orifice spud holder in plastic parts bag for each cooktop burner. Orifice spud holder C. Replace the LP gas orifice spud with a number on sides of drawer slightly and push firmly to...


