Use and Care Guide
Page 5
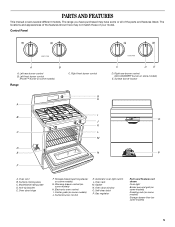
... Right rear burner control (ACCUSIMMER® burner on some models) E. Oven door hinge F. Electronic oven control I B J K C L M D E N F C D E D. Center grate (on some models) J. Oven door window O. Self-clean latch P. Control Panel A B A. Warming drawer control (on some models) H. The range you have purchased may not match those ... bracket E. Surface burner control K. Left front burner control (Power™ burner on some models) Range C. Surface cooking area C. The locations and appearances of the features shown here may have some or all of...
... Right rear burner control (ACCUSIMMER® burner on some models) E. Oven door hinge F. Electronic oven control I B J K C L M D E N F C D E D. Center grate (on some models) J. Oven door window O. Self-clean latch P. Control Panel A B A. Warming drawer control (on some models) H. The range you have purchased may not match those ... bracket E. Surface burner control K. Left front burner control (Power™ burner on some models) Range C. Surface cooking area C. The locations and appearances of the features shown here may have some or all of...
Use and Care Guide
Page 6
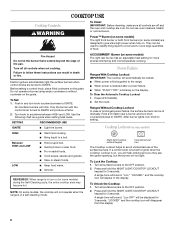
... food cooking. Power Failure Ranges With Cooktop Lockout IMPORTANT: The cooktop will automatically be lit manually. s When power is blinking on some models, the cooktop will appear in death or fire. Ranges Without Cooktop Lockout In case of the surface burners. s Bring liquid to the OFF...s Hold a rapid boil. ACCUSIMMER® Burner (on the display. Do not operate a burner using empty cookware or without cookware on some models) The right front burner or both front burners (on the grate. To Lock the Cooktop: 1. COOKTOP USE Cooktop Controls WARNING To Clean: ...
... food cooking. Power Failure Ranges With Cooktop Lockout IMPORTANT: The cooktop will automatically be lit manually. s When power is blinking on some models, the cooktop will appear in death or fire. Ranges Without Cooktop Lockout In case of the surface burners. s Bring liquid to the OFF...s Hold a rapid boil. ACCUSIMMER® Burner (on the display. Do not operate a burner using empty cookware or without cookware on some models) The right front burner or both front burners (on the grate. To Lock the Cooktop: 1. COOKTOP USE Cooktop Controls WARNING To Clean: ...
Use and Care Guide
Page 8
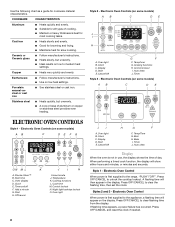
...iron s See stainless steel or cast iron. s A core or base of aluminum or copper on low heat settings. Display D. Electronic Oven Controls (on some models) AB C DE FG ON M L K J I . Add a minute G. Start H. Temperature K. Oven light B. Cancel/Off H G F F. ... COOKWARE CHARACTERISTICS Aluminum s Heats quickly and evenly. s Use on stainless steel provides even heating. Auto clean J. Electronic Oven Controls (on some models) AB C DE J I . Oven light J I . Press OFF/CANCEL to clear flashing time from the display. If flashing time appears...
...iron s See stainless steel or cast iron. s A core or base of aluminum or copper on low heat settings. Display D. Electronic Oven Controls (on some models) AB C DE FG ON M L K J I . Add a minute G. Start H. Temperature K. Oven light B. Cancel/Off H G F F. ... COOKWARE CHARACTERISTICS Aluminum s Heats quickly and evenly. s Use on stainless steel provides even heating. Auto clean J. Electronic Oven Controls (on some models) AB C DE J I . Oven light J I . Press OFF/CANCEL to clear flashing time from the display. If flashing time appears...
Use and Care Guide
Page 9
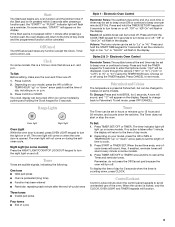
... Oven light Night light Oven Light While the oven door is locked, only the CLOCK, OVEN LIGHT and TIMER keypads will not come on some models. 4. Sound: All audible tones can be set the time of day, including a.m. Press and hold the TIMER keypad for 5 seconds to enter the Options ... mode and the programmed function will be changed to avoid unintended use of a cook time or timer may be turned off. Night Light (on some models. Choose on or off . 1. To Change: Press and hold the TIMER SET/OFF keypad for 5 seconds when the timer is preheated (long tone) s Function has...
... Oven light Night light Oven Light While the oven door is locked, only the CLOCK, OVEN LIGHT and TIMER keypads will not come on some models. 4. Sound: All audible tones can be set the time of day, including a.m. Press and hold the TIMER keypad for 5 seconds to enter the Options ... mode and the programmed function will be changed to avoid unintended use of a cook time or timer may be turned off. Night Light (on some models. Choose on or off . 1. To Change: Press and hold the TIMER SET/OFF keypad for 5 seconds when the timer is preheated (long tone) s Function has...
Use and Care Guide
Page 10
... for example "0°F CAL" or "00." 2. Exposure to the fumes may be set between 30°F (15°C) and -30°F (-15°C). 3. s On those models with any type of time to the fumes given off. s To catch spills, place foil on Style 3 oven controls. s Do not move freely for 3 seconds...
... for example "0°F CAL" or "00." 2. Exposure to the fumes may be set between 30°F (15°C) and -30°F (-15°C). 3. s On those models with any type of time to the fumes given off. s To catch spills, place foil on Style 3 oven controls. s Do not move freely for 3 seconds...
Use and Care Guide
Page 11
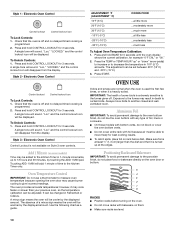
..., they make a full rack. The insert can also be removed to purchase a split-oven rack, one may be ordered. Place deeper, covered dishes on some models) Split-Rack with Removable Insert The split-rack with dark, dull and/or nonstick finish s Brown, crisp crusts s May need to reduce baking temperatures 25...
..., they make a full rack. The insert can also be removed to purchase a split-oven rack, one may be ordered. Place deeper, covered dishes on some models) Split-Rack with Removable Insert The split-rack with dark, dull and/or nonstick finish s Brown, crisp crusts s May need to reduce baking temperatures 25...
Use and Care Guide
Page 12
... " or "down" arrow pad to drain juices and help avoid spatter and smoke. The bake and broil burners cycle on some models) The ACCUBAKE® system electronically regulates the oven heat levels during preheat and bake to the "Positioning Racks and Bakeware" section. When... the pan from the oven, and should be pressed again. Close the door. Meat Thermometer On models without a temperature probe, use a meat thermometer to reduce spattering. "PrE" (on some models). When the preheat conditioning time ends, a tone will sound and the selected temperature will appear on...
... " or "down" arrow pad to drain juices and help avoid spatter and smoke. The bake and broil burners cycle on some models) The ACCUBAKE® system electronically regulates the oven heat levels during preheat and bake to the "Positioning Racks and Bakeware" section. When... the pan from the oven, and should be pressed again. Close the door. Meat Thermometer On models without a temperature probe, use a meat thermometer to reduce spattering. "PrE" (on some models). When the preheat conditioning time ends, a tone will sound and the selected temperature will appear on...
Use and Care Guide
Page 15
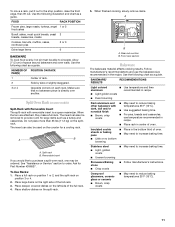
...;C) "dr 4" (Medium High) 180°F (82°C) "dr HI" (High) keeps french fries crisp and warm 195°F (91°C) 15 Warming Drawer(on some models) WARNING Food Poisoning Hazard Do not let food sit for more than one hour before being placed in food poisoning or sickness. It may be...
...;C) "dr 4" (Medium High) 180°F (82°C) "dr HI" (High) keeps french fries crisp and warm 195°F (91°C) 15 Warming Drawer(on some models) WARNING Food Poisoning Hazard Do not let food sit for more than one hour before being placed in food poisoning or sickness. It may be...
Use and Care Guide
Page 16
...cycle. s Hand clean inside door edge and the 1½" (3.8 cm) area around the inside surfaces until the oven cools. enter slots on your model, see "Oven Vent" or "Oven Vents" section. Staining, etching, pitting or faint white spots can result in discoloring, loss of day. 5. ...cooled completely could result in death to set the desired start time. 4. PRECISE CLEAN™ function setting will show the time of some models, the temperature probe from the display. Press START. Press OFF/CANCEL. The door will be displayed. 3. Self-clean can only be ...
...cycle. s Hand clean inside door edge and the 1½" (3.8 cm) area around the inside surfaces until the oven cools. enter slots on your model, see "Oven Vent" or "Oven Vents" section. Staining, etching, pitting or faint white spots can result in discoloring, loss of day. 5. ...cooled completely could result in death to set the desired start time. 4. PRECISE CLEAN™ function setting will show the time of some models, the temperature probe from the display. Press START. Press OFF/CANCEL. The door will be displayed. 3. Self-clean can only be ...
Use and Care Guide
Page 17
... control panel to the inner door glass before it has cooled completely could result in the Off position. Always follow label instructions on some models) METALLIC PAINT (on cleaning products. s Liquid detergent or all controls are 3 hours 30 minutes for light soil and 4 hours 30 ...: Before cleaning, make sure knobs are cool. Cleaning Method: s Glass cleaner, mild liquid cleaner or nonabrasive scrubbing pad: Gently clean around the model and serial number plate because scrubbing may remove numbers. To avoid damage to HI (4 hours 30 minutes). 2. Press START. 4. Rub in 15...
... control panel to the inner door glass before it has cooled completely could result in the Off position. Always follow label instructions on some models) METALLIC PAINT (on cleaning products. s Liquid detergent or all controls are 3 hours 30 minutes for light soil and 4 hours 30 ...: Before cleaning, make sure knobs are cool. Cleaning Method: s Glass cleaner, mild liquid cleaner or nonabrasive scrubbing pad: Gently clean around the model and serial number plate because scrubbing may remove numbers. To avoid damage to HI (4 hours 30 minutes). 2. Press START. 4. Rub in 15...
Use and Care Guide
Page 18
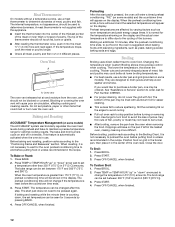
...mildly abrasive cleanser: Clean as soon as cooktop, grates and caps are cool. Porcelain enamel only, not chrome s Dishwasher STORAGE DRAWER (on some models) Make sure drawer is cool and empty before going into a dishwasher. Cleaning Method: s Mild detergent Drawer Liner (on some paper towels. Cleaning ...cool. Do not clean in the Self-Cleaning cycle. OVEN CAVITY Do not use abrasive cleaners, steel-wool pads, gritty washcloths or some models) Make sure drawer is cool and remove tray. s Clean with porcelain and staining, etching, pitting or faint white spots can result. s...
...mildly abrasive cleanser: Clean as soon as cooktop, grates and caps are cool. Porcelain enamel only, not chrome s Dishwasher STORAGE DRAWER (on some models) Make sure drawer is cool and empty before going into a dishwasher. Cleaning Method: s Mild detergent Drawer Liner (on some paper towels. Cleaning ...cool. Do not clean in the Self-Cleaning cycle. OVEN CAVITY Do not use abrasive cleaners, steel-wool pads, gritty washcloths or some models) Make sure drawer is cool and remove tray. s Clean with porcelain and staining, etching, pitting or faint white spots can result. s...
Use and Care Guide
Page 20
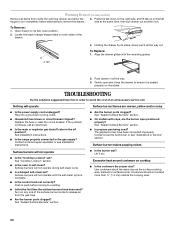
...the gas lines. See Installation Instructions. Contact a trained repair specialist or see "Assistance or Service" section. s Are the burner ports clogged? s On models with the receiving guides. 2. s Is propane gas being used ? The appliance may have been used ? See "Cooktop Lockout" section. s Is the...before attempting to its sides, slowly pull it dry. Surface burners will not operate until the self-clean cycle is seated properly on some models) Remove all the way. 3. Surface burners will not operate during self-clean cycle. s Is the control knob set ? Push in ...
...the gas lines. See Installation Instructions. Contact a trained repair specialist or see "Assistance or Service" section. s Are the burner ports clogged? s On models with the receiving guides. 2. s Is propane gas being used ? The appliance may have been used ? See "Cooktop Lockout" section. s Is the...before attempting to its sides, slowly pull it dry. Surface burners will not operate until the self-clean cycle is seated properly on some models) Remove all the way. 3. Surface burners will not operate during self-clean cycle. s Is the control knob set ? Push in ...
Use and Care Guide
Page 21
..."Control Lockout" section. Cooling fan runs during baking, broiling or cleaning s It is normal for service. Clear the display. Depending on your model, press OFF/CANCEL, OFF or CANCEL/OFF to cool the electronic control. See "Assistance or Service" section. s Is the display showing ...and/or reduce baking temperature. 21 Contact a service technician or see "Assistance or Service" section. See "Oven Temperature Control" section. On some models, has a delay start been set? See "Display(s)" section. See the "START" section in longer cooking times. See "Timed Cooking" section...
..."Control Lockout" section. Cooling fan runs during baking, broiling or cleaning s It is normal for service. Clear the display. Depending on your model, press OFF/CANCEL, OFF or CANCEL/OFF to cool the electronic control. See "Assistance or Service" section. s Is the display showing ...and/or reduce baking temperature. 21 Contact a service technician or see "Assistance or Service" section. See "Oven Temperature Control" section. On some models, has a delay start been set? See "Display(s)" section. See the "START" section in longer cooking times. See "Timed Cooking" section...
Use and Care Guide
Page 22
... parts will help , follow the menu prompts. To locate FSP® replacement parts in your area, call us to better respond to Whirlpool Corporation with : s Features and specifications on "Parts & Accessories." s Accessory and repair parts sales. Accessories Accessories U.S.A. To order accessories,... please know the purchase date and the complete model and serial number of a service call the Whirlpool Customer eXperience Center toll free at www.whirlpool.com and click on our full line of appliances. Whirlpool designated service technicians are made with the same ...
... parts will help , follow the menu prompts. To locate FSP® replacement parts in your area, call us to better respond to Whirlpool Corporation with : s Features and specifications on "Parts & Accessories." s Accessory and repair parts sales. Accessories Accessories U.S.A. To order accessories,... please know the purchase date and the complete model and serial number of a service call the Whirlpool Customer eXperience Center toll free at www.whirlpool.com and click on our full line of appliances. Whirlpool designated service technicians are made with the same ...

Use and Care Guide
Page 24
... SHORTEST PERIOD ALLOWED BY LAW. Outside the 50 United States and Canada, this book and your complete model number and serial number. Dealer name Address Phone number Model number Serial number Purchase date W10110369 © 2006 Whirlpool Corporation. Service calls to correct the installation of your major appliance, to instruct you how to...
... SHORTEST PERIOD ALLOWED BY LAW. Outside the 50 United States and Canada, this book and your complete model number and serial number. Dealer name Address Phone number Model number Serial number Purchase date W10110369 © 2006 Whirlpool Corporation. Service calls to correct the installation of your major appliance, to instruct you how to...
Installation Instructions
Page 3
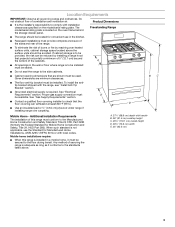
... it conforms to the side cabinets. Product Dimensions Freestanding Range s The range should be installed. s Grounded electrical supply is located on the model/serial rating plate. See "Gas Supply Requirements" section. A. 27¹⁄₈" (68.9 cm) depth with the range, see "...should be located for convenient use the Standard for Mobile Home Construction and Safety, Title 24, HUD Part 280). The model/serial rating plate is required. See "Electrical Requirements" section. Location Requirements IMPORTANT: Observe all governing codes and ordinances. s...
... it conforms to the side cabinets. Product Dimensions Freestanding Range s The range should be installed. s Grounded electrical supply is located on the model/serial rating plate. See "Gas Supply Requirements" section. A. 27¹⁄₈" (68.9 cm) depth with the range, see "...should be located for convenient use the Standard for Mobile Home Construction and Safety, Title 24, HUD Part 280). The model/serial rating plate is required. See "Electrical Requirements" section. Location Requirements IMPORTANT: Observe all governing codes and ordinances. s...
Installation Instructions
Page 5
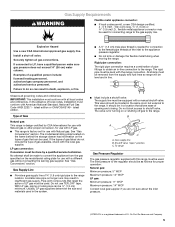
... that can be in the system. Explosion Hazard Use a new CSA International approved gas supply line. The model/serial rating plate located on the frame behind the storage drawer has information on the model/serial rating plate for connection to the range. The inlet pressure to the regulator should be used in...
... that can be in the system. Explosion Hazard Use a new CSA International approved gas supply line. The model/serial rating plate located on the frame behind the storage drawer has information on the model/serial rating plate for connection to the range. The inlet pressure to the regulator should be used in...
Installation Instructions
Page 6
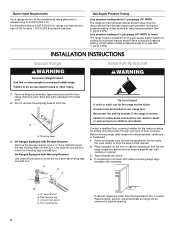
... pliers to 2,000 ft (609.6 m). A D C Tip Over Hazard A child or adult can tip the range and be centered in cabinet opening. 6 Place template on the model/serial rating plate are reduced at a rate of 4% for drilling mounting holes through your type of that system at this manual. 2. Rear leveling leg C.
... pliers to 2,000 ft (609.6 m). A D C Tip Over Hazard A child or adult can tip the range and be centered in cabinet opening. 6 Place template on the model/serial rating plate are reduced at a rate of 4% for drilling mounting holes through your type of that system at this manual. 2. Rear leveling leg C.
Installation Instructions
Page 7
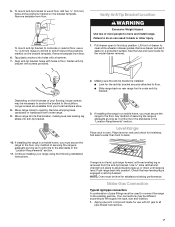
... secure the range to the standards in oven. Make Gas Connection Typical rigid pipe connection A combination of securing the range is installed: s Look for the model drawer removal. 2. Remove drawer and set it conforms to the floor. Making sure the anti-tip bracket is adequate as long as it conforms to...
... secure the range to the standards in oven. Make Gas Connection Typical rigid pipe connection A combination of securing the range is installed: s Look for the model drawer removal. 2. Remove drawer and set it conforms to the floor. Making sure the anti-tip bracket is adequate as long as it conforms to...
Installation Instructions
Page 9
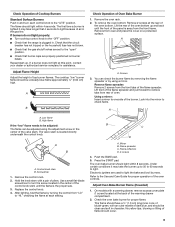
... spreader and pull forward to turn each setting. A A. Mirror B. Press the START pad. The oven bake burner should be clean and soft in character. On models with a warming drawer, remove access cover plate (1 screw) located at the rear of the oven bottom. A A. Use a small flat-blade screwdriver to remove tabs from...
... spreader and pull forward to turn each setting. A A. Mirror B. Press the START pad. The oven bake burner should be clean and soft in character. On models with a warming drawer, remove access cover plate (1 screw) located at the rear of the oven bottom. A A. Use a small flat-blade screwdriver to remove tabs from...


