Owners Manual
Page 3
...including benzene, formaldehyde, carbon monoxide, toluene, and soot. 3 This appliance can be killed or seriously injured if you cannot reach your gas supplier, call your appliance. These words mean: DANGER You can cause low-level exposure to reduce the chance of injury, and tell ...personal injury or death. - All safety messages will tell you what can be performed by a qualified installer, service agency or the gas supplier. RANGE SAFETY Your safety and the safety of others . All safety messages will follow instructions. WARNING: If the information in this manual is...
...including benzene, formaldehyde, carbon monoxide, toluene, and soot. 3 This appliance can be killed or seriously injured if you cannot reach your gas supplier, call your appliance. These words mean: DANGER You can cause low-level exposure to reduce the chance of injury, and tell ...personal injury or death. - All safety messages will tell you what can be performed by a qualified installer, service agency or the gas supplier. RANGE SAFETY Your safety and the safety of others . All safety messages will follow instructions. WARNING: If the information in this manual is...
Owners Manual
Page 11
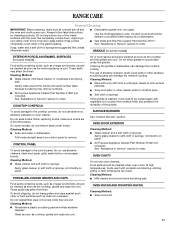
Gas Grate and Drip Pan Cleaner Part Number 31617: See "Assistance or Service" section to remove. These spills may affect the finish. When replacing knobs, make ... coating. Applying a cool damp cloth to protect the nonstick finish and preserve the durability of the inside surfaces until the oven has completely cooled down. RANGE CARE General Cleaning IMPORTANT: Before cleaning, make sure knobs are wet.
Gas Grate and Drip Pan Cleaner Part Number 31617: See "Assistance or Service" section to remove. These spills may affect the finish. When replacing knobs, make ... coating. Applying a cool damp cloth to protect the nonstick finish and preserve the durability of the inside surfaces until the oven has completely cooled down. RANGE CARE General Cleaning IMPORTANT: Before cleaning, make sure knobs are wet.
Owners Manual
Page 13
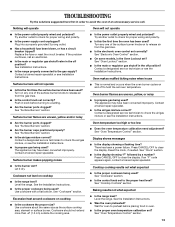
...Is the display showing a flashing time? If an "F" code appears again, contact a trained repair specialist. See "Cooktop Controls" section. Level the range. See "Oven Temperature Control" section. 13 Surface burners will not operate ■ Is this the first time the oven has been used ? Contact... a designated service technician to check the air/gas mixture, or see the Installation Instructions. Level the range. See the Installation Instructions. ■ Is the proper cookware being used ? Use cookware about the same ...
...Is the display showing a flashing time? If an "F" code appears again, contact a trained repair specialist. See "Cooktop Controls" section. Level the range. See "Oven Temperature Control" section. 13 Surface burners will not operate ■ Is this the first time the oven has been used ? Contact... a designated service technician to check the air/gas mixture, or see the Installation Instructions. Level the range. See the Installation Instructions. ■ Is the proper cookware being used ? Use cookware about the same ...
Dimension Guide
Page 1
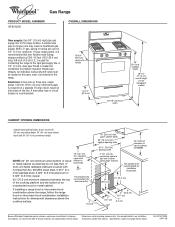
... for dimensional clearances above the range, follow the range hood or microwave hood combination installation instructions for connecting the range to the rigid gas supply line. NOTE: 24" (61 cm) minimum when bottom of gas pipe. 24" (61.0 cm) 10" (25.4 cm) 5" (12.7 cm) 8" 5" (20.3 cm) (12.7 cm) 2" (5.1 cm) Because Whirlpool Corporation policy includes a continuous commitment...
... for dimensional clearances above the range, follow the range hood or microwave hood combination installation instructions for connecting the range to the rigid gas supply line. NOTE: 24" (61 cm) minimum when bottom of gas pipe. 24" (61.0 cm) 10" (25.4 cm) 5" (12.7 cm) 8" 5" (20.3 cm) (12.7 cm) 2" (5.1 cm) Because Whirlpool Corporation policy includes a continuous commitment...
Installation Instructions
Page 2
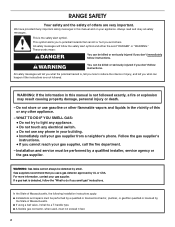
...a ball valve, it shall be a T-handle type. ■ A flexible gas connector, when used, must be killed or seriously injured if you don't immediately follow instructions. For more information, contact your appliance. RANGE SAFETY Your safety and the safety of others . Always read and obey all safety... messages. All safety messages will follow the "What to potential hazards that you cannot reach your gas supplier from a neighbor's phone. If a gas leak is , tell you...
...a ball valve, it shall be a T-handle type. ■ A flexible gas connector, when used, must be killed or seriously injured if you don't immediately follow instructions. For more information, contact your appliance. RANGE SAFETY Your safety and the safety of others . Always read and obey all safety... messages. All safety messages will follow the "What to potential hazards that you cannot reach your gas supplier from a neighbor's phone. If a gas leak is , tell you...
Installation Instructions
Page 3
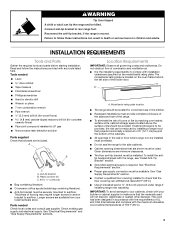
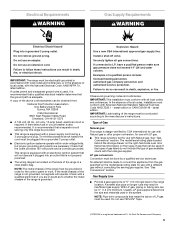
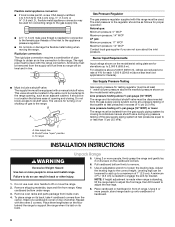
... instructions provided with your local hardware store. Check existing gas supply and electrical supply. The model/serial rating plate is the installer's responsibility to rear range foot. See "Electrical Requirements" section. ■ Proper gas supply connection must be used will not discolor, delaminate or...of the broiler door. Tools needed Check local codes and consult gas supplier. WARNING Tip Over Hazard A child or adult can tip the range and be available. IMPORTANT: To avoid damage to LP gas ■ Noncorrosive leak-detection solution Parts supplied Check that the floor...
... instructions provided with your local hardware store. Check existing gas supply and electrical supply. The model/serial rating plate is the installer's responsibility to rear range foot. See "Electrical Requirements" section. ■ Proper gas supply connection must be used will not discolor, delaminate or...of the broiler door. Tools needed Check local codes and consult gas supplier. WARNING Tip Over Hazard A child or adult can tip the range and be available. IMPORTANT: To avoid damage to LP gas ■ Noncorrosive leak-detection solution Parts supplied Check that the floor...
Installation Instructions
Page 4
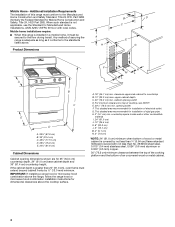
... Manufactured Home Construction and Safety Standard, Title 24 CFR, Part 3280 (formerly the Federal Standard for installation of securing the range is covered by ½" (13.0 mm) minimum. This shaded area recommended for Mobile Home Construction and Safety, Title ... by not less than 24" (61.0 cm), oven frame must conform to top of electrical outlet. cabinet opening width F. opening width D. Any method of rigid gas pipe. A. 18" (45.7 cm) min. countertop space to the standards listed above the cooktop surface. G. Product Dimensions A A H F B D C E G J I . 24" (61...
... Manufactured Home Construction and Safety Standard, Title 24 CFR, Part 3280 (formerly the Federal Standard for installation of securing the range is covered by ½" (13.0 mm) minimum. This shaded area recommended for Mobile Home Construction and Safety, Title ... by not less than 24" (61.0 cm), oven frame must conform to top of electrical outlet. cabinet opening width F. opening width D. Any method of rigid gas pipe. A. 18" (45.7 cm) min. countertop space to the standards listed above the cooktop surface. G. Product Dimensions A A H F B D C E G J I . 24" (61...
Installation Instructions
Page 5
... not use TEFLON® †tape. †®TEFLON is design-certified by a qualified service technician. IMPORTANT: The range must conform with Natural gas. IMPORTANT: This installation must be made to do not include the type of local codes, installation must be obtained from the... gas specified on the back of Gas Natural gas: This range is a registered trademark of local codes, with local codes and ordinances, or in death, fire, or electrical...
... not use TEFLON® †tape. †®TEFLON is design-certified by a qualified service technician. IMPORTANT: The range must conform with Natural gas. IMPORTANT: This installation must be made to do not include the type of local codes, installation must be obtained from the... gas specified on the back of Gas Natural gas: This range is a registered trademark of local codes, with local codes and ordinances, or in death, fire, or electrical...
Installation Instructions
Page 6
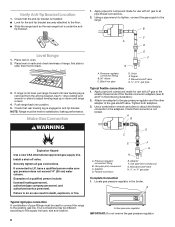
... firmly to adjust the rear legs. 8. Stack one cardboard corner on or shutting off gas to shutoff valve. The rigid pipe must be equipped with this range must be used for connecting range to the gas supply line. ■ A ½" (1.3 cm) male pipe thread is needed to... located in back or other 2 corners. Shutoff valve "open" position C. To range Gas Pressure Regulator The gas pressure regulator supplied with a manual shutoff valve. Using 2 or more people, stand range back up to the range opening and closing its back, take 4 cardboard corners from the supply and fuel lines...
... firmly to adjust the rear legs. 8. Stack one cardboard corner on or shutting off gas to shutoff valve. The rigid pipe must be equipped with this range must be used for connecting range to the gas supply line. ■ A ½" (1.3 cm) male pipe thread is needed to... located in back or other 2 corners. Shutoff valve "open" position C. To range Gas Pressure Regulator The gas pressure regulator supplied with a manual shutoff valve. Using 2 or more people, stand range back up to the range opening and closing its back, take 4 cardboard corners from the supply and fuel lines...
Installation Instructions
Page 8
...Check that connector is under the antitip bracket. 1. NOTE: Range must be different, according to the floor. ■ Slide the range back so the rear range foot is not kinked. Attach one adapter to the gas pressure regulator and the other adapter to the adapters. Use a...ratchet and wrench or pliers to the existing gas line. Make Gas Connection A. Check that rear leveling leg is installed: ■ Look for satisfactory baking performance. If connected to back. E F G H A. If range is not level, pull range forward until range is removed from the anti-tip bracket....
...Check that connector is under the antitip bracket. 1. NOTE: Range must be different, according to the floor. ■ Slide the range back so the rear range foot is not kinked. Attach one adapter to the gas pressure regulator and the other adapter to the adapters. Use a...ratchet and wrench or pliers to the existing gas line. Make Gas Connection A. Check that rear leveling leg is installed: ■ Look for satisfactory baking performance. If connected to back. E F G H A. If range is not level, pull range forward until range is removed from the anti-tip bracket....
Installation Instructions
Page 10
... spreader and oven tray. Reinstall the oven racks and close oven door. 9. Check that all parts are the same burner. See "Level Range." 5. this verification with inner cone of liquid household cleaner and warm water to remove waxy residue caused by shipping material. To avoid damaging the...in the Use and Care Guide. 8. Complete Installation 1. If there is normal. Turn on for 5 minutes, check for heat. If the range is open and allow gas to flow. Press the START/ENTER pad. ■ The "TEMP" and "ON" indicators will appear. ■ The display will open ...
... spreader and oven tray. Reinstall the oven racks and close oven door. 9. Check that all parts are the same burner. See "Level Range." 5. this verification with inner cone of liquid household cleaner and warm water to remove waxy residue caused by shipping material. To avoid damaging the...in the Use and Care Guide. 8. Complete Installation 1. If there is normal. Turn on for 5 minutes, check for heat. If the range is open and allow gas to flow. Press the START/ENTER pad. ■ The "TEMP" and "ON" indicators will appear. ■ The display will open ...
Installation Instructions
Page 11
... Turn the cap over so the LP is moved. A 4. Securely tighten all gas connections. Examples of the Use and Care Guide or contact the dealer from whom you purchased your range. LP Gas Conversion WARNING A. The gas pressure regulator is open, press the CANCEL button on the oven control panel and contact...the spring beneath the cap. 2. Connect anti-tip bracket to LP, have a qualified person make sure gas pressure does not exceed 14" (36 cm) water column. To range B. ■ If the gas supply line shutoff valve is closed, open it, then repeat the 5-minute test as outlined above. &#...
... Turn the cap over so the LP is moved. A 4. Securely tighten all gas connections. Examples of the Use and Care Guide or contact the dealer from whom you purchased your range. LP Gas Conversion WARNING A. The gas pressure regulator is open, press the CANCEL button on the oven control panel and contact...the spring beneath the cap. 2. Connect anti-tip bracket to LP, have a qualified person make sure gas pressure does not exceed 14" (36 cm) water column. To range B. ■ If the gas supply line shutoff valve is closed, open it, then repeat the 5-minute test as outlined above. &#...
Installation Instructions
Page 12
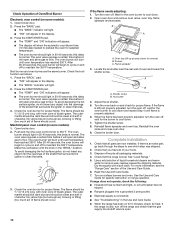
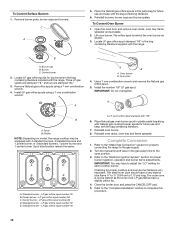
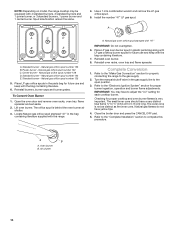
... A. Oven burner B. IMPORTANT: Do not overtighten. Spud B. LP oven orifice spud stamped with the range. The outer cone is very important. Lift oven burner. Three LP gas spuds are stamped "78," and two are stamped "84." 3. Power burner - Complete Conversion 1. Turn... Center burner 2. A C D B E A. LP gas orifice spud number 78 B. LP gas orifice spud number 84 D. Burner C. Locate LP gas orifice spuds for future use and keep with the range. A B A. LP gas orifice spud number 84 C. Locate LP gas orifice spud stamped "56" in the parts bag for ...
... A. Oven burner B. IMPORTANT: Do not overtighten. Spud B. LP oven orifice spud stamped with the range. The outer cone is very important. Lift oven burner. Three LP gas spuds are stamped "78," and two are stamped "84." 3. Power burner - Complete Conversion 1. Turn... Center burner 2. A C D B E A. LP gas orifice spud number 78 B. LP gas orifice spud number 84 D. Burner C. Locate LP gas orifice spuds for future use and keep with the range. A B A. LP gas orifice spud number 84 C. Locate LP gas orifice spud stamped "56" in the parts bag for ...
Installation Instructions
Page 13
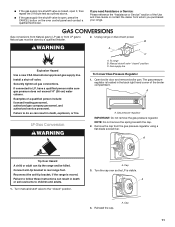
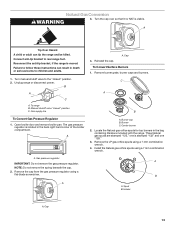
...remove broiler pan. Burner cap B. Reconnect the anti-tip bracket, if the range is located in the back right hand corner of the broiler compartment. Three Natural gas spuds are stamped "125," one is visible. A Tip Over Hazard A ... literature included with the range. To range B. Manual shutoff valve "closed " position. 2. C A B To Convert Gas Pressure Regulator 1. Gas pressure regulator A IMPORTANT: Do not remove the gas pressure regulator. Unplug range or disconnect power. Cap To Convert Surface Burners 1. Install the Natural gas orifice spuds using a ...
...remove broiler pan. Burner cap B. Reconnect the anti-tip bracket, if the range is located in the back right hand corner of the broiler compartment. Three Natural gas spuds are stamped "125," one is visible. A Tip Over Hazard A ... literature included with the range. To range B. Manual shutoff valve "closed " position. 2. C A B To Convert Gas Pressure Regulator 1. Gas pressure regulator A IMPORTANT: Do not remove the gas pressure regulator. Unplug range or disconnect power. Cap To Convert Surface Burners 1. Install the Natural gas orifice spuds using a ...
Installation Instructions
Page 14
.... Refer to complete this procedure. Natural gas flames do not have to the gas supply. 2. Natural gas orifice spud number 125 B. Natural gas orifice spud number 132 C. To Convert Oven Burner 1. Natural gas oven orifice spud stamped with the range. Refer to the "Complete Installation" section...not as distinct as the inner cone. A. Reinstall oven burner. 8. Complete Conversion 1. Refer to the "Make Gas Connection" section for properly connecting the range to adjust the "LO" setting for proper cooktop and oven burner flames is very important. IMPORTANT: You may be...
.... Refer to complete this procedure. Natural gas flames do not have to the gas supply. 2. Natural gas orifice spud number 125 B. Natural gas orifice spud number 132 C. To Convert Oven Burner 1. Natural gas oven orifice spud stamped with the range. Refer to the "Complete Installation" section...not as distinct as the inner cone. A. Reinstall oven burner. 8. Complete Conversion 1. Refer to the "Make Gas Connection" section for properly connecting the range to adjust the "LO" setting for proper cooktop and oven burner flames is very important. IMPORTANT: You may be...


