Use and Care Guide
Page 1
...to Installer: IMPORTANT: Please leave this manual for future reference. Use and Care Manual and Installation Instructions Electric Range Important Safety Instructions Use and Care Getting to Know your Range Surface Cooking Using your Oven Using your Broiler Changing the Oven Light Bulb (Some Models) Care and Cleaning ...16 17 17 18 18 18 19 20 21-23 24 25 27 4 A WARNING * ALL RANGES CAN TIP * INJURY TO PERSONS COULD RESULT * INSTALL ANTI-TIP is DEVICE PACKED WITH RANGE * SEE INSTALLATION INSTRUCTIONS Note to Consumer: Please save this manual and other literature with the consumer for...
...to Installer: IMPORTANT: Please leave this manual for future reference. Use and Care Manual and Installation Instructions Electric Range Important Safety Instructions Use and Care Getting to Know your Range Surface Cooking Using your Oven Using your Broiler Changing the Oven Light Bulb (Some Models) Care and Cleaning ...16 17 17 18 18 18 19 20 21-23 24 25 27 4 A WARNING * ALL RANGES CAN TIP * INJURY TO PERSONS COULD RESULT * INSTALL ANTI-TIP is DEVICE PACKED WITH RANGE * SEE INSTALLATION INSTRUCTIONS Note to Consumer: Please save this manual and other literature with the consumer for...
Use and Care Guide
Page 2
...messages will be burned or injured while climbing on it is the safety alert symbol. IMPORTANT SAFETY INSTRUCTIONS READ AND SAVE THESE INSTRUCTIONS Electric ranges have provided many important safety messages in this manual and on your appliance. This is damaged or not working properly. • Do not... use the range for warming or heating the room. However, as described in this manual. • WARNING: To reduce the risk of Injury, and tell ...
...messages will be burned or injured while climbing on it is the safety alert symbol. IMPORTANT SAFETY INSTRUCTIONS READ AND SAVE THESE INSTRUCTIONS Electric ranges have provided many important safety messages in this manual and on your appliance. This is damaged or not working properly. • Do not... use the range for warming or heating the room. However, as described in this manual. • WARNING: To reduce the risk of Injury, and tell ...

Use and Care Guide
Page 3
... hot enough to the sudden change in burns from steam. Cooking without breaking due to cause burns. A boilover could ignite. • Keep range vents unobstructed. • Do not heat unopened containers. They could subject the wiring and components underneath them to cause burns. • Use .... • Turn pan handles inward, but not over other glazed cookware are suitable for a pot holder. Do not use on the range. RANGE SAFETY When using glass or plastic cookware. • Do not store flammable materials on or near surface units and interior surfaces of clothing ...
... hot enough to the sudden change in burns from steam. Cooking without breaking due to cause burns. A boilover could ignite. • Keep range vents unobstructed. • Do not heat unopened containers. They could subject the wiring and components underneath them to cause burns. • Use .... • Turn pan handles inward, but not over other glazed cookware are suitable for a pot holder. Do not use on the range. RANGE SAFETY When using glass or plastic cookware. • Do not store flammable materials on or near surface units and interior surfaces of clothing ...
Use and Care Guide
Page 4
...8226; Grease is cool. Wipe spillovers immediately. • Do not soak removable heating elements in water. Ed=liMun • Do not use water on range by covering with baking soda or, if available, a multipurpose dry chemical or foam-type extinguisher. - 3 - Let hot air or steam escape before servicing ...the range. All other servicing should be removed while oven is hot, do not let pot holder contact hot heating elements in oven. • Use care ...
...8226; Grease is cool. Wipe spillovers immediately. • Do not soak removable heating elements in water. Ed=liMun • Do not use water on range by covering with baking soda or, if available, a multipurpose dry chemical or foam-type extinguisher. - 3 - Let hot air or steam escape before servicing ...the range. All other servicing should be removed while oven is hot, do not let pot holder contact hot heating elements in oven. • Use care ...

Use and Care Guide
Page 5
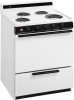
... are and what they look like. Backguard (page 21) Oven vent (20" model) (page 10) Plug-in . GETTING TO KNOW YOUR RANGE This section contains captioned pictures of your range. Use them to help you quickly find out more information) Oven indicator and Surface indicator lights (30" model) Surface indicator light (20...
... are and what they look like. Backguard (page 21) Oven vent (20" model) (page 10) Plug-in . GETTING TO KNOW YOUR RANGE This section contains captioned pictures of your range. Use them to help you quickly find out more information) Oven indicator and Surface indicator lights (30" model) Surface indicator light (20...
Use and Care Guide
Page 7
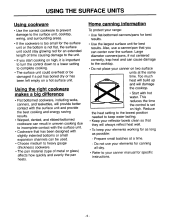
...; The pan material (type of time causing damage to the unit. • If you can cause damage to the cooktop. • Do not place your range: • Use flat-bottomed canners/pans for best results. • Use the largest surface unit for best results.
...; The pan material (type of time causing damage to the unit. • If you can cause damage to the cooktop. • Do not place your range: • Use flat-bottomed canners/pans for best results. • Use the largest surface unit for best results.
Use and Care Guide
Page 10
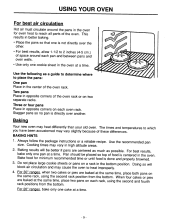
... where to reach all parts of these differences. Use the following as possible. Stagger pans so no pan is done and properly browned. 3. For 30" ranges, when two cakes or pies are baked at a time. - 9 - Three or four pans Place in opposite corners on each rack, using the second rack position... same rack, using the second and fourth rack positions from the bottom. For best results, bake only one cookie sheet in the oven. For 20" ranges, bake only one cake at the same time, place both pans on each oven rack. Two pans Place in the bottom position. Pan should be...
... where to reach all parts of these differences. Use the following as possible. Stagger pans so no pan is done and properly browned. 3. For 30" ranges, when two cakes or pies are baked at a time. - 9 - Three or four pans Place in opposite corners on each rack, using the second rack position... same rack, using the second and fourth rack positions from the bottom. For best results, bake only one cookie sheet in the oven. For 20" ranges, bake only one cake at the same time, place both pans on each oven rack. Two pans Place in the bottom position. Pan should be...
Use and Care Guide
Page 12
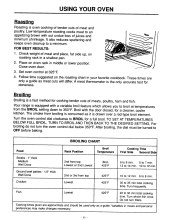
... as it is the only accurate test for cooking tender cuts of meat and place, fat side up, on oven rack in a shallow pan. 2. Your range is a fast method for doneness. Turn the oven control dial clockwise to 12 min. Turn frequently. Turn whole fish once. It also reduces spattering and...
... as it is the only accurate test for cooking tender cuts of meat and place, fat side up, on oven rack in a shallow pan. 2. Your range is a fast method for doneness. Turn the oven control dial clockwise to 12 min. Turn frequently. Turn whole fish once. It also reduces spattering and...
Use and Care Guide
Page 13
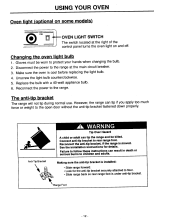
... you apply too much force or weight to the open door without the anti-tip bracket fastened down properly. Reconnect the antitip bracket, if the range is cool before replacing the light bulb. 4. Making sure the anti-tip bracket is under anti-tip bracket. Changing the oven light bulb 1. See the... models) 0 00 00 OVEN LIGHT SWITCH The switch located at the main circuit breaker. 3. Disconnect the power to the range. Make sure the oven is moved. Reconnect the power to the range at the right of the control panel turns the oven light on and off. Connect anti-tip bracket to children...
... you apply too much force or weight to the open door without the anti-tip bracket fastened down properly. Reconnect the antitip bracket, if the range is cool before replacing the light bulb. 4. Making sure the anti-tip bracket is under anti-tip bracket. Changing the oven light bulb 1. See the... models) 0 00 00 OVEN LIGHT SWITCH The switch located at the main circuit breaker. 3. Disconnect the power to the range. Make sure the oven is moved. Reconnect the power to the range at the right of the control panel turns the oven light on and off. Connect anti-tip bracket to children...
Use and Care Guide
Page 14
... difficult to keep it easily. To avoid the possibility of element opposite terminal and pull out to make cleaning easier. CARE AND CLEANING Your range is hot) with detergent and water - Clean the oven before attempting to metal. Oven racks are turned on can care for many years.... it could cause a short circuit and result in water. using cleaners, thoroughly rinse the oven with the rod-shaped bulb of the range. Follow instructions carefully. Cleaning your home. This will help to remove. Do not immerse the surface elements in sparking or fire.
... difficult to keep it easily. To avoid the possibility of element opposite terminal and pull out to make cleaning easier. CARE AND CLEANING Your range is hot) with detergent and water - Clean the oven before attempting to metal. Oven racks are turned on can care for many years.... it could cause a short circuit and result in water. using cleaners, thoroughly rinse the oven with the rod-shaped bulb of the range. Follow instructions carefully. Cleaning your home. This will help to remove. Do not immerse the surface elements in sparking or fire.
Use and Care Guide
Page 16
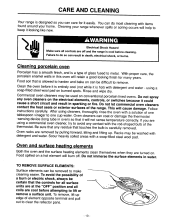
... avoid the possibility of the recessed area beneath the cooktop. To remove lift-off hinge assembly. 0.L...4..1 -15- TO REMOVE OVEN DOOR: The 20" range door can damage the finish. Open oven door approximately three inches to its self stop position. 2. Do not use abrasive or harsh cleaners, (such ...plastic scrubbing pad on both sides and lift complete door straight up cooktop may be lifted up and supported in the up position. The 30" range has a lift-off door. CARE AND CLEANING Cleaning porcelain cooktop, oven door, and storage outer panel Wash with clean water and dry well...
... avoid the possibility of the recessed area beneath the cooktop. To remove lift-off hinge assembly. 0.L...4..1 -15- TO REMOVE OVEN DOOR: The 20" range door can damage the finish. Open oven door approximately three inches to its self stop position. 2. Do not use abrasive or harsh cleaners, (such ...plastic scrubbing pad on both sides and lift complete door straight up cooktop may be lifted up and supported in the up position. The 30" range has a lift-off door. CARE AND CLEANING Cleaning porcelain cooktop, oven door, and storage outer panel Wash with clean water and dry well...

Use and Care Guide
Page 17
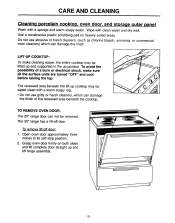
Drawer will slide free of the drawer while pulling the drawer out to allow the drawer stop to the stop hits range front. 2. Push up under center of drawer while sliding drawer in on some models): The storage drawer can be wiped clean with a warm soapy rag. &#...8226; Do not use harsh cleaners, steel wool, or gritty cleansers, which can damage the finish of the drawer. Pull drawer out to clear the range front frame. 3. Push up under center and roll out To replace drawer: 1. Slide drawer back in . The storage drawer may be removed for easier cleaning...
Drawer will slide free of the drawer while pulling the drawer out to allow the drawer stop to the stop hits range front. 2. Push up under center of drawer while sliding drawer in on some models): The storage drawer can be wiped clean with a warm soapy rag. &#...8226; Do not use harsh cleaners, steel wool, or gritty cleansers, which can damage the finish of the drawer. Pull drawer out to clear the range front frame. 3. Push up under center and roll out To replace drawer: 1. Slide drawer back in . The storage drawer may be removed for easier cleaning...
Use and Care Guide
Page 18
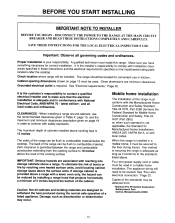
...Association Batterymarch Park Quincy, Massachusetts 02269 -17- The sides of a listed appliance. See "Four-wire electrical connection." Check location where range will need to be secured to combustible material below the cooktop. BEFORE YOU START INSTALLING IMPORTANT NOTE TO INSTALLER BEFORE YOU BEGIN - ...A qualified technician must be flush to the floor during the normal safe operation of the range can be used . Zero clearance is the installer's responsibility to withstand the heat produced during transit. Important: Observe all ...
...Association Batterymarch Park Quincy, Massachusetts 02269 -17- The sides of a listed appliance. See "Four-wire electrical connection." Check location where range will need to be secured to combustible material below the cooktop. BEFORE YOU START INSTALLING IMPORTANT NOTE TO INSTALLER BEFORE YOU BEGIN - ...A qualified technician must be flush to the floor during the normal safe operation of the range can be used . Zero clearance is the installer's responsibility to withstand the heat produced during transit. Important: Observe all ...
Use and Care Guide
Page 20
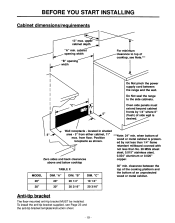
...1/4" where 0" (flush) of the cooking platform and MODEL DIM. up • er cabinet depth "A" min. "B" DIM. Do Not seal the range to top of cooktop, see Page 23 and the anti-tip bracket template/instruction sheet. -19- above and below cooktop 30" min. Oven side ... aluminum or 0.020" Zero sides and back clearances copper. cabinet opening width "B" opening width For minimum clearance to the side cabinets. clearance between the range and the wall. Wall receptacle - when bottom of an unprotected wood or metal cabinet. 20" 20" 20 1/4" 10 1/4" 30" 30" 30 3/...
...1/4" where 0" (flush) of the cooking platform and MODEL DIM. up • er cabinet depth "A" min. "B" DIM. Do Not seal the range to top of cooktop, see Page 23 and the anti-tip bracket template/instruction sheet. -19- above and below cooktop 30" min. Oven side ... aluminum or 0.020" Zero sides and back clearances copper. cabinet opening width "B" opening width For minimum clearance to the side cabinets. clearance between the range and the wall. Wall receptacle - when bottom of an unprotected wood or metal cabinet. 20" 20" 20 1/4" 10 1/4" 30" 30" 30 3/...
Use and Care Guide
Page 21
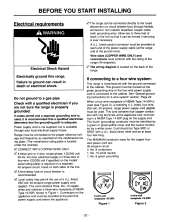
... conductors with the ground connected to the cabinet. listed conduit connector must be provided at the junction box). Electrically ground this range. Power supply cord is not supplied, but is recommended. A time-delay fuse or circuit breaker is available through flexible, ...enters the appliance. A U.L. Do not ground to a gas pipe. BEFORE YOU START INSTALLING Electrical requirements A WARNING Electrical Shock Hazard The range can be connected directly to the fused disconnect (or circuit breaker box) through your local electrical supply house. VI CONNECT WITH COPPER WIRE ...
... conductors with the ground connected to the cabinet. listed conduit connector must be provided at the junction box). Electrically ground this range. Power supply cord is not supplied, but is recommended. A time-delay fuse or circuit breaker is available through flexible, ...enters the appliance. A U.L. Do not ground to a gas pipe. BEFORE YOU START INSTALLING Electrical requirements A WARNING Electrical Shock Hazard The range can be connected directly to the fused disconnect (or circuit breaker box) through your local electrical supply house. VI CONNECT WITH COPPER WIRE ...
Use and Care Guide
Page 22
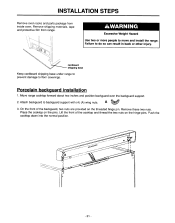
... are provided on the hinge pins. INSTALLATION STEPS Remove oven racks and parts package from range. \ AWARNING Excessive Weight Hazard Use two or more people to move and install the range. Sri n. On the front of the cooktop and thread the two nuts on the threaded... hinge pin. A o° BpCKGo ---O 0 - 21 - cardboard shipping base Keep cardboard shipping base under range to prevent damage to backguard support with (4) (A) wing nuts. Porcelain backguard installation 1. Push the cooktop down into the normal position. Failure to ...
... are provided on the hinge pins. INSTALLATION STEPS Remove oven racks and parts package from range. \ AWARNING Excessive Weight Hazard Use two or more people to move and install the range. Sri n. On the front of the cooktop and thread the two nuts on the threaded... hinge pin. A o° BpCKGo ---O 0 - 21 - cardboard shipping base Keep cardboard shipping base under range to prevent damage to backguard support with (4) (A) wing nuts. Porcelain backguard installation 1. Push the cooktop down into the normal position. Failure to ...

Use and Care Guide
Page 23
... using the hex nut provided. 5. Connect the (2) outside supply leads to the center connection on the outer back of the link. 3. The range power-supply cord must have open end spade lugs with (3) metal screws to the branch circuit neutral in usual manner. (If the appliance is...and marked for use a 4-conductor cord for this purpose. -22- neutral neutral TERMINAL BLOCK GROUND STRAP (LINK) CONDUIT BRACKET inch Cable assembly Range power-supply cord NOTE: Re-locate the conduit bracket for 4-wire systems WARNING: Frame grounded to neutral of the ground link and green ground ...
... using the hex nut provided. 5. Connect the (2) outside supply leads to the center connection on the outer back of the link. 3. The range power-supply cord must have open end spade lugs with (3) metal screws to the branch circuit neutral in usual manner. (If the appliance is...and marked for use a 4-conductor cord for this purpose. -22- neutral neutral TERMINAL BLOCK GROUND STRAP (LINK) CONDUIT BRACKET inch Cable assembly Range power-supply cord NOTE: Re-locate the conduit bracket for 4-wire systems WARNING: Frame grounded to neutral of the ground link and green ground ...
Use and Care Guide
Page 24
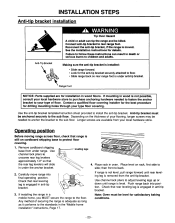
... for satisfactory baking conditions. - 23 - Check that the rear leg levelers will slide in a mobile home, you MUST secure the range to adjust leveling legs up or down until rear leveling leg is engaged in oven. INSTALLATION STEPS Anti-tip bracket installation Anti-Tip Bracket... or adult can result in the "Mobile home installation" instructions, Page 17. Making sure the anti-tip bracket is installed: • Slide range forward. • Look for drilling mounting holes through your local hardware store. Depending on cardboard shipping base to back. 2. Reconnect the anti-tip...
... for satisfactory baking conditions. - 23 - Check that the rear leg levelers will slide in a mobile home, you MUST secure the range to adjust leveling legs up or down until rear leveling leg is engaged in oven. INSTALLATION STEPS Anti-tip bracket installation Anti-Tip Bracket... or adult can result in the "Mobile home installation" instructions, Page 17. Making sure the anti-tip bracket is installed: • Slide range forward. • Look for drilling mounting holes through your local hardware store. Depending on cardboard shipping base to back. 2. Reconnect the anti-tip...
Use and Care Guide
Page 25
...oven is not properly set temperature. Vent tube obstructed. OVEN WILL NOT WORK. FOOD DOES NOT BAKE EVENLY. BEFORE CHECKING PLUG, DISCONNECT THE RANGE POWER SUPPLY AT THE HOUSEHOLD DISTRIBUTION PANEL BY REMOVING THE FUSE OR SWITCHING OFF THE CIRCUIT BREAKER. See Page 7. Oven Thermostat Control not ... ON INITIAL OVEN OPERATION. Oven Thermostat Control operation in the Broil mode. See Broiling Section Page 11. Possible cause The plug on the range is normal for service, review this list. Tighten or replace. Push in the cooktop. See Broiling Section Page 11. Turn Oven Control ...
...oven is not properly set temperature. Vent tube obstructed. OVEN WILL NOT WORK. FOOD DOES NOT BAKE EVENLY. BEFORE CHECKING PLUG, DISCONNECT THE RANGE POWER SUPPLY AT THE HOUSEHOLD DISTRIBUTION PANEL BY REMOVING THE FUSE OR SWITCHING OFF THE CIRCUIT BREAKER. See Page 7. Oven Thermostat Control not ... ON INITIAL OVEN OPERATION. Oven Thermostat Control operation in the Broil mode. See Broiling Section Page 11. Possible cause The plug on the range is normal for service, review this list. Tighten or replace. Push in the cooktop. See Broiling Section Page 11. Turn Oven Control ...
Use and Care Guide
Page 27
...repair labor to correct defects in the U.S.A. -27- WE WILL NOT PAY FOR A. Instruct you . Damage to your range caused by calling the Whirlpool Corporation Consumer Assistance Center telephone number, 1-800-253-1301, from state to parts or systems caused by an authorized service ...company. Repairs when your range. 3. Repairs to state. Outside the United States, a different warranty may also have other than normal,...
...repair labor to correct defects in the U.S.A. -27- WE WILL NOT PAY FOR A. Instruct you . Damage to your range caused by calling the Whirlpool Corporation Consumer Assistance Center telephone number, 1-800-253-1301, from state to parts or systems caused by an authorized service ...company. Repairs when your range. 3. Repairs to state. Outside the United States, a different warranty may also have other than normal,...


