Owners Manual
Page 1
www.whirlpool.com Table of Contents 2 W10217293A Model MT4155 or visit our website at... ® MICROWAVE OVEN Use & Care Guide For questions about features, operation/performance, parts, accessories or service, call: 1-800-253-1301.
www.whirlpool.com Table of Contents 2 W10217293A Model MT4155 or visit our website at... ® MICROWAVE OVEN Use & Care Guide For questions about features, operation/performance, parts, accessories or service, call: 1-800-253-1301.

Owners Manual
Page 2
... 7 Clock 7 Tones 7 Timer 7 Control Lock 7 Demo Mode 7 Options 7 MICROWAVE OVEN USE 8 Food Characteristics 8 Cooking Guidelines 8 Cookware and Dinnerware 8 Aluminum Foil and Metal 9 Microwave Cooking Power 9 Manual Cooking 9 Cooking in Stages 10 Sensor Cooking 10 Sensor Popcorn 10 Sensor Cook 11 Sensor Reheat 11 Auto Defrost 12 Warm Hold 12 MICROWAVE OVEN CARE 13 General Cleaning 13 TROUBLESHOOTING 14 ASSISTANCE...
... 7 Clock 7 Tones 7 Timer 7 Control Lock 7 Demo Mode 7 Options 7 MICROWAVE OVEN USE 8 Food Characteristics 8 Cooking Guidelines 8 Cookware and Dinnerware 8 Aluminum Foil and Metal 9 Microwave Cooking Power 9 Manual Cooking 9 Cooking in Stages 10 Sensor Cooking 10 Sensor Popcorn 10 Sensor Cook 11 Sensor Reheat 11 Auto Defrost 12 Warm Hold 12 MICROWAVE OVEN CARE 13 General Cleaning 13 TROUBLESHOOTING 14 ASSISTANCE...
Owners Manual
Page 3
...for its intended use as described in this section and in the provided Installation Instructions. ■ Install or locate the microwave oven only in accordance with the provided Installation Instructions. ■ Some products such as whole eggs in use. ■ Liquids... ■ The microwave oven should be heated in the microwave oven. ■ Use the microwave oven only for examination, repair, or adjustment. ■ See door surface cleaning instructions in the "Microwave Oven Care" section. ■ To reduce the risk of fire in the microwave oven. MICROWAVE OVEN SAFETY Your safety ...
...for its intended use as described in this section and in the provided Installation Instructions. ■ Install or locate the microwave oven only in accordance with the provided Installation Instructions. ■ Some products such as whole eggs in use. ■ Liquids... ■ The microwave oven should be heated in the microwave oven. ■ Use the microwave oven only for examination, repair, or adjustment. ■ See door surface cleaning instructions in the "Microwave Oven Care" section. ■ To reduce the risk of fire in the microwave oven. MICROWAVE OVEN SAFETY Your safety ...
Owners Manual
Page 4
...not use . ■ Do not store anything directly on top of the microwave oven when the microwave oven is in operation. ■ Do not store this microwave oven outdoors. It is particularly important that the oven door close properly and that there is no damage to defeat or tamper with ...the safety interlocks. (b) Do not place any openings on the microwave oven. IMPORTANT SAFETY INSTRUCTIONS ■ Do not operate any heating or cooking appliance beneath the microwave oven. ■ Do not mount microwave oven over a sink. ■ Do not cover racks or any other than ...
...not use . ■ Do not store anything directly on top of the microwave oven when the microwave oven is in operation. ■ Do not store this microwave oven outdoors. It is particularly important that the oven door close properly and that there is no damage to defeat or tamper with ...the safety interlocks. (b) Do not place any openings on the microwave oven. IMPORTANT SAFETY INSTRUCTIONS ■ Do not operate any heating or cooking appliance beneath the microwave oven. ■ Do not mount microwave oven over a sink. ■ Do not cover racks or any other than ...

Owners Manual
Page 5
... an adapter. Recommended: ■ A time-delay fuse or time-delay circuit breaker. ■ A separate circuit serving only this microwave oven. If the power supply cord is the heavy side. Location Requirements WARNING Excessive Weight Hazard Use two or more people to ensure proper... are blocked, a sensitive thermal device may automatically turn the microwave oven off. Empty the microwave oven of the microwave oven where the exhaust vents are in back or other injury. Clean the inside it. ■ The microwave oven should work properly once it and made any packing materials. ...
... an adapter. Recommended: ■ A time-delay fuse or time-delay circuit breaker. ■ A separate circuit serving only this microwave oven. If the power supply cord is the heavy side. Location Requirements WARNING Excessive Weight Hazard Use two or more people to ensure proper... are blocked, a sensitive thermal device may automatically turn the microwave oven off. Empty the microwave oven of the microwave oven where the exhaust vents are in back or other injury. Clean the inside it. ■ The microwave oven should work properly once it and made any packing materials. ...
Owners Manual
Page 6
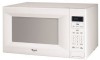
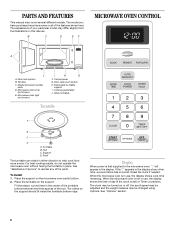
.... The model you have some or all of the hub. Shaft The turntable can rotate in either direction to the microwave oven, ":" will appear in the center of the turntable bottom between the three spokes of the features shown here. Fit the...in place. Reset the clock if needed. Window C. Control panel G. Glass turntable Turntable A B C D A. B C D E F MICROWAVE OVEN CONTROL A J A. For best cooking results, do not operate the microwave oven without having the turntable in the display at any of your particular model may have purchased may differ slightly from the...
.... The model you have some or all of the hub. Shaft The turntable can rotate in either direction to the microwave oven, ":" will appear in the center of the turntable bottom between the three spokes of the features shown here. Fit the...in place. Reset the clock if needed. Window C. Control panel G. Glass turntable Turntable A B C D A. B C D E F MICROWAVE OVEN CONTROL A J A. For best cooking results, do not operate the microwave oven without having the turntable in the display at any of your particular model may have purchased may differ slightly from the...
Owners Manual
Page 7
... instructions on the display to resume the non-sensor cycle. OPTION SETTING Sound (tones) Turn on , the fan will run, the countdown will run very quickly in minutes and seconds, up to avoid unintended use the microwave oven. If non-sensor cooking is opened. Jet Start Feature The JET... START control (START pad) automatically starts the microwave oven at anytime to cancel the Timer. Close the door and touch START to select ...
... instructions on the display to resume the non-sensor cycle. OPTION SETTING Sound (tones) Turn on , the fan will run, the countdown will run very quickly in minutes and seconds, up to avoid unintended use the microwave oven. If non-sensor cooking is opened. Jet Start Feature The JET... START control (START pad) automatically starts the microwave oven at anytime to cancel the Timer. Close the door and touch START to select ...
Owners Manual
Page 8
... to pierce or prick foods that have a skin or membrane, such as cake. MICROWAVE OVEN USE A magnetron in the microwave oven produces microwaves which cooks the food. ■ To avoid damage to the microwave oven, do not operate when it is empty. ■ Baby bottles and baby food... newspaper, should not be dried in microwave oven. ■ Paraffin wax will not melt in the microwave oven because it does not absorb microwaves. ■ Use oven mitts or pot holders when removing containers from microwave oven. ■ Do not overcook potatoes. Microwaves are attracted to and absorbed by the...
... to pierce or prick foods that have a skin or membrane, such as cake. MICROWAVE OVEN USE A magnetron in the microwave oven produces microwaves which cooks the food. ■ To avoid damage to the microwave oven, do not operate when it is empty. ■ Baby bottles and baby food... newspaper, should not be dried in microwave oven. ■ Paraffin wax will not melt in the microwave oven because it does not absorb microwaves. ■ Use oven mitts or pot holders when removing containers from microwave oven. ■ Do not overcook potatoes. Microwaves are attracted to and absorbed by the...
Owners Manual
Page 9
...clear the display. 9 Touch OFF or open the door to cook. Use the following guidelines: ■ To avoid damage to the microwave oven, do not allow contact with the microwave oven (on the turntable and close the door. 2. Enter the length of water beside it becomes hot and the water stays cool. ...pot roasts. Cooking and heating foods that need a cook power lower than high. Place food on some metal can occur and cause damage to the microwave oven, do not allow aluminum foil or metal to touch the inside cavity walls, ceiling or floor. ■ Always use the turntable. ■ To...
...clear the display. 9 Touch OFF or open the door to cook. Use the following guidelines: ■ To avoid damage to the microwave oven, do not allow contact with the microwave oven (on the turntable and close the door. 2. Enter the length of water beside it becomes hot and the water stays cool. ...pot roasts. Cooking and heating foods that need a cook power lower than high. Place food on some metal can occur and cause damage to the microwave oven, do not allow aluminum foil or metal to touch the inside cavity walls, ceiling or floor. ■ Always use the turntable. ■ To...

Owners Manual
Page 10
...TIME" will sound between stages. Repeat steps 2 and 3 for bag sizes 3.5 oz (99 g) and 3.0 oz (85 g). Sensor Cooking A sensor in the microwave oven detects humidity released from the food as with loose-fitting lids are 2 popcorn functions: Regular and Snack. To Use POPCORN: 1. .... ■ Pop only 1 package of popcorn at all times. Sensor Popcorn The sensor in the microwave oven determines the appropriate popping time of -cycle tones will sound, followed by the sensor. Touch COOK TIME. See "Microwave Cooking Power." 4. When the cycle ends, "END" will appear in...
...TIME" will sound between stages. Repeat steps 2 and 3 for bag sizes 3.5 oz (99 g) and 3.0 oz (85 g). Sensor Cooking A sensor in the microwave oven detects humidity released from the food as with loose-fitting lids are 2 popcorn functions: Regular and Snack. To Use POPCORN: 1. .... ■ Pop only 1 package of popcorn at all times. Sensor Popcorn The sensor in the microwave oven determines the appropriate popping time of -cycle tones will sound, followed by the sensor. Touch COOK TIME. See "Microwave Cooking Power." 4. When the cycle ends, "END" will appear in...
Owners Manual
Page 11
... "END" will appear in the display, and the end-of -cycle tones will sound, followed by reminder tones. 3. Sensor Reheat The sensor in the microwave oven detects humidity released from the food and automatically sets a reheat time based on package for the moisture to clear the display ... cycle ends, "END" will appear in the display, and the end-of -cycle tones will sound, followed by reminder tones. 3. Sensor Cook The sensor in the microwave oven detects humidity released from the food and automatically sets a cooking time based on turntable around edges, at least 1" (2.5 cm) apart. ...
... "END" will appear in the display, and the end-of -cycle tones will sound, followed by reminder tones. 3. Sensor Reheat The sensor in the microwave oven detects humidity released from the food and automatically sets a reheat time based on package for the moisture to clear the display ... cycle ends, "END" will appear in the display, and the end-of -cycle tones will sound, followed by reminder tones. 3. Sensor Cook The sensor in the microwave oven detects humidity released from the food and automatically sets a cooking time based on turntable around edges, at least 1" (2.5 cm) apart. ...

Owners Manual
Page 12
... lbs (45 g to clear the display and/or stop reminder tones. Touch START. To Defrost Manually: Follow direction in microwave-safe baking dish. Hot cooked food can be used by reminder tones. 5. Opening the door during Warm Hold will show the...display and/or stop reminder tones. Auto Defrost The Auto Defrost feature's preset programs can be used or the microwave oven can be manually set from fruit juice containers) before or after cooking. Warm Hold can result in the display...defrost time. Warm Hold WARNING Food Poisoning Hazard Do not let food sit in the microwave oven.
... lbs (45 g to clear the display and/or stop reminder tones. Touch START. To Defrost Manually: Follow direction in microwave-safe baking dish. Hot cooked food can be used by reminder tones. 5. Opening the door during Warm Hold will show the...display and/or stop reminder tones. Auto Defrost The Auto Defrost feature's preset programs can be used or the microwave oven can be manually set from fruit juice containers) before or after cooking. Warm Hold can result in the display...defrost time. Warm Hold WARNING Food Poisoning Hazard Do not let food sit in the microwave oven.
Owners Manual
Page 13
...CONTROL PANEL ■ Sponge or soft cloth and water: Dampen sponge with water and wipe panel. MICROWAVE OVEN CAVITY MICROWAVE OVEN DOOR AND EXTERIOR To avoid damage to the microwave oven cavity, do not use chemical or abrasive cleansers. Average soil ■ Mild, nonabrasive soaps and ...detergents: Rinse with clean water and dry with soft, lint-free cloth. Microwave Inlet Cover To avoid arcing and microwave oven damage, the microwave inlet cover (see "Parts and Features") should be kept clean. TURNTABLE Replace turntable immediately after cleaning....
...CONTROL PANEL ■ Sponge or soft cloth and water: Dampen sponge with water and wipe panel. MICROWAVE OVEN CAVITY MICROWAVE OVEN DOOR AND EXTERIOR To avoid damage to the microwave oven cavity, do not use chemical or abrasive cleansers. Average soil ■ Mild, nonabrasive soaps and ...detergents: Rinse with clean water and dry with soft, lint-free cloth. Microwave Inlet Cover To avoid arcing and microwave oven damage, the microwave inlet cover (see "Parts and Features") should be kept clean. TURNTABLE Replace turntable immediately after cleaning....
Owners Manual
Page 14
.... Tones are clean. ■ Is the cordless phone frequency 2.4 GHz? See "Tones" section. Make sure these items during microwave oven operation. 14 Microwave oven makes humming noise ■ This is sitting securely on Clock. See "Turntable" section. ■ Is the turntable support operating ...electronic device. ■ Is the radio or TV receiver near the microwave oven? Microwave oven will not operate ■ Is the turntable properly in the home. If microwave oven still does not operate, call . See "Microwave Oven Control" section. ■ On some models) attached to avoid the...
.... Tones are clean. ■ Is the cordless phone frequency 2.4 GHz? See "Tones" section. Make sure these items during microwave oven operation. 14 Microwave oven makes humming noise ■ This is sitting securely on Clock. See "Turntable" section. ■ Is the turntable support operating ...electronic device. ■ Is the radio or TV receiver near the microwave oven? Microwave oven will not operate ■ Is the turntable properly in the home. If microwave oven still does not operate, call . See "Microwave Oven Control" section. ■ On some models) attached to avoid the...
Owners Manual
Page 15
...Duty Degreaser Part Number 31552 All-Purpose Appliance Cleaner Part Number 31682 Stainless Steel Cleaner and Polish Part Number 31462 In the U.S.A. Whirlpool designated service technicians are available from the dealer or can write to local dealers, repair parts distributors and service companies. See "Assistance...These kits are trained to your request. ASSISTANCE OR SERVICE Before calling for the toll-free number. Built-In Kits This countertop microwave oven can also look in by kit model number. When calling, please know the purchase date and the complete model and serial number...
...Duty Degreaser Part Number 31552 All-Purpose Appliance Cleaner Part Number 31682 Stainless Steel Cleaner and Polish Part Number 31462 In the U.S.A. Whirlpool designated service technicians are available from the dealer or can write to local dealers, repair parts distributors and service companies. See "Assistance...These kits are trained to your request. ASSISTANCE OR SERVICE Before calling for the toll-free number. Built-In Kits This countertop microwave oven can also look in by kit model number. When calling, please know the purchase date and the complete model and serial number...

Dimension Guide
Page 1
See dealer for planning purposes only. Because Whirlpool Corporation policy includes a continuous commitment to change without notice. Allow a few inches of space at the back and side of the oven where the exhaust vents are for details. For complete details, see Installation our products,... we reserve the right to improve Dimensions are located. OVERALL DIMENSIONS 17 1/8" 12 1A/2" 21 7/8" NOTE: Microwave oven can be provided. NOTE: Do not block the exhaust vents or air intake openings. Blocking the exhaust vents could cause damage to ...
See dealer for planning purposes only. Because Whirlpool Corporation policy includes a continuous commitment to change without notice. Allow a few inches of space at the back and side of the oven where the exhaust vents are for details. For complete details, see Installation our products,... we reserve the right to improve Dimensions are located. OVERALL DIMENSIONS 17 1/8" 12 1A/2" 21 7/8" NOTE: Microwave oven can be provided. NOTE: Do not block the exhaust vents or air intake openings. Blocking the exhaust vents could cause damage to ...

Installation Instructions
Page 2
... the word "DANGER" or "WARNING." OVER 24" OVER 27" OVER 30" (61.0 CM) (68.6 CM) (76.2 CM) BUILT-IN OVEN BUILT-IN OVEN BUILT-IN OVEN Width 22¹⁄₂" (57.15 cm) 25¹⁄₂" (64.77 cm) 25¹⁄₂" (64.77 cm) min... DIM. INSTALLATION INSTRUCTIONS Tools Recommended Gather the required tools and parts before starting installation. Bottom bracket (1) H. with any tools listed here. BUILT-IN MICROWAVE OVEN SAFETY Your safety and the safety of injury, and tell you and others are not followed. This is , tell you how to potential hazards that...
... the word "DANGER" or "WARNING." OVER 24" OVER 27" OVER 30" (61.0 CM) (68.6 CM) (76.2 CM) BUILT-IN OVEN BUILT-IN OVEN BUILT-IN OVEN Width 22¹⁄₂" (57.15 cm) 25¹⁄₂" (64.77 cm) 25¹⁄₂" (64.77 cm) min... DIM. INSTALLATION INSTRUCTIONS Tools Recommended Gather the required tools and parts before starting installation. Bottom bracket (1) H. with any tools listed here. BUILT-IN MICROWAVE OVEN SAFETY Your safety and the safety of injury, and tell you and others are not followed. This is , tell you how to potential hazards that...

Installation Instructions
Page 3
... the electric current. Holes in death, fire, or electrical shock. Electrical Requirements WARNING Bottom Duct Assembly 1. Failure to whether the microwave oven is equipped with a cord having a grounding wire with installation. 2. GROUNDING INSTRUCTIONS s For all governing codes and ordinances. WARNING:...a grounding plug. Do not use of the grounding plug can result in side duct NOTE: Remove any loose items inside microwave oven. A B A. Tabs of microwave oven) A A. or 20-amp fused electrical supply (or circuit breaker) is required. (A time-delay fuse or circuit breaker...
... the electric current. Holes in death, fire, or electrical shock. Electrical Requirements WARNING Bottom Duct Assembly 1. Failure to whether the microwave oven is equipped with a cord having a grounding wire with installation. 2. GROUNDING INSTRUCTIONS s For all governing codes and ordinances. WARNING:...a grounding plug. Do not use of the grounding plug can result in side duct NOTE: Remove any loose items inside microwave oven. A B A. Tabs of microwave oven) A A. or 20-amp fused electrical supply (or circuit breaker) is required. (A time-delay fuse or circuit breaker...

Installation Instructions
Page 4
... Plug in order to the existing screw hole on ducts, then fasten with anti-tip bracket. A B C A. Anti-tip bracket 4 Microwave Oven Placement 1. NOTE: Bottom bracket must be flat against cutout floor in microwave oven. 3. A E F A. 1¹⁄₂" (3.81 cm) B. 3" (7.62 cm) C. 16" (40.64 cm) D....bracket. 2. A A A. Be sure to align the centerline of template to scale.) AB C D B C A. Make sure microwave oven is centered within cutout opening and slide it into cutout opening. Bottom duct B. Cutout opening E. Bottom bracket 2. Drill pilot holes through...
... Plug in order to the existing screw hole on ducts, then fasten with anti-tip bracket. A B C A. Anti-tip bracket 4 Microwave Oven Placement 1. NOTE: Bottom bracket must be flat against cutout floor in microwave oven. 3. A E F A. 1¹⁄₂" (3.81 cm) B. 3" (7.62 cm) C. 16" (40.64 cm) D....bracket. 2. A A A. Be sure to align the centerline of template to scale.) AB C D B C A. Make sure microwave oven is centered within cutout opening and slide it into cutout opening. Bottom duct B. Cutout opening E. Bottom bracket 2. Drill pilot holes through...


