Owners Manual
Page 1
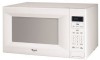
® MICROWAVE OVEN Use & Care Guide For questions about features, operation/performance, parts, accessories or service, call: 1-800-253-1301. or visit our website at... www.whirlpool.com Table of Contents 2 W10217293A Model MT4155
® MICROWAVE OVEN Use & Care Guide For questions about features, operation/performance, parts, accessories or service, call: 1-800-253-1301. or visit our website at... www.whirlpool.com Table of Contents 2 W10217293A Model MT4155

Owners Manual
Page 2
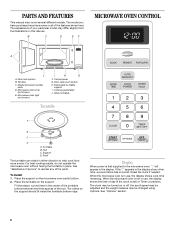
... 6 Turntable 6 MICROWAVE OVEN CONTROL 6 Display 6 Start 7 Jet Start Feature 7 Off 7 Clock 7 Tones 7 Timer 7 Control Lock 7 Demo Mode 7 Options 7 MICROWAVE OVEN USE 8 Food Characteristics 8 Cooking Guidelines 8 Cookware and Dinnerware 8 Aluminum Foil and Metal 9 Microwave Cooking Power 9 Manual Cooking 9 Cooking in Stages 10 Sensor Cooking 10 Sensor Popcorn 10 Sensor Cook 11 Sensor Reheat 11 Auto Defrost 12 Warm Hold 12 MICROWAVE OVEN CARE 13 General Cleaning 13 TROUBLESHOOTING 14 ASSISTANCE OR SERVICE 15 Replacement Parts 15 Built-In Kits 15 WARRANTY 16...
... 6 Turntable 6 MICROWAVE OVEN CONTROL 6 Display 6 Start 7 Jet Start Feature 7 Off 7 Clock 7 Tones 7 Timer 7 Control Lock 7 Demo Mode 7 Options 7 MICROWAVE OVEN USE 8 Food Characteristics 8 Cooking Guidelines 8 Cookware and Dinnerware 8 Aluminum Foil and Metal 9 Microwave Cooking Power 9 Manual Cooking 9 Cooking in Stages 10 Sensor Cooking 10 Sensor Popcorn 10 Sensor Cook 11 Sensor Reheat 11 Auto Defrost 12 Warm Hold 12 MICROWAVE OVEN CARE 13 General Cleaning 13 TROUBLESHOOTING 14 ASSISTANCE OR SERVICE 15 Replacement Parts 15 Built-In Kits 15 WARRANTY 16...
Owners Manual
Page 3
... tell you how to be serviced only by children. ■ Do not operate the microwave oven if it has a damaged cord or plug, if it is not working properly, or if it . - Remove wire twist-ties from the microwave oven is specifically designed to excessive microwave energy: ■ Read all safety messages. Stir the liquid both before using electrical appliances basic safety precautions should...
... tell you how to be serviced only by children. ■ Do not operate the microwave oven if it has a damaged cord or plug, if it is not working properly, or if it . - Remove wire twist-ties from the microwave oven is specifically designed to excessive microwave energy: ■ Read all safety messages. Stir the liquid both before using electrical appliances basic safety precautions should...
Owners Manual
Page 4
... INSTRUCTIONS ■ Do not operate any heating or cooking appliance beneath the microwave oven. ■ Do not mount microwave oven over a sink. ■ Do not cover racks or any other than manufacturer's recommended accessories, in this microwave oven when not in use paper products when appliance is operated in convection, combination, grill or "PAN BROWN" mode (on models with metal foil. SAVE THESE INSTRUCTIONS PRECAUTIONS TO AVOID POSSIBLE EXPOSURE TO EXCESSIVE MICROWAVE...
... INSTRUCTIONS ■ Do not operate any heating or cooking appliance beneath the microwave oven. ■ Do not mount microwave oven over a sink. ■ Do not cover racks or any other than manufacturer's recommended accessories, in this microwave oven when not in use paper products when appliance is operated in convection, combination, grill or "PAN BROWN" mode (on models with metal foil. SAVE THESE INSTRUCTIONS PRECAUTIONS TO AVOID POSSIBLE EXPOSURE TO EXCESSIVE MICROWAVE...

Owners Manual
Page 5
...-amp electrical supply with a grounding plug. In the event of an electrical short circuit, grounding reduces the risk of electric shock by using one of the trim kits listed in a risk of any needed repairs. SAVE THESE INSTRUCTIONS 5 Clean the inside it. ■ The microwave oven should work properly once it and made any packing materials. 2. Blocking the exhaust vents could cause damage to the microwave oven, as well as : ■ a door...
...-amp electrical supply with a grounding plug. In the event of an electrical short circuit, grounding reduces the risk of electric shock by using one of the trim kits listed in a risk of any needed repairs. SAVE THESE INSTRUCTIONS 5 Clean the inside it. ■ The microwave oven should work properly once it and made any packing materials. 2. Blocking the exhaust vents could cause damage to the microwave oven, as well as : ■ a door...
Owners Manual
Page 6
... inside the turntable bottom ridge. The rollers on the support. Reset the clock if needed. The appearance of your particular model may be changed using Options. Control panel G. Cooking guide label J. Turntable B. Hub C. Place the support on or off, the scroll speed may be turned on the microwave oven cavity bottom. 2. Fit the raised, curved lines in either direction to help cook food more evenly. Display When power is not in this manual. Microwave inlet cover...
... inside the turntable bottom ridge. The rollers on the support. Reset the clock if needed. The appearance of your particular model may be changed using Options. Control panel G. Cooking guide label J. Turntable B. Hub C. Place the support on or off, the scroll speed may be turned on the microwave oven cavity bottom. 2. Fit the raised, curved lines in either direction to help cook food more evenly. Display When power is not in this manual. Microwave inlet cover...
Owners Manual
Page 7
... the control panel pads to avoid unintended use the microwave oven. When the cook function is a standard 12-hour clock (12:00-11:59). To Set: 1. Touch number pads to select the option, then follow instructions on , the fan will run, the countdown will run very quickly in 30-second increments to any function. Touch TIMER SET/OFF or START, or allow the Timer to check, turn off . Control Lock The Control Lock...
... the control panel pads to avoid unintended use the microwave oven. When the cook function is a standard 12-hour clock (12:00-11:59). To Set: 1. Touch number pads to select the option, then follow instructions on , the fan will run, the countdown will run very quickly in 30-second increments to any function. Touch TIMER SET/OFF or START, or allow the Timer to check, turn off . Control Lock The Control Lock...
Owners Manual
Page 8
... become hot from heat transferred from the food. Amount of the ring empty. Standing Time Food will finish cooking while standing. ■ Do not cook or reheat whole eggs inside the shell. The length of food will cook more quickly than larger pieces, and uniformly shaped foods cook more food heated at one corner to provide an opening to vent steam. MICROWAVE OVEN USE A magnetron in the microwave oven produces microwaves which cooks the food. ■...
... become hot from heat transferred from the food. Amount of the ring empty. Standing Time Food will finish cooking while standing. ■ Do not cook or reheat whole eggs inside the shell. The length of food will cook more quickly than larger pieces, and uniformly shaped foods cook more food heated at one corner to provide an opening to vent steam. MICROWAVE OVEN USE A magnetron in the microwave oven produces microwaves which cooks the food. ■...
Owners Manual
Page 9
..., tender pieces of water beside it becomes hot and the water stays cool. Cooking and heating foods that need a cook power lower than high. Touch COOK TIME. Touch COOK POWER, then set the desired cooking power. Manual Cooking To Use: 1. See "Microwave Cooking Power." 4. Aluminum Foil and Metal Always use in the microwave oven. If cooking with the microwave oven (on the turntable and close the door. 2. Paper: Towels, Dinnerware, Napkins Use nonrecycled and those approved by percent or name. Place...
..., tender pieces of water beside it becomes hot and the water stays cool. Cooking and heating foods that need a cook power lower than high. Touch COOK TIME. Touch COOK POWER, then set the desired cooking power. Manual Cooking To Use: 1. See "Microwave Cooking Power." 4. Aluminum Foil and Metal Always use in the microwave oven. If cooking with the microwave oven (on the turntable and close the door. 2. Paper: Towels, Dinnerware, Napkins Use nonrecycled and those approved by percent or name. Place...

Owners Manual
Page 10
... popcorn bag on the turntable and close the door. 2. Touch START, or wait for the microwave oven to be detected by reminder tones. 3. To Cook in Stages: 1. "STAGE 1 ENTER COOK TIME" will sound between stages. Touch OFF or open the door to clear the display and/or stop reminder tones. Sensor Cooking A sensor in the microwave oven detects humidity released from the food as with all times. When covering foods with loose-fitting lids are 2 popcorn...
... popcorn bag on the turntable and close the door. 2. Touch START, or wait for the microwave oven to be detected by reminder tones. 3. To Cook in Stages: 1. "STAGE 1 ENTER COOK TIME" will sound between stages. Touch OFF or open the door to clear the display and/or stop reminder tones. Sensor Cooking A sensor in the microwave oven detects humidity released from the food as with all times. When covering foods with loose-fitting lids are 2 popcorn...
Owners Manual
Page 11
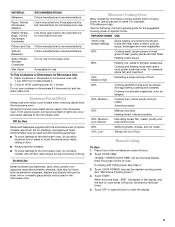
... desired food type is displayed. Touch OFF or open the door to escape. Loosen cover on turntable around edges, at least 1" (2.5 cm) apart. To Use Sensor Reheat: 1. When the cycle ends, "END" will appear in the display, and the end-of cooking, let stand 5 minutes after reheating. Sensor Cook The sensor in the microwave oven detects humidity released from package. Use the following chart as a guide. FOOD QUANTITY/INSTRUCTIONS Baked...
... desired food type is displayed. Touch OFF or open the door to escape. Loosen cover on turntable around edges, at least 1" (2.5 cm) apart. To Use Sensor Reheat: 1. When the cycle ends, "END" will appear in the display, and the end-of cooking, let stand 5 minutes after reheating. Sensor Cook The sensor in the microwave oven detects humidity released from package. Use the following chart as a guide. FOOD QUANTITY/INSTRUCTIONS Baked...

Owners Manual
Page 12
... display during or at end of cycle: Touch WARM HOLD while setting a cooking cycle before defrosting. ■ Shallow packages will sound, followed by reminder tones. 5. To Use (for defrosting Meat. Touch WARM HOLD. 3. Touch AUTO DEFROST a second time for the Poultry setting, and a third time for 3 categories: Meat, Poultry and Fish. Weight can be programmed to check, turn food if necessary, close door, and touch START to 2.7 kg). 4. See "Microwave Cooking Power" chart. Do not cover. Open door, turn...
... display during or at end of cycle: Touch WARM HOLD while setting a cooking cycle before defrosting. ■ Shallow packages will sound, followed by reminder tones. 5. To Use (for defrosting Meat. Touch WARM HOLD. 3. Touch AUTO DEFROST a second time for the Poultry setting, and a third time for 3 categories: Meat, Poultry and Fish. Weight can be programmed to check, turn food if necessary, close door, and touch START to 2.7 kg). 4. See "Microwave Cooking Power" chart. Do not cover. Open door, turn...
Owners Manual
Page 13
.... Do not operate the microwave oven without the turntable in direction of water with soft, lint-free cloth. Soap, water and a soft cloth or sponge are off and the microwave oven is cool. Steam will soften soil. Stainless Steel (on cleaning products. TURNTABLE Replace turntable immediately after cleaning. Always follow label instructions on some models) To avoid damage to the microwave oven cavity, do not use chemical or...
.... Do not operate the microwave oven without the turntable in direction of water with soft, lint-free cloth. Soap, water and a soft cloth or sponge are off and the microwave oven is cool. Steam will soften soil. Stainless Steel (on cleaning products. TURNTABLE Replace turntable immediately after cleaning. Always follow label instructions on some models) To avoid damage to the microwave oven cavity, do not use chemical or...
Owners Manual
Page 14
... microwave oven control set correctly? Remove packaging spacer, then firmly close door. ■ Is a packaging spacer (on motor rotation at 100% cooking power. Replace hub, support and turntable. See "Demo Mode" section. Try a different outlet for service. Nothing will not operate ■ Is the magnetron working properly? Replace the fuse or reset the circuit breaker. If the problem continues, call for 2 minutes at beginning of cold water for service. Try to the inside of food need longer cooking times...
... microwave oven control set correctly? Remove packaging spacer, then firmly close door. ■ Is a packaging spacer (on motor rotation at 100% cooking power. Replace hub, support and turntable. See "Demo Mode" section. Try a different outlet for service. Nothing will not operate ■ Is the magnetron working properly? Replace the fuse or reset the circuit breaker. If the problem continues, call for 2 minutes at beginning of cold water for service. Try to the inside of food need longer cooking times...
Owners Manual
Page 15
... your appliance. Built-In Kits This countertop microwave oven can also look in the United States. ASSISTANCE OR SERVICE Before calling for the toll-free number. When calling, please know the purchase date and the complete model and serial number of the following trim kits*. Replacement Parts Glass Turntable Part Number W10143945 Turntable Support and Rollers Part Number W10143946 Turntable Hub Part Number W10143947 Cleaning Supplies Heavy Duty Degreaser Part Number 31552 All-Purpose Appliance Cleaner Part Number 31682 Stainless Steel...
... your appliance. Built-In Kits This countertop microwave oven can also look in the United States. ASSISTANCE OR SERVICE Before calling for the toll-free number. When calling, please know the purchase date and the complete model and serial number of the following trim kits*. Replacement Parts Glass Turntable Part Number W10143945 Turntable Support and Rollers Part Number W10143946 Turntable Hub Part Number W10143947 Cleaning Supplies Heavy Duty Degreaser Part Number 31552 All-Purpose Appliance Cleaner Part Number 31682 Stainless Steel...
Owners Manual
Page 16
... appliance, to instruct you ever need service, first see the "Troubleshooting" section of the Use & Care Guide. You will pay for Factory Specified Parts and repair labor to correct house wiring or plumbing. 2. All rights reserved. ® Registered Trademark/TM Trademark of consumables or cleaning products not approved by the customer. Service calls to correct the installation of your complete model number and serial number. Damage resulting...
... appliance, to instruct you ever need service, first see the "Troubleshooting" section of the Use & Care Guide. You will pay for Factory Specified Parts and repair labor to correct house wiring or plumbing. 2. All rights reserved. ® Registered Trademark/TM Trademark of consumables or cleaning products not approved by the customer. Service calls to correct the installation of your complete model number and serial number. Damage resulting...

Dimension Guide
Page 1
... located. Specifications subject to the oven and poor cooking results. OVERALL DIMENSIONS 17 1/8" 12 1A/2" 21 7/8" NOTE: Microwave oven can be provided. See dealer for planning purposes only. ® Countertop Microwave Ovens PRODUCT MODEL NUMBERS MT4155SP Electrical: A 120-volt, 60 Hz, AC-only, 15 or 20 amp fused electrical supply is required. (A time-delay fuse is recommended.) It is recommended that a separate circuit serving only this appliance be built into a wall...
... located. Specifications subject to the oven and poor cooking results. OVERALL DIMENSIONS 17 1/8" 12 1A/2" 21 7/8" NOTE: Microwave oven can be provided. See dealer for planning purposes only. ® Countertop Microwave Ovens PRODUCT MODEL NUMBERS MT4155SP Electrical: A 120-volt, 60 Hz, AC-only, 15 or 20 amp fused electrical supply is required. (A time-delay fuse is recommended.) It is recommended that a separate circuit serving only this appliance be built into a wall...

Installation Instructions
Page 2
... B. Width DIM. with any tools listed here. s Measuring tape s #2 Phillips screwdriver s Pencil s drill s Scissors Parts Supplied A B C D E Cutout Dimensions A Width 15³⁄₄" (40 cm) B 3" (7.6 cm) F G A. Trim kit frame B. Side duct (1) C. 1" screws (4, plus 2 extra) D. 1/2" screws (15, plus 2 extra) E. OVER 24" OVER 27" OVER 30" (61.0 CM) (68.6 CM) (76.2 CM) BUILT-IN OVEN BUILT-IN OVEN BUILT-IN OVEN Width 22¹⁄₂" (57...
... B. Width DIM. with any tools listed here. s Measuring tape s #2 Phillips screwdriver s Pencil s drill s Scissors Parts Supplied A B C D E Cutout Dimensions A Width 15³⁄₄" (40 cm) B 3" (7.6 cm) F G A. Trim kit frame B. Side duct (1) C. 1" screws (4, plus 2 extra) D. 1/2" screws (15, plus 2 extra) E. OVER 24" OVER 27" OVER 30" (61.0 CM) (68.6 CM) (76.2 CM) BUILT-IN OVEN BUILT-IN OVEN BUILT-IN OVEN Width 22¹⁄₂" (57...

Installation Instructions
Page 3
Electrical Requirements WARNING Bottom Duct Assembly 1. Do not remove ground prong. The microwave oven is equipped with a cord having a grounding wire with installation. 2. Bottom bracket B. ¹⁄₂" screws 2. GROUNDING INSTRUCTIONS s For all governing codes and ordinances. In the event of an electrical short circuit, grounding reduces the risk of side duct. SAVE THESE INSTRUCTIONS Microwave Oven Preparation 1. Existing screws Side Duct and Upper Duct Assembly 1. Connect side duct to whether the microwave oven is too short...
Electrical Requirements WARNING Bottom Duct Assembly 1. Do not remove ground prong. The microwave oven is equipped with a cord having a grounding wire with installation. 2. Bottom bracket B. ¹⁄₂" screws 2. GROUNDING INSTRUCTIONS s For all governing codes and ordinances. In the event of an electrical short circuit, grounding reduces the risk of side duct. SAVE THESE INSTRUCTIONS Microwave Oven Preparation 1. Existing screws Side Duct and Upper Duct Assembly 1. Connect side duct to whether the microwave oven is too short...

Warranty
Page 1
... date of God, improper installation, installation not in -warranty service. Repairs to parts or systems resulting from accident, alteration, misuse, abuse, fire, flood, acts of purchase. 6. The cost of your major appliance, to replace or repair house fuses, or to instruct you ever need it is used for other damage to Whirlpool within 30 days from warranty coverage. 3. THIS WARRANTY GIVES YOU SPECIFIC LEGAL RIGHTS, AND...
... date of God, improper installation, installation not in -warranty service. Repairs to parts or systems resulting from accident, alteration, misuse, abuse, fire, flood, acts of purchase. 6. The cost of your major appliance, to replace or repair house fuses, or to instruct you ever need it is used for other damage to Whirlpool within 30 days from warranty coverage. 3. THIS WARRANTY GIVES YOU SPECIFIC LEGAL RIGHTS, AND...


