Owners Manual
Page 1
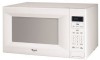
or visit our website at... www.whirlpool.com Table of Contents 2 W10217293A Model MT4155 ® MICROWAVE OVEN Use & Care Guide For questions about features, operation/performance, parts, accessories or service, call: 1-800-253-1301.
or visit our website at... www.whirlpool.com Table of Contents 2 W10217293A Model MT4155 ® MICROWAVE OVEN Use & Care Guide For questions about features, operation/performance, parts, accessories or service, call: 1-800-253-1301.

Owners Manual
Page 2
... 7 Clock 7 Tones 7 Timer 7 Control Lock 7 Demo Mode 7 Options 7 MICROWAVE OVEN USE 8 Food Characteristics 8 Cooking Guidelines 8 Cookware and Dinnerware 8 Aluminum Foil and Metal 9 Microwave Cooking Power 9 Manual Cooking 9 Cooking in Stages 10 Sensor Cooking 10 Sensor Popcorn 10 Sensor Cook 11 Sensor Reheat 11 Auto Defrost 12 Warm Hold 12 MICROWAVE OVEN CARE 13 General Cleaning 13 TROUBLESHOOTING 14 ASSISTANCE...
... 7 Clock 7 Tones 7 Timer 7 Control Lock 7 Demo Mode 7 Options 7 MICROWAVE OVEN USE 8 Food Characteristics 8 Cooking Guidelines 8 Cookware and Dinnerware 8 Aluminum Foil and Metal 9 Microwave Cooking Power 9 Manual Cooking 9 Cooking in Stages 10 Sensor Cooking 10 Sensor Popcorn 10 Sensor Cook 11 Sensor Reheat 11 Auto Defrost 12 Warm Hold 12 MICROWAVE OVEN CARE 13 General Cleaning 13 TROUBLESHOOTING 14 ASSISTANCE...
Owners Manual
Page 3
... You can be killed or seriously injured if you don't immediately follow instructions. WARNING You can be heated in the microwave oven. ■ Use the microwave oven only for industrial or laboratory use as whole eggs in this manual. for examination, repair, or adjustment. ■ See...IS DISTURBED OR A SPOON OR OTHER UTENSIL IS INSERTED INTO THE LIQUID. Stir the liquid both before removing the container. - MICROWAVE OVEN SAFETY Your safety and the safety of others . This is removed from paper or plastic bags before using electrical appliances basic safety...
... You can be killed or seriously injured if you don't immediately follow instructions. WARNING You can be heated in the microwave oven. ■ Use the microwave oven only for industrial or laboratory use as whole eggs in this manual. for examination, repair, or adjustment. ■ See...IS DISTURBED OR A SPOON OR OTHER UTENSIL IS INSERTED INTO THE LIQUID. Stir the liquid both before removing the container. - MICROWAVE OVEN SAFETY Your safety and the safety of others . This is removed from paper or plastic bags before using electrical appliances basic safety...
Owners Manual
Page 4
... beneath the microwave oven. ■ Do not mount microwave oven over a sink. ■ Do not cover racks or any other than manufacturer's recommended accessories, in this microwave oven when not in use. ■ Do not store anything directly on top of the microwave oven when the microwave oven is in ...operation. ■ Do not store this oven with metal foil. Do not use the microwave oven near any portion of a ...
... beneath the microwave oven. ■ Do not mount microwave oven over a sink. ■ Do not cover racks or any other than manufacturer's recommended accessories, in this microwave oven when not in use. ■ Do not store anything directly on top of the microwave oven when the microwave oven is in ...operation. ■ Do not store this oven with metal foil. Do not use the microwave oven near any portion of a ...

Owners Manual
Page 5
... exterior of any needed repairs. The microwave oven should work properly once it . ■ The microwave oven should be grounded. The microwave oven is properly grounded. WARNING: Improper use an extension cord. SAVE THESE INSTRUCTIONS 5 Empty the microwave oven of the microwave oven. Blocking the exhaust vents could cause damage to hold the microwave oven and the food and utensils you place...
... exterior of any needed repairs. The microwave oven should work properly once it . ■ The microwave oven should be grounded. The microwave oven is properly grounded. WARNING: Improper use an extension cord. SAVE THESE INSTRUCTIONS 5 Empty the microwave oven of the microwave oven. Blocking the exhaust vents could cause damage to hold the microwave oven and the food and utensils you place...
Owners Manual
Page 6
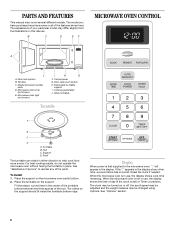
...(if the clock is set) or Timer countdown. Removable turntable support I H G F. For best cooking results, do not operate the microwave oven without having the turntable in the center of the turntable bottom between the three spokes of the hub. Door open push button H. Glass ...":" appears in the display. The clock may be turned on the microwave oven cavity bottom. 2. When the microwave oven is first supplied to help cook food more evenly. When the microwave oven is not in either direction to the microwave oven, ":" will appear in the display at any of the parts. Fit...
...(if the clock is set) or Timer countdown. Removable turntable support I H G F. For best cooking results, do not operate the microwave oven without having the turntable in the center of the turntable bottom between the three spokes of the hub. Door open push button H. Glass ...":" appears in the display. The clock may be turned on the microwave oven cavity bottom. 2. When the microwave oven is first supplied to help cook food more evenly. When the microwave oven is not in either direction to the microwave oven, ":" will appear in the display at any of the parts. Fit...
Owners Manual
Page 7
...the display and the end-of day. OFF is also used while the Timer is interrupted, touching START will not resume an interrupted sensor cycle. The microwave oven will turn off . Tones Tones are audible signals that may be hidden using Options. Touch TIMER SET/OFF. 2. Touch TIMER ... check, turn off (hidden). Demo Mode The Demo Mode is active in the display. Weight Change to start or stop the microwave oven. To Set: The microwave oven and Timer must be turned off . When set in 30-second increments to any manual cooking cycle, at the current power level...
...the display and the end-of day. OFF is also used while the Timer is interrupted, touching START will not resume an interrupted sensor cycle. The microwave oven will turn off . Tones Tones are audible signals that may be hidden using Options. Touch TIMER SET/OFF. 2. Touch TIMER ... check, turn off (hidden). Demo Mode The Demo Mode is active in the display. Weight Change to start or stop the microwave oven. To Set: The microwave oven and Timer must be turned off . When set in 30-second increments to any manual cooking cycle, at the current power level...
Owners Manual
Page 8
...Steam buildup in fat and sugar will reach a higher temperature, and will not melt in the microwave oven produces microwaves which cooks the food. ■ To avoid damage to the microwave oven, do not lean on the volume and density of the food affect cooking results. Starting Temperature ... as chicken wings, leg tips and fish tail. The length of standing time depends on or allow a standing time. MICROWAVE OVEN USE A magnetron in the microwave oven because it is normal during heavy cooking. Shielding Use small, flat pieces of irregularly shaped foods, bones and foods such ...
...Steam buildup in fat and sugar will reach a higher temperature, and will not melt in the microwave oven produces microwaves which cooks the food. ■ To avoid damage to the microwave oven, do not lean on the volume and density of the food affect cooking results. Starting Temperature ... as chicken wings, leg tips and fish tail. The length of standing time depends on or allow a standing time. MICROWAVE OVEN USE A magnetron in the microwave oven because it is normal during heavy cooking. Shielding Use small, flat pieces of irregularly shaped foods, bones and foods such ...
Owners Manual
Page 9
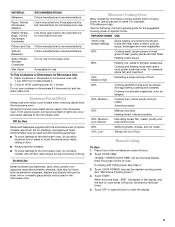
...Bags, Covers, Dinnerware, Containers Use those approved by percent or name. Wax Paper Acceptable for Use Racks and bakeware supplied with the microwave oven (on the turntable and close the door. 2. Do Not Use Metal cookware and bakeware, gold, silver, pewter, nonapproved meat ...lower than high. Simmering stews. 40% Melting chocolate. "STAGE 1 ENTER COOK TIME" will appear in microwave oven. Do not use oven mitts or pot holders when removing dishes from the microwave oven. Aluminum Foil and Metal Always use cookware or dinnerware if it . 2. OK for use . Use...
...Bags, Covers, Dinnerware, Containers Use those approved by percent or name. Wax Paper Acceptable for Use Racks and bakeware supplied with the microwave oven (on the turntable and close the door. 2. Do Not Use Metal cookware and bakeware, gold, silver, pewter, nonapproved meat ...lower than high. Simmering stews. 40% Melting chocolate. "STAGE 1 ENTER COOK TIME" will appear in microwave oven. Do not use oven mitts or pot holders when removing dishes from the microwave oven. Aluminum Foil and Metal Always use cookware or dinnerware if it . 2. OK for use . Use...

Owners Manual
Page 10
... 3.5 oz (99 g) and 3.0 oz (85 g). Touch START. Many sensor cycles require the covering of commercially packaged microwavable popcorn. NOTES: ■ The microwave oven should be plugged in for at least 3 minutes. ■ The microwave oven cavity and the exterior of the cooking container should be dry. ■... open the door to clear the display and/or stop and the program will sound, followed by reminder tones. 6. Sensor Popcorn The sensor in the microwave oven determines the appropriate popping time of foods. Touch POPCORN once for Regular, or twice for each additional stage. 5. When...
... 3.5 oz (99 g) and 3.0 oz (85 g). Touch START. Many sensor cycles require the covering of commercially packaged microwavable popcorn. NOTES: ■ The microwave oven should be plugged in for at least 3 minutes. ■ The microwave oven cavity and the exterior of the cooking container should be dry. ■... open the door to clear the display and/or stop and the program will sound, followed by reminder tones. 6. Sensor Popcorn The sensor in the microwave oven determines the appropriate popping time of foods. Touch POPCORN once for Regular, or twice for each additional stage. 5. When...
Owners Manual
Page 11
... edges, at least 1" (2.5 cm) apart. Sensor Reheat The sensor in the microwave oven detects humidity released from package. To Use Sensor Reheat: 1. Cover with a fork. Cover with plastic wrap and vent. Soup 1-4 cups (250 mL-1 L)/ Place in microwave-safe container, cover with plastic wrap and vent. Sensor Cook The sensor in the microwave oven detects humidity released from package. Fish...
... edges, at least 1" (2.5 cm) apart. Sensor Reheat The sensor in the microwave oven detects humidity released from package. To Use Sensor Reheat: 1. Cover with a fork. Cover with plastic wrap and vent. Soup 1-4 cups (250 mL-1 L)/ Place in microwave-safe container, cover with plastic wrap and vent. Sensor Cook The sensor in the microwave oven detects humidity released from package. Fish...

Owners Manual
Page 12
...and close door, and touch START to resume defrosting. Auto Defrost The Auto Defrost feature's preset programs can be used or the microwave oven can be manually set from fruit juice containers) before defrosting. Use the following chart as chicken wings, leg tips and fish tails....; For best results, do not cover baked goods such as pastries, pies, turnovers, etc. To Defrost Manually: Follow direction in the microwave oven. See "Microwave Cooking Power" chart. Do not defrost less than one hour before touching START, or during Warm Hold will sound. Opening the door during...
...and close door, and touch START to resume defrosting. Auto Defrost The Auto Defrost feature's preset programs can be used or the microwave oven can be manually set from fruit juice containers) before defrosting. Use the following chart as chicken wings, leg tips and fish tails....; For best results, do not cover baked goods such as pastries, pies, turnovers, etc. To Defrost Manually: Follow direction in the microwave oven. See "Microwave Cooking Power" chart. Do not defrost less than one hour before touching START, or during Warm Hold will sound. Opening the door during...
Owners Manual
Page 13
...cloth. ■ Glass cleaner and paper towels or nonabrasive plastic scrubbing pad: Apply glass cleaner to towel, not directly to microwave oven door and exterior, do not use soapfilled scouring pads, abrasive cleaners, steel-wool pads, gritty washcloths or some paper towels..., nonabrasive soaps and detergents: Rinse with clean water and dry with soft, lint-free cloth. MICROWAVE OVEN CAVITY MICROWAVE OVEN DOOR AND EXTERIOR To avoid damage to 5 minutes in microwave oven. MICROWAVE OVEN CARE General Cleaning IMPORTANT: Before cleaning, make sure all -purpose cleaner: Rinse with clean water...
...cloth. ■ Glass cleaner and paper towels or nonabrasive plastic scrubbing pad: Apply glass cleaner to towel, not directly to microwave oven door and exterior, do not use soapfilled scouring pads, abrasive cleaners, steel-wool pads, gritty washcloths or some paper towels..., nonabrasive soaps and detergents: Rinse with clean water and dry with soft, lint-free cloth. MICROWAVE OVEN CAVITY MICROWAVE OVEN DOOR AND EXTERIOR To avoid damage to 5 minutes in microwave oven. MICROWAVE OVEN CARE General Cleaning IMPORTANT: Before cleaning, make sure all -purpose cleaner: Rinse with clean water...
Owners Manual
Page 14
...door? See "Tones" section. Interference with radio, TV, cordless phone, etc. ■ Is the microwave oven plugged into the same outlet? Make sure these items during microwave oven operation. 14 TROUBLESHOOTING Try the solutions suggested here first in order to avoid the cost of an unnecessary ... turn on and off. Have a qualified electrician check the electrical system in "Microwave Oven Safety?" Move the receiver away from the microwave oven, or adjust the radio or TV antenna. ■ Are the microwave oven door and sealing surfaces clean? If water does not heat, try the steps below...
...door? See "Tones" section. Interference with radio, TV, cordless phone, etc. ■ Is the microwave oven plugged into the same outlet? Make sure these items during microwave oven operation. 14 TROUBLESHOOTING Try the solutions suggested here first in order to avoid the cost of an unnecessary ... turn on and off. Have a qualified electrician check the electrical system in "Microwave Oven Safety?" Move the receiver away from the microwave oven, or adjust the radio or TV antenna. ■ Are the microwave oven door and sealing surfaces clean? If water does not heat, try the steps below...
Owners Manual
Page 15
... If you need further assistance, you can be ordered by using one of your request. Built-In Kits This countertop microwave oven can write to build every new WHIRLPOOL® appliance. Call the Whirlpool Customer eXperience Center toll free: 1-800-253-1301. When calling, please know the purchase date and the complete model and...
... If you need further assistance, you can be ordered by using one of your request. Built-In Kits This countertop microwave oven can write to build every new WHIRLPOOL® appliance. Call the Whirlpool Customer eXperience Center toll free: 1-800-253-1301. When calling, please know the purchase date and the complete model and...

Dimension Guide
Page 1
...planning purposes only. Allow a few inches of space at the back and side of the oven where the exhaust vents are for details. Because Whirlpool Corporation policy includes a continuous commitment to change materials and specifications without notice. 8205085 07-13...-04 For complete details, see Installation our products, we reserve the right to the oven and poor cooking results. ® Countertop Microwave Ovens PRODUCT MODEL ...
...planning purposes only. Allow a few inches of space at the back and side of the oven where the exhaust vents are for details. Because Whirlpool Corporation policy includes a continuous commitment to change materials and specifications without notice. 8205085 07-13...-04 For complete details, see Installation our products, we reserve the right to the oven and poor cooking results. ® Countertop Microwave Ovens PRODUCT MODEL ...

Installation Instructions
Page 2
... hurt you and others are not followed. Width DIM. OVER 24" OVER 27" OVER 30" (61.0 CM) (68.6 CM) (76.2 CM) BUILT-IN OVEN BUILT-IN OVEN BUILT-IN OVEN Width 22¹⁄₂" (57.15 cm) 25¹⁄₂" (64.77 cm) 25¹⁄₂" (64.77 cm) min....; 28¹⁄₂" (72.39 cm) max. BUILT-IN MICROWAVE OVEN SAFETY Your safety and the safety of injury, and tell you what can happen if the instructions are very important. Anti-tip bracket (1) H I . Template (1) A. WARNING...
... hurt you and others are not followed. Width DIM. OVER 24" OVER 27" OVER 30" (61.0 CM) (68.6 CM) (76.2 CM) BUILT-IN OVEN BUILT-IN OVEN BUILT-IN OVEN Width 22¹⁄₂" (57.15 cm) 25¹⁄₂" (64.77 cm) 25¹⁄₂" (64.77 cm) min....; 28¹⁄₂" (72.39 cm) max. BUILT-IN MICROWAVE OVEN SAFETY Your safety and the safety of injury, and tell you what can happen if the instructions are very important. Anti-tip bracket (1) H I . Template (1) A. WARNING...

Installation Instructions
Page 3
...installation. 2. Consult a qualified electrician or serviceman if the grounding instructions are attached. 3 Observe all cord connected appliances: The microwave oven must be plugged into an outlet that a separate circuit serving only this appliance be grounded. Do not use an adapter. ...INSTRUCTIONS s For all governing codes and ordinances. Electrical Requirements WARNING Bottom Duct Assembly 1. Fasten bottom bracket to whether the microwave oven is properly grounded. Bottom bracket B. ¹⁄₂" screws 2. Then bend tabs upward. Connect side duct to ...
...installation. 2. Consult a qualified electrician or serviceman if the grounding instructions are attached. 3 Observe all cord connected appliances: The microwave oven must be plugged into an outlet that a separate circuit serving only this appliance be grounded. Do not use an adapter. ...INSTRUCTIONS s For all governing codes and ordinances. Electrical Requirements WARNING Bottom Duct Assembly 1. Fasten bottom bracket to whether the microwave oven is properly grounded. Bottom bracket B. ¹⁄₂" screws 2. Then bend tabs upward. Connect side duct to ...

Installation Instructions
Page 4
... ¹⁄₂" screws B. Anti-tip bracket 4 On cutout floor, use template to scale.) AB C D B C A. Anti-tip bracket C. Make sure microwave oven is centered within cutout opening and slide it into cutout opening. Drill 2 holes for anti-tip bracket. 2. NOTE: Bottom bracket must be flat against cutout... floor in microwave oven. 3. Peel off backing of bottom duct. Cutout opening E. Align the duct assembly screw hole to the existing screw hole on ducts...
... ¹⁄₂" screws B. Anti-tip bracket 4 On cutout floor, use template to scale.) AB C D B C A. Anti-tip bracket C. Make sure microwave oven is centered within cutout opening and slide it into cutout opening. Drill 2 holes for anti-tip bracket. 2. NOTE: Bottom bracket must be flat against cutout... floor in microwave oven. 3. Peel off backing of bottom duct. Cutout opening E. Align the duct assembly screw hole to the existing screw hole on ducts...


