User Instructions
Page 1
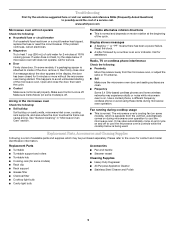
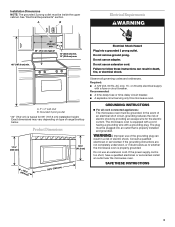
...your model and serial number located on your appliance. SAVE THESE INSTRUCTIONS W10197620A You will need assistance, call us at www.whirlpool.com for additional information. This symbol alerts you and others are very important. WARNING You can kill or hurt you to ...■ Read all safety messages. IMPORTANT SAFETY INSTRUCTIONS When using electrical appliances basic safety precautions should not be heated in the microwave oven. ■ The microwave oven must be followed, including the following: WARNING: To reduce the risk of burns, electric shock, fire, injury to persons, ...
...your model and serial number located on your appliance. SAVE THESE INSTRUCTIONS W10197620A You will need assistance, call us at www.whirlpool.com for additional information. This symbol alerts you and others are very important. WARNING You can kill or hurt you to ...■ Read all safety messages. IMPORTANT SAFETY INSTRUCTIONS When using electrical appliances basic safety precautions should not be heated in the microwave oven. ■ The microwave oven must be followed, including the following: WARNING: To reduce the risk of burns, electric shock, fire, injury to persons, ...

User Instructions
Page 2
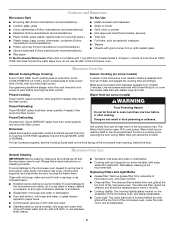
...with maximum width of 36" (91.44 cm). ■ Clean Ventilating Hoods Frequently - Do not use corrosive chemicals or vapors in the microwave oven. Do not use the microwave oven near a swimming pool, or similar locations. ■ Do not immerse cord or plug in water. ■ Keep cord away from paper...INSERTED INTO THE LIQUID. Stir the liquid both gas and electric cooking equipment. ■ Intended to be used by children. ■ Do not operate the microwave oven if it has a damaged cord or plug, if it is no damage to the: (1) Door (bent), (2) Hinges and latches (broken or loosened), ...
...with maximum width of 36" (91.44 cm). ■ Clean Ventilating Hoods Frequently - Do not use corrosive chemicals or vapors in the microwave oven. Do not use the microwave oven near a swimming pool, or similar locations. ■ Do not immerse cord or plug in water. ■ Keep cord away from paper...INSERTED INTO THE LIQUID. Stir the liquid both gas and electric cooking equipment. ■ Intended to be used by children. ■ Do not operate the microwave oven if it has a damaged cord or plug, if it is no damage to the: (1) Door (bent), (2) Hinges and latches (broken or loosened), ...
User Instructions
Page 3
... "3" for 2-level cooking. The "DEMO" icon will appear in the display. Cooking Rack (on . Touch the Timer control. 2. The microwave oven is equipped with a cord having a grounding wire with Part 18 of electric shock. Then touch the Start control to turn back on some ...by making cleaning easier. Recommended: ■ A time-delay fuse or time-delay circuit breaker. ■ A separate circuit serving only this microwave oven. To Set Clock: 1. Scroll Speed To Adjust Speed: 1. Touch the Timer control or the Start control. Touch and hold number pad ...
... "3" for 2-level cooking. The "DEMO" icon will appear in the display. Cooking Rack (on . Touch the Timer control. 2. The microwave oven is equipped with a cord having a grounding wire with Part 18 of electric shock. Then touch the Start control to turn back on some ...by making cleaning easier. Recommended: ■ A time-delay fuse or time-delay circuit breaker. ■ A separate circuit serving only this microwave oven. To Set Clock: 1. Scroll Speed To Adjust Speed: 1. Touch the Timer control or the Start control. Touch and hold number pad ...
User Instructions
Page 4
... 6 months. ■ Cooktop light(s): The cooktop light(s) is located behind the door. The Warm Hold function uses 10% cook power. Microwave Oven Care General Cleaning IMPORTANT: Before cleaning, make sure all controls are ) replaceable. ■ Cavity light: The cavity light bulb is (are...) located on the front facing of microwave oven, and clean monthly. ■ Charcoal filter: The charcoal filter is replaceable. 4 Touch DEFROST, select food item, enter quantity, and touch ...
... 6 months. ■ Cooktop light(s): The cooktop light(s) is located behind the door. The Warm Hold function uses 10% cook power. Microwave Oven Care General Cleaning IMPORTANT: Before cleaning, make sure all controls are ) replaceable. ■ Cavity light: The cavity light bulb is (are...) located on the front facing of microwave oven, and clean monthly. ■ Charcoal filter: The charcoal filter is replaceable. 4 Touch DEFROST, select food item, enter quantity, and touch ...
User Instructions
Page 5
... First try the steps below is on motor rotation at 100% cooking power. Arcing in "Microwave Oven Care" section. Please refer to avoid unintended starting of the cycle. www.whirlpool.com Microwave oven will not operate Check the following : ■ Soil buildup Soil buildup on some models, if a packaging spacer is an error indicator. If...
... First try the steps below is on motor rotation at 100% cooking power. Arcing in "Microwave Oven Care" section. Please refer to avoid unintended starting of the cycle. www.whirlpool.com Microwave oven will not operate Check the following : ■ Soil buildup Soil buildup on some models, if a packaging spacer is an error indicator. If...
User Instructions
Page 6
... or systems resulting from the date of original purchase date is not installed in accordance with the product, Whirlpool Corporation or Whirlpool Canada LP (hereafter "Whirlpool") will pay for repairs. Any food loss due to instruct you can find your model number and serial...further assistance, you on the upper or lower front facing of Whirlpool, U.S.A. 461966100243 5/08 Printed in your major appliance if it was purchased. All rights reserved. ® Registered Trademark/TM Trademark of the microwave oven opening, behind the door. Repairs to obtain service under these...
... or systems resulting from the date of original purchase date is not installed in accordance with the product, Whirlpool Corporation or Whirlpool Canada LP (hereafter "Whirlpool") will pay for repairs. Any food loss due to instruct you can find your model number and serial...further assistance, you on the upper or lower front facing of Whirlpool, U.S.A. 461966100243 5/08 Printed in your major appliance if it was purchased. All rights reserved. ® Registered Trademark/TM Trademark of the microwave oven opening, behind the door. Repairs to obtain service under these...
Installation Instructions
Page 1
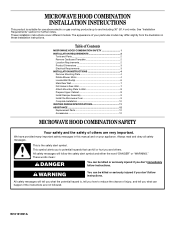
Table of Contents MICROWAVE HOOD COMBINATION SAFETY 1 INSTALLATION REQUIREMENTS 2 Tools and Parts 2 Remove Cardboard Template 2 Location Requirements 2 Product Dimensions 3 Electrical Requirements 3 INSTALLATION ... Upper Cabinet 8 Install Damper Assembly 9 Install the Microwave Oven 9 Complete Installation 10 VENTING DESIGN SPECIFICATIONS 11 ASSISTANCE 12 Replacement Parts 12 Accessories 12 MICROWAVE HOOD COMBINATION SAFETY Your safety and the safety of your appliance. MICROWAVE HOOD COMBINATION INSTALLATION INSTRUCTIONS This product is suitable for further...
Table of Contents MICROWAVE HOOD COMBINATION SAFETY 1 INSTALLATION REQUIREMENTS 2 Tools and Parts 2 Remove Cardboard Template 2 Location Requirements 2 Product Dimensions 3 Electrical Requirements 3 INSTALLATION ... Upper Cabinet 8 Install Damper Assembly 9 Install the Microwave Oven 9 Complete Installation 10 VENTING DESIGN SPECIFICATIONS 11 ASSISTANCE 12 Replacement Parts 12 Accessories 12 MICROWAVE HOOD COMBINATION SAFETY Your safety and the safety of your appliance. MICROWAVE HOOD COMBINATION INSTALLATION INSTRUCTIONS This product is suitable for further...
Installation Instructions
Page 2
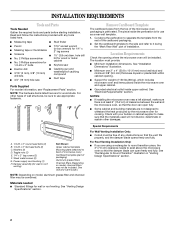
...cord bushing (1) H. Materials needed ■ Standard fittings for weight of 150 lbs (68 kg), which includes microwave oven and items placed inside the microwave oven and upper cabinet. ■ Grounded electrical outlet inside the perforation is perforated. Remove Cardboard Template The cardboard piece...50.8 x 101.6 mm) wood wall stud and minimum 3/8" (9.5 mm) thickness drywall or plaster/lath within cabinet opening where the microwave oven will not discolor, delaminate or sustain other types of wall structures, be included. Special Requirements For Wall Venting Installation Only: ■...
...cord bushing (1) H. Materials needed ■ Standard fittings for weight of 150 lbs (68 kg), which includes microwave oven and items placed inside the microwave oven and upper cabinet. ■ Grounded electrical outlet inside the perforation is perforated. Remove Cardboard Template The cardboard piece...50.8 x 101.6 mm) wood wall stud and minimum 3/8" (9.5 mm) thickness drywall or plaster/lath within cabinet opening where the microwave oven will not discolor, delaminate or sustain other types of wall structures, be included. Special Requirements For Wall Venting Installation Only: ■...
Installation Instructions
Page 3
...AC only, 15- Recommended: ■ A time-delay fuse or time-delay circuit breaker. ■ A separate circuit serving only this microwave oven. Consult a qualified electrician or serviceman if the grounding instructions are not completely understood, or if doubt exists as to follow these instructions ... with a grounding plug. Do not use of the grounding plug can result in a risk of electric shock. Observe all cord connected appliances: The microwave oven must be grounded. A B Electrical Requirements WARNING 30" (76.2 cm) min. 30" (76.2 cm) typical* 12" (30.5 cm) min...
...AC only, 15- Recommended: ■ A time-delay fuse or time-delay circuit breaker. ■ A separate circuit serving only this microwave oven. Consult a qualified electrician or serviceman if the grounding instructions are not completely understood, or if doubt exists as to follow these instructions ... with a grounding plug. Do not use of the grounding plug can result in a risk of electric shock. Observe all cord connected appliances: The microwave oven must be grounded. A B Electrical Requirements WARNING 30" (76.2 cm) min. 30" (76.2 cm) typical* 12" (30.5 cm) min...
Installation Instructions
Page 4
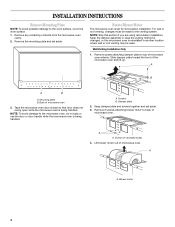
... 2. A A. Remove the mounting plate and set aside. 3. For wall or roof venting, changes must be used. A Screws B. Remove 2 screws attaching blower motor to back of microwave oven 3. Rotate Blower Motor The microwave oven is being handled. A A. NOTE: Skip this section if you are using recirculation installation. Remove screws attaching damper plate to the...
... 2. A A. Remove the mounting plate and set aside. 3. For wall or roof venting, changes must be used. A Screws B. Remove 2 screws attaching blower motor to back of microwave oven 3. Rotate Blower Motor The microwave oven is being handled. A A. NOTE: Skip this section if you are using recirculation installation. Remove screws attaching damper plate to the...
Installation Instructions
Page 5
... exhaust ports face the top of microwave oven, and flat sides of blower motor face back of the microwave oven (as shown), performance will be reattached to back of microwave oven with 2 screws removed in the top of microwave oven with 2 screws removed in Step 3 of the microwave oven. A B C D A. Slots... back of "Wall Venting Installation Only." 5 Repeat Step 1 from "Wall Venting Installation Only." Reattach blower motor to the microwave oven. 7. A A A. Reattach damper plate. Reattach damper plate. NOTE: If blower motor is not positioned with 2 screws removed in...
... exhaust ports face the top of microwave oven, and flat sides of blower motor face back of the microwave oven (as shown), performance will be reattached to back of microwave oven with 2 screws removed in the top of microwave oven with 2 screws removed in Step 3 of the microwave oven. A B C D A. Slots... back of "Wall Venting Installation Only." 5 Repeat Step 1 from "Wall Venting Installation Only." Reattach blower motor to the microwave oven. 7. A A A. Reattach damper plate. Reattach damper plate. NOTE: If blower motor is not positioned with 2 screws removed in...
Installation Instructions
Page 6
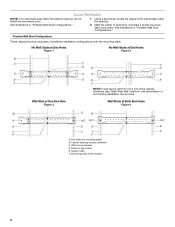
... Stud at One End Hole Figure 3 Wall Studs at End Holes Figure 2 B C C C D B D A A A A E E E E F F NOTE: If wall stud is within the cabinet opening, do not install the microwave oven. 1.
... Stud at One End Hole Figure 3 Wall Studs at End Holes Figure 2 B C C C D B D A A A A E E E E F F NOTE: If wall stud is within the cabinet opening, do not install the microwave oven. 1.
Installation Instructions
Page 7
... Step 6, and mark. 11. Set the mounting plate aside. Drill 3/16" (5 mm) hole(s) into the wall stud(s) at End Holes (Figures 1 & 2) 1. Mark Rear Wall The microwave oven must attach to the wall at both holes are over wall studs, use 2 lag screws. Front edge of 1 lag screw, preferably 2. 1. They must be 14...
... Step 6, and mark. 11. Set the mounting plate aside. Drill 3/16" (5 mm) hole(s) into the wall stud(s) at End Holes (Figures 1 & 2) 1. Mark Rear Wall The microwave oven must attach to the wall at both holes are over wall studs, use 2 lag screws. Front edge of 1 lag screw, preferably 2. 1. They must be 14...
Installation Instructions
Page 8
...: If the upper cabinet has a frame around it, trim the template edges so that fits over the 3/4" (19 mm) hole drilled in Step 3 of the microwave oven. Make sure the template centerline aligns with tape or thumbtacks. B A C A. 1/4-20 x 3" round-head bolt B. Check alignment of mounting plate, making sure it fits inside the...
...: If the upper cabinet has a frame around it, trim the template edges so that fits over the 3/4" (19 mm) hole drilled in Step 3 of the microwave oven. Make sure the template centerline aligns with tape or thumbtacks. B A C A. 1/4-20 x 3" round-head bolt B. Check alignment of mounting plate, making sure it fits inside the...
Installation Instructions
Page 9
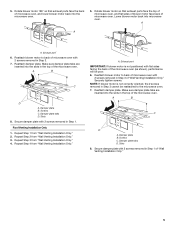
...as shown. Damper assembly C. NOTE: If upper cabinet is being handled. B A A. Drill 3/8" (10 mm) holes at the bottom of the microwave oven so that damper blade moves freely, and opens fully. 2. Cut 3/4" (19 mm) hole at the circular shaded area "G" on each 1/4-20 x... wall cutout. 6. Cut the 1¹⁄₂" (3.8 cm) diameter hole at one corner of microwave oven B. Metal cabinet B. Install Damper Assembly (for wall venting only) 1. A B A. Rotate microwave oven up toward upper cabinet. Support tabs 4. Check that the damper blade hinge is for two 1/4-20 ...
...as shown. Damper assembly C. NOTE: If upper cabinet is being handled. B A A. Drill 3/8" (10 mm) holes at the bottom of the microwave oven so that damper blade moves freely, and opens fully. 2. Cut 3/4" (19 mm) hole at the circular shaded area "G" on each 1/4-20 x... wall cutout. 6. Cut the 1¹⁄₂" (3.8 cm) diameter hole at one corner of microwave oven B. Metal cabinet B. Install Damper Assembly (for wall venting only) 1. A B A. Rotate microwave oven up toward upper cabinet. Support tabs 4. Check that the damper blade hinge is for two 1/4-20 ...
Installation Instructions
Page 10
.... 9. The blocks must be adjusted, skip steps 7-9. 7. WARNING A. Replace the fuse or reset the circuit breaker. NOTE: If microwave oven does not need to be the same thickness as shown. Tighten bolts until there is now complete. A B A. Then secure with ...in death, fire, or electrical shock. 2. Damper assembly C. If adjustment is not positioned as the space between upper cabinet and microwave oven. Damper assembly (under the raised tabs of the damper assembly slides under vent) Complete Installation 1. Insert damper assembly through upper ...
.... 9. The blocks must be adjusted, skip steps 7-9. 7. WARNING A. Replace the fuse or reset the circuit breaker. NOTE: If microwave oven does not need to be the same thickness as shown. Tighten bolts until there is now complete. A B A. Then secure with ...in death, fire, or electrical shock. 2. Damper assembly C. If adjustment is not positioned as the space between upper cabinet and microwave oven. Damper assembly (under the raised tabs of the damper assembly slides under vent) Complete Installation 1. Insert damper assembly through upper ...
Installation Instructions
Page 11
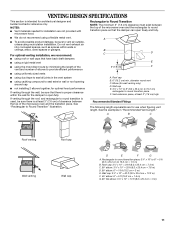
... must exist between the top of the microwave oven and the rectangular to round transition is used, be sure there is at least 3" (7.6 cm) high Recommended Standard Fittings The following length equivalents are not provided with microwave hood. If venting through the wall, ... draft dampers ■ using a rigid metal vent E ■ using the most direct route by minimizing the length of the 3" (7.6 cm) F vent and number of the microwave oven and the transition piece. Roof cap: 3¹⁄₄" x 10" = 24 ft (8.3 x 25.4 cm = 7.3 m) C. 90° elbow: 3¹ ₄" x 10" ...
... must exist between the top of the microwave oven and the rectangular to round transition is used, be sure there is at least 3" (7.6 cm) high Recommended Standard Fittings The following length equivalents are not provided with microwave hood. If venting through the wall, ... draft dampers ■ using a rigid metal vent E ■ using the most direct route by minimizing the length of the 3" (7.6 cm) F vent and number of the microwave oven and the transition piece. Roof cap: 3¹⁄₄" x 10" = 24 ft (8.3 x 25.4 cm = 7.3 m) C. 90° elbow: 3¹ ₄" x 10" ...
Installation Instructions
Page 12
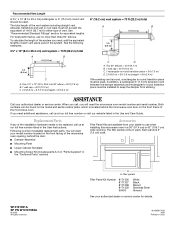
... ft (0.6 m) C A. Replacement Parts If any of available replacement parts. A A. For best performance, use when installing this microwave oven in a 36" (91.4 cm) or 42" (106.7 cm) wide opening , behind the microwave oven door on the front frame of each vent piece used . If you need , add the equivalent lengths of the.... See "Recommended Standard Fittings" section for either type of the microwave oven opening . The filler panels come in pairs. The total length of the system you will need the microwave oven model number and serial number. Both numbers can be found on the...
... ft (0.6 m) C A. Replacement Parts If any of available replacement parts. A A. For best performance, use when installing this microwave oven in a 36" (91.4 cm) or 42" (106.7 cm) wide opening , behind the microwave oven door on the front frame of each vent piece used . If you need , add the equivalent lengths of the.... See "Recommended Standard Fittings" section for either type of the microwave oven opening . The filler panels come in pairs. The total length of the system you will need the microwave oven model number and serial number. Both numbers can be found on the...

Dimensions
Page 1
® Microwave Hood Combination PRODUCT MODEL NUMBERS MH1160XS MH1170XS MH2175XS Electrical: A 120-volt, 60 Hz, AC-only, 15 or 20 amp electrical supply located in the system. ... no more than three 90° elbows. wall cap = 40 ft. (12.2 m) 8 feet straight = 8 ft. (2.4 m) Length of 6" system = 73 ft. (22.2 m) Because Whirlpool Corporation policy includes a continuous commitment to the microwave oven hood. wall cap 8 feet straight = 5 ft. (1.5 m) = 20 ft. (6.1 m) = 40 ft. (12.2 m) = 8 ft. (2.4 m) Length of 3-1/4" x 10" system = 73 ft. (22.2 m) 6" (15.2 cm...
® Microwave Hood Combination PRODUCT MODEL NUMBERS MH1160XS MH1170XS MH2175XS Electrical: A 120-volt, 60 Hz, AC-only, 15 or 20 amp electrical supply located in the system. ... no more than three 90° elbows. wall cap = 40 ft. (12.2 m) 8 feet straight = 8 ft. (2.4 m) Length of 6" system = 73 ft. (22.2 m) Because Whirlpool Corporation policy includes a continuous commitment to the microwave oven hood. wall cap 8 feet straight = 5 ft. (1.5 m) = 20 ft. (6.1 m) = 40 ft. (12.2 m) = 8 ft. (2.4 m) Length of 3-1/4" x 10" system = 73 ft. (22.2 m) 6" (15.2 cm...


