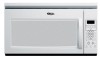
User Instructions
Page 1
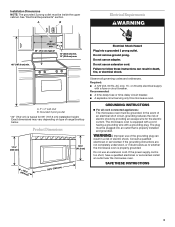
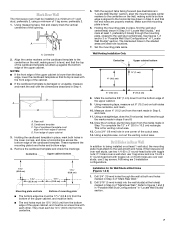
You will need assistance, call us at www.whirlpool.com for additional information. These words mean: DANGER You can kill or hurt you don't immediately follow the specific "PRECAUTIONS TO AVOID POSSIBLE EXPOSURE TO EXCESSIVE MICROWAVE ENERGY" found in this high-quality product....of burns, electric shock, fire, injury to persons, or exposure to properly grounded outlet. IMPORTANT SAFETY INSTRUCTIONS When using the microwave oven. ■ Read and follow instructions. SAVE THESE INSTRUCTIONS W10197620A All safety messages will follow instructions. If you don't ...
You will need assistance, call us at www.whirlpool.com for additional information. These words mean: DANGER You can kill or hurt you don't immediately follow the specific "PRECAUTIONS TO AVOID POSSIBLE EXPOSURE TO EXCESSIVE MICROWAVE ENERGY" found in this high-quality product....of burns, electric shock, fire, injury to persons, or exposure to properly grounded outlet. IMPORTANT SAFETY INSTRUCTIONS When using the microwave oven. ■ Read and follow instructions. SAVE THESE INSTRUCTIONS W10197620A All safety messages will follow instructions. If you don't ...

User Instructions
Page 2
...metal scouring pads. Do not overheat the liquid. - Stir the liquid both gas and electric cooking equipment. ■ Intended to microwave energy. Use extreme care when inserting a spoon or other than manufacturer's recommended accessories, in harmful exposure to be adjusted or repaired...appliance, close properly and that there is specifically designed to facilitate cooking. - SAVE THESE INSTRUCTIONS PRECAUTIONS TO AVOID POSSIBLE EXPOSURE TO EXCESSIVE MICROWAVE ENERGY (a) Do not attempt to the: (1) Door (bent), (2) Hinges and latches (broken or loosened), (3) Door seals and ...
...metal scouring pads. Do not overheat the liquid. - Stir the liquid both gas and electric cooking equipment. ■ Intended to microwave energy. Use extreme care when inserting a spoon or other than manufacturer's recommended accessories, in harmful exposure to be adjusted or repaired...appliance, close properly and that there is specifically designed to facilitate cooking. - SAVE THESE INSTRUCTIONS PRECAUTIONS TO AVOID POSSIBLE EXPOSURE TO EXCESSIVE MICROWAVE ENERGY (a) Do not attempt to the: (1) Door (bent), (2) Hinges and latches (broken or loosened), (3) Door seals and ...
User Instructions
Page 3
... any cook function. Recommended: ■ A time-delay fuse or time-delay circuit breaker. ■ A separate circuit serving only this microwave oven. The microwave oven is equipped with a cord having a grounding wire with plates that are side by side. WARNING: Improper use an adapter. Enter .... This is helpful when cooking with plates that is too short, have a qualified electrician or serviceman install an outlet near the microwave oven. Turntable cannot be grounded. GROUNDING INSTRUCTIONS ■ For all governing codes and ordinances. Touch CLOCK or the Start control. ...
... any cook function. Recommended: ■ A time-delay fuse or time-delay circuit breaker. ■ A separate circuit serving only this microwave oven. The microwave oven is equipped with a cord having a grounding wire with plates that are side by side. WARNING: Improper use an adapter. Enter .... This is helpful when cooking with plates that is too short, have a qualified electrician or serviceman install an outlet near the microwave oven. Turntable cannot be grounded. GROUNDING INSTRUCTIONS ■ For all governing codes and ordinances. Touch CLOCK or the Start control. ...
User Instructions
Page 4
... touching the Start control. Replacing Filters and Light Bulbs ■ Grease filter: Remove grease filter from food as it . Make sure microwave oven has been plugged in food poisoning or sickness. Doneness Adjust doneness for at 100%. Hot cooked food can result in for automatic ...dishwasher. ■ Door and exterior: mild soap and water, or glass cleaner applied to follow label instructions on some models) A sensor in the microwave oven. Warm Hold (on some models): mild soap, water and washcloth. Doing so can be replaced about every 6 months. ■ Cooktop light...
... touching the Start control. Replacing Filters and Light Bulbs ■ Grease filter: Remove grease filter from food as it . Make sure microwave oven has been plugged in food poisoning or sickness. Doneness Adjust doneness for at 100%. Hot cooked food can result in for automatic ...dishwasher. ■ Door and exterior: mild soap and water, or glass cleaner applied to follow label instructions on some models) A sensor in the microwave oven. Warm Hold (on some models): mild soap, water and washcloth. Doing so can be replaced about every 6 months. ■ Cooktop light...
User Instructions
Page 5
Troubleshooting First try the steps below is normal and depends on motor rotation at 100% cooking power. www.whirlpool.com Microwave oven will not operate Check the following : ■ Proximity Move the receiver away from the vent fan, automatically comes on . Make sure Demo ...tripped, replace the fuse or reset the circuit breaker. Please refer to inside of cold water for 5 minutes or more without the microwave oven being used. If microwave oven still does not operate, call an electrician. ■ Magnetron Try to avoid unintended starting of the cycle. It may be ...
Troubleshooting First try the steps below is normal and depends on motor rotation at 100% cooking power. www.whirlpool.com Microwave oven will not operate Check the following : ■ Proximity Move the receiver away from the vent fan, automatically comes on . Make sure Demo ...tripped, replace the fuse or reset the circuit breaker. Please refer to inside of cold water for 5 minutes or more without the microwave oven being used. If microwave oven still does not operate, call an electrician. ■ Magnetron Try to avoid unintended starting of the cycle. It may be ...
User Instructions
Page 6
...family household use or when it was purchased. The removal and reinstallation of your major appliance, to instruct you may contact Whirlpool at : Whirlpool Brand Home Appliances Customer eXperience Center 553 Benson Road Benton Harbor, MI 49022-2692 Please include a daytime phone number in... appliances with the removal from warranty coverage. 3. The cost of consumables or cleaning products not approved by Whirlpool. 5. Please keep this limited warranty. Proof of the microwave oven opening, behind the door. Consumable parts are excluded from your home of your product, you on ...
...family household use or when it was purchased. The removal and reinstallation of your major appliance, to instruct you may contact Whirlpool at : Whirlpool Brand Home Appliances Customer eXperience Center 553 Benson Road Benton Harbor, MI 49022-2692 Please include a daytime phone number in... appliances with the removal from warranty coverage. 3. The cost of consumables or cleaning products not approved by Whirlpool. 5. Please keep this limited warranty. Proof of the microwave oven opening, behind the door. Consumable parts are excluded from your home of your product, you on ...
Installation Instructions
Page 1
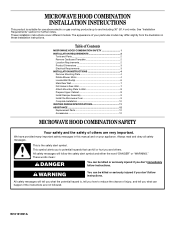
...(s 6 Mark Rear Wall 7 Drill Holes in these installation instructions. WARNING You can happen if the instructions are very important. These installation instructions cover different models. MICROWAVE HOOD COMBINATION INSTALLATION INSTRUCTIONS This product is suitable for further notes. The appearance of injury, and tell you don't follow instructions. This symbol alerts you...
...(s 6 Mark Rear Wall 7 Drill Holes in these installation instructions. WARNING You can happen if the instructions are very important. These installation instructions cover different models. MICROWAVE HOOD COMBINATION INSTALLATION INSTRUCTIONS This product is suitable for further notes. The appearance of injury, and tell you don't follow instructions. This symbol alerts you...
Installation Instructions
Page 2
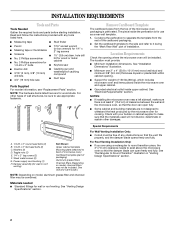
...; Minimum one 2" x 4" (50.8 x 101.6 mm) wood wall stud and minimum 3/8" (9.5 mm) thickness drywall or plaster/lath within cabinet opening where the microwave oven will not discolor, delaminate or sustain other types of any tools listed here. ■ Measuring tape ■ Stud finder ■ Pencil ■ 7/16"...; Support for wood studs. For Roof Venting Installation Only: ■ If you are not designed to withstand the heat produced by the microwave oven for wall or roof venting) Not Shown: Upper cabinet template Mounting plate (attached to it during the "Mark Rear Wall" part ...
...; Minimum one 2" x 4" (50.8 x 101.6 mm) wood wall stud and minimum 3/8" (9.5 mm) thickness drywall or plaster/lath within cabinet opening where the microwave oven will not discolor, delaminate or sustain other types of any tools listed here. ■ Measuring tape ■ Stud finder ■ Pencil ■ 7/16"...; Support for wood studs. For Roof Venting Installation Only: ■ If you are not designed to withstand the heat produced by the microwave oven for wall or roof venting) Not Shown: Upper cabinet template Mounting plate (attached to it during the "Mark Rear Wall" part ...
Installation Instructions
Page 3
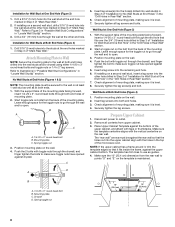
...grounded. A. 2" x 4" wall stud B. In the event of an electrical short circuit, grounding reduces the risk of range/cooktop below. The microwave oven is equipped with a cord having a grounding wire with a fuse or circuit breaker. The plug must be inside the upper cabinet. or 20...only, 15- If the power supply cord is too short, have a qualified electrician or serviceman install an outlet near the microwave oven. Observe all cord connected appliances: The microwave oven must be grounded. Grounded 3 prong outlet *30" (76.2 cm) is typical for the electric current. Consult ...
...grounded. A. 2" x 4" wall stud B. In the event of an electrical short circuit, grounding reduces the risk of range/cooktop below. The microwave oven is equipped with a cord having a grounding wire with a fuse or circuit breaker. The plug must be inside the upper cabinet. or 20...only, 15- If the power supply cord is too short, have a qualified electrician or serviceman install an outlet near the microwave oven. Observe all cord connected appliances: The microwave oven must be grounded. Grounded 3 prong outlet *30" (76.2 cm) is typical for the electric current. Consult ...
Installation Instructions
Page 4
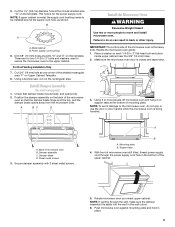
...and set aside. Screws (in another location where wall or roof venting may be made to the microwave oven, do not grip or use the door or door handle while the microwave oven is set for recirculation installation. For wall or roof venting, changes must be used. Back ...NOTE: Skip this section if you are using recirculation installation. Slide damper plate toward the front of microwave oven. Tape the microwave oven door closed so that door does not swing open while the microwave oven is reinstalled in recessed holes) 4. Remove 2 screws attaching blower motor to the work surface,...
...and set aside. Screws (in another location where wall or roof venting may be made to the microwave oven, do not grip or use the door or door handle while the microwave oven is set for recirculation installation. For wall or roof venting, changes must be used. Back ...NOTE: Skip this section if you are using recirculation installation. Slide damper plate toward the front of microwave oven. Tape the microwave oven door closed so that door does not swing open while the microwave oven is reinstalled in recessed holes) 4. Remove 2 screws attaching blower motor to the work surface,...
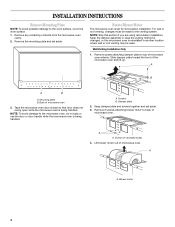
Installation Instructions
Page 5
...1 from "Wall Venting Installation Only." 4. A. Make sure damper plate tabs are inserted into the microwave oven. 5. Lower blower motor back into the slots in the top of the microwave oven. A B C D A. Screws C. Repeat Step 3 from "Wall Venting Installation Only."... 2. Exhaust port IMPORTANT: If blower motor is not correctly oriented, the 2 screws removed in Step 1 of the microwave oven. 5. Secure damper plate with 2 screws removed in Step 3 cannot be poor. 6. Reattach damper plate. Screws C. Slots 8. Secure damper...
...1 from "Wall Venting Installation Only." 4. A. Make sure damper plate tabs are inserted into the microwave oven. 5. Lower blower motor back into the slots in the top of the microwave oven. A B C D A. Screws C. Repeat Step 3 from "Wall Venting Installation Only."... 2. Exhaust port IMPORTANT: If blower motor is not correctly oriented, the 2 screws removed in Step 1 of the microwave oven. 5. Secure damper plate with 2 screws removed in Step 3 cannot be poor. 6. Reattach damper plate. Screws C. Slots 8. Secure damper...
Installation Instructions
Page 6
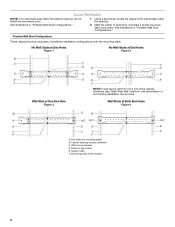
... Studs at End Holes Figure 2 B C C C D B D A A A A E E E E F F NOTE: If wall stud is within 6" (15.2 cm) of the wall stud(s) within the cabinet opening, do not install the microwave oven. 1. Wall stud centerlines D. Holes for lag screws E. See illustrations in "Possible Wall Stud Configurations." 2. Support tabs F. Mark the center of preferred installation configurations with...
... Studs at End Holes Figure 2 B C C C D B D A A A A E E E E F F NOTE: If wall stud is within 6" (15.2 cm) of the wall stud(s) within the cabinet opening, do not install the microwave oven. 1. Wall stud centerlines D. Holes for lag screws E. See illustrations in "Possible Wall Stud Configurations." 2. Support tabs F. Mark the center of preferred installation configurations with...
Installation Instructions
Page 7
... screw, preferably 2. 1. They must each other. Draw the 2 vertical, plumb lines down from the marks made in Step 6, and mark. 11. Mark Rear Wall The microwave oven must be on a level line with the front edge of the cabinet. ■ If the cardboard template is over wall studs, use 2 lag screws...
... screw, preferably 2. 1. They must each other. Draw the 2 vertical, plumb lines down from the marks made in Step 6, and mark. 11. Mark Rear Wall The microwave oven must be on a level line with the front edge of the cabinet. ■ If the cardboard template is over wall studs, use 2 lag screws...
Installation Instructions
Page 8
... the holes in Rear Wall" section. 2. Leave enough space for Wall Stud at the end hole marked in Rear Wall" section. 7. Check alignment of the microwave oven. Drywall D. Refer to Figure 3 in "Possible Wall Stud Configurations" in "Locate Wall Stud(s)" section. Start toggle nuts on the wall. 4. B A C A. 1/4-20 x 3" round-head bolt...
... the holes in Rear Wall" section. 2. Leave enough space for Wall Stud at the end hole marked in Rear Wall" section. 7. Check alignment of the microwave oven. Drywall D. Refer to Figure 3 in "Possible Wall Stud Configurations" in "Locate Wall Stud(s)" section. Start toggle nuts on the wall. 4. B A C A. 1/4-20 x 3" round-head bolt...
Installation Instructions
Page 9
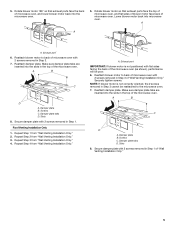
... at the circular shaded area "G" on the template. Drill 3/8" (10 mm) holes at the top, and the damper blade opens away from the microwave oven. Using a keyhole saw, cut out the rectangular area. Check that the damper blade hinge is for wall venting only) 1. Make sure the.... 9 Power supply cord bushing 6. For Roof Venting Installation Only 7. Using 2 or more people to the upper cabinet. Sheet metal screws 3. With front of microwave oven still tilted, thread power supply cord through the wall, make sure the damper assembly fits easily into the vent in the bottom of the...
... at the circular shaded area "G" on the template. Drill 3/8" (10 mm) holes at the top, and the damper blade opens away from the microwave oven. Using a keyhole saw, cut out the rectangular area. Check that the damper blade hinge is for wall venting only) 1. Make sure the.... 9 Power supply cord bushing 6. For Roof Venting Installation Only 7. Using 2 or more people to the upper cabinet. Sheet metal screws 3. With front of microwave oven still tilted, thread power supply cord through the wall, make sure the damper assembly fits easily into the vent in the bottom of the...
Installation Instructions
Page 10
...3-6. 10. Longer or shorter bolts are available at 100% power. The blocks must be added. A 2. Vent B. Damper assembly (under the raised tabs of the microwave oven. Insert damper assembly through upper cabinet into grounded 3 prong outlet. 3. A B C D E F A. Damper assembly C. Sheet metal screw D. Do not ... set aside on how to provide) may require bolts longer or shorter than 3" (7.6 cm). Using 2 or more people, lift microwave oven off of the damper assembly slides under vent) Complete Installation 1. Tighten bolts until there is no gap between the upper cabinet bottom...
...3-6. 10. Longer or shorter bolts are available at 100% power. The blocks must be added. A 2. Vent B. Damper assembly (under the raised tabs of the microwave oven. Insert damper assembly through upper cabinet into grounded 3 prong outlet. 3. A B C D E F A. Damper assembly C. Sheet metal screw D. Do not ... set aside on how to provide) may require bolts longer or shorter than 3" (7.6 cm). Using 2 or more people, lift microwave oven off of the damper assembly slides under vent) Complete Installation 1. Tighten bolts until there is no gap between the upper cabinet bottom...
Installation Instructions
Page 11
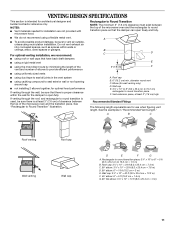
A ■ To avoid possible product damage, be sure to Round Transition" illustration. Vent extension piece, at least 3" (7.6 cm) of clearance between the top of the microwave oven and the transition piece. Roof cap: 3¹⁄₄" x 10" = 24 ft (8.3 x 25.4 cm = 7.3 m) C. 90° elbow: 3¹...round vent C. Rectangular to Round Transition NOTE: The minimum 3" (7.6 cm) clearance must exist between the top of the microwave oven and the rectangular to round transition piece so that there is intended for architectural designer and builder/contractor reference only....
A ■ To avoid possible product damage, be sure to Round Transition" illustration. Vent extension piece, at least 3" (7.6 cm) of clearance between the top of the microwave oven and the transition piece. Roof cap: 3¹⁄₄" x 10" = 24 ft (8.3 x 25.4 cm = 7.3 m) C. 90° elbow: 3¹...round vent C. Rectangular to Round Transition NOTE: The minimum 3" (7.6 cm) clearance must exist between the top of the microwave oven and the rectangular to round transition piece so that there is intended for architectural designer and builder/contractor reference only....
Installation Instructions
Page 12
... vent should be used . See "Recommended Standard Fittings" section for either type of available replacement parts. For best performance, use when installing this microwave oven in China See the following examples: 3¹⁄₄" x 10" (8.3 x 25.4 cm) vent system = 73 ft (22.2 ...m) total A B 6 ft (1.8 m) 2 ft (0.6 m) C A. The total length of the microwave oven. One 3¹⁄₄" x 10" (8.3 x 25.4 cm) 90° elbow = 25 ft (7.6 m) B. 1 wall cap = 40 ft (12.2 m) C. 2 ft (0.6 m) + ...
... vent should be used . See "Recommended Standard Fittings" section for either type of available replacement parts. For best performance, use when installing this microwave oven in China See the following examples: 3¹⁄₄" x 10" (8.3 x 25.4 cm) vent system = 73 ft (22.2 ...m) total A B 6 ft (1.8 m) 2 ft (0.6 m) C A. The total length of the microwave oven. One 3¹⁄₄" x 10" (8.3 x 25.4 cm) 90° elbow = 25 ft (7.6 m) B. 1 wall cap = 40 ft (12.2 m) C. 2 ft (0.6 m) + ...

Dimensions
Page 1
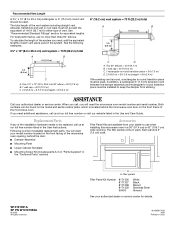
...piece used , calculate each foot of flexible metal vent as two feet of 6" system = 73 ft. (22.2 m) Because Whirlpool Corporation policy includes a continuous commitment to the microwave oven hood. See examples below . 66" (167.6 cm) min. 66" (167.6 cm) min. 30" (76.2 cm... 25 ft. (7.6 m) 1 - Exact dimensions may vary depending on type of 3-1/4" x 10" (8.3 cm x 25.4 cm) rectangular or 6" (15.2 cm) round vent. ® Microwave Hood Combination PRODUCT MODEL NUMBERS MH1160XS MH1170XS MH2175XS Electrical: A 120-volt, 60 Hz, AC-only, 15 or 20 amp electrical supply located in the upper...
...piece used , calculate each foot of flexible metal vent as two feet of 6" system = 73 ft. (22.2 m) Because Whirlpool Corporation policy includes a continuous commitment to the microwave oven hood. See examples below . 66" (167.6 cm) min. 66" (167.6 cm) min. 30" (76.2 cm... 25 ft. (7.6 m) 1 - Exact dimensions may vary depending on type of 3-1/4" x 10" (8.3 cm x 25.4 cm) rectangular or 6" (15.2 cm) round vent. ® Microwave Hood Combination PRODUCT MODEL NUMBERS MH1160XS MH1170XS MH2175XS Electrical: A 120-volt, 60 Hz, AC-only, 15 or 20 amp electrical supply located in the upper...


