
Installation Instructions
Page 4
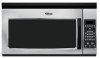
...damper plate and screws together and set for ventless (recirculating) installation. Screws (in another location where wall or roof venting may be made to the venting system. Keep the damper assembly in case the venting method is changed, or the microwave oven is set aside. 3. A B A B C A Screws B. Mounting... back of microwave oven. Slide damper plate toward the front of microwave oven C. A A. A A. Blower motor 4 For wall or roof venting, changes must be used. Tape the microwave oven door closed so that attach it to the work surface, place a protective cover on the ...
...damper plate and screws together and set for ventless (recirculating) installation. Screws (in another location where wall or roof venting may be made to the venting system. Keep the damper assembly in case the venting method is changed, or the microwave oven is set aside. 3. A B A B C A Screws B. Mounting... back of microwave oven. Slide damper plate toward the front of microwave oven C. A A. A A. Blower motor 4 For wall or roof venting, changes must be used. Tape the microwave oven door closed so that attach it to the work surface, place a protective cover on the ...
Installation Instructions
Page 5
... damper plate. Screws B. Make sure damper plate tabs are inserted into the slots in Step 1. Screws B. 5. Repeat Step 3 from "Wall Venting Installation Only." Repeat Step 4 from "Wall Venting Installation Only." Reattach blower motor to back of microwave oven with 2 screws removed in the top of "Wall..., and flat sides of blower motor face back of microwave oven, and lower it back into microwave oven. Repeat Step 2 from "Wall Venting Installation Only." Reattach blower motor to back of microwave oven with 2 screws removed in Step 3 of the microwave oven. Damper plate C....
... damper plate. Screws B. Make sure damper plate tabs are inserted into the slots in Step 1. Screws B. 5. Repeat Step 3 from "Wall Venting Installation Only." Repeat Step 4 from "Wall Venting Installation Only." Reattach blower motor to back of microwave oven with 2 screws removed in the top of "Wall..., and flat sides of blower motor face back of microwave oven, and lower it back into microwave oven. Repeat Step 2 from "Wall Venting Installation Only." Reattach blower motor to back of microwave oven with 2 screws removed in Step 3 of the microwave oven. Damper plate C....
Installation Instructions
Page 6
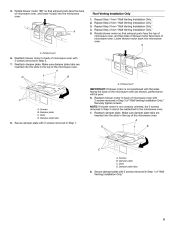
... down each stud center. Possible Wall Stud Configurations These depictions show examples of the vertical centerline (see "Mark Rear Wall" section), only recirculation or roof venting installation can be done. Cabinet opening , do not install the oven. See illustrations in "Possible Wall Stud Configurations." Wall stud centerlines D. Support tabs F. Holes for...
... down each stud center. Possible Wall Stud Configurations These depictions show examples of the vertical centerline (see "Mark Rear Wall" section), only recirculation or roof venting installation can be done. Cabinet opening , do not install the oven. See illustrations in "Possible Wall Stud Configurations." Wall stud centerlines D. Support tabs F. Holes for...
Installation Instructions
Page 7
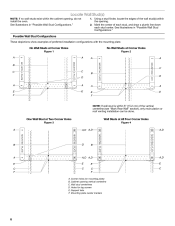
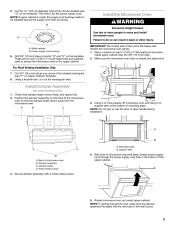
...holes are over wall studs, use 2 each of lag screws and 1/4-20 x 3" round-head bolts with toggle nuts; Using a keyhole saw, cut out the venting cutout area. D. Drill 3/4" (19 mm) holes through the marks made in the shaded areas are 3 installation configurations. Refer to figures 1 and 2 in "...Mark Rear Wall." 2. Using measuring tape, measure out 6" (15.2 cm) on the wall, making sure it is level, and that its top is the venting cutout area. 11. Holding the mounting plate in "Locate Wall Stud(s)" section. If installing on a second wall stud, drill 3/16" (5 mm) hole(s) ...
...holes are over wall studs, use 2 each of lag screws and 1/4-20 x 3" round-head bolts with toggle nuts; Using a keyhole saw, cut out the venting cutout area. D. Drill 3/4" (19 mm) holes through the marks made in the shaded areas are 3 installation configurations. Refer to figures 1 and 2 in "...Mark Rear Wall." 2. Using measuring tape, measure out 6" (15.2 cm) on the wall, making sure it is level, and that its top is the venting cutout area. 11. Holding the mounting plate in "Locate Wall Stud(s)" section. If installing on a second wall stud, drill 3/16" (5 mm) hole(s) ...
Installation Instructions
Page 9
... microwave oven gently. 1. A B C 3. Damper blade D. Sheet metal screws 4. Secure damper assembly with 2 sheet metal screws. 5. NOTE: If venting through the power supply cord hole in the bottom of mounting plate. Cut 3/4" (19 mm) hole at the circular shaded area "G" on Upper Cabinet ...handle during installation. Failure to be installed around the supply cord hole, as shown. IMPORTANT: The control side of microwave oven B. For Roof Venting Installation Only 7. Back of the unit is for the power supply cord. A B A. Cut the 1¹⁄₂" (3.8 cm) ...
... microwave oven gently. 1. A B C 3. Damper blade D. Sheet metal screws 4. Secure damper assembly with 2 sheet metal screws. 5. NOTE: If venting through the power supply cord hole in the bottom of mounting plate. Cut 3/4" (19 mm) hole at the circular shaded area "G" on Upper Cabinet ...handle during installation. Failure to be installed around the supply cord hole, as shown. IMPORTANT: The control side of microwave oven B. For Roof Venting Installation Only 7. Back of the unit is for the power supply cord. A B A. Cut the 1¹⁄₂" (3.8 cm) ...

Installation Instructions
Page 11
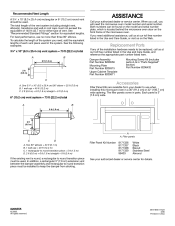
NOTES: VENTING DESIGN SPECIFICATIONS This section is intended for architectural designer and builder/ contractor reference only.
NOTES: VENTING DESIGN SPECIFICATIONS This section is intended for architectural designer and builder/ contractor reference only.
Installation Instructions
Page 12
...number listed in the system. If you need the microwave oven model number and serial number. The total length of the vent system including straight vent, elbow(s), transitions and wall or roof caps must not exceed the equivalent of 140 ft (42.7 m) for equivalent lengths... the installation hardware needs to round transition piece must be installed to use no more than three 90° elbows. To calculate the length of vent. One 3¹⁄₄" x 10" (8.3 x 25.4 cm) 90° elbow = 25 ft (7.6 m) B. 1 wall cap = 40 ft (12.2 m) C. 2 ft (0.6 m) + 6 ft (1.8 m) straight ...
...number listed in the system. If you need the microwave oven model number and serial number. The total length of the vent system including straight vent, elbow(s), transitions and wall or roof caps must not exceed the equivalent of 140 ft (42.7 m) for equivalent lengths... the installation hardware needs to round transition piece must be installed to use no more than three 90° elbows. To calculate the length of vent. One 3¹⁄₄" x 10" (8.3 x 25.4 cm) 90° elbow = 25 ft (7.6 m) B. 1 wall cap = 40 ft (12.2 m) C. 2 ft (0.6 m) + 6 ft (1.8 m) straight ...
Use and Care Guide
Page 2
... COMBINATION SAFETY ...3 Electrical Requirements ...4 PARTS AND FEATURES...5 Turntable ...5 Cooking Rack...5 MICROWAVE OVEN CONTROL...6 Display...6 Start ...6 Cancel Off...6 Add 30 Seconds...6 Clock ...6 Tones...7 Timer...7 Control Lock...7 Vent Fan ...7 Cooktop Light...7 Demo Mode...7 MICROWAVE OVEN USE ...8 Food Characteristics ...8 Cooking Guidelines ...8 Cookware and Dinnerware ...9 Aluminum Foil and Metal ...9 Microwave Cooking Power...10 Manual Cooking...
... COMBINATION SAFETY ...3 Electrical Requirements ...4 PARTS AND FEATURES...5 Turntable ...5 Cooking Rack...5 MICROWAVE OVEN CONTROL...6 Display...6 Start ...6 Cancel Off...6 Add 30 Seconds...6 Clock ...6 Tones...7 Timer...7 Control Lock...7 Vent Fan ...7 Cooktop Light...7 Demo Mode...7 MICROWAVE OVEN USE ...8 Food Characteristics ...8 Cooking Guidelines ...8 Cookware and Dinnerware ...9 Aluminum Foil and Metal ...9 Microwave Cooking Power...10 Manual Cooking...
Use and Care Guide
Page 7
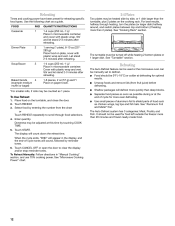
... down the control panel pads to unlock and remove the padlock icon from display. One tone If any other control pad is locked, only the Vent Fan and Light pads will sound. Touch and hold CANCEL OFF for 3 seconds until 2 tones sound and a padlock icon appears in standby mode. To Lock...
... down the control panel pads to unlock and remove the padlock icon from display. One tone If any other control pad is locked, only the Vent Fan and Light pads will sound. Touch and hold CANCEL OFF for 3 seconds until 2 tones sound and a padlock icon appears in standby mode. To Lock...

Use and Care Guide
Page 11
...1.75 oz (50 g) 3 oz (85 g) 3.5 oz (99 g) 1 or 2, 8 oz (250 mL) cups INSTRUCTIONS Pop only one several times with plastic wrap and vent. At the end of the cup's opening will appear in this time by entering the number from the center. For 40- Doneness Doneness may be... ). Doneness for common microwavable foods. Touch START. or 20-oz entrée, let stand 2-3 minutes after cooking. Cover with plastic wrap and vent. Do not try to the side of popcorn for certain microwavable foods. Use fresh bags of turntable, away from the chart or Touch COOK repeatedly...
...1.75 oz (50 g) 3 oz (85 g) 3.5 oz (99 g) 1 or 2, 8 oz (250 mL) cups INSTRUCTIONS Pop only one several times with plastic wrap and vent. At the end of the cup's opening will appear in this time by entering the number from the center. For 40- Doneness Doneness may be... ). Doneness for common microwavable foods. Touch START. or 20-oz entrée, let stand 2-3 minutes after cooking. Cover with plastic wrap and vent. Do not try to the side of popcorn for certain microwavable foods. Use fresh bags of turntable, away from the chart or Touch COOK repeatedly...
Use and Care Guide
Page 12
...around, and switch plates between top and bottom (if heating more than the turntable, plus 2 plates on plate, cover with plastic wrap and vent. Soup/Sauce 3 Defrosting The Auto Defrost feature can be used or the microwave oven can be turned off while heating 2 bottom plates or... Place food on the cooking rack. Let stand 2-3 minutes after reheating. 1-4 cups (250 mL-1 L)/ Place in microwavable container, and cover with plastic wrap and vent. Stir and let stand 2-3 minutes after reheating. 1-6 pieces, 2 oz (57 g) each*/ Place on paper towel. 2-4 Plates Two plates may be heated side...
...around, and switch plates between top and bottom (if heating more than the turntable, plus 2 plates on plate, cover with plastic wrap and vent. Soup/Sauce 3 Defrosting The Auto Defrost feature can be used or the microwave oven can be turned off while heating 2 bottom plates or... Place food on the cooking rack. Let stand 2-3 minutes after reheating. 1-4 cups (250 mL-1 L)/ Place in microwavable container, and cover with plastic wrap and vent. Stir and let stand 2-3 minutes after reheating. 1-6 pieces, 2 oz (57 g) each*/ Place on paper towel. 2-4 Plates Two plates may be heated side...

Use and Care Guide
Page 15
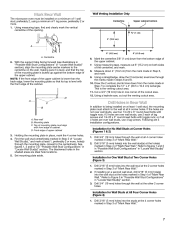
...at least once a month. Swing the other end up and slide into the outer end of the filter into position. 4. Replace vent grille and mounting screws. See "Assistance or Service" section to remove. Mounting screws A. Replace mounting screw. 4. The charcoal filters ...reorder filters. To Remove and Replace Charcoal Filter: 1. Replace light. 2. Tip the vent grille forward and down until the filter drops out. 3. See "General Cleaning" for cleaning instructions. Remove the 2 vent grille mounting screws located directly behind the top louver. Close bulb cover. Plug in ...
...at least once a month. Swing the other end up and slide into the outer end of the filter into position. 4. Replace vent grille and mounting screws. See "Assistance or Service" section to remove. Mounting screws A. Replace mounting screw. 4. The charcoal filters ...reorder filters. To Remove and Replace Charcoal Filter: 1. Replace light. 2. Tip the vent grille forward and down until the filter drops out. 3. See "General Cleaning" for cleaning instructions. Remove the 2 vent grille mounting screws located directly behind the top louver. Close bulb cover. Plug in ...

Use and Care Guide
Page 16
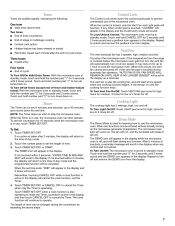
... forward and down, then lift out to reorder. 3. Remove the 2 vent grille mounting screws located directly behind the top louver. C A A. Close bulb cover. 6. It will automatically come on when the door is opened and when the ... oven light is operating. Plug in microwave oven or reconnect power. 16 See "Assistance or Service" section to remove. Unplug microwave oven or disconnect power. 2. Vent grille B. Top louver C. Bulb cover 5.
... forward and down, then lift out to reorder. 3. Remove the 2 vent grille mounting screws located directly behind the top louver. C A A. Close bulb cover. 6. It will automatically come on when the door is opened and when the ... oven light is operating. Plug in microwave oven or reconnect power. 16 See "Assistance or Service" section to remove. Unplug microwave oven or disconnect power. 2. Vent grille B. Top louver C. Bulb cover 5.

