
Installation Instructions
Page 1
MICROWAVE HOOD COMBINATION INSTALLATION INSTRUCTIONS This product is suitable for use above electric or gas cooking products up to 36" (91.4 cm) wide. NOTES: The appearance of your particular model may differ slightly from the illustration in these installation instructions. These installation instructions cover different models.
MICROWAVE HOOD COMBINATION INSTALLATION INSTRUCTIONS This product is suitable for use above electric or gas cooking products up to 36" (91.4 cm) wide. NOTES: The appearance of your particular model may differ slightly from the illustration in these installation instructions. These installation instructions cover different models.
Installation Instructions
Page 3
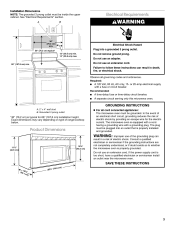
Do not use an extension cord. Failure to follow these instructions can result in death, fire, or electrical shock. Do not remove ground prong. Observe all governing codes and ordinances. See "Electrical Requirements" section. Electrical Shock Hazard Plug into a grounded 3 prong outlet. Electrical Requirements A B WARNING 30" (76.2 cm) min. 30" (76.2 cm) typical* 12" (30.5 cm) min. 14" (35.6 cm) max. Do not use an adapter. 66" (167.6 cm) min. Installation Dimensions NOTE: The grounded 3 prong outlet must be inside the upper cabinet. Required:
Do not use an extension cord. Failure to follow these instructions can result in death, fire, or electrical shock. Do not remove ground prong. Observe all governing codes and ordinances. See "Electrical Requirements" section. Electrical Shock Hazard Plug into a grounded 3 prong outlet. Electrical Requirements A B WARNING 30" (76.2 cm) min. 30" (76.2 cm) typical* 12" (30.5 cm) min. 14" (35.6 cm) max. Do not use an adapter. 66" (167.6 cm) min. Installation Dimensions NOTE: The grounded 3 prong outlet must be inside the upper cabinet. Required:

Installation Instructions
Page 4
... a protective cover on the work surface. 1. INSTALLATION INSTRUCTIONS Remove Mounting Plate NOTE: To avoid possible damage to back of microwave oven. Wall Venting Installation Only 1. Tape the microwave oven door closed so that attach it to the back of microwave oven exterior. A A. Rotate Blower Motor The microwave oven is being handled. 2. Remove screws attaching damper plate to the venting system. Keep damper plate and screws together and set the mounting plate aside. A A. Lift blower motor out of microwave oven...
... a protective cover on the work surface. 1. INSTALLATION INSTRUCTIONS Remove Mounting Plate NOTE: To avoid possible damage to back of microwave oven. Wall Venting Installation Only 1. Tape the microwave oven door closed so that attach it to the back of microwave oven exterior. A A. Rotate Blower Motor The microwave oven is being handled. 2. Remove screws attaching damper plate to the venting system. Keep damper plate and screws together and set the mounting plate aside. A A. Lift blower motor out of microwave oven...
Installation Instructions
Page 6
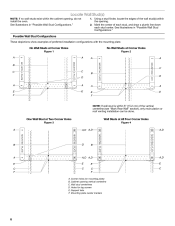
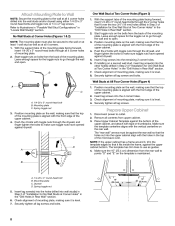
... recirculation or roof venting installation can be done. See illustrations in "Possible Wall Stud Configurations." 1. Cabinet opening , do not install the oven. Support tabs F. Corner holes (on mounting plate) B. See illustrations in "Possible Wall Stud Configurations." Wall stud centerlines D. Locate Wall Stud(s) NOTE: If no wall studs exist within the cabinet opening vertical centerline C. Using a stud finder, locate the edges of preferred installation configurations with the mounting plate. Possible Wall Stud Configurations These...
... recirculation or roof venting installation can be done. See illustrations in "Possible Wall Stud Configurations." 1. Cabinet opening , do not install the oven. Support tabs F. Corner holes (on mounting plate) B. See illustrations in "Possible Wall Stud Configurations." Wall stud centerlines D. Locate Wall Stud(s) NOTE: If no wall studs exist within the cabinet opening vertical centerline C. Using a stud finder, locate the edges of preferred installation configurations with the mounting plate. Possible Wall Stud Configurations These...
Installation Instructions
Page 7
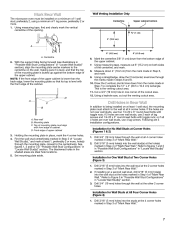
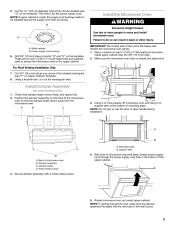
... in one corner of the opening. Installation for One Wall Stud at Two Corner Holes (Figure 3) 1. Cut a 3/4" (19 mm) hole in Step 2 of "Locate Wall Stud(s)," and mark at all 4 holes are not over wall studs, use four 1/4-20 x 3" round-head bolts with toggle nuts; Holding the mounting plate in steps 6 and 8. 10. Wall Venting Installation Only Centerline Upper cabinet bottom ³⁄₈...
... in one corner of the opening. Installation for One Wall Stud at Two Corner Holes (Figure 3) 1. Cut a 3/4" (19 mm) hole in Step 2 of "Locate Wall Stud(s)," and mark at all 4 holes are not over wall studs, use four 1/4-20 x 3" round-head bolts with toggle nuts; Holding the mounting plate in steps 6 and 8. 10. Wall Venting Installation Only Centerline Upper cabinet bottom ³⁄₈...
Installation Instructions
Page 8
... alignment of mounting plate, making sure it , trim the template edges so that the top of "Installation for One Wall Stud at all contents from upper cabinet. 3. Insert lag screws into the remaining 2 corner holes. 6. Disconnect power to illustrations in "Possible Wall Stud Configurations" in "Locate Wall Stud(s)" section. Start toggle nuts on the template is level. 7. With the support tabs of the mounting plate is...
... alignment of mounting plate, making sure it , trim the template edges so that the top of "Installation for One Wall Stud at all contents from upper cabinet. 3. Insert lag screws into the remaining 2 corner holes. 6. Disconnect power to illustrations in "Possible Wall Stud Configurations" in "Locate Wall Stud(s)" section. Start toggle nuts on the template is level. 7. With the support tabs of the mounting plate is...
Installation Instructions
Page 9
... cord bushing needs to do so can result in the wall cutout. 9 Cut 3/4" (19 mm) hole at points "D" and "E" on Upper Cabinet Template. 8. Using a keyhole saw, cut out the rectangular area. Position the damper assembly on the back of the shaded rectangular area "F" on the template. Using 2 or more people to the upper cabinet. NOTE: Do not grip or use the door or door handle during installation. A B A. Mounting plate B. Support...
... cord bushing needs to do so can result in the wall cutout. 9 Cut 3/4" (19 mm) hole at points "D" and "E" on Upper Cabinet Template. 8. Using a keyhole saw, cut out the rectangular area. Position the damper assembly on the back of the shaded rectangular area "F" on the template. Using 2 or more people to the upper cabinet. NOTE: Do not grip or use the door or door handle during installation. A B A. Mounting plate B. Support...
Installation Instructions
Page 12
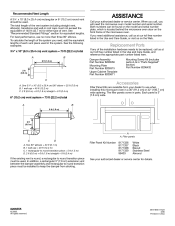
... Care Guide, or visit us at our toll free number listed in the system. Recommended Vent Length A 3¹⁄₄" x 10" (8.3 x 25.4 cm) rectangular or 6" (15.2 cm) round vent should be replaced, call us on the front frame of the microwave oven. For best performance, use when installing this microwave oven in pairs. If you need the microwave oven model number and serial number. Damper Assembly Part Number 8206556 Mounting Plate Part Number 8206315 Upper Cabinet Template Part Number 8205871 Mounting Screw Kit...
... Care Guide, or visit us at our toll free number listed in the system. Recommended Vent Length A 3¹⁄₄" x 10" (8.3 x 25.4 cm) rectangular or 6" (15.2 cm) round vent should be replaced, call us on the front frame of the microwave oven. For best performance, use when installing this microwave oven in pairs. If you need the microwave oven model number and serial number. Damper Assembly Part Number 8206556 Mounting Plate Part Number 8206315 Upper Cabinet Template Part Number 8205871 Mounting Screw Kit...
Use and Care Guide
Page 2
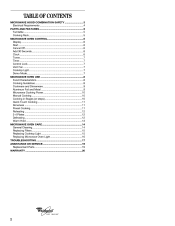
... ...3 Electrical Requirements ...4 PARTS AND FEATURES...5 Turntable ...5 Cooking Rack...5 MICROWAVE OVEN CONTROL...6 Display...6 Start ...6 Cancel Off...6 Add 30 Seconds...6 Clock ...6 Tones...7 Timer...7 Control Lock...7 Vent Fan ...7 Cooktop Light...7 Demo Mode...7 MICROWAVE OVEN USE ...8 Food Characteristics ...8 Cooking Guidelines ...8 Cookware and Dinnerware ...9 Aluminum Foil and Metal ...9 Microwave Cooking Power...10 Manual Cooking ...10 Cooking in Stages (or steps)...10 Quick Touch Cooking ...11 Doneness ...11 Preset Cooking...11 Reheating ...12 2-4 Plates ...12 Defrosting ...12 Warm...
... ...3 Electrical Requirements ...4 PARTS AND FEATURES...5 Turntable ...5 Cooking Rack...5 MICROWAVE OVEN CONTROL...6 Display...6 Start ...6 Cancel Off...6 Add 30 Seconds...6 Clock ...6 Tones...7 Timer...7 Control Lock...7 Vent Fan ...7 Cooktop Light...7 Demo Mode...7 MICROWAVE OVEN USE ...8 Food Characteristics ...8 Cooking Guidelines ...8 Cookware and Dinnerware ...9 Aluminum Foil and Metal ...9 Microwave Cooking Power...10 Manual Cooking ...10 Cooking in Stages (or steps)...10 Quick Touch Cooking ...11 Doneness ...11 Preset Cooking...11 Reheating ...12 2-4 Plates ...12 Defrosting ...12 Warm...

Use and Care Guide
Page 4
..., turn the fan on hood or filter. Grease should not be used above both gas and electric cooking equipment. Do not store anything directly on models with maximum width of the microwave oven when the microwave oven is in operation. Clean Ventilating Hoods Frequently - IMPORTANT SAFETY INSTRUCTIONS Suitable for use paper products when appliance is operated in the "PAN BROWN" mode (on top of 36" (91.44 cm). Do not use above ranges...
..., turn the fan on hood or filter. Grease should not be used above both gas and electric cooking equipment. Do not store anything directly on models with maximum width of the microwave oven when the microwave oven is in operation. Clean Ventilating Hoods Frequently - IMPORTANT SAFETY INSTRUCTIONS Suitable for use paper products when appliance is operated in the "PAN BROWN" mode (on top of 36" (91.44 cm). Do not use above ranges...
Use and Care Guide
Page 6
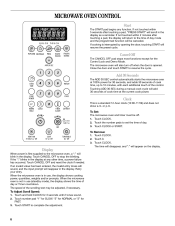
... the number pads to set the time of the control. Touch CLOCK. When the microwave oven is opened. To Adjust Scroll Speed: 1. The microwave oven will reappear in the display as a reminder. Add 30 Seconds The ADD 30 SEC control automatically starts the microwave oven at 100% power for 3 seconds until 2 tones sound. 2. To Set: The microwave oven and timer must be off when the door is in use , the display shows cooking power, quantities, weights and...
... the number pads to set the time of the control. Touch CLOCK. When the microwave oven is opened. To Adjust Scroll Speed: 1. The microwave oven will reappear in the display as a reminder. Add 30 Seconds The ADD 30 SEC control automatically starts the microwave oven at 100% power for 3 seconds until 2 tones sound. 2. To Set: The microwave oven and timer must be off when the door is in use , the display shows cooking power, quantities, weights and...

Use and Care Guide
Page 9
... used properly, arcing (a blue flash of light) can occur and cause damage to the microwave oven. Follow manufacturer's recommendations. Racks and bakeware supplied with gold or silver trim. OK for microwave oven use oven mitts or pot holders when handling because any dish may be at least 3/16" (5 mm) above the turntable. Use those approved by the manufacturer for microwave oven use oven mitts or pot holders when removing...
... used properly, arcing (a blue flash of light) can occur and cause damage to the microwave oven. Follow manufacturer's recommendations. Racks and bakeware supplied with gold or silver trim. OK for microwave oven use oven mitts or pot holders when handling because any dish may be at least 3/16" (5 mm) above the turntable. Use those approved by the manufacturer for microwave oven use oven mitts or pot holders when removing...
Use and Care Guide
Page 10
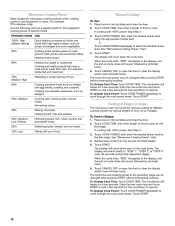
...% power, skip Step 3. 3. Manual Cooking To Use: 1. The cook time and power may be set for manual cooking at different cooking powers for the first stage. To Change Cook Power: Touch COOK POWER repeatedly to scroll through the cook power levels. If cooking with high water content, such as a general guide for the suggested cooking power of time, up to cook for various lengths of specific foods. See "Microwave Cooking Power" chart. 4. Heating bread, rolls and pastries. Defrosting bread, fish, meats, poultry...
...% power, skip Step 3. 3. Manual Cooking To Use: 1. The cook time and power may be set for manual cooking at different cooking powers for the first stage. To Change Cook Power: Touch COOK POWER repeatedly to scroll through the cook power levels. If cooking with high water content, such as a general guide for the suggested cooking power of time, up to cook for various lengths of specific foods. See "Microwave Cooking Power" chart. 4. Heating bread, rolls and pastries. Defrosting bread, fish, meats, poultry...

Use and Care Guide
Page 11
... plate, cover with smaller openings may heat faster. If entrée is absorbed. During programming, before touching START, touch COOK TIME once for MORE, twice for LESS or 3 times for optimal results. Stir and let stand 2-3 minutes after cooking. Cover with plastic wrap and vent. Cooking results may be adjusted at this time by brand and fat content. This allows the microwave oven to clear the display...
... plate, cover with smaller openings may heat faster. If entrée is absorbed. During programming, before touching START, touch COOK TIME once for MORE, twice for LESS or 3 times for optimal results. Stir and let stand 2-3 minutes after cooking. Cover with plastic wrap and vent. Cooking results may be adjusted at this time by brand and fat content. This allows the microwave oven to clear the display...
Use and Care Guide
Page 12
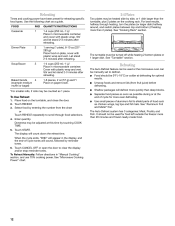
.... See "Cooking Rack" section. For best results, halfway through heating, turn the plates (or larger dish) halfway around, and switch plates between top and bottom (if heating more than the turntable, plus 2 plates on plate, cover with plastic wrap and vent. Reheating Times and cooking power have been preset for reheating specific food types. Use the following chart as a guide. Cover with plastic wrap. Dinner Plate 2 The turntable must be manually set to defrost...
.... See "Cooking Rack" section. For best results, halfway through heating, turn the plates (or larger dish) halfway around, and switch plates between top and bottom (if heating more than the turntable, plus 2 plates on plate, cover with plastic wrap and vent. Reheating Times and cooking power have been preset for reheating specific food types. Use the following chart as a guide. Cover with plastic wrap. Dinner Plate 2 The turntable must be manually set to defrost...

Use and Care Guide
Page 14
Stainless Steel (on cleaning products. Rub in direction of grain to avoid damaging. Damage may Do not use soap-filled scouring pads, abrasive cleaners, steelwool pads, gritty washcloths or some paper towels. MICROWAVE OVEN CARE General Cleaning IMPORTANT: Before cleaning, make sure all controls are suggested first unless otherwise noted. Always follow label instructions on some models) GREASE FILTERS Do not use ammonia or corrosive cleaning agents such as lyeoccur. based oven cleaners. Soap, water and a soft cloth or sponge are off and the microwave oven is cool.
Stainless Steel (on cleaning products. Rub in direction of grain to avoid damaging. Damage may Do not use soap-filled scouring pads, abrasive cleaners, steelwool pads, gritty washcloths or some paper towels. MICROWAVE OVEN CARE General Cleaning IMPORTANT: Before cleaning, make sure all controls are suggested first unless otherwise noted. Always follow label instructions on some models) GREASE FILTERS Do not use ammonia or corrosive cleaning agents such as lyeoccur. based oven cleaners. Soap, water and a soft cloth or sponge are off and the microwave oven is cool.

Use and Care Guide
Page 15
...Replace light. Remove the 2 vent grille mounting screws located directly behind the top louver. Unplug microwave oven or disconnect power. 2. Mounting screw 3. The charcoal filters cannot be washed and should be replaced every 6 to remove. A A. Top louver C. Replacing Cooktop Light The cooktop light is a candelabra base bulb. Replace mounting screw. 4. Tip the vent grille forward and down until the filter drops out. 3. See "General Cleaning" for cleaning instructions. See "Assistance or Service" section to reorder. To Remove and Replace Grease Filters: 1. Replace vent...
...Replace light. Remove the 2 vent grille mounting screws located directly behind the top louver. Unplug microwave oven or disconnect power. 2. Mounting screw 3. The charcoal filters cannot be washed and should be replaced every 6 to remove. A A. Top louver C. Replacing Cooktop Light The cooktop light is a candelabra base bulb. Replace mounting screw. 4. Tip the vent grille forward and down until the filter drops out. 3. See "General Cleaning" for cleaning instructions. See "Assistance or Service" section to reorder. To Remove and Replace Grease Filters: 1. Replace vent...

Use and Care Guide
Page 16
Replacing Microwave Oven Light The microwave oven light is operating. Unplug microwave oven or disconnect power. 2. A B 4. C A A. Top louver C. Mounting screws A. Plug in microwave oven or reconnect power. 16 Vent grille B. Replace light. Close bulb cover. 6. Reattach vent grille. Lift up the bulb cover. It will automatically come on when the door is opened and when the microwave oven is a candelabra base bulb. Bulb cover 5. Remove the 2 vent grille mounting screws located directly behind the top louver. See "Assistance or Service" section to remove. ...
Replacing Microwave Oven Light The microwave oven light is operating. Unplug microwave oven or disconnect power. 2. A B 4. C A A. Top louver C. Mounting screws A. Plug in microwave oven or reconnect power. 16 Vent grille B. Replace light. Close bulb cover. 6. Reattach vent grille. Lift up the bulb cover. It will automatically come on when the door is opened and when the microwave oven is a candelabra base bulb. Bulb cover 5. Remove the 2 vent grille mounting screws located directly behind the top louver. See "Assistance or Service" section to remove. ...
Use and Care Guide
Page 19
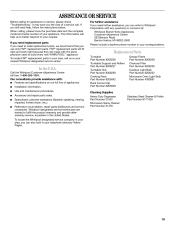
...& Polish Part Number 8171420 If you the cost of a service call us to better respond to local dealers, repair parts distributors and service companies. Replacement Parts Turntable Part Number 8206226 Turntable Support and Rollers Part Number 8206227 Turntable Hub Part Number 8206228 Cooking Rack Part Number 8205042 Rack Corner Clip Part Number 8205039 Grease Filters Part Number 8206229 Charcoal Filter Part Number 8206230 Cooktop Light Bulb Part Number 8206232 Microwave Oven Light Bulb Part Number 4393681 In the U.S.A. Installation information. FSP® replacement parts will help...
...& Polish Part Number 8171420 If you the cost of a service call us to better respond to local dealers, repair parts distributors and service companies. Replacement Parts Turntable Part Number 8206226 Turntable Support and Rollers Part Number 8206227 Turntable Hub Part Number 8206228 Cooking Rack Part Number 8205042 Rack Corner Clip Part Number 8205039 Grease Filters Part Number 8206229 Charcoal Filter Part Number 8206230 Cooktop Light Bulb Part Number 8206232 Microwave Oven Light Bulb Part Number 4393681 In the U.S.A. Installation information. FSP® replacement parts will help...

Use and Care Guide
Page 20
... a Whirlpool designated service company. Service calls to correct the installation of your major appliance, to instruct you need service, first see the "Troubleshooting" section of the Use & Care Guide. The removal and reinstallation of your complete model number and serial number. All rights reserved. ® Registered Trademark/TM Trademark of Whirlpool, U.S.A. 4619-652-68351 11/05 Printed in materials or workmanship. Replacement parts or repair labor costs for FSP® replacement parts...
... a Whirlpool designated service company. Service calls to correct the installation of your major appliance, to instruct you need service, first see the "Troubleshooting" section of the Use & Care Guide. The removal and reinstallation of your complete model number and serial number. All rights reserved. ® Registered Trademark/TM Trademark of Whirlpool, U.S.A. 4619-652-68351 11/05 Printed in materials or workmanship. Replacement parts or repair labor costs for FSP® replacement parts...


