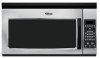
Whirlpool MH1170XS Support Question
Whirlpool MH1170XS Support Question
Find answers below for this question about Whirlpool MH1170XS.Need a Whirlpool MH1170XS manual? We have 2 online manuals for this item!
Question posted by takeyaturner on September 19th, 2016
Fuse
Where is the fuse located on this model?
Current Answers
Answer #1: Posted by freginold on September 20th, 2016 3:16 AM
freginold

Member since:
December 20th, 2011 Points: 23,253,885

Member since:
December 20th, 2011 Points: 23,253,885
Hello, the fuse is located on the right side of this model. You can see the exact location of the line fuse on page 4-1 of the service manual (download it here if you need it). Note that if you replace the fuse, you should also replace several of the switches at the same time because of possible damage. See the warning at the bottom of page 1-2. See pages 4-6 and 4-7 for instructions on removing the fuse.
Related Whirlpool MH1170XS Manual Pages
Installation Instructions - Page 1

The appearance of your particular model may differ slightly from the illustration in these installation instructions. NOTES: These installation instructions cover different models. MICROWAVE HOOD COMBINATION INSTALLATION INSTRUCTIONS
This product is suitable for use above electric or gas cooking products up to 36" (91.4 cm) wide.
Installation Instructions - Page 2
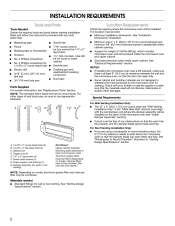
Read and follow the instructions provided with any tools listed here. The location must provide: Location Requirements
Check the opening where the microwave oven will be installed.
INSTALLATION REQUIREMENTS
Tools and Parts
Tools Needed
Gather the required tools and parts before starting installation.
Installation Instructions - Page 4

... by peeling off the strips of tape that door does not swing open while the microwave oven is set the mounting plate aside. Mounting plate B. Back of the microwave oven and lift up. Screws (in another location where wall or roof venting may be made to the work surface, place a protective cover on...
Installation Instructions - Page 5
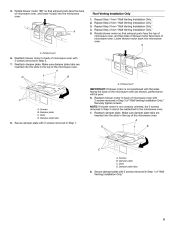
... plate with 2 screws removed in Step 3 cannot be poor. 6. Rotate blower motor 180° so that exhaust ports face the top of microwave oven, and flat sides of blower motor face back of the microwave oven. Repeat Step 3 from "Wall Venting Installation Only." Make sure damper plate tabs are inserted into microwave...
Installation Instructions - Page 6
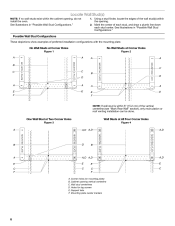
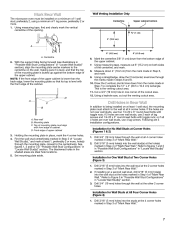
...a plumb line down each stud center. Corner holes (on mounting plate) B. Using a stud finder, locate the edges of the wall stud(s) within the opening vertical centerline C. One Wall Stud at Two Corner ...D
C D A E
B
A E F
A E F
A E
NOTE: If wall stud is within the cabinet opening, do not install the oven. Cabinet opening . 2. See illustrations in "Possible Wall Stud Configurations."
Installation Instructions - Page 7
... the 2 corner holes marked in Step 3 of the opening. Mark Rear Wall
The microwave oven must be installed on a minimum of 1 wall stud, preferably 2, using a minimum of ...Corner Holes (Figure 3)
1. Centerline
2.
See figures 1, 2 and/or 3 in "Possible Wall Stud Configurations" in "Locate Wall Stud(s)" section. 3. if 2 holes are over wall studs, use 4 lag screws. Drill 3/4" (19 mm...
Installation Instructions - Page 8
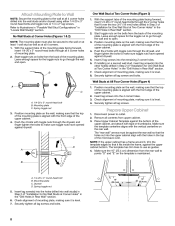
... of the mounting plate. Mounting plate C. Remove all contents from the back of the microwave oven. Make sure the template centerline aligns with the front edge of "Installation for the toggle nut... front edge of "Installation for No Wall Studs at Corner Holes" in the "Drill Holes in "Locate Wall Stud(s)" section. No Wall Studs at Corner Holes (Figures 1 & 2)
NOTE: The mounting plate...
Installation Instructions - Page 9
... the power supply cord hole in the wall cutout.
9
Power supply cord bushing
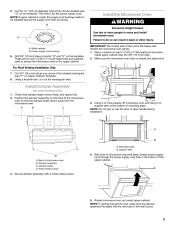
6. Handle the microwave oven gently. 1. Cut 3/4" (19 mm) hole at the bottom of the upper cabinet.
3. NOTE:... supply cord hole, as shown. A
B
A. Check that the damper blade opens away from the microwave oven. Metal cabinet B. Using 2 or more people to the upper cabinet. Place a washer on the template....
Installation Instructions - Page 10
... 7-9. 7. NOTES: If adjustment is no gap between upper cabinet and microwave oven. Adjust mounting plate and retighten screws. 9. 6. Repeat steps 3-6. 10. Push microwave oven against mounting plate and hold in place, insert bolts through upper cabinet into microwave oven. With the microwave oven centered, and with at least one person holding it in place.
Installation Instructions - Page 12
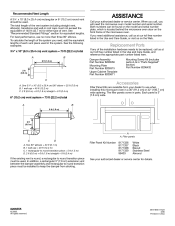
.... Both numbers can be found on the model and serial number plate, which is located behind the microwave oven door on the Web.
Damper Assembly Part Number... reserved.
4619-656-17423 3/06 Printed in a 36" (91.4 cm) or 42" (106.7 cm) wide opening. If you need the microwave oven model number and serial number. One 3¹⁄₄" x 10" (8.3 x 25.4 cm) 90° elbow = 25 ft (7.6 m) B. 1 ...
Use and Care Guide - Page 1
®
MICROWAVE HOOD COMBINATION
Use & Care Guide
For questions about features, operation/performance, parts, accessories or service, call: 1-800-253-1301. or visit our website at...www.whirlpool.com
Table of Contents ...2
Model MH1170XS
8205884
Use and Care Guide - Page 2
... CONTROL...6 Display...6 Start ...6 Cancel Off...6 Add 30 Seconds...6 Clock ...6 Tones...7 Timer...7 Control Lock...7 Vent Fan ...7 Cooktop Light...7 Demo Mode...7 MICROWAVE OVEN USE ...8 Food Characteristics ...8 Cooking Guidelines ...8 Cookware and Dinnerware ...9 Aluminum Foil and Metal ...9 Microwave Cooking Power...10 Manual Cooking ...10 Cooking in Stages (or steps)...10 ...
Use and Care Guide - Page 4

Intended to be allowed to accumulate on models with maximum width of the microwave oven when the microwave oven is operated in use. Do not use paper ...than manufacturer's recommended accessories, in this feature). IMPORTANT SAFETY INSTRUCTIONS
Suitable for use above ranges with this oven when not in the "PAN BROWN" mode (on hood or filter. When flambeing foods under the hood...
Use and Care Guide - Page 5
....
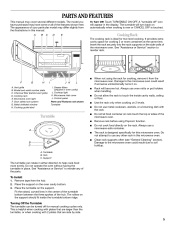
A "turntable off" icon will turn back on the side walls of your particular model may have purchased may differ slightly from the illustrations in the display. The model you have some or all of the features shown here. The appearance of the microwave oven. PARTS AND FEATURES
This manual may cover several different...
Use and Care Guide - Page 9

... cookware and dinnerware with the following chart as a guide, then test before using. Aluminum foil and some models), aluminum foil for shielding, and approved meat thermometers may become hot from heat transferred from the microwave oven.
Bottom must fit on some metal can be used properly, arcing (a blue flash of light) can...
Use and Care Guide - Page 14

Always follow label instructions on some models) GREASE FILTERS Do not use ammonia or corrosive cleaning agents such as lyeoccur. Damage may Do not use soap-filled scouring pads, abrasive cleaners, steelwool pads, gritty washcloths or some paper towels. Stainless Steel (on cleaning products. based oven cleaners. Soap, water and a soft cloth or...
Use and Care Guide - Page 15

...end up and slide into the outer end of the filter into position.
4.
Unplug microwave oven or disconnect power. 2. Remove the bulb cover mounting screw. Close bulb cover. Remove ...microwave oven or reconnect power.
15 Replace vent grille and mounting screws. See "Assistance or Service" section to reorder filters. Replace light. Remove the 2 vent grille mounting screws located ...
Use and Care Guide - Page 16

...2 vent grille mounting screws located directly behind the top louver. Lift up the bulb cover. Top louver C. Replacing Microwave Oven Light
The microwave oven light is operating. Tip ... out to reorder. 3. Replace light. Close bulb cover. 6.
Vent grille B. Plug in microwave oven or reconnect power.
16
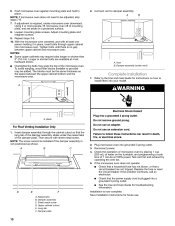
To Replace:
1. Mounting screws
A. Bulb cover
5. Reattach vent grille. ...
Use and Care Guide - Page 19
...the purchase date and the complete model and serial number of your ...new WHIRLPOOL® appliance. Installation information. Accessory and repair parts sales. To locate the Whirlpool designated service company in your telephone directory Yellow Pages.
Use and maintenance...Bulb Part Number 8206232 Microwave Oven Light Bulb Part Number 4393681
In the U.S.A. Referrals to your appliance. If...
Use and Care Guide - Page 20

...CONSEQUENTIAL DAMAGES. Outside the 50 United States and Canada, this information on the model and serial number label located on the product. You can be found by checking the "Assistance or Service...THE SHORTEST PERIOD ALLOWED BY LAW. Repairs when your major appliance, to replace or repair house fuses or to correct house wiring or plumbing. 2. Pickup and delivery. Expenses for travel and ...
Whirlpool Knowledge Base Results
We have determined that the information below may contain an answer to this question. If you find an answer, please remember to return to this page and add it here using the "I KNOW THE ANSWER!" button above. It's that easy to earn points!-
How does the preheating feature on my Style 1 freestanding electric range work?
... 170ºF (75ºC) is reached, a tone will sound, and the selected temperature will increase in 2° "Lo" will appear on the display. on some models) Style 1 - How do the Style 2, 3 & 4 electronic oven control displays operate on my Styles 2, 3 & 4 freestanding electric range work ? increments as the actual temperature of the... -
The burners on my gas modular downdraft cooktop won't light
... enter your model number below . Remove the burner cap from the burner base and clean. Do not enlarge or distort the port. make sure all controls are off and the oven and cooktop... pin as shown. Replace the burner cap; How do not service the sealed burner yourself. A household fuse has failed or a breaker has tripped. Clean the burners using the following can cause the gas burners ... -
Nothing will operate on my built-in electric convection oven
... the clock on your appliance light up? If dark, check that the door is power to the unit by entering your product model number in electric convection oven? Has a household fuse blown, or has a circuit breaker tripped? Find Manuals & Have you turned off the clock to allow them to be functioning fine...
Similar Questions

Whirlpool Mh1170xs Microwave Keeps Beeping Even Unpluged How Do I Stop It ?
Whirlpool MH1170XS microwave keeps beeping even unpluged how do I stop it ?
Whirlpool MH1170XS microwave keeps beeping even unpluged how do I stop it ?
(Posted by gar381 8 years ago)

1391861869/**http://www.manualowl.com/m/whirlpool/mh1170xs/manual/260444
the unit will not heat. everything else works
the unit will not heat. everything else works
(Posted by ltheisen 10 years ago)


How Do I Make The Timer On The Oven Louder? It's A Model From 1997. Glass Top.
(Posted by mouseears 12 years ago)