
Whirlpool MH3184XPB Support Question
Whirlpool MH3184XPB Support Question
Find answers below for this question about Whirlpool MH3184XPB.Need a Whirlpool MH3184XPB manual? We have 2 online manuals for this item!
Question posted by ckterry on July 24th, 2013
How To Attach A Vent Grill On Microwave?
I have to buy a replacement vent grill for my Whirlpool microwave model MH3184XPB-4. How does it get attached? How many screws and how many clips?
Supporting Image
You can click the image below to enlarge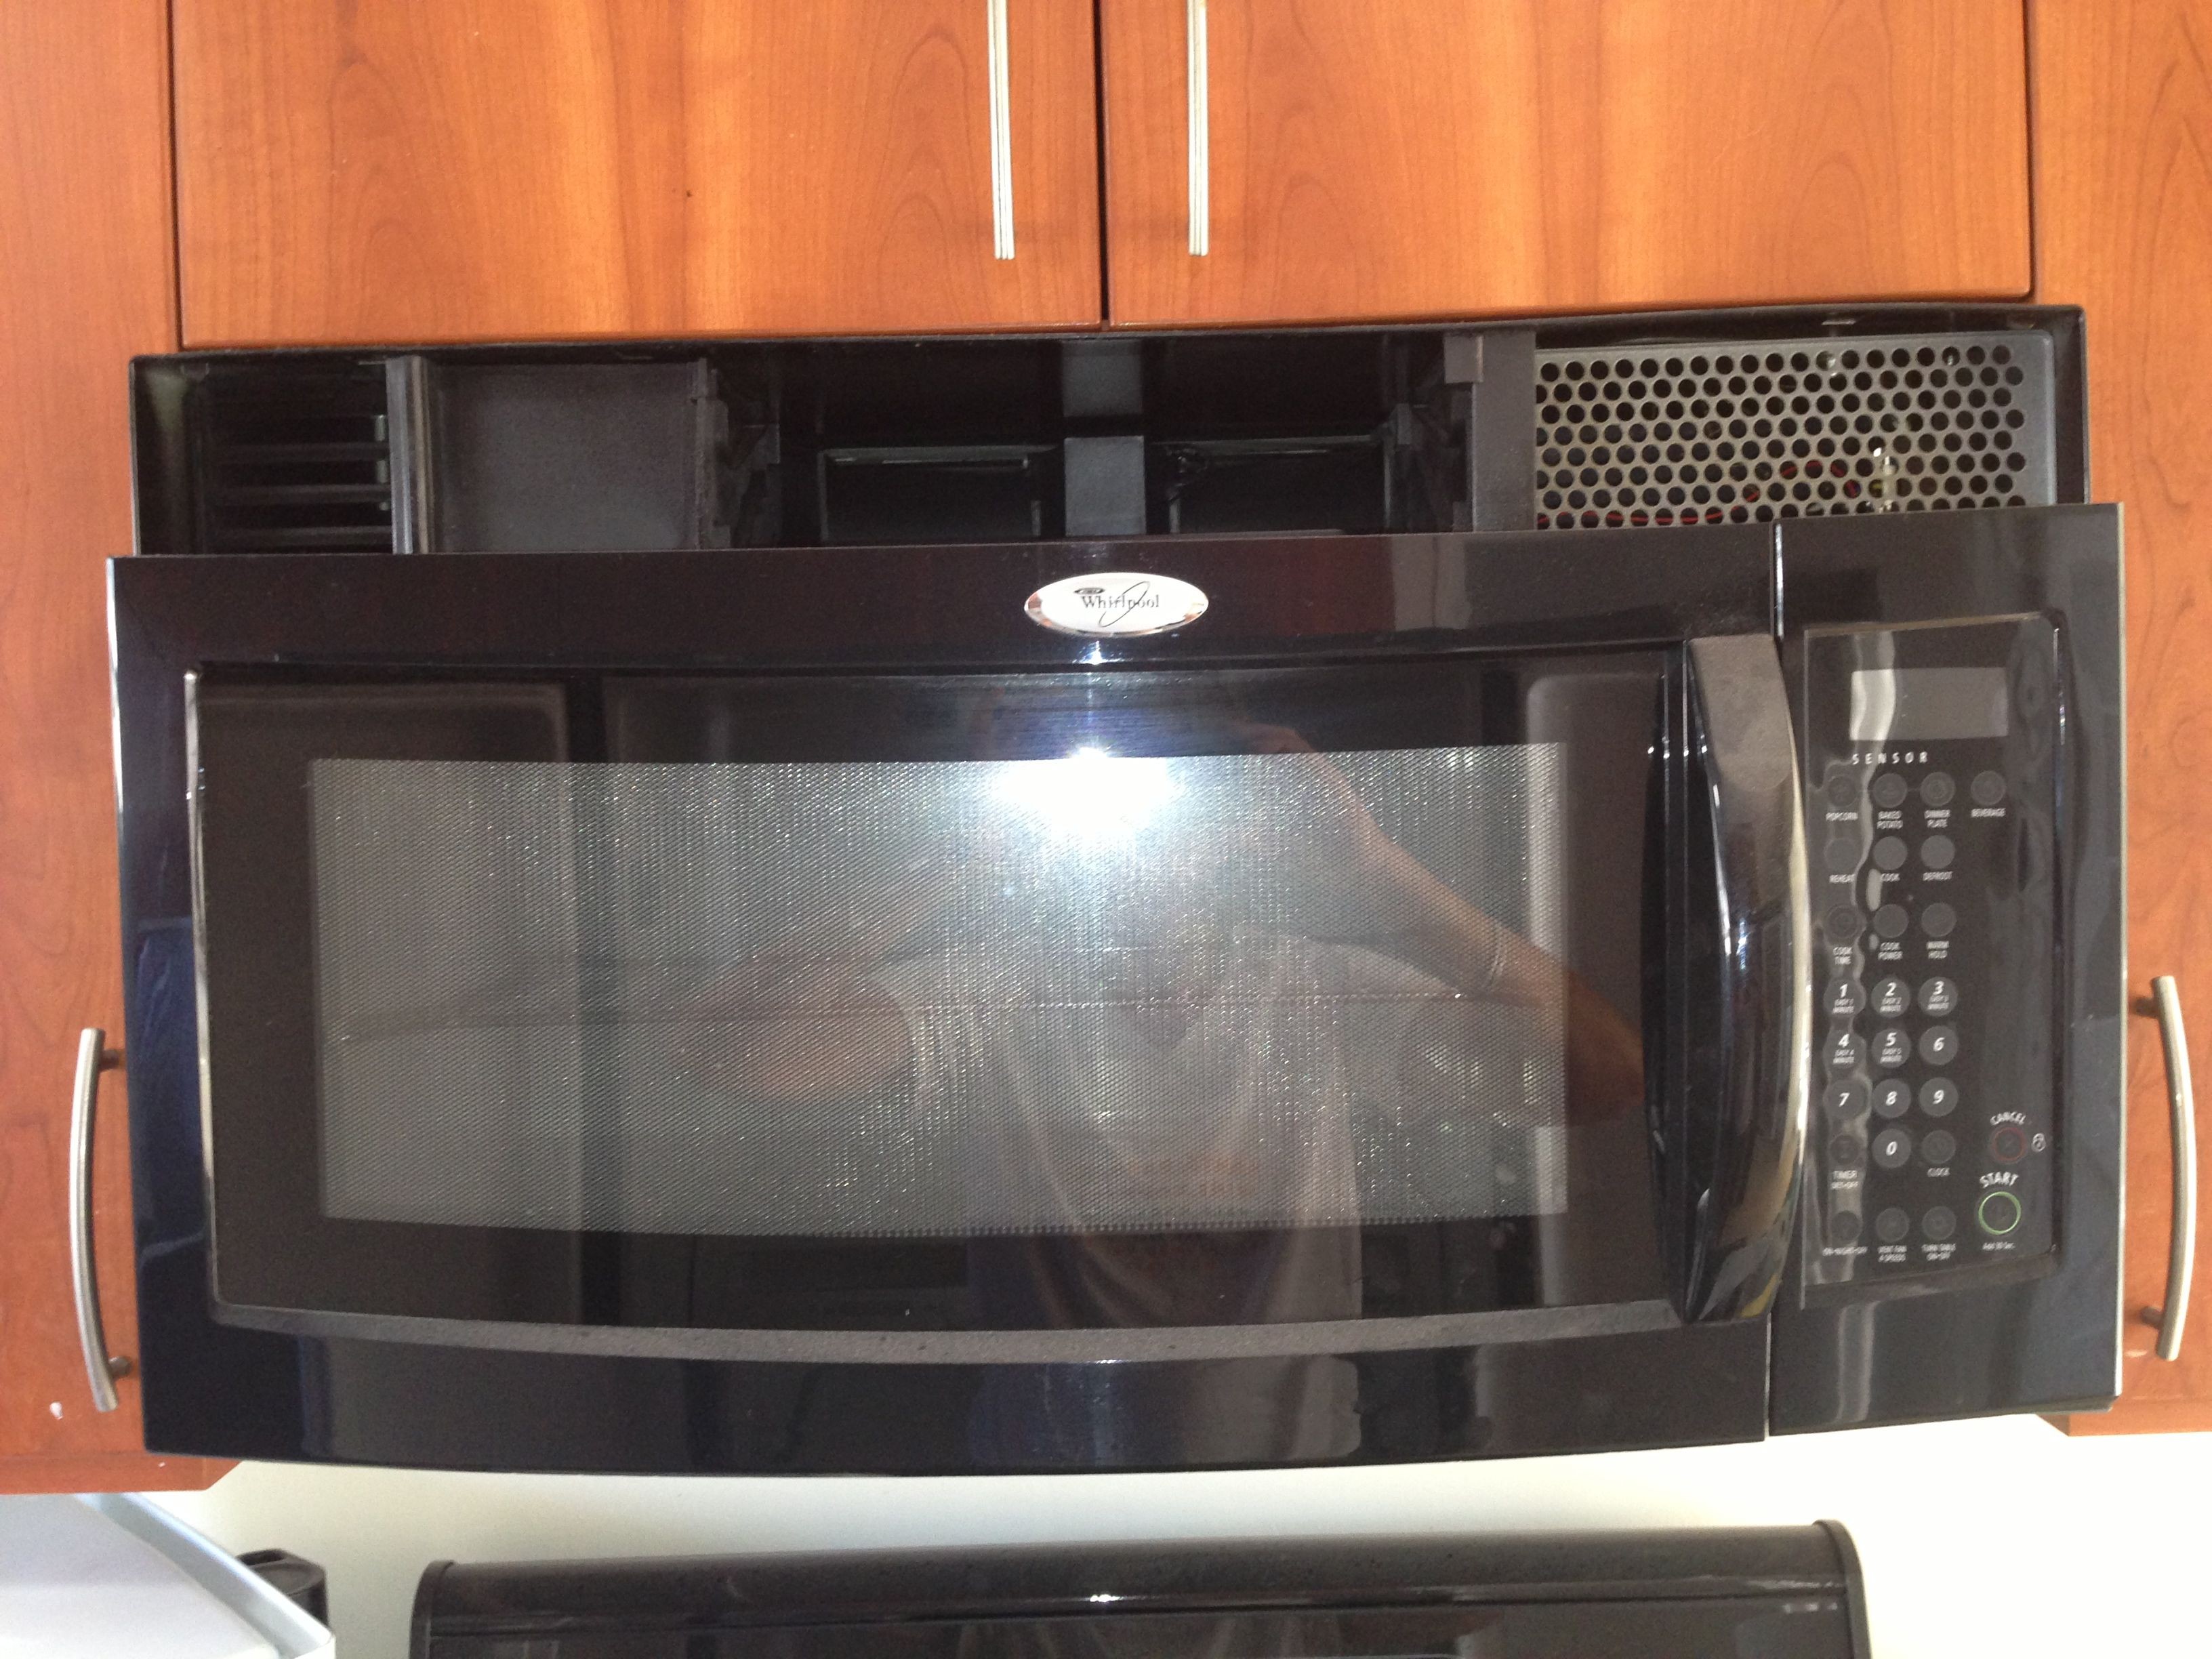
Current Answers
Related Whirlpool MH3184XPB Manual Pages
Installation Instructions - Page 1

... instructions cover different models.
This symbol alerts you to Wall 8 Prepare Upper Cabinet 8 Install Damper Assembly 9 Install the Microwave Oven 9 Complete Installation 10 VENTING DESIGN SPECIFICATIONS 11 ASSISTANCE 12 Replacement Parts 12 Accessories 12
MICROWAVE HOOD COMBINATION SAFETY
Your safety and the safety of others .
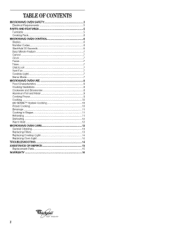
Table of Contents
MICROWAVE HOOD COMBINATION...
Installation Instructions - Page 2

... fittings for 1/4" x 2" lag screws
■ Scissors
■ 1½" (3.8 cm) diam. See "Venting Design Specifications" section. The piece inside upper cabinet.
Location Requirements
Check the opening .
■ Support for wall or roof
venting)
Not Shown:
Upper cabinet template
Mounting plate (attached to withstand the heat produced by the microwave oven for use appropriate fasteners...
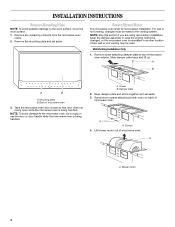
Installation Instructions - Page 4
... Only
1. Mounting plate B. Damper plate
2. Keep damper plate and screw together and set for recirculation installation.
Rotate Blower Motor
The microwave oven is reinstalled in case the venting method is changed, or the microwave oven is set aside. 3.
A
B
A
B
A.
A
A. Remove screw attaching damper plate to the venting system.
Remove the mounting plate and set aside. For...
Installation Instructions - Page 5
... removed in top of damper plate C. Reattach blower motor to back of microwave oven with 2 screws removed in back of "Wall Venting Installation Only." A
B C
D E
A. A
B C
D E
A. Repeat Step 3 from "Wall Venting Installation Only." 2. Slots in Step 3.
8. Tabs at back of microwave oven. Secure damper plate with screw. Rotate blower motor so that exhaust ports face the top of...
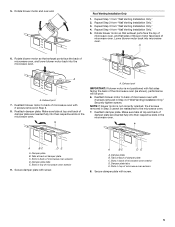
Installation Instructions - Page 6
...within the cabinet opening, do not install the microwave oven.
1. Mounting plate center markers
6 Mark ...venting installation can be done. See illustrations in "Possible Wall Stud Configurations." Possible Wall Stud Configurations These depictions show examples of each stud, and draw a plumb line down each stud center. Support tabs F.
Wall stud centerlines D. Holes for lag screws...
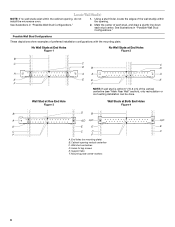
Installation Instructions - Page 7
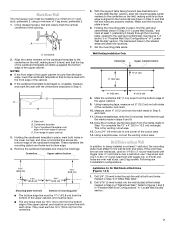
... Stud(s)" section.
7 Using a keyhole saw, cut out the venting cutout area. Using measuring tape, find the wall stud centerline(s) ... is over a wall stud, use 2 lag screws.
See figures 1, 2 and/or 3 in ...."
2. Cardboard template C. They must attach to the wall stud centerline(s). Using measuring...microwave oven must be 14¹⁄₈" (35.9 cm) from the centerline.
5.
Installation Instructions - Page 8
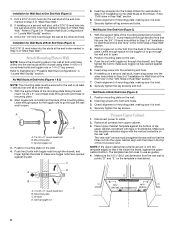
...a lag screw into both ends. 1. Wall Studs at both end holes. 3. Remove all lag screws and bolts. Drywall D. If installing on bolts from the back of mounting plate. 2. Attach Mounting Plate...sure toggle nut has opened against the upper cabinet bottom.
Check alignment of the microwave oven. Make sure the template centerline aligns with tape or thumbtacks. Start a toggle ...
Installation Instructions - Page 9

... the heavy side. NOTE: To avoid damage to do not grip or use the door or door handle while the microwave oven is for wall venting only)
1. Secure damper assembly with 2 sheet metal screws. Push microwave oven against mounting plate and hold in the wall cutout. 6. Using a keyhole saw, cut out the rectangular area.
With front...
Installation Instructions - Page 10
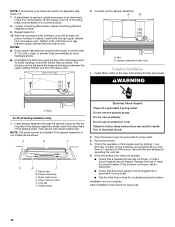
... downward. If adjustment is now complete. Repeat steps 3-6. 10.
Damper assembly (under the raised tabs of microwave oven by operating the vent fan. 5. Refer to the User Instructions for future use.
10
Sheet metal screw
D. Long tab
F.
Replace the fuse or reset the circuit breaker. Save Installation Instructions for filter placement.
Upper cabinet cutout
E.
Plug...
Installation Instructions - Page 11
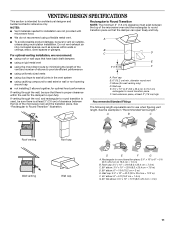
... number of elbows to provide efficient performance
■ using uniformly sized vents
■ using duct tape to seal all joints in "Recommended Vent Length." Roof cap B. 6" (15.2 cm) min. Vent extension piece, at least 3" (7.6 cm) of clearance between the top of the microwave oven and the transition piece.
A
■ To avoid possible product damage, be...
Installation Instructions - Page 12
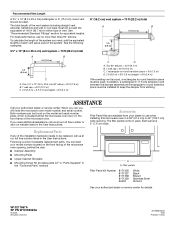
...9632; Mounting Screw Kit (includes parts A-F in "Parts Supplied" in the system. In addition, a rectangular 3" (7.6 cm) extension vent between the...Replacement Parts
If any of the microwave oven opening . You will need the microwave oven model number and serial number. Recommended Vent Length
A 3¹⁄₄" x 10" (8.3 x 25.4 cm) rectangular or 6" (15.2 cm) round vent should be replaced...
Use and Care Manual - Page 2
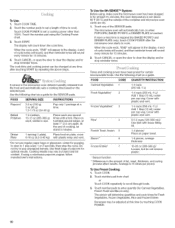
...7 Vent Fan 7 Cooktop Light 7 Demo Mode 7 MICROWAVE OVEN USE 8 Food Characteristics 8 Cooking Guidelines 8 Cookware and Dinnerware 8 Aluminum Foil and Metal 9 Cooking Power 9 Cooking 10 6th SENSF M System Cooking 10 Preset Cooking 10 Beverage 11 Cooking in Stages 11 Reheating 11 Defrosting 12 Warm Hold 12
MICROWAVE OVEN CARE 13 General Cleaning 13 Replacing Filters 13 Replacing...
Use and Care Manual - Page 4
...hood, turn the fan on models with narrow necks.
- Stir the liquid both gas and electric cooking equipment.
[] Do not store this microwave oven outdoors. After heating, allow soil or cleaner residue to be inserted in the microwave oven as they may damage the ... used above both before removing the container.
[] Use care when cleaning the vent-hood filter.
It is not
always present.
Use and Care Manual - Page 5
...oven cavity bottom. 3. I
J
KH
H. G
H
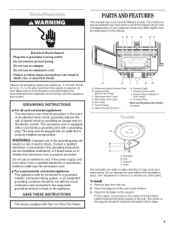
A. Charcoal Filter
(behind Vent Grille) C. Microwave Oven Light E. PARTSANDFEATURES
This manual may have a qualified electrician or serviceman install an outlet near the microwave oven...not use an extension cord. If the power supply cord is properly grounded. Model and Serial Number Plate B. In the event of an electrical short circuit, ...
Use and Care Manual - Page 7
...and remove the lock icon from the range or cooktop below the microwave oven gets too hot, the vent fan will function. Repeat to 99 minutes 99 seconds and counts down... number will return to the time of time. 3. Repeat to cool the microwave oven. NOTE: The Timer does not start or stop the microwave oven. The vent fan has 4 speeds ranging from the display. Repeat to 1 (slowest). ...
Use and Care Manual - Page 8

... cooking several places to vent.
The length of time if necessary. Check for 5 minutes.
Heavy, dense foods, such as meat and potatoes, require a longer cook time than frozen foods. Cookware and dinnerware must fit on the oven door.
• Do not operate microwave oven when it does not absorb microwaves.
• Use oven mitts or pot...
Use and Care Manual - Page 10
... mL-1 L)
1-4 cups (250 mL-1 L)/ Add 1 tbsp (15 mL) water per cup veg.
Use fresh bags of the container and microwave oven cavity are dry.
1. Touch one several times with plastic wrap and vent.
*Do not use regular paper bags or glassware. Doneness may vary by touching COOK POWER,
10 To Use the 6th...
Use and Care Manual - Page 11
... L)
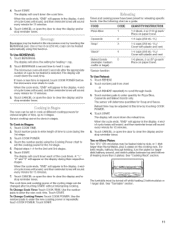
Soup*
3
1-4 cups (250 mL-1 L)/
Cover with plastic and vent. Sauce*
4
1-4 cups (250 mL-1 L)/
Cover with plastic and vent. Two or More Plates
Two 101/4'' (26 cm) plates may be changed ...towel.
*Sensor function
To Use Reheat: 1. When the cycle ends, "END" will appear in the microwave oven by touching COOK POWER.
4. Use the following chart as a guide. Baked Goods
5
(example: ...
Use and Care Manual - Page 14
..., call .
Firmly close door.
Open the oven door,
2.
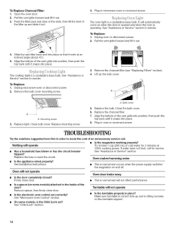
Mounting screw 3. Close the bulb cover.
6. Try to heat 1 cup (250 mL) of the vent grille into position, then push the top back until it out.
4. tripped?
See "Microwave Oven Control" section. Pull the vent grille forward and lift it out.
4. To Replace: 1. Unplug microwave oven or disconnect power. 2. Lift up and is...
Use and Care Manual - Page 15
... in use only FSP_ replacement parts. Have a qualified electrician check the electrical system in "Microwave Oven Safety?" Radio, TV or cordless phone interference
• Is the microwave oven plugged into the same outlet? Try a different outlet.
• Is the radio or TV receiver near the microwave oven? Move the receiver away from the vent grille
• Some steam is...
Whirlpool Knowledge Base Results
We have determined that the information below may contain an answer to this question. If you find an answer, please remember to return to this page and add it here using the "I KNOW THE ANSWER!" button above. It's that easy to earn points!-
Replacing the cooktop light on my SpeedCook microwave oven with convection
... fit right and work right because they are made with bare fingers. Plug in my microwave oven? Close bulb cover and replace mounting screw. FSP replacement parts will need to handle the bulb. To locate FSP replacement parts in my SpeedCook microwave oven with convection? How do I operate the cooktop light on when door is a registered trademark of... -
Why won't my SpeedCook microwave oven with convection operate?
... is the Cancel pad on the range display My microwave oven will not run , and the turntable will function while the Child Lock is active is visible in the lower-left command area with real displays and tones, without actually turning on some models) attached to heat one cup (250 mL) of the... -
How do I replace the cooking light in my microwave oven?
... need to build every new Whirlpool appliance. To locate FSP replacement parts in my convertible range hood? What type of the vent grille into place. Slide the top of light bulb do I replace the oven light in my SpeedCook microwave oven with the same precision used to order replacement parts, we recommend that you use in your area...
Similar Questions

Oven Bake Burner Cover On Whirlpool Oven Keeps Popping Off When Oven Is Heated.
I have a new Whirlpool oven WGG755S0BS01. Every time I bake in the top oven, the oven bake burner co...
I have a new Whirlpool oven WGG755S0BS01. Every time I bake in the top oven, the oven bake burner co...
(Posted by seborges 9 years ago)

How Difficult Or How Easy Is To Change The Light Bulb In The Microwave
The light in my microwave gmc305prs went bad and I need to change it. Can you tell me where I can ge...
The light in my microwave gmc305prs went bad and I need to change it. Can you tell me where I can ge...
(Posted by Marinoscarm 9 years ago)
How To Install Under The Cabinet?
Need instruction manual to mount this microwave. Was left in the garage by previous owner. No direct...
Need instruction manual to mount this microwave. Was left in the garage by previous owner. No direct...
(Posted by laspenceraz 10 years ago)


Not Heating, Display Reads F7
Our Gold Series microwave, model # GH5184XPB-4 suddenly began displaying F7. It won't heat, shuts of...
Our Gold Series microwave, model # GH5184XPB-4 suddenly began displaying F7. It won't heat, shuts of...
(Posted by macrr 11 years ago)